Integra ASSIST PLUS Quick Start Manual
Pipetting robot
Hide thumbs
Also See for ASSIST PLUS:
- Operating instructions manual (56 pages) ,
- Quick start manual (4 pages)
Table of Contents
Advertisement
Quick Links
Quick Start Guide
This quick start guide is intended to provide a quick overview of your ASSIST PLUS's
key features and to offer basic instructions for getting started. For detailed
information, please refer to the latest operating instructions (OI) that can be found at
www.integra-biosciences.com
Intended use
This is a general-purpose laboratory instrument. Any use of this instrument in a medical or IVD
setting is the sole responsibility of the user. ASSIST PLUS is used to perform pipetting operations
automatically with a VIAFLO multichannel pipette, a VOYAGER pipette or a D-ONE single channel
pipetting module attached.
Safety information
Regardless of the listed safety notes, all locally applicable regulations must be observed.
1) This product may only be operated in a secure, protected network with trustworthy clients.
2) The pipette may only be used by properly trained personnel in a manner specified by INTEGRA
Biosciences.
3) Observe the hazard warnings on the device. Keep the tower moving area free of any labware
and keep hands away.
4) Do not use or charge the instrument near flammable material or in an atmosphere with danger
of explosion. Also, do not pipette highly flammable liquids such as acetone or ether.
5) Servicing work and repairs may only be performed by INTEGRA Biosciences or an authorized
after-sales service member.
Getting started
Set up the instrument on a perfectly horizontal surface according to the IQ/OQ document
(PN 128953). Supply voltage: 100
Insert the adapter cable in the socket on the left side of the ASSIST PLUS and connect the adapter
via a 3-core cable to the electricity mains.
a
b
c
d
k
128957_V03_QSG_ASSIST_PLUS_EN.docx
in different languages.
–
240 VAC,
i
j
h
e
f
g
m
l
n
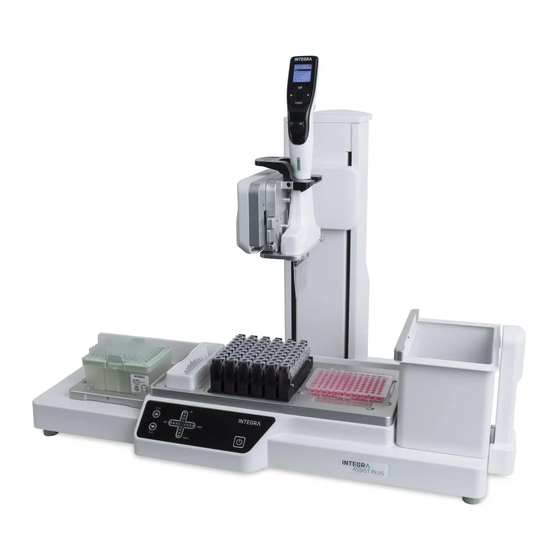
ASSIST PLUS Pipetting Robot
.
47
–
6
3
Hz
a. Gripper, with lever to release the pipette
b. Tower, with pipette arm
c. Interfaces and main switch
d. Tip rack deck, for GRIPTIPS
e. Touch panel
f. Deck, with positions for labware
g. Instrument base
h. Waste bin, for tip ejection
i.
Tip sensor, for tip monitoring
j.
Reflector, for tip sensor
Switch on/off:
Press the main switch.
k. Arrow keys to move the pipette back and
fore (Y-axis), right and left (X-axis) and up
and down (Z-axis)
l.
Start/pause key
m. Communication LED and error LED
n. On/standby key
1/4
Advertisement
Table of Contents

Related Manuals for Integra ASSIST PLUS


Summary of Contents for Integra ASSIST PLUS
- Page 1 240 VAC, – 6 Insert the adapter cable in the socket on the left side of the ASSIST PLUS and connect the adapter via a 3-core cable to the electricity mains. a. Gripper, with lever to release the pipette b.
- Page 2 Enabling ASSIST PLUS program and pairing To display the ASSIST PLUS program in the main menu of the pipette, navigate to the Toolbox. Select Preferences - Main Menu and select ASSIST PLUS (green ). The first time a specific pipette is connected to ASSIST PLUS, both instruments need to be paired.
- Page 3 70 % solution of isopropanol or ethanol. • To decontaminate the ASSIST PLUS, take out the waste bin (h) to the front, remove the waste bin frame, the magnetically attached sensor reflector (j) and the decks. Wipe the clean instrument surface with a lint-free cloth lightly soaked with a suitable disinfectant and wipe dry directly.
- Page 4 Equipment Disposal ASSIST PLUS must not be disposed of with unsorted municipal waste. Dispose of ASSIST PLUS in accordance with the regulations in your area governing disposal of devices. In certain regions and countries, e.g. in EU member states, the distributor is obliged to take back this product free of charge at the end of life.
Need help?
Do you have a question about the ASSIST PLUS and is the answer not in the manual?
Questions and answers