Advertisement
Quick Links
Advertisement

Related Manuals for Integra MEDIACLAVE 10


Summary of Contents for Integra MEDIACLAVE 10
- Page 1 MEDIACLAVE 10 and 30 Service Instructions (Part No. 136960, Version V23)
- Page 2 MC 10/30 – Service Instructions V23 Manufacturer INTEGRA BIOSCIENCES AG Tardisstrasse 201 CH-7205 Zizers Switzerland Web Address https://www.integra-biosciences.com Technical Support INTEGRA BIOSCIENCES AG Email: support-ch@integra-biosciences.com Phone: +41 81 286 95 11 United States Representative INTEGRA BIOSCIENCES CORP. 2 Wentworth Drive Hudson, NH 03051 Email: support-us@integra-biosciences.com...
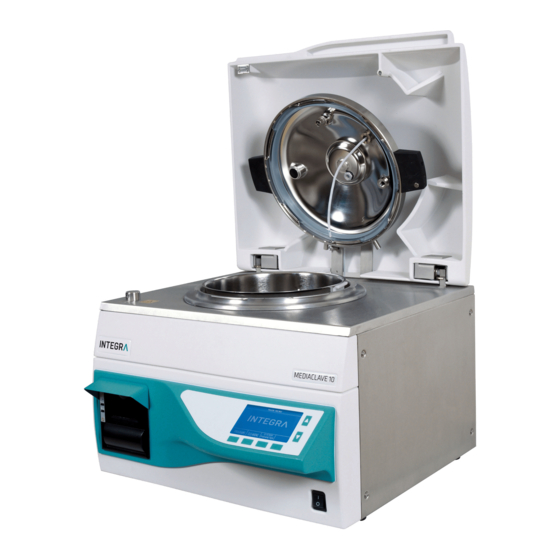
- Page 3 Side view right MEDIACLAVE 10 ........
- Page 4 Operational Qualification (OQ, not included) ......184 Automated Operational Qualification (OQ)......185 INTEGRA Biosciences AG...
- Page 5 (for additional info or corrections). This allows easy and quick recognition of changes by the reader. Software This service instruction (SI) manual refers to MEDIACLAVE 10/30: - Firmware (FW) version (App) up to V02.22 and higher. Hardware - Webserver (Web) up to V03.00 and later.
- Page 6 All persons entrusted with maintenance and repair of the MC 10/30 must have read and understood this service instruction manual and, in particular, the safety instructions, and must have been instructed by INTEGRA Biosciences AG such that they are able to service the device without danger.
- Page 7 MC 10/30 – Service Instructions V23 2 Instrument overview Instrument overview Differences of the two MC 10/30 versions are listed hereafter. Property MEDIACLAVE 10 MEDIACLAVE 30 Vessel contents 10 Liter 30 Liter Heating capacity 3 kW 9 kW Mains voltages and connec- “Power connection of MC 10/30”...
- Page 8 MC 10/30 – Service Instructions V23 2 Instrument overview Side view right MEDIACLAVE 10 Dust baffle for Ctrl box fan Screw for front panel Vessel lid pos. sensor Circuit breaker Main contactor Heating relay 1 and 2 Main board I/F-cable to USB Board...
- Page 9 MC 10/30 – Service Instructions V23 2 Instrument overview Side view left MEDIACLAVE 10 Temperature sensor cou- pling water [19] Safety cover lock solenoid Flow heater [11] Heat exchanger [39] Sterile filter [33] Circulation pump [14] Screws for front panel Screws for flow heater Fig.
- Page 10 MC 10/30 – Service Instructions V23 2 Instrument overview Front view MEDIACLAVE 10 Safety cover lock Safety cover position sensor PE-wire to USB Board (not visible) Nuts for heat exchanger Connector board Cables to main switch Circulation pump [14] Fig. 2.6...
- Page 11 Vessel lid pos. sensor Main contactor Circuit breaker Heating relays 1 and 2 Main board Fuses Power supply Screw for front panel Filling pump [5] Fill valve [7] Fig. 2.8 Right side view without panel MC 30 INTEGRA Biosciences AG...
- Page 12 Main board connectors Flow heater [11] Pressure sensor [9] Check valve [42] Valve block B Sterile filter [33] Level sensor bottom [10b] Valve block A Adjustment of cooling water flow Fig. 2.9 Rear view without panel MC 30 INTEGRA Biosciences AG...
- Page 13 2.10 Side view left MEDIACLAVE 30 Safety cover lock solenoid Screws for front panel Temperature sensor coupling water [19] Screws for flow heater Flow heater Heat exchanger [39] Circulation pump [14] Fig. 2.10 Left side view without panel MC 30 INTEGRA Biosciences AG...
- Page 14 Pay attention to any projecting parts! front side Heat exchanger [39] Fill valve [7] Stirrer motor Circulation pump [14] Strainer [35] Filling pump [5] rear side Fig. 2.11 Bottom view without panel MC 30 INTEGRA Biosciences AG...
- Page 15 It shows all elements involved in the physical process. e.g. valves, pumps, etc. and also their positions in the system. 3.1.1 Electrical block diagram The electric block diagram contains all elements of the instrument, which are controlled by the program. INTEGRA Biosciences AG...
- Page 16 MC 10/30 – Service Instructions V23 3 Functional description Fig. 3.1 Electric block diagram INTEGRA Biosciences AG...
- Page 17 MC 10/30 – Service Instructions V23 3 Functional description 3.1.2 System block diagram Fig. 3.2 System block diagram INTEGRA Biosciences AG...
- Page 18 16 Silencer 39 Heat exchanger 17 Support pressure pump 40 Support pressure valve 18 Medium temperature sensor 41 Air vent valve 19 Coupling water temperature sensor 42 Check valve Table 3.1 Elements in the system block diagram INTEGRA Biosciences AG...
- Page 19 X411 F304 D608 D600 D502 D506 VINT2 X317 X1007 X407 TP337 Fig. 3.4 Main board MC 10/30 with test points and fuses Note At the RTC-RAM battery the gray dot must be located to the lower left! INTEGRA Biosciences AG...
- Page 20 -4.0 … -6.0 V VISO TP327 5.0 V TP328, TP334, GLOG Ground TP340, TP341 TP329 12.0 V 11 … 13 V SENS TP330 GISO TP332 /RESET_C167 TP333 GINT TP335 Ground Table 3.3 Test points on main board INTEGRA Biosciences AG...
- Page 21 Fig. 2.1 on page 7 Front kit with keyboard 136996 Fig. 2.1 on page 7 USB Board kit with cables 136573 Fig. 2.1 on page 7 Table 3.5 Spare part kits for the Interfaces module a. Includes 136576 (since 2014/03) INTEGRA Biosciences AG...
- Page 22 MC 10/30 – Service Instructions V23 3 Functional description The wiring diagram interfaces is valid for all types of MC 10/30. Fig. 3.5 Wiring diagram Interfaces INTEGRA Biosciences AG...
- Page 23 Element of Flow heater kit 10L respective 30L (identical for 10L and 30L); 7.6.1 “Overtemperature protecting device (T-limiter)” on page 168 MEDIACLAVE 10 and MEDIACLAVE 30 have a different set of sensors. Hence two wiring diagrams are presented hereafter.
- Page 24 MC 10/30 – Service Instructions V23 3 Functional description Fig. 3.6 Wiring diagram sensors MEDIACLAVE 10 INTEGRA Biosciences AG...
- Page 25 MC 10/30 – Service Instructions V23 3 Functional description Fig. 3.7 Wiring diagram sensors MEDIACLAVE 30 INTEGRA Biosciences AG...
- Page 26 Spare part kits for the module Actuators 1 a. Includes 136576 (since 2014/03) b. Option introduced/available (since 2014/03) MEDIACLAVE 10 and MEDIACLAVE 30 have a different set of actuators 1. Hence two wiring diagrams are presented hereafter. INTEGRA Biosciences AG...
- Page 27 MC 10/30 – Service Instructions V23 3 Functional description Fig. 3.8 Wiring diagram actuators 1 MEDIACLAVE 10 INTEGRA Biosciences AG...
- Page 28 MC 10/30 – Service Instructions V23 3 Functional description Fig. 3.9 Wiring diagram actuators 1 MEDIACLAVE 30 INTEGRA Biosciences AG...
- Page 29 Fig. 2.4 on page 9 Table 3.8 Spare part kits for the module Actuators 2 MEDIACLAVE 10 and MEDIACLAVE 30 have a different set of actuators 2. MEDIACLAVE 30 mains voltage variants call for differentiation. Hence three wiring diagrams are presented hereafter.
- Page 30 MC 10/30 – Service Instructions V23 3 Functional description Fig. 3.10 Wiring diagram Actuators 2 MEDIACLAVE 10 INTEGRA Biosciences AG...
- Page 31 MC 10/30 – Service Instructions V23 3 Functional description Fig. 3.11 Wiring diagram Actuators 2 MEDIACLAVE 30 3×400V INTEGRA Biosciences AG...
- Page 32 MC 10/30 – Service Instructions V23 3 Functional description Fig. 3.12 Wiring diagram Actuators 2 MEDIACLAVE 30 3×200-208V INTEGRA Biosciences AG...
- Page 33 30” on page 46 Table 3.9 Spare part kits for the module Mains and Heating MEDIACLAVE 10 and MEDIACLAVE 30 have different set of flow heaters. MEDIACLAVE 30 mains voltage variants call for differentiation. Hence three wiring diagrams are presented hereafter.
- Page 34 MC 10/30 – Service Instructions V23 3 Functional description Fig. 3.13 Wiring diagram Mains and Heating MEDIACLAVE 10 INTEGRA Biosciences AG...
- Page 35 MC 10/30 – Service Instructions V23 3 Functional description Fig. 3.14 Wiring diagram Mains and Heating MEDIACLAVE 30 3×400V INTEGRA Biosciences AG...
- Page 36 MC 10/30 – Service Instructions V23 3 Functional description Fig. 3.15 Wiring diagram Mains and Heating MEDIACLAVE 30 3×200-208V INTEGRA Biosciences AG...
- Page 37 In case of errors (such as unclosed lid) error messages are issued and the process halted. All steps are logged (see “0 Logbook” on page 55). Step Actions Block diagram Preparations. The stirrer starts after selecting a program. Table 3.10 Steps in a sample process with process diagrams INTEGRA Biosciences AG...
- Page 38 The air vent valve is open to allow escape of air. The deaeration port must be open and must not be blocked (no back pressure e.g. by water in tube). Table 3.10 Steps in a sample process with process diagrams INTEGRA Biosciences AG...
- Page 39 1/3 of heating power. Start cooling: A support pressure is pro- vided to avoid delay in boiling. Support pressure is con- trolled with the support pressure valve Table 3.10 Steps in a sample process with process diagrams INTEGRA Biosciences AG...
- Page 40 Cooling water circulation still active. Further cooling: Support pressure valve is open for respiration of air through filter by negative pressure. Medium temperature con- trolled by cooling valve. Table 3.10 Steps in a sample process with process diagrams INTEGRA Biosciences AG...
- Page 41 “20 (19; FW < V02.20) Leak test” on page 64. If the test fails: Check the lid sealing and all caps Check the pressure sensor [9]. See “Service test pressure” on page 134. Check the deaeration port. INTEGRA Biosciences AG...
- Page 42 Overview 3.4.2 Valve block A Valve block A is arranged horizontally at the bottom of the rear (see “Rear view MEDIACLAVE 10” on page 8). The valves are used in the following process steps: Cooling valve Heat exchanger Process step...
- Page 43 3 Functional description 3.4.3 Valve block B Valve block B is arranged vertically at the rear (see “Rear view MEDIACLAVE 10” on page 8). The valves are used in the following process steps: Support pres- Dispense pres- Air vent valve...
- Page 44 Service menu “9 Test sensors” on page 59 displays the sensor status. 3.4.5 Vessel lid detection “Side view right MEDIACLAVE 10” on page 8 for the location of the vessel lid position sensor. Magnet for vessel lid position sensor Vessel lid detection sensor (below cover) Fig.
- Page 45 Whether the stirrer always turns in the same direction or changes direction after a certain time is set up in the User menu with “Program Settings”. It can also be set in the Service menu (see “17 (16; FW < V02.20) Test stirrer” on page 63). INTEGRA Biosciences AG...
- Page 46 The circuit breaker is located on the right side of the instrument close to the front panel. It is the leftmost element in the picture: Fig. 3.21 Circuit breaker at MEDIACLAVE 10 Note The main switch does not directly operate on the mains voltage. It operates on the control voltage only.
- Page 47 Phase P 200-240 V 50/60 Hz Black Neutral N - (none) Yellow - Green Protective Earth PE Table 3.15 MEDIACLAVE 10 mains cable with single phase supply Fig. 3.23 MEDIACLAVE 10 installation with switch at single phase supply INTEGRA Biosciences AG...
- Page 48 Phase P2 120 V 50/60 Hz - (none) Yellow - Green Protective Earth PE Table 3.16 MEDIACLAVE 10 mains cable with single phase supply Fig. 3.25 MEDIACLAVE 10 installation with switch at split phase supply Fig. 3.26 MEDIACLAVE 10 installation with coupler at split phase supply...
- Page 49 An additional coupler may be installed between the switch and the MC 10/30 so that MC 10/30 can be used in a second location. All wiring components must have a current con- ducting capacity (30 A) and voltage rating (200/208 VAC) Fig. 3.27 MEDIACLAVE 30 installation with three phase delta supply INTEGRA Biosciences AG...
- Page 50 Carefully read section 3.6 “Power connection for MEDIACLAVE 10” on page 47 for requirements for the coupler. This is possible, because during the dispensing phase MEDIACLAVE 30 Article No 136055 runs on single phase supply from wire 3 (phase C), because it only needs reduced heating power to keep the medium temperature.
- Page 51 MC 10/30 – Service Instructions V23 3 Functional description Fig. 3.29 MEDIACLAVE 30 # 136055 with single phase supply during dispensing phase INTEGRA Biosciences AG...
- Page 52 USB status: USB flash drive connected USB status: No USB port integrated! If ok, press START to Manual backup of logfiles to USB Sterilization Sterilization tolerance (0.5-3.0 °C). 1.5°C parameters Table 4.1 System parameters in user level dialog INTEGRA Biosciences AG...
- Page 53 To use the functions the unit must be equipped with USB port and a USB flash drive must be plugged in! Note More information about the user level functions are included in the “MC 10/30 10/30 Operating instructions (OI)!” INTEGRA Biosciences AG...
- Page 54 9) Press SAVE The SERVICE TESTS menu appears The service level functions can now be selected Table 4.2 Entering the service level dialog The following subsections describe the various Service Tests. INTEGRA Biosciences AG...
- Page 55 Service level menu “Serial number” 2 Device type The device type must correspond to the actual instrument type! The device type must be set again after exchange of the main board. Table 4.5 Service level menu “Device type” INTEGRA Biosciences AG...
- Page 56 The access code may be neces- sary to see/modify specific user data (e.g. programs). The access code is set by the user in menu System Parameters. Default Access Code is 3473 Table 4.9 Service level menu “Show access code” INTEGRA Biosciences AG...
- Page 57 The phone number box appears In the last drop-down list choose the serial interface (COM1, COM2...) which is connected to the MEDIACLACE and press OK. Table 4.11 Service level menu “Send system information to RS232” INTEGRA Biosciences AG...
- Page 58 File > Properties. Press ASCII Setup … Activate Append line feeds … Press OK twice until you are back in the HyperTerminal window Table 4.11 Service level menu “Send system information to RS232” INTEGRA Biosciences AG...
- Page 59 The current value measured by the sensors is displayed. The Medium calib. temperature is defined by the temperature coeffi- cients. The Boiling point is calculated from the Ambient pressure. Table 4.13 Service level menu “Analog sensors” INTEGRA Biosciences AG...
- Page 60 They should not jitter more than ±10%. Note: MONIT_V5USB only relevant for units with FW >= V02_00 and USB port! Table 4.16 Service level menu “Analog inputs” See also the Web Interface “Analog Inputs.” on page 81”. INTEGRA Biosciences AG...
- Page 61 Switch off the fans only for short time! The external clamp valve can be connected at the rear. See Operat- ing Instructions, menu “Pressure Dispense”. For the buzzer see Table 4.18 Service level menu “Test actuators 2” INTEGRA Biosciences AG...
- Page 62 If at all it is necessary to run it dry, do so only for a few seconds! Note: Temporary settings for tests only! Table 4.20 Service level menu “Circulation pump” (FW < V02.20)) INTEGRA Biosciences AG...
- Page 63 Single missing pixels will not de- grade the display of text etc. If clusters of pixels are not dis- played, replace the display unit. 7.3.4 “Display kit” on page 150 Table 4.23 Service level menu “Test display” INTEGRA Biosciences AG...
- Page 64 Use this test to judge the quality of the printout. If the print is weak, replace the ink ribbon cartridge (see Operator In- structions). BACK leaves the test and advan- ces the paper. Table 4.26 Service level menu “Printer test” INTEGRA Biosciences AG...
- Page 65 Fill in coupling water (upper level sensor must be covered). Fill at least 5L water into the cu- vertte. Close the vessel lid and insert the temperature sensor. Table 4.28 Service level menu “Automatic calibration” INTEGRA Biosciences AG...
- Page 66 Reference temperature measuring device at the same time. 4 Go to the next phase of the process 5 In Dispensing phase, read and note temperatures displayed on MC 10/30 and on Reference temperature measuring device at the same time. 6 Terminate Dispensing INTEGRA Biosciences AG...
- Page 67 The FTP upload requires a special program on the PC. During the upload the instrument must not be disturbed. After the upload the update must be activated. Table 4.32 Service level menu “Firmware update” INTEGRA Biosciences AG...
- Page 68 The function “Save filesystem to USB” allows you to save all log files onto a USB flash drive. The data can be analysed externally and also supplied to INTEGRA Biosciences AG, Technical Service. After insertion of the USB flash ...
- Page 69 Try test “30 (28; FW < V02.20) For- mat filesystem” on page 69. If this also fails, contact INTEGRA cus- tomer support. The Mainboard might be defective! Table 4.36 Service level menu “Test filesystem” 32 (30; FW < V02.20) Operation Qualification For the detailed procedure see 8.4 “Installation Qualification (IQ, not included)”...
- Page 70 If the IP of the instrument is 192.168.0.1 then the PC may get 192.168.0.2. Note The IP adresses of the MEDIACLAVE and PC must be different. Do not forget to note the IP address of the PC if there was one defined already. INTEGRA Biosciences AG...
- Page 71 Select the desired parameter and press CHANGE. In the next screen enter the value of the parameter and press SAVE When terminating with BACK the value is not saved! Table 4.38 Set IP address at the instrument INTEGRA Biosciences AG...
- Page 72 Properties. You get a dialog similar to the one displayed here. Scroll down to the last entry in the list: Internet Protocol (TCP/IP). Press button “Properties”. Table 4.40 Set IP address at the computer INTEGRA Biosciences AG...
- Page 73 Start Menu of Windows Vista select the symbol “Network and Sharing”. This opens the following Window: Select “Mange network connec- tions”. This opens a window with all network devices Table 4.41 Set up network on Windows Vista INTEGRA Biosciences AG...
- Page 74 In the list select “Internet Protocol version 4 (TCP/IPv4)” Press “Properties” In this dialog the network parame- ters are set up similar to Windows Table 4.41 Set up network on Windows Vista INTEGRA Biosciences AG...
- Page 75 Start Menu of Windows 7 select the symbol “Network and Sharing Cen- ter”. This opens the following Window: Select “Network and Sharing Cen- ter”. select “Change adapter settings” right-click on LAN-Connection Select “Properties” Table 4.42 Set up network on Windows 7 INTEGRA Biosciences AG...
- Page 76 4 Service tools In the list select “Internet Protocol version 4 (TCP/IPv4)” Press “Properties” In this dialog the network parame- ters are set up similar to Windows Table 4.42 Set up network on Windows 7 INTEGRA Biosciences AG...
- Page 77 Now the program tests four times whether the device can be reached or not. If the device can be reached the time is displayed which was needed for each of the attempts. If the device can not be reached, an error message is displayed.: “Request timed out”. INTEGRA Biosciences AG...
- Page 78 The menu in the web interface gives access to various elements of the menu on the instrument and even to other information not presented on the instru- ment display: 4.5.1 Main menu The Main menu displays the current display at the instrument. INTEGRA Biosciences AG...
- Page 79 You can download a log file by right-clicking on the link and selecting “save target to …” (or similar, depending on your browser). Logfiles are very helpful for troubleshooting and diagnosis. For analysis pur- Note poses ALL logfiles are required. See also 4.7 “Logdata and logfiles: overview” on page 83 INTEGRA Biosciences AG...
- Page 80 In the web-interface and in the user dialogs they are filtered. Actuators / Sensors “9 Test sensors” on page 59 “13 Test actuators” on page 61 as well as “14 Test actuators 2” on page System Voltages “11 System voltages” on page INTEGRA Biosciences AG...
- Page 81 “7 Print device parameters” on page 57 to get the same information printed at the instrument. Key for signature The public key used to sign the logfiles if “Logfile signature” is On. This is a PGP (Pretty Good Privacy) key. INTEGRA Biosciences AG...
- Page 82 3 FW update with USB flash drive See also 4.8 “Firmware update” on page 86 Logfiles are very helpful for troubleshooting and diagnosis. For analysis pur- Note poses ALL logfiles are required. See also 4.7 “Logdata and logfiles: overview” on page 83 INTEGRA Biosciences AG...
- Page 83 RUN data files. 1 RUN data files: e.g. file: PRG_05_10_05_25.log or RUN00058.LOG (for FW >=V02.00) 2 System Logfile: file: system.log or SYSTEM.LOG (for FW >=V02.00) 3 Device Parameters: file:parameter.log or PARAM.LOG (for FW >=V02.00) INTEGRA Biosciences AG...
- Page 84 | | | ... ; .. last 10 runs per day! | | | RUN00067.LOG ; Run xxxxx (5‐digits) | | | SYSTEM.LOG ; System logfile | | | | | +‐‐‐12_02_25 ; Backup/saving date : YY_MM_DD | | | ... | | ... | | | | | +‐‐‐12_02_29 ; Backup/saving date (last): YY_MM_DD | | | ... | | ... | | | | | \‐‐‐RUN ; Collection of runs | | RUN00001.LOG When in System Parameter > | | RUN00002.LOG Process documentation: | | ... USB flash drive active and connected. | | ... Sufficient storage space required! | | ATTENTION: | | PARAM.LOG and SYSTEM.LOG are not saved! | | | \‐‐‐11030240 ; MC 10 serial number (owener with >1 unit) | +‐‐‐12_02_23 ; Backup/saving date (first): YY_MM_DD | | ... | ... | \‐‐‐12_02_24 ; Backup/saving date (last): YY_MM_DD | ... | +‐‐‐MC30 ; same as for MC 10 | +‐‐‐11103160 ; MC 30 serial number (8‐digits): YYMMnnnn | | +‐‐‐12_02_28 ; Date of run: YY_MM_DD 2012_02_28 | |‐‐‐ | |‐‐‐ | \‐‐‐ Optional: for firmware update by service technicians INTEGRA Biosciences AG...
- Page 85 Environment (JRE). JRE is required to display the animated Process diagram in the webserver. The testbox simulates some key elements of a MEDIACLAVE 10/30. The testbox allows worldwide access from any PC connected to the internet/web. To access, please enter the following address in any Internet-Explorer: ...
- Page 86 - Stored programs [only available by this way] - Logbook entries [same as system.log] After each successful FW update, please inform INTEGRA customer support about the MC type/s (10/30), serial number/s and FW version before and after INTEGRA Biosciences AG...
- Page 87 Update with the MC 10/30 Update Tool (Remote update) Note For software tools such as the Update Tool please consult the web site of INTEGRA Biosciences AG. Note The MC 10/30 Update Tool requires the Java Runtime Environment to be installed on your computer (version 6 or higher).
- Page 88 OK and on the instru- ment enter Service > “28 (27; FW < V02.20) Remote update” on page In the Update Tool re-establish the connection to the instrument (see step 1) Table 4.45 Update Firmware with Update Tool INTEGRA Biosciences AG...
- Page 89 Update Webserver. This uploads the required files. After complete upload a message is displayed. Leave the Update Tool with At the instrument leave the Service mode. Table 4.45 Update Firmware with Update Tool INTEGRA Biosciences AG...
- Page 90 Update via USB is available for units equipped with FW >= V02.00 and with USB port. To use the functions, a USB flash drive must be plugged in! Units equipped with FW < V02.00 or without USB port must be updated via MC Update tool (MCUpdater) or via FTP! INTEGRA Biosciences AG...
- Page 91 4.8.3 “Update with FTP: Initial step” on page 90). Prepare USB flash drive for Update (see 4.8.1 “Update files: Directory structure / files on USB flash drive” on page 87). Table 4.46 Update firmware with FTP or USB INTEGRA Biosciences AG...
- Page 92 If ok, replug. FTP and USB: For filessys- tem related errors: Format filesystem (see “30 (28; FW < V02.20) Format filesystem” on page 69) and restart Up- date. Table 4.46 Update firmware with FTP or USB INTEGRA Biosciences AG...
- Page 93 Set up an Ethernet connection to the instrument (see 4.4 “Ethernet connection of the MC 10/30” on page Prepare the FTP transfer at the PC (see “Establish FTP connection to the MC 10/30” on page 90). Table 4.47 Update web server with FTP INTEGRA Biosciences AG...
- Page 94 In the Network status of the work status on PC displays PC press Repair. If no suc- address type “self as- cess, define the IP manual- signed”. ly and/or consult your IT departement. Table 4.48 Error handling for communication issues (Ethernet) INTEGRA Biosciences AG...
- Page 95 Update or Remote Update. see 4.8 “Firmware update” on page Web interface does not Firewall blocks incoming Activate Passive Mode for work, FTP can not connect traffic the FTP function. Table 4.48 Error handling for communication issues (Ethernet) INTEGRA Biosciences AG...
- Page 96 Settings Faulty/wrong settings en- Only if not handled properly tered Calibration/adjustment Probe not calibrated/adjust- Only if not handled properly ed after replacement. Main board Component failure. Rare, early failures. Table 5.1 Example of a functional chain INTEGRA Biosciences AG...
- Page 97 OI user/operator MC 10 Accessories flyer/brochure, OI user/operator Foot switch Consumables flyer/brochure, OI user/operator Lid seal Spare parts SI, instruction sheet service technician Temperature probe Medium - To be cali- brated/adjusted. Table 5.2 General part categories INTEGRA Biosciences AG...
- Page 98 To be executed by service technician (trained expert): Temperature probe Medium. Pressure sensor (on valve block B). For these elements INTEGRA Biosciences AG have semi automatic calibration and adjustment kits available. No calibration and/or adjustment needed: Temperature sensor coupling water ...
- Page 99 MC 10/30 – Service Instructions V23 5 Service and maintenance Calibration tools (temperature and pressure) 5.3.1 Temperature calibration kit INTEGRA Biosciences AG can provide the following temperature calibration tools. The numbers refer to the picture below. Spare Item # Title part #...
- Page 100 MC 10/30 – Service Instructions V23 5 Service and maintenance 5.3.2 Pressure calibration kit INTEGRA Biosciences AG can provide the following pressure calibration tools. The numbers refer to the picture below. Spare Item # Title part # 136916 Pressure calibration kit This consists of all the items in the picture.
- Page 101 The list’s Information column marks parts as follows: Strongly recommended spare parts for stock Recommended spare parts for stock Spare parts only for MEDIACLAVE 10 Spare parts only for MEDIACLAVE 30 Table 5.5 The titles with page numbers are live links to the detail description and drawing of the kits.
- Page 102 Contactor 20A (page 172) 136991 Contactor 32A, 3x200-208V (page 172) 136992 Connector board (page 174) 136993 Main board MC 10/30 (page 148) 136994 Fuse, SMD, T4A (10-pack) Littlefuse, Series: NANO Table 5.6 Spare part kits and spare parts INTEGRA Biosciences AG...
- Page 103 Display kit (page 150) 136998 Printer kit with cable (page 151) 136999 O-ring 7×3 (10-pack) for dispense tubing fitting Table 5.6 Spare part kits and spare parts a. Option introduced/available (since 2014/03) b. Included 136576 (since 2014/03) INTEGRA Biosciences AG...
- Page 104 After use, the MC 10/30 must be cleaned properly and always left clean and dry. For example: Antox 71 E or Sandvik Pickling paste, Formula 1 www.smt.sandvik.com) Cable ties: set of Lint-free towels INTEGRA Biosciences AG...
- Page 105 The following table contains a brief history of the MC 10/30 FW. If you need more information (e.g. ex-factory FW version of a specific unit), please contact INTEGRA customer support. We need at least instrument type and serial number. Newest version information on top, oldest at bottom!
- Page 106 Sterilization time: lower limit 0 min (was 1 min) CHOCOLATE AGAR mode: Adding temperature: upper limit to 80C (was 75C) SERVICE TESTS: 20 (19; FW <V02.20) Leak test 1 bar test added to existing 100 mbar test. Table 5.8 FW history (brief) INTEGRA Biosciences AG...
- Page 107 SYSTEM.LOG: Delayed start entry; error number added. e.g. E04:Timeout during heat up In case of error: Safety cover opening only after cooling phase and confirmation. Dispense phase entry: Dispense pressure valve opened before support pressure valve. Table 5.8 FW history (brief) INTEGRA Biosciences AG...
- Page 108 Logfile backup tool to copy logfiles to PC. Delayed start of run: 0-5h in 10min Steps. Decalcify warning added. New INTEGRA logo (old was IBS). File system repair or format. Service Tests: Allow manual entry of T-coefficients. ...
- Page 109 Assignment to specific MC 10/30 type and serial numbers is somewhat difficult. If you need more information (e.g. ex-factory version of a specific element), please contact INTEGRA customer support. We need at least instrument type and serial number.
- Page 110 136571 Handle for cuvette 10/30L incl. nuts: metal instead of plastics. 2009/03 MC 30 introduction. 2009/01 MC 10 introduction. 136030 Cuvette 10L with threaded bolt M4x10: 28.10.176 Guide bush for magnetic stirrer V04 Table 5.9 HW history (brief) INTEGRA Biosciences AG...
- Page 111 For MC 10/30 units without USB port, the Webserver is recommended to save the logfiles via 4.5 “Webserver in MC 10/30” on page 78 After receipt of all data and logfiles we will analize the files and supply you with appropriate debug hints. INTEGRA Biosciences AG...
- Page 112 Fan control box State must be OK. If Not OK, check whether the fan really rotates. For exchange of the fan see “Fan with cable/ connector” on page 149 Table 6.3 Sensor test instructions INTEGRA Biosciences AG...
- Page 113 (calibrated) thermometer and compare to the display of the test. The difference must not be larger than 3 °C. For exchange of the sensor see 7.4.4 “Tempera- ture sensor coupling water 10L” on page 156. Table 6.3 Sensor test instructions INTEGRA Biosciences AG...
- Page 114 # with letter as pre-fix will appear in system logfile Logbook (FW < V02.20) 00-0000 09.06.2005 14:01:18 INFO: Startup SW-Rev. 00.91 Error type Error number Date & time stamp Module Textstring Fig. 6.2Logbook entry structure (FW < V02.20) Error types Information Software Application Hardware INTEGRA Biosciences AG...
- Page 115 4.8 “Firmware update” on page Init system: Switch the instrument OFF, wait for 10 sec, then switch the instru- ment ON again. Troubleshooting - see 6 “Troubleshooting” on page 111 Table 6.4 Abbreviations for tasks to do used in messages INTEGRA Biosciences AG...
- Page 116 DEBUG: TF set manually FW, EX Table 6.5 Critical errors (Technical errors) System messages The following system messages are displayed on the main display below the logo, when recognized. e.g. At power-on or later. System Errors are also INTEGRA Biosciences AG...
- Page 117 FW, EX U227 27 NV-RAM RTC: RAM magic error T, Replace #103806 RTC- RAM Battery, lo- cation see Fig. 3.4 on page 19 U228 28 NV-RAM RTC: Checksum error T, EX Table 6.7 Detailed system messages (uncritical) INTEGRA Biosciences AG...
- Page 118 USB: No drive U259 n/a USB: No drive S999 1000 SOFTWARE: Programming problem TrapNr. n Table 6.7 Detailed system messages (uncritical) a. see “Application errors (Errors during operation Exx)” on page 119, #5 Overtem- perature heater, Remedy INTEGRA Biosciences AG...
- Page 119 7.8 “Decalcification” on page 179). Test sensor (see “9 Test Failure tempera- Sensor defect (cable bro- sensors” on page 59) and ture sensor heat- ken, short circuit) replace if necessary (see 7.4.7) Table 6.8 Application errors calling for technician INTEGRA Biosciences AG...
- Page 120 Check visually and replace net-chuck damaged if necessary (see 7.2.4) Test function (see “9 Test Sensor board defect or sensors” on page 59). Re- Vessel lid open! misaligned adjust if necessary (see 7.7.2) Table 6.8 Application errors calling for technician INTEGRA Biosciences AG...
- Page 121 Error circulation Malfunction circulation Check circulation pump pump pump: “Circulation pump er- • pump blocked ror handling” on page 123. Note: FW tries to restart pump up to 10 times! Table 6.8 Application errors calling for technician INTEGRA Biosciences AG...
- Page 122 Timeout during heat up System Pressure drop during process! System Temp.difference too large n/a System Temp.difference too large (C/max) n/a System spare n/a System Error circulation pump n/a System Defective Table 6.9 Application errors calling for technician (as displayed) INTEGRA Biosciences AG...
- Page 123 Confirm with OK. Carefully open adding port to re- lease any pressure which might still be present inside the vessel. Then carefully open the vessel lid and press OK to continue INTEGRA Biosciences AG...
- Page 124 Error 17: Over current circulation pump W543 Warning; overcurrent is detected during accel. phase of the pump W544 Warning; over current is detected at full speed of the pump (100%) W547 Warning: error circulation pump Error: Error circulation pump INTEGRA Biosciences AG...
- Page 125 W346 n/a GND(Pul/max)REF(Pul/min) W349 n/a Overpressure (mbar/max) W350 n/a Limiter: Coupling media (C/max) W351 n/a Limiter: Heater (C/max) W352 n/a Limiter: Overpres.(mbar/max) W353 n/a Continue STANDARD (power fail) W354 n/a Cont. CHOC.AGAR (power fail) Table 6.10 Warning message (Wxxx) INTEGRA Biosciences AG...
- Page 126 Clean/de-block pump W547 n/a Error circulation pump W550 n/a USB: Communication error FTDI W551 n/a USB: No board detected Install USB board W552 n/a SafetyAlarm1 activated W553 n/a SafAlarm2 Off %umbar C2:%u C1:%u Table 6.10 Warning message (Wxxx) INTEGRA Biosciences AG...
- Page 127 I615 n/a Error flushing logfile I616 n/a Error opening CAL.log I624 n/a Startup: Cooling down started I625 n/a Startup: Overpressure detected I627 n/a RUNXXXXX Start STANDARD process I629 n/a End STANDARD process Table 6.11 Information message (Ixxx) INTEGRA Biosciences AG...
- Page 128 End STANDARD process (CALIB) I672 n/a Start STANDARD process (OQ) I673 n/a No relais check (Sens. medium missing) I674 n/a End STANDARD process (OQ) I681 n/a User abort preparation I682 n/a User abort AGAR preparat. Table 6.11 Information message (Ixxx) INTEGRA Biosciences AG...
- Page 129 User abort process (heating) I732 n/a User abort process (steri) I733 n/a User abort process (sup.press) I734 n/a User abort process (cooling) I736 n/a Continue with abort process I738 n/a User abort process (heating) Table 6.11 Information message (Ixxx) INTEGRA Biosciences AG...
- Page 130 OQ: Test hall sensors SKIP I781 n/a OQ: Pressure vessel cleaned I782 n/a OQ: Press. vessel not cleaned I783 n/a OQ: Test level sensors SKIP I784 n/a OQ: Test level sensors PASS Table 6.11 Information message (Ixxx) INTEGRA Biosciences AG...
- Page 131 Safety_V: Pmax=%umbar I818 n/a Safety_V: Pmax=%umbar I822 n/a New firmware installed I826 n/a EEPR SPARE0 repaired I827 n/a EEPR SPARE1 repaired I828 n/a EEPR SPARE2 repaired I829 n/a EEPR DET_SCHWELL repaired Table 6.11 Information message (Ixxx) INTEGRA Biosciences AG...
- Page 132 USB: Filesystem write error I888 n/a USB: Filesystem write error I889 n/a USB: Filesystem open error I890 n/a USB: Filesystem open error I891 n/a USB open error after powerfail I892 n/a USB open runfile error Table 6.11 Information message (Ixxx) INTEGRA Biosciences AG...
- Page 133 Check level sensors (see “9 protection device Test sensors” on page 59). triggered Level sensors do not work Reset overtemperature protec- properly tion device (see 7.6.1 “Over- temperature protecting device (T-limiter)” on page 168). Table 6.12 Miscellaneous trouble shooting INTEGRA Biosciences AG...
- Page 134 Frequently asked questions (FAQ’s) Some important service related information for a specific component can be found in chapter 7 “Repair” on page 135 at the corresponding service kit (under Specials): e.g. 7.4.7 “Temperature sensor for heater” on page 158 INTEGRA Biosciences AG...
- Page 135 (cables to Display, Keypad, Printer and USB Board)! Cable ties Cable ties do not only hold together threads, but also keep the cable away of hot areas. This has to be observed when cable ties have to be cut and re- INTEGRA Biosciences AG...
- Page 136 To strong tightening might damage the tube. All tube clamps require a 5mm socket wrench. Loctite Apply sealing and securing Loctite only at the outer thread! Not observing this rule might lead to valves not closing properly etc. INTEGRA Biosciences AG...
- Page 137 The 4 screws fixing the module are quite hidden. See “Side view right MEDIACLAVE 10” on page 8 “Side view left MEDIACLAVE 10” on page The front is connected to the connector board. After unscrewing the front the cables must be unplugged.
- Page 138 To allow easier cleaning and to prevent potential finger cuts and scrapes, we have replaced the steel clamps by magnetic holders. The latest safety valve maintenance tool is made of chrom plated magnetic steel. MC 10 units with sn >=12mmxxxx MC 30 units with sn >=12mmxxxx INTEGRA Biosciences AG...
- Page 139 “14 Test actuators 2” on page 61 7.2.5 Vessel lid stop sleeve Location Fig. 3.19 on page 45 Service kit 136928 Contents: (2 each), Including screws Loctite 222 Loctite 222 Specials Loctite 222 to secure the screws. INTEGRA Biosciences AG...
- Page 140 (MC 10) or Fig. 2.9 on page 12 (MC 30). Service kit 136933 Contents: including distance rings and nuts. Tools Open spanner size 13mm Specials The heat exchanger is fastened by 2 hex nuts on the front side. INTEGRA Biosciences AG...
- Page 141 To eliminate the risk of accidental separation, we have improved the design by adding a heat shrink sleeve. MC 10 units with sn >=11100286 MC 30 units with sn >=11103157 INTEGRA Biosciences AG...
- Page 142 Before inserting the safety valve into the vessel lid, apply Loctite 577 or Permabond LH 050 to the thread. Attention, no Loctite outside the thread! Test For check of the safety valve see Operators Instructions (OI). INTEGRA Biosciences AG...
- Page 143 7 Repair 7.2.12 Burst disk kit Note INTEGRA Biosciences AG has introduced a new type of burst disk. Old type burst disks have to be replaced by a new type. Discontinued type of burst disk. Life time limited to one year or 1000 cycles (whatever is reached first).
- Page 144 MC 10 cuvette: 8 caps (at upper and lower end); MC 30 cuvette: 4 caps (at lower end only); Material: PEEK; Length: 11 +/-0.1mm; Discontinued handle version! Replaced by metallic version shown above! 136571 Handle for cuvette 10/30L incl. nuts Discontinued type! Replaced by metallic version! INTEGRA Biosciences AG...
- Page 145 MC 10: Pivot pin with inserted Pivot pin MC 30: Pivot pin with inserted Pivot pin disk PTFE (red arrow) and disk PTFE (red arrow) and 132130 Magnetic stirrer bar complete. 136075 Magnetic stirrer bar with paddle. Table 7.1 INTEGRA Biosciences AG...
- Page 146 There are two none-compatible versions in use. For cuvette MC 10/30 with threaded bolt M4x25mm 136570 Pivot pin kit for stirrer bar (pin and cap nut) Note: Cuvettes equipped ex-factory with this version: Table 7.2 INTEGRA Biosciences AG...
- Page 147 Stirrer bar in use threaded bolt w/ Guide bush (blind hole M4x10mm thread) Table 7.3 Comments Please note that we only have ex-factory records. End-users might have ordered additional cuvette/s or mix cuvettes from multiple MC 10 units. INTEGRA Biosciences AG...
- Page 148 This very important for units with FW >= V02.00! As the cycle count is used for the RUN data logfile name! Test all actuators and sensors. Set the service reminder (see “3 Service reminder” on page 56). INTEGRA Biosciences AG...
- Page 149 Then install the assembly to control box. 4 screws from outside. The rear panel fan is connected with a flying socket. Before re-installing the rear panel connect the fan! Test Test menu “13 Test actuators” on page 61 INTEGRA Biosciences AG...
- Page 150 Only two screws at the top fix the panel in its place Special .To get access to the display panel you need to demount the front unit. See “Front kit” on page 137. Test Switch on the instrument. INTEGRA Biosciences AG...
- Page 151 Printer configuration: Printers delivered as spare part are configured by INTEGRA. The following information is needed if a printer for any reason has lost the configuration. At printer press PRINT and FEED key simultaneously while switching the MC 10/30 on (power on).
- Page 152 * END PROGRAMMING * ESC/POS EMULATION CR‐LF IGNORE CR DISABLE SET RTCK DISABLE SECONDS DIS. PRINT TIME BY KEY BUFFER 1K BYTE BAUD RATE = 9600 PROTOCOL = 8,n,1 FLOW CONTROL XON‐XOFF ************************* Test “21 (20; FW < V02.20) Printer test” on page 64 7.3.6 USB Board kit with cables Location Fig. 2.5 on page 9 Service kit 136573 INTEGRA Biosciences AG...
- Page 153 7.3.6 “USB Board kit with cables” on page 152 An update to FW >= V02.00 is required! See 4.8 “Firmware update” on page 86 Test Use Manual backup of logfiles to USB (see also OI). 4.2 “User level dialog” on page 52 INTEGRA Biosciences AG...
- Page 154 Safety cover detection kit Location Fig. 2.6 on page 10 Service kit 136923 Contents: complete set including screws Sensor 2; MB-X1100 Sensor 1; MB-X1008 Test “Adjustment of safety cover detection” on page 175. This requires sight onto the display. INTEGRA Biosciences AG...
- Page 155 (OI). i.e. Minimal conductivity must be observed. For a quick test a wetted finger can be used to simulate Level Top/ Level Bottom covered. “9 Test sensors” on page 59 INTEGRA Biosciences AG...
- Page 156 Specials After replacement carefully close the heat protecting tube and its tube clamps to avoid excessive scape of heat. The sensor is connected to X901 on the main board. Test “10 Analog sensors” on page INTEGRA Biosciences AG...
- Page 157 On mainboard side: Connect plug into mainboard socket (X1101) Tools Fork wrenchOpen-end wrench 17mm Test “10 Analog sensors” on page Specials When disconnected (unplug X1101 on Mainboard or connector at sensor), the display will show a pressure of 3.00bar! INTEGRA Biosciences AG...
- Page 158 Triggering of fuse F305 (VINT3) on the Main board. Keep spare fuses in stock! Triggering of thermo fuse/s on flow heater: These elements are resettable Trigger temperature: 200 deg. C +/- 7.5 K. Reset according the instructions 7.6.1 “Overtemperature protecting device (T-limiter)” on page 168 INTEGRA Biosciences AG...
- Page 159 For this reason, we recommend to remove it / not use it! Overbend protector DO NOT USE IT! BUT PLEASE PAY ATTENTION: Label content: e.g. INTEGRA P/N 136978 Temp.Probe 1xPt1000 1/3 DIN FA11-01634-004 Overbend protec- tor located/fixed inside of the ves- sel lid. DO NOT USE IT /...
- Page 160 To prevent overbending we have modified the T-probe design near the flexible hose (smaller diameter) and added an overbend protector. This protector limits mechanical freedom of movement. It will also indicate visually, that overbending is not allowed. Note: As mentioned above, we have disapproved the overbend protector! INTEGRA Biosciences AG...
- Page 161 Please note, that such damage by mishandling is not covered by warranty! Potential complications of a damaged cable: It might cause a leak and the thightness check might fail. Vapor or water might enter the cable and cause false temperature readings. INTEGRA Biosciences AG...
- Page 162 The FW tries to restart the pump up to 10 times. If the pump does not start after the retry period, the system will trigger an error. See 7 Error handling Test “15 Circulation pump” on page INTEGRA Biosciences AG...
- Page 163 “15 Circulation pump” on page Specials We have noticed that few circulation pumps have difficulties to start after longer standstills. I.E. Not automatically starting after not running the MC 10/ 30 for several months. Overtemperature heater is typically a subsequent INTEGRA Biosciences AG...
- Page 164 The valve block is fastened from behind (its bottom) with 3 screws (Allen key 3mm). Test Check valves with “13 Test actuators” on page 61: Drain valve [8], Heat exchanger vent valve [36] and Cool valve [15]. INTEGRA Biosciences AG...
- Page 165 This must snap in when connect- ing. Version 2 (since ~2014/10): Disconnect/connect at the main- board. (X1101). Test Check valves with “13 Test actuators” on page 61: Support pressure valve [40], Dispense pressure valve [37] and Air vent valve [41]. INTEGRA Biosciences AG...
- Page 166 at the main board. Note The support pressure pump itself is the same as on the “Support pressure pump kit 10L” on page 166. Just the supporting construction is different. Test “13 Test actuators” on page INTEGRA Biosciences AG...
- Page 167 “13 Test actuators” on page 7.5.9 Filling pump kit 30L Location Fig. 2.8 on page Service kit 136943 Contents: including cable, no screws. The pump is connected to X507 on the main board. Test “13 Test actuators” on page INTEGRA Biosciences AG...
- Page 168 Overtemperature protecting device (T-limiter) Location Fig. 2.3 on page Wiring Fig. 3.6 “Wiring diagram sensors MEDIACLAVE 10” on page 24 Fig. 3.7 “Wiring diagram sensors MEDIACLAVE 30” on page Service kit 136575 All flow heater types comprise multiple overtemperature protecting devices (T- limiter).
- Page 169 The heater is mounted on top with screws. Tie the cables so that the do not touch hot surfaces! Test “13 Test actuators” on page 61. Switch on one, then both heating relays (and the main contactor). INTEGRA Biosciences AG...
- Page 170 The heater is mounted on top with screws. Tie the cables so that the do not touch hot surfaces! Test “13 Test actuators” on page 61. Switch on one, then both heating relays (and the main contactor) INTEGRA Biosciences AG...
- Page 171 The heating relay is snapped into the assembly track. Pull the latch with a small screwdriver. Test “13 Test actuators” on page 61. Activate heating until you see the coupling water temperature raising in “10 Analog sensors” on page INTEGRA Biosciences AG...
- Page 172 The contactor is snapped into the assembly track. Pull the latch with a small screwdriver. Test “13 Test actuators” on page 61. Activate heating until you see the coupling water temperature raising in “10 Analog sensors” on page INTEGRA Biosciences AG...
- Page 173 Open the 4 screws (see circles) to get access to the rear of the supply. Unscrew the 5 wires (Check with Fig. 3.13 “Wiring diagram Mains and Heat- ing MEDIACLAVE 10” on page 34). On the exchange supply first attach the mounting brackets with the smaller screws.
- Page 174 Detach the optional cables of the printer (X102, X103). For mounting first insert the dis- tance bolts (A) and then fix the board with screws (B). Reconnect cabling. front side control box Test Switch on the instrument. INTEGRA Biosciences AG...
- Page 175 If Safety cover open (uncovered by magnet) E11 is triggered. E11 Safety cover open (Sensor2) entry in SYSTEM.log file. If Safety cover open (uncovered by magnet) AND P_system > ~130mbar, Main contactor is disabled. SafetyAlarm2 (SAFETY_ALARM_2) entry in SYSTEM.log file. INTEGRA Biosciences AG...
- Page 176 Keep the cover closed. Select service menu 12 Analog In- puts. Monitor the value SAFE_COV_- POS. The displayed value must be lower than 350 with cover closed Table 7.4 Adjustment of safety cover detection INTEGRA Biosciences AG...
- Page 177 7.7.4 Check and calibrate pressure sensor Automatic calibration: “23 (22; FW < V02.20) Automatic calibration” on page 65 Manual check: Observe the pressure during the automatic calibra- tion. It must be between 1.1 and 1.4 bar. INTEGRA Biosciences AG...
- Page 178 Required tools Measuring cup holding at least 2 litres. Watch with seconds hand. Required water flow Water Temperature MEDIACLAVE 10 MEDIACLAVE 30 5 °C 1.5 liter per minute 2.5 litre per minute 15 °C 1.8 liter per minute...
- Page 179 After decalcification with citric acid, the system must be drained. Then sodium bicar- bonate can be used to efficiently neutralize remaining traces of citric acid. MEDIACLAVE 10 150g citric acid in powder form (molecular formula C , can be found in food-, chemist’s- and drug stores) to be dissolved in 3L de-ionised water...
- Page 180 Let solution circulate for 5 min, then drain Let water circulate for 5 min, then drain again. again. Repeat this step four times (4x) Table 7.8 8 Fill MC 10/30 with coupling water as described in Operating Instructions, sec- tion 7.4.3. INTEGRA Biosciences AG...
- Page 181 Pressure 9’ 600 Reference External Printer 9’ 600 External 9'600, XON -XOFF Printer Fig. 8.1 MC 10/30 interconnection diagram INTEGRA Biosciences AG recommends the EPSON TM-U220 matrix printer which is tested successfully together with the MC 10/30. INTEGRA Biosciences AG...
- Page 182 The printer is now configured to work together with the MC 10/30 Table 8.1 Epson TM-U220 matrix printer Note For further assistance how to connect the EPSON TM-U220 matrix printer con- tact the INTEGRA Biosciences AG technical support department! INTEGRA Biosciences AG...
- Page 183 Ensure opera- ed operating ranges. tional safety: Check all safety components of device. Table 8.2 Introduction to instrument qualification 1. EU Guide to Good Manufacturing Practice. INTEGRA Biosciences AG...
- Page 184 With version 23 the chapter was removed and saved and maintained as a sep- arate document, see: 136951_V01_IQ_MEDIACLAVE_10_30 or newer. Operational Qualification (OQ, not included) With version 23 the chapter was removed and saved and maintained as a sep- arate document, see: 136952_V01_OQ_MEDIACLAVE_10_30 or newer. INTEGRA Biosciences AG...
- Page 185 Otherwise tests will be marked with “SKIP” in the test report. 8.6.2 Maintenance, safety and performance checks 1 Enter service level dialog 2 Activate service test “Operation Qualification (OQ)” If necessary drain coupling water Table 8.3 INTEGRA Biosciences AG...
- Page 186 7.7.2 “Adjustment of ves- sel lid detection” on page 177 If this check fails see 7.7.1 “Adjust- ment of safety cover detection” on page 175 7.7.2 “Adjustment of ves- sel lid detection” on page 177 Table 8.3 INTEGRA Biosciences AG...
- Page 187 If your instrument is not equipped with a safety valve maintenance tool use an edgeless tool of any kind (e.g. Allen key) Table 8.3 INTEGRA Biosciences AG...
- Page 188 Press HELP for further information Note: This screen only appears if the instru- ments is equipped with a support pressure pump which is not strong enough for this test. (Serial numbers lower than 10030150) Table 8.3 INTEGRA Biosciences AG...
- Page 189 99 automatic manual Temperature calibration kit (Part No. 136919) Pressure gauge (rated 0 to 1.5bar relative pressure) manual manual Temperature reference instrument (rated 0°C to 130°C) Pressure gauge rated (0 to 1.5bar relative pressure) Table 8.5 INTEGRA Biosciences AG...
- Page 190 LEX1 is cor- rect. If displayed check connection of LEX1 and press RERUN. Set-up 2: Press CONTINUE Make sure that the reference tem- perature probe is in the water. Press START Table 8.6 INTEGRA Biosciences AG...
- Page 191 B” on page 157) MC 10/30 temperature reading points and reference values are displayed. Unplug calibration instruments Press CONTINUE go to next chapter 8.6.4 “Documen- tation” on page 194 Table 8.6 INTEGRA Biosciences AG...
- Page 192 MC 10/30 If within the limits, press CONTINUE else press ABORT and replace pressure sensor (see 7.4.6 “Pres- sure sensor kit for valve block B” on page 157) Table 8.7 INTEGRA Biosciences AG...
- Page 193 MC 10/30 to reference value by pressing buttons “UP” or “DOWN” Press NETX PHASE MEDIACLAVE temperature reading points are displayed. Unplug calibration instruments Press CONTINUE go to next chapter 8.6.4 “Documen- tation” on page 194 Table 8.7 INTEGRA Biosciences AG...
- Page 194 Operational Qualification (separate document). spond with Printed test report (FW >= V02.00) At the end of the testrun a test report will be printed automatically: Press PRINT to print an additional report Press OK to complete OQ INTEGRA Biosciences AG...
- Page 195 Serial number: 10040155 Date: 07.05.2010 Time: 12:47:58 Software version: 02.00 Webserver version: 02.00 Bootloader version: 6 Mainboard version: 2 Type: MEDIACLAVE 10 Operating hours: 60h Cycle counter: Temp.coeff. a: -0.008573 Temp.coeff. b: 0.200086 Pres. offset: 5.0mbar ***Reminder Service Reminder Test due: 07.05.2011...
- Page 196 OQ PASS *** M4 check is entered instead of PASS! Strainer cleaned? e.g. 15.07.2010 PASS *** M6 Pressure vessel cleaned? PASS *** M2 Decalcification done? ___________ Fill in if decalcification done or not SUMMARY MAINTENANCE CHECKS PASS REMARKS / OBSERVATIONS ________________________ ________________________ ________________________ ************************ INTEGRA Biosciences AG...
- Page 197 REMARKS / OBSERVATIONS (50): 49.8 to 51.0 (-0.2/+1.0)°C ________________________ ________________________ ************************ Service reminder reset if all mainte- Service reminder reset nance/safety/performance checks DONE successfully passed ************************ FINAL ACCEPTANCE confirmed by signatures Fill in signatures Validation Engineer ________________________ Responsible MEDIACLAVE Owner ________________________ INTEGRA Biosciences AG...
- Page 198 At the end of the testrun a log file named “OQ” has been generated. This log file contains the same information as a printed report described above. download log files see “Log files (via Webserver)” on page 79 INTEGRA Biosciences AG...
Need help?
Do you have a question about the MEDIACLAVE 10 and is the answer not in the manual?
Questions and answers