Table of Contents
Advertisement
Advertisement
Chapters
Table of Contents
Troubleshooting

Related Manuals for Biotage ELSD-A120


Summary of Contents for Biotage ELSD-A120
- Page 1 Biotage ELSD-A120 ® User Manual...
- Page 2 A CAUTION notice denotes language) without prior agreement future editions. Further, to the a hazard. It calls attention and written consent from Biotage as maximum extent permitted by governed by United States and inter- to an operating procedure, applicable law, Biotage dis- national copyright laws.
-
Page 3: Table Of Contents
General Considerations 5 Optimizing Performance Do’s and Don’ts of ELS Detection Location of the Detector Mobile Phase Priming Solvent Recommendations 6 Troubleshooting and Diagnostics Troubleshooting General Problems 7 Error Information What Are Error Messages Error Messages ® Biotage ELSD-A120 User Manual... - Page 4 Putting the Detector into Storage Replacing the Detector Firmware 9 Parts and Materials for Maintenance Identifying Parts and Materials 10Appendix General Safety Information The Waste Electrical and Electronic Equipment Directive Radio Interference Biotage on Internet ® Biotage ELSD-A120 User Manual...
-
Page 5: Introduction To The Detector
Introduction to the Detector Introduction to the ELSD Detector Overview Basic Principles of Operation Operational Parameters Overview of the Detector This chapter gives an introduction to ELSD-A120, detector overview and internal connectors. ® Biotage ELSD-A120 User Manual... -
Page 6: Introduction To The Elsd
This manual only instructs the user in the installation and operation of ELSD-A120 when used with an Isolera™ system. If you want to use it for stand alone use or connect it to another chromatography system, please contact Biotage for more information and instructions. -
Page 7: Detector Overview
This scattered light enters the optical aperture of the detection system and generates a signal response from the photodiode in real time. The quantity of light detected is dependent on the solute concentration and solute particle size distribution. ® Biotage ELSD-A120 User Manual... - Page 8 With this configuration, refraction is of greater significance than reflection. The majority of organic ® Biotage ELSD-A120 User Manual...
-
Page 9: Operational Parameters
ELSD-A120 evaporator temperature is independent of the mobile phase. Consequently, ELSD-A120 can be set at 30 °C for all types of mobile phase provided the evaporator gas flow is adjusted accordingly. -
Page 10: Overview Of The Detector
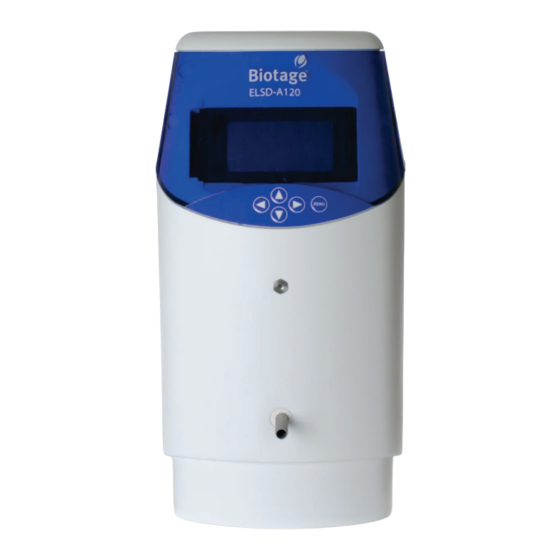
Introduction to the Detector Detector Overview Overview of the Detector Figure 3 ELSD-A120 overview (front) Front screen display Keypad Eluent inlet Solvent waste outlet ® Biotage ELSD-A120 User Manual... - Page 11 Introduction to the Detector Detector Overview Figure 4 ELSD-A120 overview (rear) Vapor sensor vent Serial RS232 port (only used for firmware update) LAN connector (not active) Firmware button I/O connector (not used) Mains switch Mains input Nitrogen Gas Inlet port...
- Page 12 Introduction to the Detector Detector Overview ® Biotage ELSD-A120 User Manual...
-
Page 13: Site Requirements And Specifications
Site Requirements and Specifications Pre-Installation Requirements Site Requirements Power Considerations Power Cords Physical Specifications Performance Specifications Specifications Specification Conditions This chapter provides information on environmental requirements, and physical and performance specifications. ® Biotage ELSD-A120 User Manual... -
Page 14: Pre-Installation Requirements
For a detailed description of the environmental and operating requirements of ELSD-A120, please refer to the Site Preparation Checklist supplied by Biotage. This manual will give you an overview of ELSD-A120, and describe its operation in more detail. ® Biotage... -
Page 15: Site Requirements
Site Requirements A suitable environment is important to ensure optimal performance of the detector, please refer to the Site Preparation Checklist supplied by Biotage for more details. Power Considerations Check the operating voltage of your detector on the IEC inlet fuse holder on the rear of the detector. -
Page 16: Power Cords
Never operate your detector from a power outlet that has no ground connection. Never use a power cord other than the Biotage power cord designed for your region. Use of unsupplied cables... -
Page 17: Physical Specifications
Operating altitude Up to 2000 m (6562 ft) Non-operating Up to 4600 m (15091 ft) For storing the altitude detector Safety standards: Installation category II, For indoor use IEC, CSA, UL Pollution degree 2 only ® Biotage ELSD-A120 User Manual... -
Page 18: Performance Specifications
Site Requirements and Specifications Performance Specifications Performance Specifications Specifications ELSD-A120 is suitable for indoor use only and is classified suitable under the following categories (EN 61010-1):2010 • Installation category II • Pollution degree 2 • Safety class 1 Table 2 Performance Specification of ELSD-A120... -
Page 19: Specification Conditions
1 °C/h (1.8 °F/h). Turbulences around one minute or less can be ignored. ASTM measurements require that the detector should be turned on enough time before start of testing. ® Biotage ELSD-A120 User Manual... - Page 20 Site Requirements and Specifications Performance Specifications ® Biotage ELSD-A120 User Manual...
-
Page 21: Installing The Detector
Installing the Detector Unpacking the Detector Damaged Packaging Delivery Checklist Installing the Detector Connecting the Detector to an Isolera™ System Checking Operation of the Detector This chapter gives information about the installation of your ELSD-A120. ® Biotage ELSD-A120 User Manual... -
Page 22: Unpacking The Detector
Unpacking the Detector Damaged Packaging If the delivery packaging shows signs of external damage, please call your Biotage sales and service office immediately. Inform your service representative that the detector may have been damaged during shipment. “Defective on arrival” problems... -
Page 23: Delivery Checklist
Delivery Checklist Unpack the detector and accessories, and ensure that all parts and materials shown in the table below have been delivered with your detector. Report any missing or damaged parts to your local Biotage sales and service office. Description... -
Page 24: Installing The Detector
Installing the Detector Installing the Detector Connecting the Detector to an Isolera™ System ELSD-A120 must be installed by an Biotage service representative. Your Biotage service representative will: • Unpack the detector. • Remove all packing list items that are shipped with the detector and present them to you for review. - Page 25 Though it will not cause any damage, if the solvent waste tube NOTE becomes submersed below the solvent level inside the waste container, positive pressure will be exerted on the nebulizer chamber leading to excessive baseline noise. Analog output cable (414123). NOTE ® Biotage ELSD-A120 User Manual...
-
Page 26: Checking Operation Of The Detector
Turn on the eluent flow and allow the detector to stabilize. Again check the baseline noise. Where noise and all other conditions are acceptable, the detector is ready to begin work. Some volatile buffers can generate considerable offsets and increased NOTE noise levels. ® Biotage ELSD-A120 User Manual... -
Page 27: Using The Detector
Power Mode Data Output Rate (Hz) Fill the Nebulizer With Solvent Adjust the Splitter Flow Rate General Considerations Solvent Recommendations Sample Preparation Cartridge Considerations Transferring ELSD Temperature Methods This chapter explains the operational parameters of ELSD-A120. ® Biotage ELSD-A120 User Manual... -
Page 28: Detector Controls
Using the Detector Detector Controls Detector Controls ELSD-A120 can be controlled via the front keypad and screen, as shown in Figure 5 below. Display Screen The graphical interface on the front of the detector displays the current method, status, evaporator temperature, nebulizer temperature, gas flow and output of the detector. -
Page 29: Sub-Menu Screen
Set Data Output Rate Figure 6 Sub menu screen Status Mode ELSD-A120 can be operated in two modes; STANDBY or RUN, both of which are described below. To display the current mode and/or select a new mode, highlight the MODE function on the detector display. The current mode will now be displayed on the screen. -
Page 30: Error Conditions
Error Conditions ELSD-A120 is equipped with a number of sensors and error checking facilities to ensure safe operation. If an error is detected, the detector gives an audible warning and a visible description of the error condition. -
Page 31: Operational Parameters
Operational Parameters Operational Parameters Method ELSD-A120 has 10 pre-set methods and a method XXX that allows modification of the ELSD parameters via the front screen and keypad. Loading a Method To load one of the 10 pre-set methods or the XXX method, highlight MTD. -
Page 32: Evaporator Gas Flow
The smoothing range is 1 , (in increments of 1), – 50 which translates to 0.1 – 5.0 s. For flash applications a value of 50 (5 seconds) is satisfactory. ® Biotage ELSD-A120 User Manual... -
Page 33: Light Source Intensity (Led)
This feature is extremely useful for preparative chromatography where samples of high concentration can be analyzed which would otherwise exceed the dynamic range of the detector. ELSD-A120 performs an automatic auto-zero (i.e. 10 mV) following an NOTE LED change in order to keep the signal on-scale. -
Page 34: Fill The Nebulizer With Solvent
Fill the Nebulizer With Solvent Fill the Nebulizer With Solvent The nebulizer should be filled with solvent when starting ELSD-A120 for the first time or when the detector has not been used for a while. Fill the syringe supplied with the splitter with ethyl acetate, acetone, or the solvent you are using. -
Page 35: Adjust The Splitter Flow Rate
For prime instructions, see the Isolera™ User Manual. Disconnect the PEEK capillary tube from the eluent inlet, at the front of ELSD-A120, and insert it into a measuring cylinder. Prime the Isolera system with 100 mL of the same solvent (mix) used in step 1 above at a flow rate of 50 mL/min. -
Page 36: General Considerations
Using the Detector General Considerations General Considerations ELSD-A120 should be thought of as a detector like any other designed for liquid chromatography with an Isolera system. The main distinguishing feature is the ability to evaporate the solvent from the cartridge eluent. Therefore, normal system set-up precautions should be remembered when starting to use the detector. -
Page 37: Sample Preparation
Samples containing particulate matter should be filtered through a 0.45 µm filter prior to analysis. Cartridge Considerations ELSD-A120 will detect all non-volatile components in the mobile phase, which includes cartridge-packing material. Cartridge packing material will become chemically and mechanically broken down over the lifetime of the cartridge, causing particles to enter the detector. -
Page 38: Transferring Elsd Temperature Methods
ELSD-A120 requires an evaporation temperature between 35 and 40 °C. Therefore the transfer of operating conditions from other ELSD to ELSD-A120 is not valid and the only way to ensure that the detector will provide the optimum analyte signal-to-noise is to follow the guidelines outlined in “Operational Parameters”... -
Page 39: Optimizing Performance
Optimizing Performance Do’s and Don’ts of ELS Detection Location of the Detector Mobile Phase Priming Solvent Recommendations This chapter gives hints on how to optimize the performance or use additional devices. ® Biotage ELSD-A120 User Manual... -
Page 40: Do's And Don'ts Of Els Detection
High pressures on the internal chamber will lead to increased baseline noise and low sensitivity. NEVER block the exhaust outlet. NEVER allow the solvent waste outlet tube to become immersed in the waste solvent. Only use volatile mobile phase additives. ® Biotage ELSD-A120 User Manual... -
Page 41: Location Of The Detector
Provide approximately four inches (10 cm) of space behind the detector so that the cooling fan intake is not impeded, and to allow easy access to the rear panel. ELSD-A120 can be placed within 2 meters of an extraction unit, using the exhaust tube provided. ®... -
Page 42: Mobile Phase Priming
Optimizing Performance Mobile Phase Priming Mobile Phase Priming ELSD-A120 does not require any mobile phase priming, other than that required to prime the solvent through the Isolera system. It is recommended that priming of the Isolera system be performed without ELSD-A120 attached, to prevent non-volatile impurities contaminating the detector. -
Page 43: Solvent Recommendations
Solvent Recommendations The maximum operating temperature of the detector and the boiling point of the solvent will determine the type of solvents compatible with ELSD-A120. High boiling point solvents such as • N-methylpyrrolidone (NMP), • Dimethylsulphoxide (DMSO), • meta-Cresol (m-Methylphenol) and •... - Page 44 Optimizing Performance Solvent Recommendations ® Biotage ELSD-A120 User Manual...
-
Page 45: Troubleshooting And Diagnostics
Display Not On, but Power Connected Vapor Sensor Error Occurs, but There Is No Solvent or Vapor Leak inside the Detector High Back-Pressure from Detector This chapter gives an overview about the troubleshooting and diagnostic features. ® Biotage ELSD-A120 User Manual... -
Page 46: Troubleshooting
If there is an error or fault and you follow the recommended course of action and the result is not satisfactory, then please direct the matter to Biotage or your local distributor. -
Page 47: General Problems
3 Insufficient evaporation Increase the temperature of the evaporator by 10 °C until the baseline noise decreases 4 Non-volatile additive in the mobile Replace the additive in the mobile phase phase with a volatile buffer ® Biotage ELSD-A120 User Manual... -
Page 48: Low Sensitivity
Change the gas to nitrogen or evaluate different nitrogen sources 3 Poor regulation of the inlet gases • If using bottled gas, check that the gas regulator is functioning correctly and giving consistent flow • Alternatively, use a pulse dampner ® Biotage ELSD-A120 User Manual... -
Page 49: Large Baseline Offset
3 Contaminated diffuser Perform cleaning procedure 4 Optics heater failed Please contact your Biotage service representative Peak Tailing Probable cause Suggested actions 1 Eluent particles lingering in the... -
Page 50: Detector Fails To Zero
• Stop the pump flow and switch off due to impurity in the mobile the detector. Restart the detector phase and auto-zero without liquid flowing • Please contact your Biotage service representative • Optical section contaminated and requires cleaning No Power Probable cause... -
Page 51: Temperature Error As Soon As Detector Powered On
Powered On Probable cause Suggested actions 1 Temperature probe fault or • Check RTD connections disconnected • Please contact your Biotage service representative Display Not On, but Power Connected Probable cause Suggested actions 1 Detector Power Supply Please contact your Biotage service... -
Page 52: High Back-Pressure From Detector
Troubleshooting and Diagnostics General Problems High Back-Pressure from Detector Probable cause Suggested actions 1 Nebulizer or nebulizer inlet tube Manually inject acetone into the blocked eluent inlet port at the front of the detector to remove obstruction ® Biotage ELSD-A120 User Manual... -
Page 53: Error Information
Evaporator Gas Flow Rate Limit Exceeded Invalid Nebulizer Temperature Invalid Evaporator Temperature Leak Sensor Failed This chapter describes the meaning of error messages, and provides information on probable causes and suggested actions how to recover from error conditions. ® Biotage ELSD-A120 User Manual... -
Page 54: What Are Error Messages
(e.g. repair, or exchange of consumables is necessary). In the event of such a failure, the red status indicator at the front of the detector is switched on, and an entry is written into the detector logbook. ® Biotage ELSD-A120 User Manual... -
Page 55: Error Messages
Error ID: 12 The vapor sensor located on the main control board has failed. Probable cause Suggested actions 1 Vapor sensor not connected to the Please contact your Biotage service main board representative 2 Defective vapor sensor Please contact your Biotage service representative ®... -
Page 56: Rear Vapor Sensor Failed
The vapor sensor located on the rear panel of the detector has failed. Probable cause Suggested actions 1 Vapor sensor not connected to the Please contact your Biotage service main board representative 2 Defective vapor sensor Please contact your Biotage service... -
Page 57: Fan Failed
Fan Failed Error ID: 16 Thermal shut-down of the main cooling fan. Probable cause Suggested actions 1 Fan cable disconnected Please contact your Biotage service representative 2 Defective fan Please contact your Biotage service representative 3 Defective main board Please contact your Biotage service... -
Page 58: Evaporator Temperature Limit Exceeded
Evaporator Temperature Limit Exceeded Error ID: 19 Evaporator temperature exceeded threshold after stabilizing. Probable cause Suggested actions 1 Defective thermocouple Please contact your Biotage service representative 2 Defective evaporator heater Please contact your Biotage service assembly representative 3 Defective main board... -
Page 59: Invalid Nebulizer Temperature
Invalid Nebulizer Temperature Error ID: 22 Invalid nebulizer temperature reading. Probable cause Suggested actions 1 Nebulizer heater not connected to Please contact your Biotage service the main board representative 2 Defective nebulizer heater Please contact your Biotage service representative Invalid Evaporator Temperature Error ID: 23 Invalid evaporator temperature reading. - Page 60 Error Information Error Messages ® Biotage ELSD-A120 User Manual...
-
Page 61: Maintenance
Cautions and Warnings Cleaning the Detector Inspection of Cables Drying the Diffuser Cleaning the Nebulizer Cleaning the Evaporator Tube Putting the Detector into Storage Replacing the Detector Firmware This chapter describes the maintenance of ELSD-A120. ® Biotage ELSD-A120 User Manual... -
Page 62: Introduction To Maintenance
Maintenance Introduction to Maintenance Introduction to Maintenance Authorized Biotage service engineer only should carry out maintenance inside ELSD-A120. There are no user serviceable parts inside the detector. Unauthorized access to the detector will invalidate the detector warranty. ® Biotage ELSD-A120 User Manual... -
Page 63: Cautions And Warnings
Repair work at the detector can lead to personal injuries, e.g. shock hazard, when the cover is opened. Do not remove the cover of the detector. Only authorized Biotage service engineer are allowed to carry out repairs inside the detector. Eye discomfort W A R N I N G The light source in the detector is a Class 1 LED product. -
Page 64: Cleaning The Detector
Switch off and disconnect the power cord from the detector before cleaning. Do not use an excessively damp cloth during cleaning. Drain all solvent lines before opening any fittings. Allow the detector to dry off completely before reconnecting power. ® Biotage ELSD-A120 User Manual... -
Page 65: Inspection Of Cables
Inspection of Cables Inspection of Cables Periodically inspect the connecting cables for signs of physical damage caused by abrasion, solvent spillage, impact etc. Replace damaged cables, particularly the power cord, if any damage is observed. ® Biotage ELSD-A120 User Manual... -
Page 66: Drying The Diffuser
The diffuser will be dried out and the detector ready to use after approximately 1 hour under these conditions. Reset the detector to the correct operating conditions and allow it to stabilize before continuing. ® Biotage ELSD-A120 User Manual... -
Page 67: Cleaning The Nebulizer
It is not possible to pump solvent into the detector if the nebulizer NOTE becomes completely blocked. It is strongly recommended to regularly clean the detector with a suitable solvent (e.g. acetone) to keep the nebulizer clear of obstruction. ® Biotage ELSD-A120 User Manual... -
Page 68: Cleaning The Evaporator Tube
40 hours of use as a preventative routine. If cleaning the evaporator tube does not cure the problems, then consult Biotage for further assistance. Do not use solvents that contain additives when performing the NOTE cleaning procedure. -
Page 69: Putting The Detector Into Storage
13 Using the gas supply, blow nitrogen gas through the exhaust to evaporate any remaining acetone in the solvent trap. 14 Plug the exhaust, waste tube and eluent inlet with the plastic caps provided. ® Biotage ELSD-A120 User Manual... -
Page 70: Replacing The Detector Firmware
Maintenance Replacing the Detector Firmware Replacing the Detector Firmware ELSD-A120 contains control firmware that can be flash upgraded via the serial port. When For majority of internal repairs Tools required Description Allen keys Tera Term software Current firmware file Parts required... - Page 71 When in Service mode, the Tera Term displays the boot loader version and firmware menu. Select the firmware you wish to upgrade/downgrade by pressing the appropriate number (e.g. press 1 to upgrade the main control firmware). ® Biotage ELSD-A120 User Manual...
- Page 72 Replacing the Detector Firmware Press U to begin the update process. To choose the firmware file, select the Send File option from the File menu in the toolbar and navigate to the folder where the file is located. ® Biotage ELSD-A120 User Manual...
- Page 73 11 On successful completion of the file transfer, the software will display a Flash memory updated ok message. 12 Power cycle the detector and check that the firmware version displayed on the detector’s front panel at boot-up is correct. ® Biotage ELSD-A120 User Manual...
- Page 74 Maintenance Replacing the Detector Firmware ® Biotage ELSD-A120 User Manual...
- Page 75 Parts and Materials for Maintenance Identifying Parts and Materials This chapter provides information on parts for maintenance. ® Biotage ELSD-A120 User Manual...
-
Page 76: Parts And Materials For Maintenance Identifying Parts And Materials
ELSD-A120 analog signal cable PL0890-0305 Gas inlet tube (2 m) PL0890-0310 Rear exhaust hose (PVC-2 m) G4261-63000 Solvent waste tube (1.9 m) PL0890-0320 Solvent waste container (500 mL) Use only spare parts supplied by Biotage. ® Biotage ELSD-A120 User Manual... -
Page 77: 10Appendix
Appendix General Safety Information Safety Symbols General Safety Information Safety Standards Operation The Waste Electrical and Electronic Equipment Directive Radio Interference Biotage on Internet This chapter provides addition information on safety, legal and web. ® Biotage ELSD-A120 User Manual... -
Page 78: General Safety Information
Failure to comply with these precautions or with specific warnings elsewhere in this manual, violates safety standards of design, manufacture, and intended use of the detector. Biotage assumes no liability for the customer’s failure to comply with these requirements. ®... -
Page 79: Safety Standards
When working with solvents, observe appropriate safety procedures (e.g. goggles, safety gloves and protective clothing) as described in the material handling and safety data sheet by the solvent vendor, especially when toxic or hazardous solvents are used. ® Biotage ELSD-A120 User Manual... -
Page 80: The Waste Electrical And Electronic Equipment Directive
With reference to the equipment types in the WEEE Directive Annex I, this product is classed as a Monitoring and Control Instrumentation product. Do not dispose off in domestic household waste NOTE To return unwanted products, contact your local Biotage office for more information. ® Biotage ELSD-A120 User Manual... -
Page 81: Radio Interference
Appendix Radio Interference Radio Interference Never use cables other than the ones supplied by Biotage to ensure proper functionality and compliance with safety and EMC regulations. Test and Measurement If test and measurement equipment is operated with unscreened cables and/or used for measurements on open set-ups, the user has to assure that under operating conditions the radio interference limits are still met within the premises. -
Page 82: Biotage On Internet
Appendix Biotage on Internet Biotage on Internet For the latest information on products and services, please visit our website at: www.biotage.com ® Biotage ELSD-A120 User Manual... - Page 83 LED light source error evaporator tube overview cleaning rear view line frequency diffuser line voltage drying location fan failed dimensions detector fan stopped display not on low sensitivity firmware display screen replacing drying diffuser flat baseline frequency range ® Biotage ELSD-A120 User Manual...
- Page 84 ® Biotage ELSD-A120 User Manual...
- Page 87 Trademark Acknowledgement The following trademarks are owned by Biotage AB: Advancer, Advancer 350, Advancer Kilobatch, AFFINILUTE, Biotage, Biotage ZIP, Endeavor, EVOLUTE, EVOLUTE EXPRESS, ExploraSep, Extrahera, Firefly design, FLASH+, FlashMaster, FlashVac, Flash 75, Flash 150, Flash 400, Horizon, HPFC, HP-SIL, HP-Sphere, Initiator, Initiator Peptide Workstation, Initiator+, Initiator+ Alstra, Initiator+ Robot...
- Page 88 Part Number: 414127-A © 2014 Biotage. All rights reserved. No material may be reproduced or published without the written permission of Biotage. Information in this document is subject to change without notice and does not represent any commitment from Biotage. E&OE.
Need help?
Do you have a question about the ELSD-A120 and is the answer not in the manual?
Questions and answers