Biotage V-10 Touch User Manual
Hide thumbs
Also See for V-10 Touch:
- Quick manual (2 pages) ,
- Installation and safety (12 pages) ,
- Lifting instructions (2 pages)
Table of Contents
Advertisement
Quick Links
Advertisement
Table of Contents

Subscribe to Our Youtube Channel
Related Manuals for Biotage V-10 Touch


Summary of Contents for Biotage V-10 Touch
- Page 1 Biotage V-10 Touch ® User Manual...
-
Page 2: Table Of Contents
Set Up an Evaporation Job Modify or Delete a Queued Evaporation Job Save and Open a Job List Start the Queue Monitor an Evaporation Job Edit an Evaporation Job in Progress Biotage V-10 Touch User Manual | © Biotage 2019 ®... -
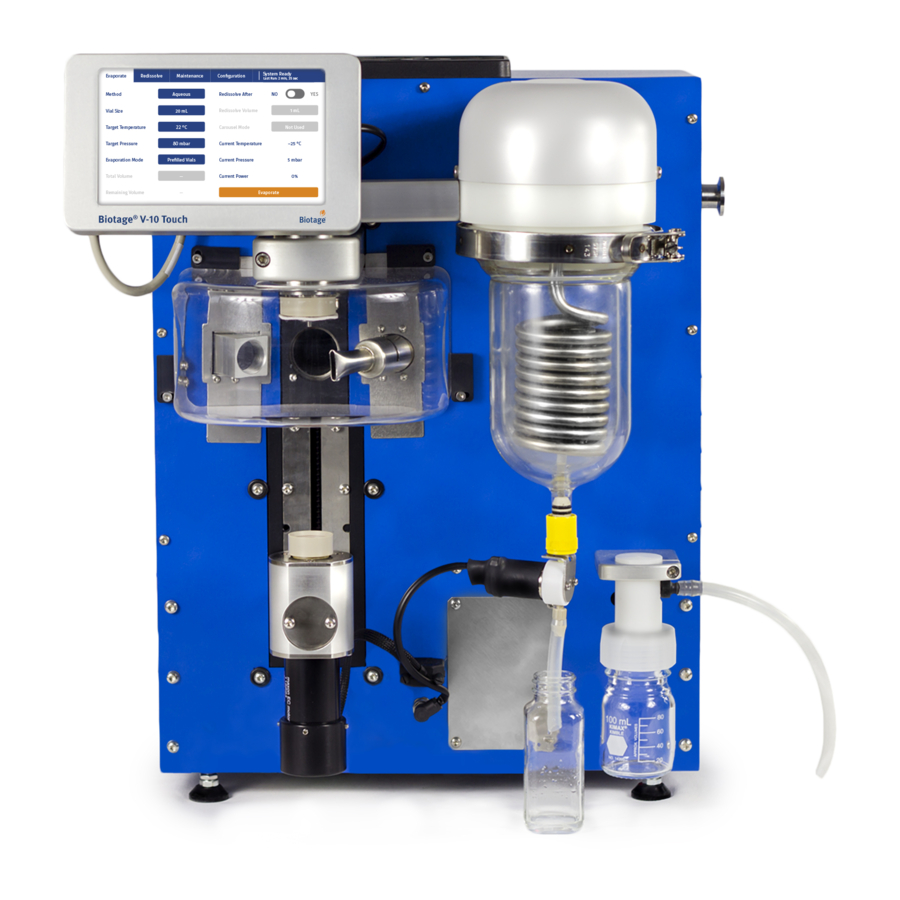
Page 3: System Overview
Boiling Point (BP) applications in organic and inorganic chemistry. The evaporator Very High Boil Very high boiling point. > 160°C is operated via its touch screen or V-10 Touch Control Centre. High Boil High boiling point. 110°C ≤ BP ≤ 160°C Aqueous 90°C ≤... -
Page 4: External Vacuum Pump (Optional)
Biotage V-10 Touch Control Centre (Optional) ® V-10 Touch Control Centre can be used to control any V-10 Touch system. The software is installed on an external computer and adds the capabilities of integrating the V-10 Touch system with a liquid handler as well as running the carousel with different methods for different carousel positions. -
Page 5: Define Methods, Vials, And System Settings
» To reset settings to factory default, see "Reset Parameter Target Pressure: The target pressure (in mbar) Settings" on page 5. for the evaporation. Note: To define V-10 Touch Control Centre settings, see page 13. Very High HPLC Mixed High... -
Page 6: Define A Vial
(in minutes) for an evaporation. redissolved after evaporation. » Timed, this is the total time (in minutes) Note: When using V-10 Touch Control Centre, the Speed (rpm) for an evaporation. parameter (see page 14) overrides this parameter. System Ready System Ready... -
Page 7: Define Sample Pump Settings
Brightness: The brightness of the the sample loop. When using the probe and sample inlet touch screen (in percentages). tube supplied by Biotage, it must be set to 1.2 mL. » Liquid Handler : Defines whether a liquid handler is Note: The sample pump settings above are not used when using connected (YES) or not (NO). -
Page 8: Prepare And Start The System
» Observe general as well as specific safety regulations for the There are four different carousel sample holders available: use of the equipment at all times; see the “Biotage V-10 Touch ® 20 and 30 mL vials (P/N 411181), 16 mL vials (P/N 411985), 4 mL Installation and Safety”... -
Page 9: Fluid Connections
Prepare and Start the System Fluid Connections Adjust the Green Vial Tube The height of the green vial tube has to be adjusted according to If the system is equipped with a built-in sample pump, all fluid the vial being used: connections should be connected as shown in Figure 15. -
Page 10: Defrost And Drain The Condenser
If enabled, the automatic defrost will be performed after a job is 3. Set the Needle Drain Volume to 40 mL and the Needle Wash completed and not in the middle of a job. See "Define Biotage ® Volume to 5 mL. -
Page 11: Set Up The Liquid Handler (Optional)
Prepare and Start the System Set Up the Liquid Handler (Optional) Before running an evaporation job using a liquid handler, ensure that the liquid handler is correctly set up. 1. Ensure that the liquid handler has the Z-arm positioned at 175 mm. -
Page 12: Evaporate
(if used) while the vial is being loaded or unloaded. the selected method. The following evaporation parameters are available: Note: To evaporate using V-10 Touch Control Centre, see page 13. » Method: The evaporation method. For more information, see "Evaporation Methods" on page 1. -
Page 13: Monitor An Evaporation Run
Evaporate » Edit an Evaporation Run Redissolve After : Defines whether the sample will be automatically redissolved During the evaporation run, it is possible to increase the after the evaporation (YES) or not (NO). target temperature and/or decrease the target pressure in the »... -
Page 14: Redissolve
Dispense Method Auto Redissolve Volume 2.0 mL Carousel Mode Not Used Redissolve Figure 22. The Redissolve view during setup. This system has both a built- in sample pump and a carousel. Biotage V-10 Touch User Manual | © Biotage 2019 ®... -
Page 15: Evaporate Using Biotage
Connect an External Computer Setup view on the touch screen; see page 4. » For information on how to connect the V-10 Touch system to an Instrument IP Address: The IP address of the external computer running V-10 Touch Control Centre, see the V-10 Touch system that the external computer is “Biotage... -
Page 16: Set Up An Evaporation Job
C:\Program Files (x86)\ Parameters" above. Biotage\Biotage V-10 Touch Control Centre, using a text 5. When done, click Modify Selected Job to save the changes. editor. Each user must be listed on its own line. Note that Controller has to be restarted for the changes to take effect. -
Page 17: Save And Open A Job List
The system can be controlled either through the touch screen or through an external computer running V-10 Touch Control Centre. When using V-10 Touch Control Centre, it is your responsibility to ensure that you will not interfere with an operation that is about to be started through the touch screen. -
Page 18: Monitor An Evaporation Job
Remaining Volume Stop Figure 26. When a run is controlled by V-10 Touch Control Centre, the text "Remote Control" is displayed in the top right corner of the touch screen when the system is loading and unloading the vial and pumping and moving liquids. -
Page 19: Define Workspaces For A Liquid Handler
6. Select the folder to save the rack in, enter the file name, and click Save. The predefined racks are located in the Racks and workspaces folder (C:\Program Files (x86)\Biotage\ Biotage V-10 Touch Control Centre\Racks and workspaces). Rack Parameters The following rack parameters are available: »... -
Page 20: Verify The Setup Of A Workspace
Z: The distance between the rim of the test tube and the rack: bottom of the needle guide (needle home), in millimeters. a. Remove the first test tube (top left) in the rack and select its position in the software. Biotage V-10 Touch User Manual | © Biotage 2019 ®... - Page 21 Define Workspaces for a Liquid Handler b. Select Tube - Top from the Go To list and click Run. Ensure that the needle moves to the centre of the selected rack position and to the height where the rim of the test tube would have been if present.
-
Page 22: Maintenance
See Figure 31B. Figure 29 . A: Removing the drain valve from the condenser pot. B: Loosening the clamp. C: Removing the condenser pot. Biotage V-10 Touch User Manual | © Biotage 2019 ®... -
Page 23: Clean The Plastic Guard
Maintenance 2. Remove the plastic guard as described in step 2 in "Clean the Plastic Guard" above. 3. Remove the heater nozzle by pulling it straight out; see Figure 33A. 4. Pull down firmly on the upper vial holder until it is completely free of its mounting;... -
Page 24: Clean The Upper Spin Head, Vapor Duct, And Condenser Pot Inlet Region
Figure 35. The drain tube on the condenser drain connector. sample solution has been evaporated. See "Define Biotage ® V-10 Touch Control Centre Settings" on page 13. Replace the Drain Tube Warning Warning »... -
Page 25: Clean The Tubing
8. Connect the other end of the transparent vial tube to the Over time, it may be necessary to replace some of the tubing. VIAL port on the pump manifold. Note: Only use tubing supplied by Biotage. 9. Fasten the tube clips. -
Page 26: Liquid Handler Maintenance
Liquid Handler Maintenance If using a liquid handler, ensure to keep it well maintained as described in the user documentation supplied by the manufacturer. Biotage V-10 Touch User Manual | © Biotage 2019 ®... -
Page 27: Hints And Tips
Hints and Tips Hints and Tips Methods for Various Solvents Solvent Name Alternative Name Boiling Point (°C) Method 1,2-Dichlorobenzene 179.0 Very High Boil 1,2-Dichloroethane 83.5 Volatile 1,4-Dioxane 101.5 Aqueous 1-Methyl-2-pyrrolidinone 202.0 Very High Boil Acetic acid HOAc 117.9 High Boil Acetone Propanone or 2-propanone 56.1... -
Page 28: Troubleshooting
5. Press Initialize Carousel and keep your hands away from the broken. See "Clean or Replace the Vial Face Seal and carousel until it has stopped moving. Lubricate or Replace the Vial Holder O-rings" on page 21. Biotage V-10 Touch User Manual | © Biotage 2019 ®... -
Page 29: Sample Pump
Note that the built-in sample pump is optional. Redissolve Volume If the precision of the redissolve volume is out of range (see the technical specification in the “Biotage V-10 Touch Installation ® and Safety” document, P/N 414661), this may be due to air in the tubing. -
Page 30: General Information
General Information Accessories and Spare Parts Part No. Description Only Biotage and Biotage approved accessories and spare parts 411181 Carousel Sample Holder 20 and 30 mL must be used in the system. To order accessories and spare parts, see contact information on the back of this document or... - Page 32 Part Number: 414662-D © 2019 Biotage. All rights reserved. No material may be reproduced or published without the written permission of Biotage. Information in this document is subject to change without notice and does not represent any commitment from Biotage. E&OE.
Need help?
Do you have a question about the V-10 Touch and is the answer not in the manual?
Questions and answers