Table of Contents
Advertisement
Quick Links
Advertisement
Table of Contents

Subscribe to Our Youtube Channel
Related Manuals for Comica Vimo S-MI


Summary of Contents for Comica Vimo S-MI
- Page 1 Vimo S-MI 2.4G Dual-channel Mini Wireless Microphone User Manual...
- Page 3 Foreword Thanks for purchasing Comica 2.4G Dual-channel Mini Wireless Microphone Vimo S-MI. Features Mini and Lightweight, Unique Magnetic Integrated Microphone ● 48kHz/24bit Record, Broadcasting-level Sound Quality ● USB Digital Output, Universal for Computers and Phones ● Stepless Volume Adjustment, One-key Muting and Denoise ●...
- Page 4 Notice Due to 2.4G wireless characteristics, please keep face to face when use it, and don’t turn your back to the receiver, otherwise it is easy to generate breakpoints, which is a normal phenomenon. Due to the characteristics of lithium batteries, the transmitter's charging indicator will show an inaccurate battery level when the charging starts, and the actual power may be lower than the indicated power.
-
Page 5: Packing List
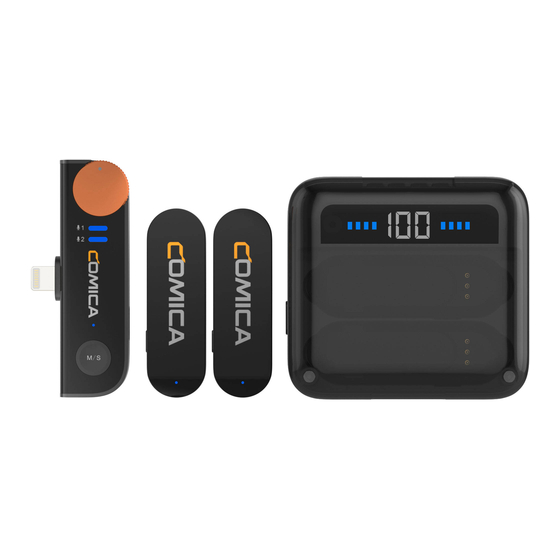
Packing List Vimo S-MI Versatile 2.4G Wireless Mini USB Microphone User Manual ⑧ ①x2 ② ③ ④x2 ⑤ ⑥ ⑦ ① Transmitter(TX) ② Receiver(RX) ③ Charging Case ④ Wind Mu ⑤ 2 in 1 Charging/Monitoring Adapter Cable ⑥ USB C-USB A Charging Cable ⑦... - Page 6 Components and Instruction Transmitter (TX): ① ③ ④ ⑤ ② Internal Mic ① Working Status Indicator: ② Blink blue slowly when unpaired; Blink rapidly when pairing; Show blue when paired; Show green when denoise is on; Show red when muting. Belt Clip ③...
-
Page 7: Receiver (Rx)
Receiver (RX): ③ ④ ② ① ⑤ ⑥ Charging/Monitoring Port ① Lightning Plug ② Transmitter Volume Control Knob: ③ Adjust the volume of transmitter 1/2 synchronously. Turn counterclockwise to increase the volume, and turn clockwise to reduce the volume. Transmitter 1/2 Pairing Indicator: ④... -
Page 8: Charging Case
Charging Case: ③ ④ ④ ⑤ ⑥ ② ⑦ ① ⑧ Lightning Port ① ② Battery Level Indicator Button: Short press to show the battery level of charging case and transmitters. Charging Case Battery Level: 0-100 ③ Battery Level Indicator of Transmitters: ④... -
Page 9: Installation And Usage
Installation and Usage Pairing (All have been paired at the factory. If you need to re-pair, please follow the steps below.) Long press the pairing button on the TX to pair. The indicator lights on the TX and the RX will show blue when the pairing is successful. - Page 10 Usage 1. Remove the transmitters and the receiver from the charging case Remove from the left side...
- Page 11 2. Install the transmitter on the collar ① ② Install the transmitter on the collar so that the internal mic points to the sound source 3. Attach the receiver to the Lightning devices (iPhone/iPad)
- Page 12 4. Monitoring/Charging Method One Connect USB-C headphones to monitor or connect the power bank/DC power using the USB C-USB A charging cable to charge the mobile phone.
- Page 13 Method Two Connect 3.5mm headphones through the 2 in1 charging/monitoring adapter cable for monitoring and connect the power bank/DC power to charge the mobile phone at the same time.
-
Page 14: Specification
Specification Wireless Type 2.4GHz Antenna Built-in Antenna Sampling Rate 48kHz Bit Depth 24bits Transmitting Power 10dBm Sensitivity -32dB ±2dB Polar Pattern Omnidirectional Frequency Response 80Hz~20kHz 70dB Equivalent Noise 24dBA Maximum SPL 110dB Dynamic Range 86dB Sound Delay <20ms TX: Built-in Li-ion Battery 95mAh 3.8V Battery Charging Case: Built-in Li-ion Battery 800mAh 3.8V Charging Time... - Page 15 Email: support@comica-audio.com...
Need help?
Do you have a question about the Vimo S-MI and is the answer not in the manual?
Questions and answers