Table of Contents
Advertisement
Quick Links
HDMI over CAT6/6A Extender - 4K 60Hz - 230ft (70m)
Product ID
4K70IC-EXTEND-HDMI
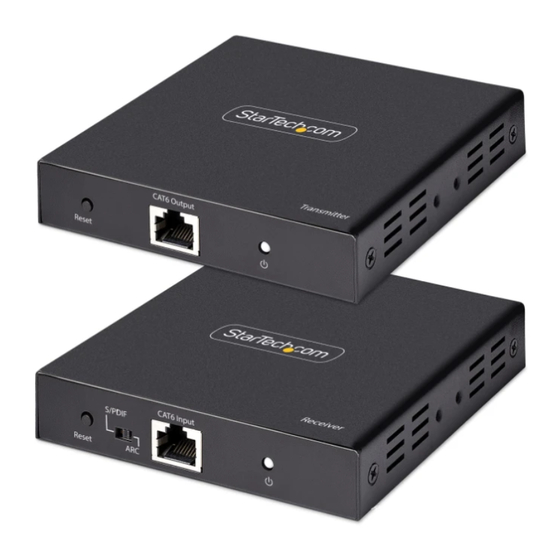
Transmitter
1
2
3
Receiver
1
8
2
3
Port
1
Reset Button
2
RJ45 Port
3
Power Indicator
4
DC 12V Port
5
HDMI Output Port
6
HDMI Input Port
7
IR Output Port
8
9
Optical Audio Output
10
IR Input Port
To view manuals, FAQs, videos, drivers, downloads, technical drawings, and more, visit www.startech.com/support.
4
5
6
4
9
Function
Transmitter and Receiver: Reboots the unit
•
which will cause a renegotiation of connected
devices
Connect the Transmitter and Receiver together,
•
using a CAT6/6a Ethernet Cable (sold separately)
Flashing Blue: Power connected, but no HDMI
•
input signal is detected
Solid Blue: Power connected, and a HDMI input
•
signal is detected
Power the Transmitter or Receiver using the
•
included Power Adapter
Connect to an HDMI Display
•
Connect to an HDMI Source Device
•
Connect the IR Blaster to the Transmitter
•
Switch Receiver's audio input source between
•
the Transmitter's HDMI Input Port, or Receiver's
HDMI Output Port
Connect to an S/PDIF Input on a Audio Device
•
(i.e. A/V Receiver)
Connect the IR Receiver to the Receiver
•
Product Information
For the latest product information, technical specifications, and declarations of
conformance, please visit: www.StarTech.com/4K70IC-EXTEND-HDMI
Package Contents
• Local HDMI Transmitter Unit x 1
• Remote HDMI Receiver Unit x 1
• IR Blaster x 1
7
• IR Receiver x 1
• Rubber Feet x 8
• Mounting Kit x 1
• Power Adapter x 1
• Quick-Start Guide x 1
Installation
5
10
(Optional) Mounting Kit
Note: Before mounting the HDMI Extender make sure that the surface you are
mounting to is strong enough to support the weight of the HDMI Extender. It is
recommended that you mount the HDMI Extender on a wall stud to provide the
correct support.
Determine the Mounting Surface for the HDMI Extender.
1.
Place the Mounting Brackets on each side of the HDMI Extender. Align the Holes
2.
in the Mounting Brackets with the Holes on the sides of the HDMI Extender's
Transmitter and Receiver.
Insert two Screws through each Mounting Bracket and into the HDMI Extender.
3.
Tighten each Screw using a Phillips Head Screwdriver.
4.
Mount the HDMI Extender to the desired Mounting Surface using the appropriate
5.
Mounting Hardware (e.g. Wood Screws).
Installing the HDMI Transmitter and Receiver
1.
On the Transmitter, use the Audio Output Selector to set which audio output the
setup requires.
Note: If changing the audio output after initial installation, a power cycle may be
required.
2.
Position the Transmitter near the HDMI Source Device.
Connect an HDMI Cable (not included) from the HDMI Source Device to the HDMI
3.
Input Port on the Transmitter.
4.
(Optional) Connect an HDMI Cable (not included) from the HDMI Output Port on
the Transmitter, to a Local HDMI Display.
Quick-Start Guide
Manual Revision: August 10, 2022 8:43 AM
Advertisement
Table of Contents

Subscribe to Our Youtube Channel
Related Manuals for StarTech.com 4K70IC-EXTEND-HDMI


Summary of Contents for StarTech.com 4K70IC-EXTEND-HDMI
- Page 1 (i.e. A/V Receiver) the Transmitter, to a Local HDMI Display. IR Input Port Connect the IR Receiver to the Receiver • To view manuals, FAQs, videos, drivers, downloads, technical drawings, and more, visit www.startech.com/support. Manual Revision: August 10, 2022 8:43 AM...
- Page 2 If this equipment does cause harmful interference to radio or television reception, which and do not represent an endorsement of a product or service by StarTech.com, or an endorsement of the product(s) to which can be determined by turning the equipment off and on, the user is encouraged to try to correct the interference by one or this manual applies by the third-party company in question.
Need help?
Do you have a question about the 4K70IC-EXTEND-HDMI and is the answer not in the manual?
Questions and answers