Advertisement
Table of Contents
Contents
TrueCam M7 GPS Dual Quick Start Guide
HOW TO USE
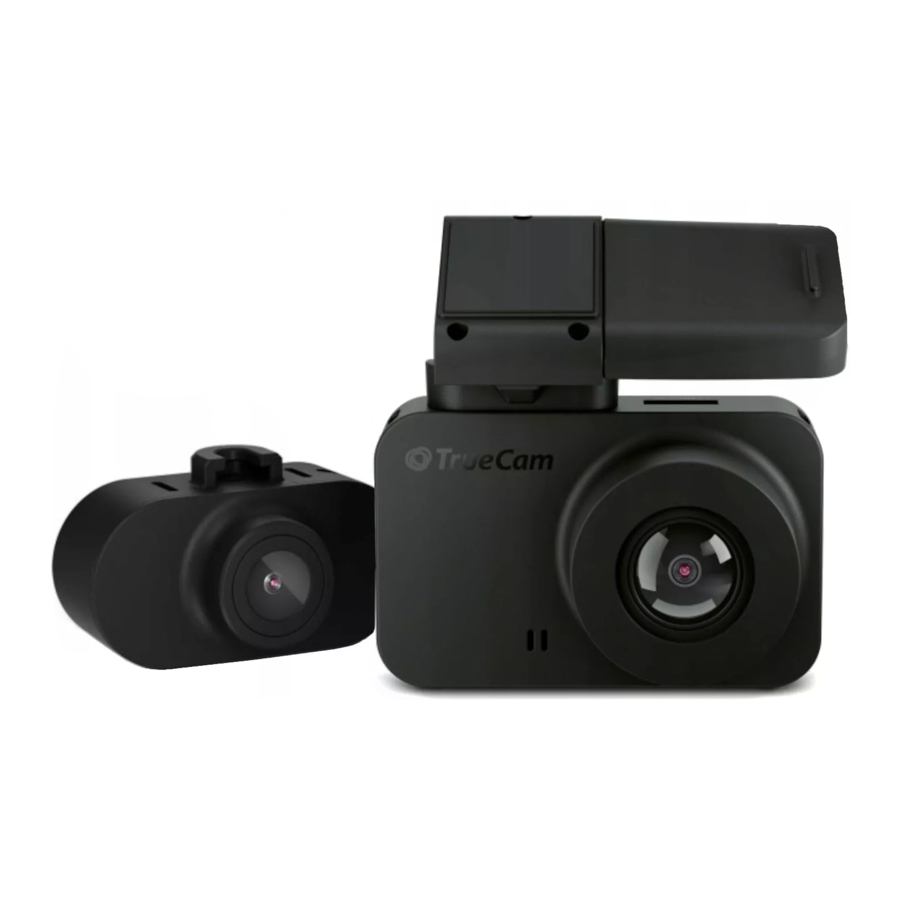
PACK CONTENTS

- TrueCam M7 GPS Dual
- Rear camera
- Magnetic GPS module
- Magnetic holder with 3M adhesive pad
- Cigarette lighter adapter with two USB outputs
- 3-metre micro USB charging cable
- Micro SD/USB adapter to transfer files to PC
- Spare 3M adhesive pads to attach holder to glass (2x)
- 3M adhesive power cable clips (5x)
- Protective carry bag
- Rear camera connection cable
- Cable tool
- USB data cable for GPS module update
GETTING TO KNOW THE CAMERA / CONTROLS

- Wide-angle lens
- Memory card slot
- Magnetic holder input
- OK/POWER button
- MENU/MODE button
- 2.0" display
- Status LED (lit = camera on, blinking = recording)
- RESET button
- Rear camera cable input
CONTROLS:
| VIDEO MODE | OK / POWER | Press | Start/stop recording |
| Hold | Turn camera on/off | ||
| MENU / MODE | Press | Open menu | |
| Whilst recording- protect recording | |||
| Hold | Switch mode | ||
| Whilst recording- mute/unmute audio recording | |||
| PHOTO MODE | OK / POWER | Press | Take photo |
| Hold | Turn camera on/off | ||
| MENU / MODE | Press | Open menu | |
| Hold | Switch mode | ||
| PLAYBACK MODE | OK / POWER | Press | Start/stop playback |
| End fast playback | |||
| Hold | Turn camera on/off | ||
| Change playback speed during playback | |||
| MENU / MODE | Press | Open menu | |
| Hold | Switch mode | ||
| Return to video selection during playback | |||
| MENU | OK / POWER | Press | Confirm |
| When entering characters- Up | |||
| Hold | Switch mode menu/camera menu | ||
| When entering characters- Confirm | |||
| MENU / MODE | Press | Down | |
| Hold | Back |
BASIC SETTINGS AND FUNCTIONS

- Insert the microSD card as shown into the camera (card connectors facing the display)
- Use Class 10 and higher branded cards up to 64 GB
- Only remove the card, when the camera is turned off
- When using the card for the first time, format it directly in the camera and repeat the formatting at least once a month to ensure proper camera operation
- Insert the adapter into the car cigarette lighter and connect it to the camera holder using the USB cable
- The camera is designed to operate only when connected to a power supply
- Instead of a battery, the camera contains a supercapacitor that provides power which has several times the lifespan of a conventional battery
- Camera turns on automatically and begins recording For some vehicles, the ignition key must be turned first
- Perform basic camera settings before sticking the holder to the glass
BASIC FUNCTIONS:
G-senzor
- If the G-Sensor detects an impact, it automatically protects the video currently being captured against being overwritten
- Attention, when the settings are set to high sensitivity and you are driving over uneven surfaces this can cause files to be automatically protected and the filling up of the SD card
Motion Detection
- The camera automatically starts recording when it detects movement in the lens field of view and stops recording after about 10 seconds.
- If you stop recording manually or turn off the camera, motion detection is disabled The function is for monitoring a parked vehicle, do not use whilst driving
- To use the motion detection function, the camera must be turned on and connected to the power supply
Parking Mode
- The camera will start recording automatically when it detects a jolt to the vehicle and if it does not happen again, after about 30 seconds it stops recording and turns off
- To use the parking mode function, the camera should be turned off and connected to the power supply
GPS module functions
- Includes a database of more than 40,000 static speed cameras throughout Europe
- Lets you display speed / GPS coordinates in the video
- Lets you view the speed on the display
PLACEMENT ON GLASS

- The ideal place to mount your camera is the space between the windscreen and the rear-view mirror so as not to obstruct the driver's view. The ideal location for the rear camera is in the centre at the top of the rear window
- Make sure that the glass is clean and dry at the attachment point The ideal bonding temperature is 20°C - 40°C
- Remove the film from 3M adhesive pad on the camera holder
- Before attaching it to the glass, point the camera to capture best view
- Press the 3M adhesive pad onto the glass and hold it for a while. Use the same procedure for the rear camera
- Connect the two cameras with the cable, which can easily be hidden under the ceiling trim. Route it sideways to the passenger side and gradually insert the trim tool under the upholstery
SPEED CAMERA DETECTION

- Attaching the magnetic GPS module to camera mount
- When connected to GPS satellites, the module's LED flashes blue
- The GPS module records speed, GPS coordinates and warns of static speed cameras and traffic lights.
- Speed camera
- Average speed camera
- Red light camera
- Combined red light and speed camera
- Road safety camera
AUDIBLE SOUNDS:
| Approaching speed camera | long beep |
| At the speed camera point / start of average measurement | short beeps |
| End of average measurement | short beeps |
UPDATING THE SPEED CAMERA DATABASE

- Connect the GPS module to a PC with an Internet connection using the included USB cable
- Open the GPS module memory (similar to flash drive)
- Run Update.exe
- Click Update
MORE INFORMATION

You'll find the firmware update, speed camera database update at http://truecam.eu/downloads plus a special PC application for playing back videos from the camera.

VideosTrueCam H7 Dashcam Daytime Sample Footage 1440p Video
TrueCam H7 Dashcam Night-time Sample Footage 1440p Video
Documents / Resources
References
Download manual
Here you can download full pdf version of manual, it may contain additional safety instructions, warranty information, FCC rules, etc.
Advertisement


Need help?
Do you have a question about the M7 GPS Dual and is the answer not in the manual?
Questions and answers