Advertisement
Available languages
Available languages
Quick Links
Advertisement

Subscribe to Our Youtube Channel
Related Manuals for Hyundai HTDER50PW


Summary of Contents for Hyundai HTDER50PW
- Page 1 Mode d'emploi rapide Quick User Guide...
- Page 2 1. Réglage Wi-Fi 1. Téléchargement et installation de l’application APP Download QR Code 2. Activer le mode Wi-Fi de la tondeuse Indicateur lumineux Wi-Fi : Etape 1...
- Page 3 3. Ouvrir l’application et ajouter un appareil Etape 1 et étape 2 Etape 3 Etape 4 Etape 5 Etape 6 Etape 7 Etape 8 connecte avec * Remarque : Si la connexion Wi-Fi échoue 1). Veuillez éteindre puis rallumer l'appareil,...
- Page 4 Réglage de la minuterie Etape 1 Etape 2 doit être plus tôt que l'heure Réglage du point de départ Etape 1 Etape 2 Etape 3 de départ où la la tondeuse travaillera au point de...
- Page 5 Plus de réglages dans l’application Etape 2 Etape 3 Etape 4 Etape 1 Pour régler le mode Re- Pour régler le mode Pour démarrer ou charge: de tonte: arrêter le mode Spirale:dans la ON ) Etape 7 Etape 5 Etape 6 Pour choisir la date de tonte Pour régler la tonte Pour allumer et...
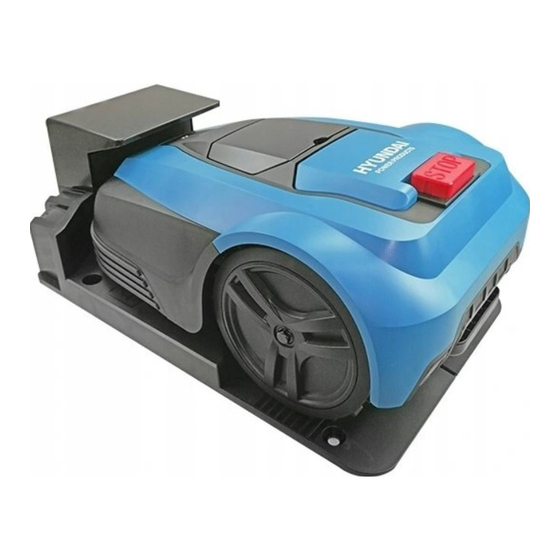
- Page 6 2. Connaitre la tondeuse...
- Page 7 4 Capteur de pluie 6 Roue avant 23 Adaptateur secteur Clé Allen...
- Page 8 3. Carte de directive Ci-après est une direc�ve générale pour installa�on de la tondeuse comprenant le posi�onnement de la sta�on d'accueil et celle du fil de délimita�on. Min.50cm Min.35cm Min.2m Min.30cm Min.1.2m Min.1.2m Fil de délimita on Max. 1.5cm Angle d'arc Angle obtu Angle droit Angle aigu...
- Page 9 4. Positionnement de la station d'accueil 5. Connecter le fil de délimitation et sécuriser la station d'accueil Fig.2 Fig.1...
- Page 10 200cm Vue A 30cm Fig.3 Fig.4...
-
Page 11: Chargement De La Tondeuse
7. Faire fonctionner la tondeuse Démarrage rapide : 8. Chargement de la tondeuse... - Page 12 1. Wi-Fi Connec�ng 1. APP Download and Installa�on This product can be remotely controlled via the mobile phone APP. Please follow the instruc�ons below or refer to the product guide in the APP interface. 1.1 APP Download and Installa�on Please scan belowing QR Code to download and install APP. APP Download QR Code Smart Life APP Icon 2.
- Page 13 3. Open APP and Choose to add device like below images Step 1 & Step 2 Step 3 Step 4 Step 5 Open Smart Life APP, Find “Small Home Ensure the Wi-Fi Enter Wi-Fi pass- sign up and login; Appliances”, then indicator light is word according to Then choose to add...
- Page 14 APP Timer Se�ng The mower supports schedule func�on, which can help you enjoy smart life be�er. Use the Smart Life APP to control the mower. When you schedule successfully, the mower can be programmed to automa�cally start mowing and back to the dock sta�on at specified �me of the day.
- Page 15 More Se�ngs on APP Step 1 Step 2 Step 3 Step 4 On opera�ng inter- To set the Recharge To set the Mowing To ON or OFF the face, click Se�ng at Mode: click Recharge Pa�ern: click Mowing Spiral Pa�ern: on the bo�om to enter Mode to set mower Mode then choose...
- Page 16 2. Know Mower...
- Page 17 1. Emergency bu�on 16. Keyboard 2. The control panel cover 17. Charging electrodes 18. Signal indicator light 3. Height of cut cover 19. Power connector 4. Rain sensor 20. Boundary connector 5. Charging socket 21. Dock sta�on base 6. Front wheel 22.
- Page 18 3. Guide line map As below is a general guide line map how to install the mower including placement of the dock sta Min.50cm Min.35cm Min.2m Min.30cm Min.1.2m Min.1.2m Boundary Wire Max. 1.5cm Arc angle Obtuse angle Right angle Sharp angle Cross...
- Page 19 Min. 30cm straight wire Min.2 Make sure there is minumum 2 metres straight wire in the front and 30cm straight wire in the 5. Connec�ng the boundary wire and securing the dock sta�on the boundary wir securing Fig.2 Fig.1...
- Page 20 200cm 30cm Fig.3 Fig.4 1. Follow up Fig.1 to Fig. 4 to connect the boundary 2. Connect the adapter power cord to a 100-240 V wall socket.
- Page 21 6. Operate Mower 1. Place the mower in the area that inside the boundary wire. then it enters into menu. and c will work 7. Charging Mower...
Need help?
Do you have a question about the HTDER50PW and is the answer not in the manual?
Questions and answers