Dräger Alcotest 5000 Instructions For Use Manual
Hide thumbs
Also See for Alcotest 5000:
- Instructions for use manual (560 pages) ,
- Manual (2 pages) ,
- Quick start manual (2 pages)
Table of Contents
Advertisement
Available languages
Available languages
Quick Links
Advertisement
Table of Contents

Related Manuals for Dräger Alcotest 5000


Summary of Contents for Dräger Alcotest 5000
- Page 1 Instructions for use enUS 3 Instrucciones de uso 20 ® Dräger Alcotest 5000 WARNING Strictly follow the Instructions for Use. The user must fully understand and strictly observe the instructions. Use the product only for the purposes specified in the Intended use section of this document.
- Page 2 00100214.ai...
-
Page 3: Safety-Related Information
Safety-related information Safety-related information Before using this product, carefully read these instructions for use and those of the associated products. Strictly follow the instructions for use. The user must fully understand and strictly observe the instructions. Use the product only for the purposes specified in the intended use section of this document. -
Page 4: Typographical Conventions
Conventions used in this document WARNING Indicates a potentially hazardous situation. If not avoided, it could result in death or serious injury. CAUTION Indicates a potentially hazardous situation. If not avoided, it could result in physical injury. It may also be used to alert against unsafe practices. NOTICE Indicates a potentially hazardous situation. -
Page 5: Product Overview
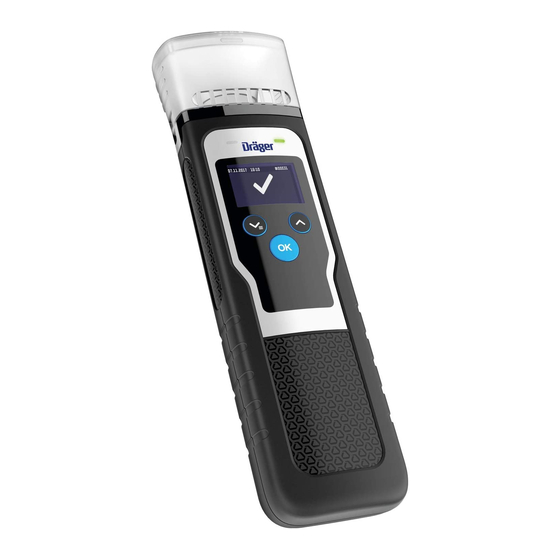
Description Description Product overview (see page 2) Funnel Funnel mount LEDs (red, green) Display button (access menu, set value) button (switch device on/off, confirm entry) Wrist strap button USB-C connection (not for charging the device, for servicing only) 10 Eye for wrist strap Intended use For detecting alcohol in a person’s breath, in air over substances, or ambient air (passive test). -
Page 6: Prerequisites For Use
Prerequisites for use NOTICE Avoid sampling with a draft. This could falsify the test result. Observe a wait time of approx. 15 minutes after the last consumption of alcohol. The wait time cannot be reduced by rinsing your mouth with water or with non-alcoholic beverages. -
Page 7: Initial Start-Up
4.1.5 Switching the instrument on and off Switching the instrument on: Hold down the button for about 1 second. Wait until the device displays that it is ready to measure. Switching the instrument off: Hold down the button for about 3 seconds. The instrument will switch off automatically approx. - Page 8 A cursor pre-selects the hours of the time. Press briefly on the button to change the hour until the actual hour is shown. Please hold the button for approx. 2 seconds to confirm the hour. Please continue with the minutes in the same way: short press to change and long press to confirm.
- Page 9 Ask the subject to blow evenly into the funnel at a distance without interruption. An adequate breath flow is indicated by a continuous tone. While the sample is being taken, the display shows an empty bar that slowly fills (see figures A and B). If sampling was successful, the tone ends with an audible click.
- Page 10 27.12.2016 10:25 #00075 27.12.2016 10:25 #00075 00633785 C) No alcohol was detected. The test was passed. The green LED is also lit. The instrument is then ready for use once again after a few seconds. D) Alcohol was detected. The test was failed. The red LED is also lit. Press the button to continue with the next measurement.
-
Page 11: Menu Control
Hold down the button for approx. 1 second until the startup screen appears. Hold the instrument, which is ready to measure, in the air to be analyzed without the funnel. Tap the button to initiate the measurement. In the results display, Passive is also displayed. Removing the funnel ... - Page 12 Menu option Description Interaction instruction Device info Serial no and part no of the Hold the button for device 2 seconds to leave the submenu. Next service Overview, in how many days Hold the button for the device... 2 seconds to leave the ...
- Page 13 Menu option Description Interaction instruction Language The language of the display Select the language using can be adjusted. buttons. Confirm with the button. Hold the button for 2 seconds to confirm the setting and leave the submenu. Automatic shut- Menu option to set the time Adjust the time using the...
-
Page 14: Troubleshooting
Troubleshooting Troubleshooting An error message is displayed if a device error occurs. The number that appears below the message is used for service functions. If the fault remains after switching theinstrument on and off several times, contact DrägerService or your dealer. -
Page 15: Replacing The Battery
Maintenance Replacing the battery Switch off the instrument. Slide the battery cover off. Replace the batteries (3 x 1.5 V AA alkaline batteries). Pay attention to the correct polarity. Fit the battery cover. Check that the time is correctly set. If the battery replacement process takes longer than 5 minutes, the time must be reset. - Page 16 Storage Storage CAUTION Damage to the device Leaking battery acid can damage the device. ► Remove the batteries if the device will remain unused for an extended period of time. Disposal This product must not be disposed of as household waste. This is displayed by the adjacent symbol.
-
Page 17: Ambient Conditions
Technical data Technical data Measuring principle Electrochemical sensor Ambient conditions During operation –15 °C to +50 °C (+5 °F to +122 °F) 10 to 100 % rel. hum. (non-condensing) 600 to 1300 hPa During storage –20 °C to +60 °C (–4 °F to +140 °F) 15 to 75 % rel. -
Page 18: Data Storage
Technical data Calibration Recommendation: every 24 months Dimensions 63 mm x 219 mm x 41 mm (W x H x D) Weight approx. 7 lbs (245 g) Power supply 3 x 1.5 V AA alkaline batteries The batteries are designed for up to 5000 measurements (depending on use and the ambient conditions). -
Page 19: Order List
Order list this equipment does cause harmful interference to radio or television reception, which can be determined by turning the equipment off and on, the user is encouraged to try to correct the interference by one or more of the following measures: Reorient or relocate the receiving antenna. -
Page 20: Información Relacionada Con La Seguridad
Información relacionada con la seguridad Información relacionada con la seguridad Antes de utilizar el producto, leer atentamente estas instrucciones de uso, así como las de los productos correspondientes. Observar exactamente las instrucciones de uso. El usuario debe comprender íntegramente las instrucciones y cumplirlas estrictamente. El producto debe utilizarse exclusivamente conforme a los fines de uso previstos. -
Page 21: Convenciones Tipográficas
Convenciones en este documento Convenciones en este documento Significado de los símbolos de advertencia En este documento se utilizan los siguientes símbolos de advertencia, para advertir al usuario acerca de los posibles peligros. El significado de los símbolos de advertencia se define a continuación: ADVERTENCIA Advertencia de una situación potencialmente peligrosa. -
Page 22: Uso Previsto
Descripción Descripción Vista general del producto (véase página 2) Embudo Alojamiento del embudo LED (rojo, verde) Pantalla Botón Botón (conectar/desconectar el dispositivo, confirmar entradas) Correa de muñeca Botón Conexión USB-C (no para cargar el dispositivo, únicamente para el servicio técnico) 10 Enganche para la correa para muñeca Uso previsto Para detectar alcohol en el aliento de una persona, en el aire sobre sustancias... -
Page 23: Condiciones Para El Uso
Condiciones para el uso AVISO Evitar realizar la toma de muestras en medio de una corriente de aire. Esto podría falsear los resultados de la prueba. Esperar aprox. 15 minutos después de haber tomado la última bebida alcohólica. El tiempo de espera no se puede reducir por medio de enjuagues de la boca ... -
Page 24: Primera Puesta En Marcha
® El volumen de suministro del Alcotest 5000 de Dräger no incluye ninguna barra telescópica. Seguir las instrucciones de uso del fabricante de la barra telescópica. 4.1.4 Preparativos para su uso Comprobar que las pilas están cargadas y colocadas. Comprobar que se ha colocado un embudo limpio. - Page 25 Idioma Un cursor preselecciona un idioma de la lista. Pulsar brevemente el botón para cambiar la posición del cursor y así seleccionar el idioma adecuado. Cuando el cursor seleccione el idioma adecuado, mantener el botón presionado aprox. 2 segundos para confirmar. Fecha Un cursor preselecciona el día de la fecha.
- Page 26 Realizar una prueba de aliento automática ADVERTENCIA Mantener una higiene correcta. Resultados de medición falseados. ► No tocar la parte superior del embudo. ► Mantener una distancia mínima de unos 2-3 cm con el objeto que se desea comprobar o con la persona sometida a la prueba. ►...
- Page 27 ADVERTENCIA Daños en el dispositivo Si se realizan varias pruebas seguidas en un corto espacio de tiempo, es posible que se forme un condensado en el interior del embudo, que podría terminar en el dispositivo. ► Sustituir el embudo a tiempo. 4.3.1 Leer el resultado de medición Transcurridos unos segundos (dependiendo de la concentración medida y de la...
- Page 28 Los resultados de la prueba se confirman automáticamente transcurridos 2 segundos. 4.3.2 Realizar una muestra de aire espirado manual (opcional) Cuando la persona sometida a la prueba no puede aportar el volumen mínimo necesario, la toma de muestras se puede iniciar manualmente. Realizar una muestra de aire espirado manual: Seguir los pasos 1 a 3 de la muestra de aire espirado automática.
-
Page 29: Elementos De Menú
Salir del menú: Seleccionar el elemento de menú Regresar en el submenú. Seleccionar el elemento de menú Medida en el menú principal. Elementos de menú La siguiente tabla muestra una lista de las opciones del menú y como usarlas: Opción del menú... - Page 30 Opción del menú Descripción Instrucción de interacción Fecha y hora Aquí se ajustan la fecha, la Seleccionar una opción hora y también el formato de moviendo el cursor a la fecha (aaaa/mm/dd, aaaa- opción y pulsando mm-dd, mm/dd/aaaa, brevemente el botón dd.mm.aaaa) y el formato de .
- Page 31 Opción del menú Descripción Instrucción de interacción Altavoz Se puede desactivar o Cambiar la cambiar el volumen al 50 o configuración pulsando 100% de cualquier señal brevemente el botón acústica del aparato. Mantener el botón presionado 2 segundos para confirmar la configuración y dejar el submenú.
- Page 32 Opción del menú Descripción Instrucción de interacción Autom. a siguiente Se puede ajustar como Pulsar brevemente el prueba sigue el aparato después de botón para elegir la una medición. opción. Elegir Sin alcohol o Alcohol con el botón ...
-
Page 33: Eliminación De Averías
Eliminación de averías Eliminación de averías Cuando se produce un error en el dispositivo, aparece un mensaje de error. El número que aparece debajo del mensaje de error se emplea con fines de servicio. Si el fallo persiste después de repetidos procesos de conexión y desconexión, ponerse en contacto con DrägerService. -
Page 34: Mantenimiento
Mantenimiento Mantenimiento El instrumento se suministra con una calibración estándar. La fecha de la última calibración se puede comprobar en el menú. Dräger recomienda calibrar el instrumento una vez al año. Permita que únicamente personal experto, por ejemplo, DrägerService, realice la calibración. A la hora de realizar la calibración, se debe respetar la normativa local. - Page 35 Almacenamiento Almacenamiento PRECAUCIÓN Daños en el dispositivo La fuga de los ácidos contenidos en las pilas puede provocar daños en el equipo. ► Extraer las pilas cuando el dispositivo no se vaya a utilizar durante un prolongado espacio de tiempo. Eliminación Este producto no debe eliminarse como residuo doméstico.
-
Page 36: Datos Técnicos
Datos técnicos Datos técnicos Principio de medición Sensor electroquímico Condiciones ambientales Durante el funcionamiento –15 °C a +50 °C (+5 °F a +122 °F) 10 a 100 % h.r. (no condensado) 600 a 1300 hPa Durante el almacenamiento –20 °C a +60 °C (–4 °F a +140 °F) 15 a 75 % h.r. - Page 37 Datos técnicos Dimensiones 63 mm x 219 mm x 41 mm (ancho x alto x profundo) Peso aprox. 245 g Alimentación eléctrica 3 pilas alcalinas AA de 1,5 V Las pilas permiten realizar hasta 5000 mediciones (dependiendo del uso y de las condiciones ambiente).
-
Page 38: Lista De Referencias
Lista de referencias confirmarse apagando y enciendo el aparato, se ruega al usuario intentar corregir los ruidos de interferencia tomando una o varias de las siguientes medidas: Reorientar o recolocar la antena receptora. Aumentar la separación entre el aparato y el receptor. ... - Page 40 Dräger Safety AG & Co. KGaA Revalstraße 1 23560 Lübeck, Germany +49 451 882 0 Fax +49 451 882 20 80 www.draeger.com 93 00 215 - IFU 4754.553 © Dräger Safety AG & Co. KGaA Edition 01 - October 2019 Subject to alteration...
Need help?
Do you have a question about the Alcotest 5000 and is the answer not in the manual?
Questions and answers