
Subscribe to Our Youtube Channel
Related Manuals for EOS Zeus


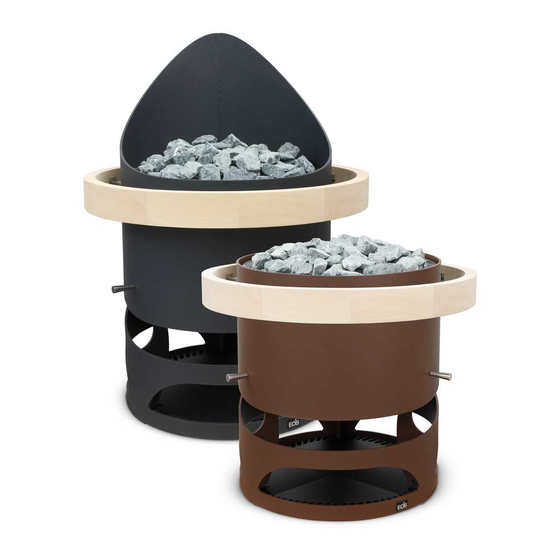
Summary of Contents for EOS Zeus
- Page 1 EOS Zeus / Zeus L Heater for Sauna Cabins Installation and Operating Instructions Made in Germany Druck-Nr.: 2902 4847 Stand: 48/20...
-
Page 2: Documentation
Cross-reference to a page Read instructions Result of a step Table title Title of figure Revision history Date Version Description 1 March 2021 01.00 First version EN-2 Installation and Operating Instructions - EOS Zeus / Zeus L... -
Page 3: Table Of Contents
Terminal diagram 20 kW–36 kW ........EN-29 4.2.3 Internal wiring 12 kW–36 kW..........EN-30 4.2.4 Establishing an electrical connection......EN-32 Heating time limitation................EN-33 5 Commissioning ....................EN-34 Filling stones....................EN-35 Starting the heater.................EN-36 Commissioning by remote control..........EN-36 Water splash.....................EN-37 EOS Zeus / Zeus L - Installation and Operating Instructions EN-3... - Page 4 Cleaning the heater................EN-38 Replacing sauna stones ..............EN-39 Replacing the tubular heating elements........EN-39 Troubleshooting..................EN-44 7 General terms and conditions of service ........... EN-45 8 Disposal ......................EN-47 EN-4 Installation and Operating Instructions - EOS Zeus / Zeus L...
-
Page 5: General Safety Instructions
Indicates a hazardous situation which, if not avoided, could result in minor or moderate injury. NOTICE Notice Indicates a hazardous situation which, if not avoided, will result in damage to the unit. EOS Zeus / Zeus L - Installation and Operating Instructions EN-5... -
Page 6: Mounting And Electrical Installation
When installing the cabin, ensure that the touchable glass sur- faces on the outside of the cabin may reach a maximum tem- perature of 76°C. Appropriate protection may need to be installed if required. EN-6 Installation and Operating Instructions - EOS Zeus / Zeus L... - Page 7 The cabin door must open outward and must not have a lock that cannot be opened in the case of failure. We recommend magnetic or spring locks. EOS Zeus / Zeus L - Installation and Operating Instructions EN-7...
-
Page 8: Operator Instruction
Spending time in a sauna cabin can lead to serious health risks or even death for persons with health impairments. Persons with health impairments who spend time in a sauna must consult a doctor before entering a sauna cabin. EN-8 Installation and Operating Instructions - EOS Zeus / Zeus L... -
Page 9: Standards And Regulations
For an overview of the standards that were observed during design and construction of the sauna heaters, please refer to the individual product's technical data sheet that can be downloaded from www.eos-sauna.com. EOS Zeus / Zeus L - Installation and Operating Instructions EN-9... -
Page 10: Identification
Zeus L is designed for installation in the middle of the cabin. Zeus is designed for installation in a cabin corner or in front of a wall. It is equipped with an asymmetrical, elevated outer casing (plate). -
Page 11: Scope Of Delivery
Otherwise, the heavy weight of large stones could cause deformation of and damage to the light-red (glowing) heating elements during operation. EOS Zeus / Zeus L - Installation and Operating Instructions EN-11... -
Page 12: Intended Use
100 kg Intended use The EOS Zeus/Zeus L sauna heater is designed solely to heat sauna cabins with a suitable control unit and an output controller. EOS Zeus/Zeus L is a free-standing sauna heater that is suitable for com- mercially used cabins. - Page 13 The first time the cabin is heated, you may notice a slight odour result- ing from the evaporation of consumables used in the manufacturing processes. Air out your cabin once it has been heated and before using the sauna. EOS Zeus / Zeus L - Installation and Operating Instructions EN-13...
-
Page 14: Technical Data
30 kW 50–65 m ~ Ø 70 x 79 c approx. 1 50 x 10 cm Compact series 28 kg 36 kW ~ Ø 25–30 cm 65–70 m EN-14 Installation and Operating Instructions - EOS Zeus / Zeus L... -
Page 15: Installation
Installation Installation This chapter describes how to install Zeus. Prior to installing the unit, air inlets and outlets must be installed in the cabin. It may be necessary to mount additional fans in the inlets/outlets. All protective films must be removed. -
Page 16: Installation Site
A Cabin ceiling D Heater B Temperature sensor with safety E Air inlet temperature limiter F Heater guard rail C Cabin wall Dimensions in the cabin (in mm) EN-16 Installation and Operating Instructions - EOS Zeus / Zeus L... -
Page 17: Air Inlets And Outlets
The air outlet must meet the following criteria: Location: Across from the heater Height: 30–50 cm above the cabin floor For more specifications, see 2.5 Technical data, EN-14. EOS Zeus / Zeus L - Installation and Operating Instructions EN-17... - Page 18 This form of air supply requires that the slats on the bottom of the heater are bent upward. See Setting up the heater, EN-22. The slots are bent upward during heater manufacturing. They must be checked before commissioning. EN-18 Installation and Operating Instructions - EOS Zeus / Zeus L...
- Page 19 A fan must be mounted at the beginning of the duct outside of the cabin. > 150 A Air inlet B Slots closed Installing the air inlet in the cabin wall EOS Zeus / Zeus L - Installation and Operating Instructions EN-19...
-
Page 20: Connection Cable
The temperature sensor with the safety temperature limiter is not included in the scope of delivery. See the separate installation instructions for the control unit for information on installation. EN-20 Installation and Operating Instructions - EOS Zeus / Zeus L... -
Page 21: Installing The Heater
Stone attachment, only for 30/36 kW E Safety pin for heating unit A drip pan is mounted under the heating element. It collects residual water from a water splash, which then vaporizes. EOS Zeus / Zeus L - Installation and Operating Instructions EN-21... - Page 22 Reattach these parts once electrical installation is complete. If air is supplied from below, check that the slots are in the correct posi- tion. The slots are bent upward approx. 45° during heater manufacturing. EN-22 Installation and Operating Instructions - EOS Zeus / Zeus L...
-
Page 23: Installing The Heater Guard Rail (Optional
Loosen the clamping yokes on the bottom of the heater at the terminal box and remove the red connector plugs. The connections are accessible from below through the side opening in the housing. EOS Zeus / Zeus L - Installation and Operating Instructions EN-23... - Page 24 The heating element consists of the inner casing, the heating coil and the terminal box. These are firmly attached to each other on the lower stone grate. EN-24 Installation and Operating Instructions - EOS Zeus / Zeus L...
- Page 25 Screw on the screw bushings (C) from the outside and tighten. In the middle of the front side, push on the retaining sleeve (D) until it stops. The sleeve's large hole must face outward. EOS Zeus / Zeus L - Installation and Operating Instructions EN-25...
- Page 26 (F). Rotate the adjustment sleeves (G) for the back brackets until the spacing is the same on all sides. EN-26 Installation and Operating Instructions - EOS Zeus / Zeus L...
- Page 27 Only use stones with a grain size of 100–150 mm. See 5.1 Filling stones, EN-35. Start the heater. 4.2.4 Establishing an electrical connection, EN-32. 5.2 Starting the heater, EN-36 EOS Zeus / Zeus L - Installation and Operating Instructions EN-27...
-
Page 28: Connections
Connections The sauna control unit, the output controllers, and the EOS Zeus heater must be connected as shown in the circuit diagrams. The heater is con- nected to one or two output controllers (LSGs), depending on the output capacity. -
Page 29: Connections
230 V AC N 400 V AC 3N A Sauna control unit B Heater sensor with safety C Sauna heater D Output controller temperature limiter 36 kW switching output EOS Zeus / Zeus L - Installation and Operating Instructions EN-29... -
Page 30: Internal Wiring 12 Kw-36 Kw
N W V U N W V U N W V U Internal wiring 20/24 kW 20 kW = 12 x 1.66 kW 24 kW = 12 x 2.0 kW EN-30 Installation and Operating Instructions - EOS Zeus / Zeus L... - Page 31 N W V U N W V U N W V U Internal wiring 20/36 kW 30 kW = 12 x 2.5 kW 36 kW = 12 x 3.0 kW EOS Zeus / Zeus L - Installation and Operating Instructions EN-31...
-
Page 32: Establishing An Electrical Connection
B Plug with lock D Connection cable The metal duct protects the cable from the heat radiating from above. Route the cable along the internal side of the heater wall downward. EN-32 Installation and Operating Instructions - EOS Zeus / Zeus L... -
Page 33: Heating Time Limitation
6 hours, and an automatic restart is not permitted. In accordance with UL875 (USA), this timer must fully disconnect the sauna heater from the power supply after one hour and must not switch on again automatically. EOS Zeus / Zeus L - Installation and Operating Instructions EN-33... -
Page 34: Commissioning
Inspect the cabin prior to each use. Commission the cabin only after all air inlets and outlets have been opened. EN-34 Installation and Operating Instructions - EOS Zeus / Zeus L... -
Page 35: Filling Stones
WARNING! Stones that are positioned too close together in the heater prevent hot air from being exhausted. This leads to overheating of the heater. Place the stones loosely on the stone grate. EOS Zeus / Zeus L - Installation and Operating Instructions EN-35... -
Page 36: Starting The Heater
If you switch on the heater using the remote control, ensure that no objects are placed on the heater. A suitable safety system, for example EOSafe D/L, can be used to prevent this. EN-36 Installation and Operating Instructions - EOS Zeus / Zeus L... -
Page 37: Water Splash
This time is needed for the sauna stones to reheat. Recommendation: During a water splash, no more than approx. 10 cL of water per m³ cabin volume should be vaporised. EOS Zeus / Zeus L - Installation and Operating Instructions EN-37... -
Page 38: Maintenance
Openings can easily become blocked with lint and dust as fresh air is drawn in. This limits the air convection ability of the sauna heater and could lead to impermissible temperatures. EN-38 Installation and Operating Instructions - EOS Zeus / Zeus L... -
Page 39: Replacing Sauna Stones
A complete replacement heating coil with terminal box but without inner casing is supplied. Necessary steps: Removing the heating coil, EN-40 Replacing the tubular heating elements, EN-42 Inserting the heating coil, EN-43 EOS Zeus / Zeus L - Installation and Operating Instructions EN-39... - Page 40 Loosen the clamping yokes on the bottom of the heater at the terminal box and remove the red connector plugs. Remove the decoration ring and safety slots or stone attachment. EN-40 Installation and Operating Instructions - EOS Zeus / Zeus L...
- Page 41 Replace the defective tubular heating element. See Replacing the tubular heating elements, EN-42 Insert the new heating coil. See Inserting the heating coil, EN-43 EOS Zeus / Zeus L - Installation and Operating Instructions EN-41...
- Page 42 Ensure that no water can seep into the terminal box. Use an SW 19 spanner to counter the hexagon socket screw on the tubular heating element when tightening the nut. EN-42 Installation and Operating Instructions - EOS Zeus / Zeus L...
- Page 43 Position the decoration ring and safety slots or stone attachment. Arrange the stones in place so there is ample space between them. See Reshuffling the sauna stones, EN-39 Reconnect the power supply. EOS Zeus / Zeus L - Installation and Operating Instructions EN-43...
-
Page 44: Troubleshooting
The position of the temperature sen- Check the position of the temperature sor with the safety temperature limiter sensor and adjust as needed. See is not optimal. 3.2 Installing the temperature sensor, EN-20. EN-44 Installation and Operating Instructions - EOS Zeus / Zeus L... -
Page 45: General Terms And Conditions Of Service
If the main reason for the service visit is not the fault of the manufacturer, any costs incurred shall be charged to the customer after the service visit and must be paid by the customer in full within the agreed payment term. EOS Zeus / Zeus L - Installation and Operating Instructions EN-45... - Page 46 The manufacturer's General Terms and Conditions of Business, in the ver- sion available at www.eos-sauna.com/agb, shall apply in addition to the foregoing terms and conditions of service. EN-46 Installation and Operating Instructions - EOS Zeus / Zeus L...
-
Page 47: Disposal
Do not dispose of the unit with household waste. Packaging The packaging of the Zeus can be completely separated for disposal and recycled. The following materials are used in the packaging: Used paper/cardboard ... - Page 48 Store this address with the Installation and Operating Instructions in a safe place. Please always provide us with nameplate data, such as model, item num- ber and serial number so we can provide fast and efficient support. Date of sale Stamp/retailer signature: © EOS Saunatechnik GmbH - All rights reserved.
Need help?
Do you have a question about the Zeus and is the answer not in the manual?
Questions and answers