Table of Contents
Advertisement
Quick Links
Advertisement
Table of Contents

Related Manuals for EOS Structure


Summary of Contents for EOS Structure
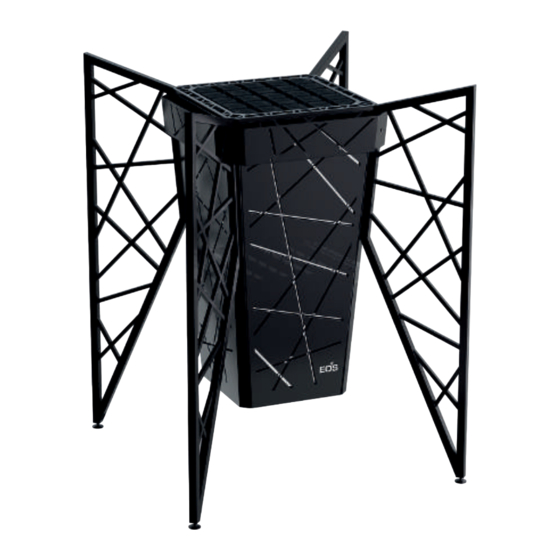
- Page 1 EOS Structure Sauna heater Installation and Operating Instructions...
-
Page 2: Documentation
(electrically skilled personnel). Manufacturer EOS Saunatechnik GmbH Schneiderstriesch 1 35759 Driedorf, Germany Tel. +49 2775 82-514 +49 2775 82-431 Email servicecenter@eos-sauna.com www.eos-sauna.com Installation and Operating Instructions - EOS Structure... -
Page 3: Means Of Representation
Additional information about an operating step Cross-reference to a page Result of a single action Overall result of an instruction Table title Title of figure Revision history Dated Revision Version Description 06/02/2022 25/04/2023 01.00 First version EOS Structure - Installation and Operating Instructions... -
Page 4: Table Of Contents
2.4 Technical data....................16 2.5 Intended use .....................17 3 Installation..................19 3.1 Specifications for the cabin .................19 3.2 Unpacking the product.................21 3.3 Setting up the product..................21 3.4 Air inlets and outlets ..................22 3.5 Installing the temperature sensor.............23 Installation and Operating Instructions - EOS Structure... - Page 5 9.2 Disposal.......................43 10 General terms and conditions of service..........44 10.1 Scope ........................44 10.2 Costs........................44 10.3 Performance and cooperation obligations..........44 10.4 Service visit by the manufacturer’s employees........44 10.5 Guarantee ......................44 10.6 Manufacturer’s warranty ................45 EOS Structure - Installation and Operating Instructions...
-
Page 6: General Safety Instructions
Insufficient ventilation can lead to the unit overheating and Fire hazard from fire. overheating Install air inlets and outlets in the cabin. Follow the safety and installation instructions of the cabin manufacturer. Installation and Operating Instructions - EOS Structure... - Page 7 The air outlet is always installed in the lower part of the wall, diagonal to the sauna heater. The air inlets and air outlets must not be closed. Note the instructions of the sauna cabin supplier. EOS Structure - Installation and Operating Instructions...
-
Page 8: Operator Instruction
The system must be disconnected and removed entirely from the mains supply before commencing repair work. The housing cover must only be removed by a qualified electrician. Use only original spare parts from the manufacturer. Installation and Operating Instructions - EOS Structure... - Page 9 Do not exceed the usual sauna times. Leave the sauna cabin if your body reacts unusually to the heat or if you feel unwell. Do not drink alcohol, take drugs or medicines before a sauna session. EOS Structure - Installation and Operating Instructions...
-
Page 10: Personal Protective Equipment
Personal protective equipment protects people from health and safety impacts during their work. The specified protective equipment must be worn. Symbol Meaning Wearing cut and puncture resistant gloves protect against hand injuries. 4 Personal protective equipment Installation and Operating Instructions - EOS Structure... -
Page 11: Safety Instructions And Warnings
CAUTION Indicates a hazardous situation which, if not avoided, can result in minor or moderate injury. NOTE Indicates a hazardous situation which, if not avoided, can result in damage to the unit. EOS Structure - Installation and Operating Instructions... - Page 12 Explanation of safety symbols on the product The following safety symbols are attached to the product: Symbol Meaning General warning of a hazard Do not cover Refer to operating instructions 4 Safety symbols on the product Installation and Operating Instructions - EOS Structure...
-
Page 13: Safety Devices
IEC and EN standards. For safety reasons, this timer limits the operation time. This timer is typically integrated in all EOS sauna control units. Illegible signage... -
Page 14: Identification
Control system The sauna heater EOS Structure may only be operated in conjunction with a con- trol unit, which is named in the technical data of these instructions. The control unit is not included in the scope of delivery. -
Page 15: Scope Of Delivery
1 ea. frame Classic sauna stones, 30 – 60 mm, in 15 kg the box Installation and Operating Instructions 1 ea. Connection cable, preassembled, con- 1 ea. at ≤ 10 kW nection length 8 m 2 ea. at 12 kW EOS Structure - Installation and Operating Instructions... -
Page 16: Technical Data
5 × 2.5 mm² − Connection, LSG – heater − 5 × 2.5 mm² Connection, control unit − LSG − 4 × 1.5 mm² All line cross-section specifications are the minimum cross-sections for the copper line. Installation and Operating Instructions - EOS Structure... -
Page 17: Intended Use
Identification Intended use The sauna heater EOS Structure is intended solely for the purpose of heating sauna cabins, together with a suitable control unit. The sauna heater EOS Structure is suitable for commercial and private use. The sauna heater is not suitable for outdoor use. It must be operated only inside... - Page 18 The first time the cabin is heated, you may notice a slight odour resulting from the evaporation of consumables used in the manufacturing processes. Air out your cabin once it has been heated and before using the sauna. Installation and Operating Instructions - EOS Structure...
-
Page 19: Installation
Installation Installation This temperature describes how to install the EOS Structure. Before installing the heater, the air inlets and air outlets must be installed in the cabin. It may be ne- cessary to mount additional fans in the inlets/outlets. All protective films must be removed. - Page 20 Position of temperature sensor see following diagram 4 Minimum distances 355 mm 175 mm 700 mm 10 mm 10 mm 175 mm A Front view B Side view C Plan view Minimum distances Installation and Operating Instructions - EOS Structure...
-
Page 21: Unpacking The Product
Separate the transport packaging, transport locks and protective films and dispose of properly. Setting up the product – CAUTION! Heavy, bulky load! Always lift the heater with another person. Lift the product off the pallet and lower in the place of installation. EOS Structure - Installation and Operating Instructions... -
Page 22: Air Inlets And Outlets
The sauna heater is in the middle of the cabin: air inlet underneath it § Sauna heater is positioned in front of the cabin wall: air inlet at the side Possible positions of the air inlet Installation and Operating Instructions - EOS Structure... -
Page 23: Installing The Temperature Sensor
The temperature sensor connection is described in the instructions for the control unit. Further information: 1.5 Safety devices, / 13 Control unit instructions EOS Structure - Installation and Operating Instructions... -
Page 24: Electrical Installation
Information Technologies (VDE). Install the cable in such a way that it is protected from damage. This means that the cable must be routed under a suitable protect- ive cover (e.g. in a cable duct or reserve conduits). Further information: Electrical cables, / 19 Installation and Operating Instructions - EOS Structure... -
Page 25: Connection Diagram (Heater Output 6 Kw, 8 Kw, 10 Kw, 400 Kw~)
10 kW, 400 kW~) A Sauna control unit B Temperature sensor and safety temperature limiter (STB) C Sauna heater D Mains connection for sauna con- trol unit 6 kW, 8 kW and 10 kW terminal diagram EOS Structure - Installation and Operating Instructions... -
Page 26: Connection Diagram (Heater Output 12 Kw With Lsg, 400 Kw~)
6 kW, 8 kW and 10* kW terminal diagram *) Not for connection with EOS Econ control units. A power extension unit is addi- tionally required for the connection of EOS Econ control units. Connection diagram (heater output 12 kW with LSG, 400 kW~) -
Page 27: Connection Diagram (Heater Output 6 Kw, 8 Kw, 230 V 1N~)
230 V 1N~, the cable can overheat and cause a cable fire. This causes a risk of death. The control unit and the sauna heater must be suitable for connection to 230 V 1N ~. Use suitable fuses and cables. EOS Structure - Installation and Operating Instructions... - Page 28 Connection, PE terminal of sauna heater – ≥ 4 mm ≥ 6 mm mains 4 Cable cross-sections for the single phase connection All line cross-section specifications are the minimum cross-sections for copper lines. Installation and Operating Instructions - EOS Structure...
-
Page 29: Internal Wiring
U1 V1 W1 N1 PE (Gr) (Gr) 400 V 3N ~ 400 V 3N ~ 6 kW = 3 × 2000 W 6 kW = 3 × 2000 W Connection diagram, heater output 12 kW EOS Structure - Installation and Operating Instructions... -
Page 30: Establishing An Electrical Connection
IEC and EN standards. For safety reasons, this timer limits the oper- ation time. This timer is typically integrated in all EOS sauna control units. §... -
Page 31: Commissioning And Operation
Cubius stones in the frame. The cover of the central shaft in the rock store must be positioned so that it fits properly and must not be moved by stones. EOS Structure - Installation and Operating Instructions... -
Page 32: Starting The Sauna Heater
The temperature in the cabin is controlled via the temperature sensor in the con- trol unit. – Set the required temperature at the control unit. Ü The control panel on the control unit indicates when the required temperat- ure has been reached. Installation and Operating Instructions - EOS Structure... -
Page 33: Heating The Sauna Heater For The First Time
This time is needed for the sauna stones to reheat. Recom- mendation: When pouring water onto the stones, no more than approx. 100 mL of water per m cabin volume should be vaporised. EOS Structure - Installation and Operating Instructions... -
Page 34: Cleaning And Servicing
Heating and cooling can cause the sauna stones to become brittle, or aggressive infusions can corrode them and cause them to disintegrate over time. This causes small particles to break free from the stones making the gaps between the stones Installation and Operating Instructions - EOS Structure... - Page 35 Remove any splinters and broken off stone from the bottom of the rock store. Place the stones individually and loosely so that there is enough space between them for air to circulate properly, see 5.1 Filling with stones, / 31 . EOS Structure - Installation and Operating Instructions...
-
Page 36: Maintenance By A Qualified Electrician
If the terminal box side of the sauna heater is not accessible: Lift up the sauna heater carefully and adjust its position. Pull a suitable length of the connection cable out of the base/bases. Installation and Operating Instructions - EOS Structure... - Page 37 Undo the screws of the sheet metal guards at the side. Detach and remove the sheet metal guards at the side. Undo the two screws in the top cover and remove the cover. EOS Structure - Installation and Operating Instructions...
- Page 38 Removing the panelling of the sauna heater, / 37 . Open the terminal box. Detach the connection cables from the terminals. Unscrew the screws in the mounting brackets of the terminal box. Installation and Operating Instructions - EOS Structure...
- Page 39 C Fixing nuts Loosen the two fixing nuts (C) and serrated washers of the defective heating element. Push the heating element towards the back slightly and remove it from the top. Insert the new heating element. EOS Structure - Installation and Operating Instructions...
- Page 40 Complete the maintenance work on the sauna heater Push the sauna heater back into its original position. Insert the sauna stones. Switch on the fuses of the sauna heater. Ü The sauna heater is again ready for use. Installation and Operating Instructions - EOS Structure...
-
Page 41: Replacing The Connection Cable
10 Connect the connection cable to the control unit or the power extension unit and the control unit. Follow the regulations of the local power supply company and the VDE (German Association for Electrical, Electronic & In- formation Technologies ). EOS Structure - Installation and Operating Instructions... -
Page 42: Troubleshooting
The position of the temperature Check the position of the tem- 1.5.2 Temperature sensor with safety sensor in the cabin is not op- perature sensor and correct if temperature lim- timal. necessary. iter, / 13 Installation and Operating Instructions - EOS Structure... -
Page 43: Dismantling And Disposal
The packaging of the unit can be completely separated for disposal and recycled. The following materials are used in the packaging: § Paper / cartonboard / cardboard / wood § Plastic film / plastic Additional disposal instructions for commercial users Further disposal instructions at www.eos-sauna.com/recycling. EOS Structure - Installation and Operating Instructions... -
Page 44: General Terms And Conditions Of Service
The guarantee is provided in accordance with the currently applicable statutory regulations. All our products are packaged in such a way that the individually packed goods (pallets) can be shipped. We wish to point out that our packaging Installation and Operating Instructions - EOS Structure... -
Page 45: Manufacturer's Warranty
Service visits made by third parties shall require a written order issued by our service department. § The equipment in question is be sent to our service department by the cus- tomer at the customer’s own expense. EOS Structure - Installation and Operating Instructions... - Page 46 Notes Installation and Operating Instructions - EOS Structure...
- Page 47 Notes EOS Structure - Installation and Operating Instructions...
- Page 48 made in Germany 17/2023 2901 5341...
Need help?
Do you have a question about the Structure and is the answer not in the manual?
Questions and answers