Table of Contents
Advertisement
Quick Links
Advertisement
Table of Contents

Related Manuals for CAB 5314


Summary of Contents for CAB 5314
- Page 1 Service Manual Vacuum-Belt Applicator 5314 / 5316 Made in Germany...
- Page 2 Edition: 09/2022 - Part No. 9009638 Copyright This documentation as well as translation hereof are property of cab Produkttechnik GmbH & Co. KG. The replication, conversion, duplication or divulgement of the whole manual or parts of it for other intentions than its original intended purpose demand the previous written authorization by cab.
-
Page 3: Table Of Contents
Table of Contents Introduction ............................4 Instructions ............................... 4 Safety Instruction ............................. 4 Safety Markings ............................5 Environment ............................. 5 Product Description ..........................6 Important Features ........................... 6 Technical Data ............................6 Device Overview ............................. 7 Contents of Delivery ..........................8 Operation .............................. -
Page 4: Introduction
Introduction Instructions Important information and instructions in this documentation are designated as follows: Danger! Draws attention to an exceptionally great, imminent danger to your health or life due to hazardous voltages. Danger! Draws attention to a danger with high risk which, if not avoided, may result in death or serious injury. Warning! Draws attention to a danger with medium risk which, if not avoided, may result in death or serious injury. -
Page 5: Safety Markings
Introduction Always have service work done in a qualified workshop, where the personnel have the technical knowledge and • tools required to do the necessary work. • There are various warning stickers on the device. They draw your attention to dangers. Warning stickers must therefore not be removed, as then you and other people cannot be aware of dangers and may be injured. -
Page 6: Product Description
Product Description Important Features • For operation in a system the I/O interface of the printer can be used. Technical Data Vacuum belt applicator 5314-3 5316-3 Label applications on plane surfaces Directions to which dispense labels 20 - 114 Label widths operating a HERMES Q4/Q4.3 HERMES Q6.3... -
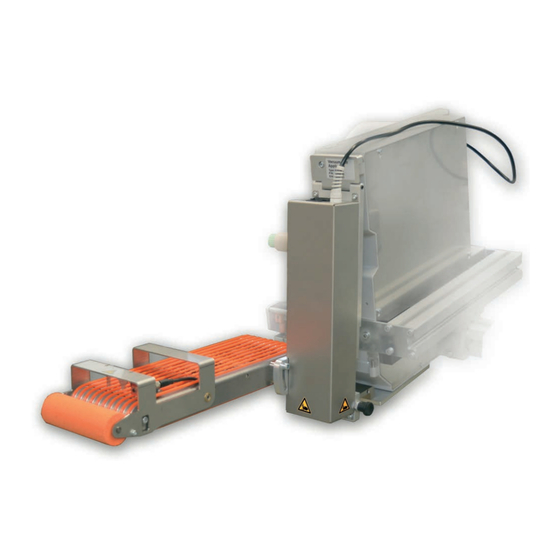
Page 7: Device Overview
Product Description Device Overview Fig. 2 Overview 1 Power supply cable of the printer 9 Power supply with cover 2 3-pole connector for sensor start 10 Belt with motor shaft belt 3 Power switch applicator 11 Locking bold 4 SUB-D 9 connector to the printer 12 Pinch roller 5 Circuit board applicator control 6 Belt driven motor... -
Page 8: Contents Of Delivery
Product Description Contents of Delivery Fig. 3 Contents of delivery 1 Mounted applicator 2 Base plate for mounting the applicator to the printer 3 Self adhesive cable clamps x 4 4 Screws for mounting the applicator to the printer 5 Documentation Note! Please keep the original packaging in case the applicator needs to be returned. -
Page 9: Operation
Operation Standard Operation Check all external connections. Load the material. "Operator's Manual" Switch on the printer. Press the respectively feed at the printer. A synchronization feed is initiated. The processed labels need to be removed manually. After a few seconds the printer carries out a short backfeed to position the front edge of the next label at the printing line. -
Page 10: Power Supply Of The Devices
Operation Power Supply of the Devices Fig. 5 Power supply of the printer and the applicator Attention! When the power cable is connected the entire current flows through the power supply of the printer. The power switch of the applicator only affects the powers supply of the applicator. 1. Plug the power cable (2), as part of the contents of delivery, into the plug point of the applicator. 2. Disconnect the plug (4) of cable (3) of the applicator and plug it into the plug point of the printer. 3. -
Page 11: Pivoting The Applicator
Operation Pivoting the Applicator Fig. 6 Pivoting the applicator Attention! Danger of injury to hands and fingers by the applicator! When releasing the snap lock keeping the applicator in place, it will drop due to its own weight. 1. To pivot the applicator (5), for cleaning or inserting material, pull the locking bolts (3) outward. 2. -
Page 12: Error Messages Of The Printer
Operation Error Messages of the Printer For detailed information about printer errors (e.g. 'Paper out', 'Ribbon out', etc.) Operator's manual of the printer Error treatment: Clear the error results. Press the feed key to synchronize the label feed and remove the peeled labels manually. ... -
Page 13: Installation
The values are listed in the setup protocol and delivered with the printer applicator system. The default factory values are: Connected to a cab HERMES Q printer, vertical cab part No.: 5556472 54x35.5 Default material used for the setup: Tools •... -
Page 14: Mounting And Dismounting The Applicator
Installation Mounting and Dismounting the Applicator Fig. 7 Mounting and dismounting the applicator 1 Pull out the locking pin (3) and insert the mounting plate (2) into the opening (1) on the applicator. 2 Snap the locking bolts (3) into the holes (4). 3 Place the printer onto its back - with the material guide upward. -
Page 15: External Start-Sensor
Installation External Start-Sensor The start signal to apply the label can originate from an external sensor connected to the 3 pole connector (1) connected directly to the applicator. Fig. 8 Start signal connector on the applicator Fig. 9 Examples of connections of start sensors The start of the printing job - print first label is still initiated over the I/O interface of the printer. -
Page 16: Adjustments
Adjustments Note! The position of the applicator to the printer is predetermined by the factory and should not be altered to guarantee a reliable label take-over. Only change the angle of the applicator and the pressure of the pinch roller. Adjust the Angle to the Printer max 30°... -
Page 17: Adjustments In The Printer Setup
Adjustments Adjustments in the Printer Setup Label transport/reflex sensor Fig. 11 Waiting position of the label The operation mode "Blow" must be selected in the setup: Setup > Labelling > Transfer mode . Only once this is selected is it possible to change the parameter "Blow time" . After detection of the label (3) by the reflex sensor (1) it will be transported further for a set time to reach the pinch roller (4). -
Page 18: Configuration
Configuration Configuration Parameters of the Applicator The configuration parameters of the applicator can be found in the menu Setup > Machine param. Note! The speed of the belt and the label transport is set by the parameter Support del. off. The value is displayed in ms and not the actual value used mm/s. Note! It is necessary to set the values of the table precisely. -
Page 19: Test Operation
Test Operation Test Mode without a Print Job Fig. 12 Display By alternating between buttons on the display it is possible to simulate the labeling process without an active printing job. Push button This causes the feed of an empty label. Simultaneously the vacuum of the pad as well as the supporting air are activated. -
Page 20: Exchanging The Pinch Roller
Exchanging the Pinch Roller Fig. 13 Exchanging the pinch roller 1. Loosen screw (3). 2. Turn the lever (2) 90°. On the opposite side of lever (4) the lock of the axis (2) must be placed into the indentation of lever (4). 3. -
Page 21: Hermes Q And Hermes+ Menu
HERMES Q and Hermes+ Menu Comparison of menu items / parameter HERMES Q Hermes+ Label feed feed Label feed with print job:alternately print and Enter apply of a label without print job: Start of the applicator movement Start display - Setup Selection menü... -
Page 22: Block Diagram
Block Diagram EEPROM SUB-D 9 Connection to the PCB applicator printer control 19/41 Label sensor 20/21 Motor belt driven CON 7 Distribution PCB fan CON 8 Fig. 14 Block diagram... -
Page 23: Index
Index Angle to the Printer ......16 Blow time ..........21 Cleaning ..........9 Delivery..........8 Features ..........6 Important information......4 Instruction ...........4 Menu..........21 Mounting ...........14 Operation ..........9 Parameter .........18 Parameters of configuration .....21 Peel-off Mode ........18 Peel Position........18 Pinch Rolle ........20 Print Job ...........19 Roll On time ........21 Safety Marking........5 Speed ..........18...
Need help?
Do you have a question about the 5314 and is the answer not in the manual?
Questions and answers