Advertisement
Quick Links
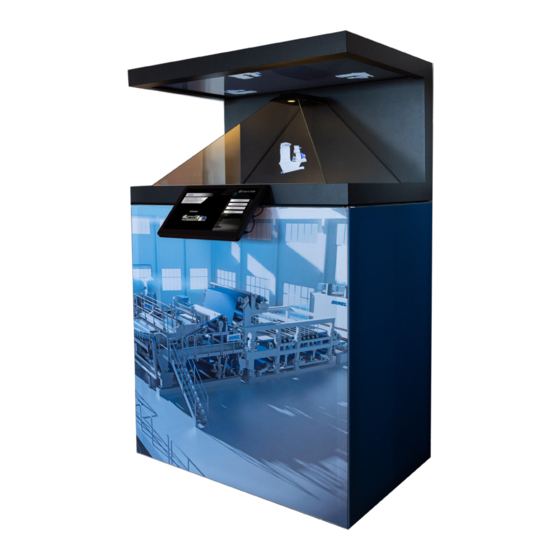
Attaching a touchscreen to the XL5 with the vesa mount
NOTE: We advise you to be two people doing this.
Adding a touchscreen to the XL5 to enable interactive experiences, involves 3 easy steps:
1) Attach, by using the vesa mount, the touchscreen to either:
a) The XL5 smartframe stand, or
b) The bottom of the XL5 display
2) Connect the touchscreen to the XL5's built-in Brightsign media player with an ethernet cable
3) Connect the touchscreens powersupply to a power outlet
In the following, we will go through each of these 3 steps in detail.
1.a - Attach the touchscreen to the XL5 smartframe stand
In this example we will position the touchscreen
centered on the front of the smartframe stand
like this. In our example the smartframe stand is
already assembled.
With on side loose, you can push the bar up
just enough to slide the two silver brackets that
comes with the vesa mount into the groove on
the bar.
Start by loosening one side of the front topbar
on the stand using a 5 mm unbraco key. The
screw is hidden behind the cloth. Be carefull
only to loosen the screw. Do not remove it!
Position the brackets where you want to have
the touchscreen. Remember to tighten the
screw on the bar again!
1
Advertisement

Related Manuals for Realfiction Dreamoc XL5


Summary of Contents for Realfiction Dreamoc XL5
- Page 1 Attaching a touchscreen to the XL5 with the vesa mount NOTE: We advise you to be two people doing this. Adding a touchscreen to the XL5 to enable interactive experiences, involves 3 easy steps: 1) Attach, by using the vesa mount, the touchscreen to either: a) The XL5 smartframe stand, or b) The bottom of the XL5 display 2) Connect the touchscreen to the XL5’s built-in Brightsign media player with an ethernet cable...
- Page 2 This is done with 4 cap hexagon socket screws Now attach the vesa mount to the backside of that come with the vesa mount and a 2 mm the touchscreen. unbraco key. Do not overtighten the screws! Attach the vesa mount to the silver brackets, Before firmly tightening the two screws, you can using two countersunk hexagon socket screws adjust the exact position of the touchscreen.
- Page 3 2 - Connect the ethernet cable NOTE: This is a revised description which is relevant only for XL5 displays from serial number SC2302-0001 (early 2023) and later. For earlier models, please refer to the original XL5 user manual v. 1.0 Start by placing the XL5 on a flat surface, but You should be able to access these holes on with the front of the display accesible from...
Need help?
Do you have a question about the Dreamoc XL5 and is the answer not in the manual?
Questions and answers