Advertisement
Table of Contents
- 1 Table of Contents
- 2 Conexis® Smart Lock L2 Product Overview
- 3 Inside the Box
- 4 Removing Existing Handle & Cylinder
- 5 Measuring Your Door
- 6 Installing the Actuator
- 7 Installing Handles
- 8 Handing the Lock
- 9 Installing the Yale Access Module and Connect Wi-Fi Bridge
- 10 Locking the Conexis® Smart Lock L2
- 11 Unlocking with Key Card or Key Tag
- 12 Installation Checklist
- 13 Battery Indicator
- 14 Factory Reset
- Download this manual
Advertisement
Table of Contents

Related Manuals for Yale Conexis Smart Lock L2


Summary of Contents for Yale Conexis Smart Lock L2
- Page 1 Conexis® Smart Lock L2 User Manual KM 735817...
-
Page 2: Table Of Contents
Removing existing handle & cylinder Measuring Your Door Installing The Actuator Installing Handles Handing The Lock Installing the Yale Access Module and Connect Wi-Fi Bridge Locking the Conexis® Smart Lock L2 Unlocking with Key Card or Key Tag Installation Checklist Battery Indicator Factory Reset Hereby, ASSA ABLOY Ltd declares that the Conexis®... -
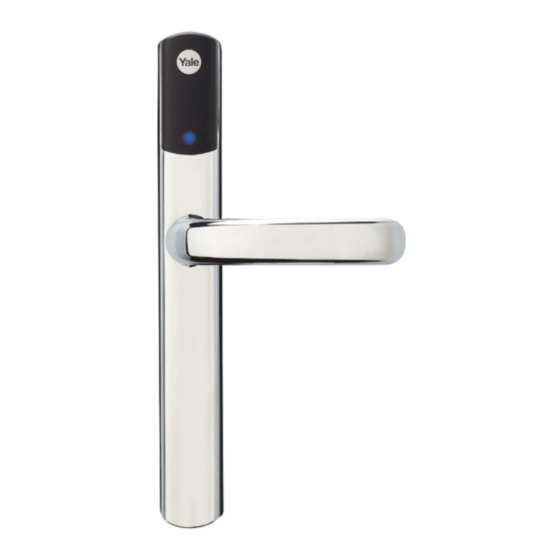
Page 3: Conexis® Smart Lock L2 Product Overview
Conexis® Smart Lock L2 Product Overview I N S I D I D E I D E I N S I D O U T S O U T S I N S I D E O U T S I Radio Cover Key Card/Tag Reader Radio Cover... -
Page 4: Inside The Box
1 x DoorSense 1x Yale Access 1x Key Tag Module Fixing Pack B Fixing Pack C Fixing Pack D 1 x Yale Connect Wi-Fi Bridge 1x Manual Key Card 1 x DoorSense 7 0 m 8 0 m 5 5 m... - Page 5 Fixing Pack A 4 x AA Alkaline Batteries 4x AA Alkaline Fixing Pack B Fixing Pack C The smart way to protect your home. Fixing Pack D 8 0 m Fixing Pack D 1 7 0 m...
-
Page 6: Removing Existing Handle & Cylinder
Removing Existing Handle And Cylinder Do not close door until installation is complete Make note of your current fixing screw positions... -
Page 7: Measuring Your Door
Measuring Your Door Measure the thickness of the door to select the correct fixing pack. I N S I D Door thickness Door thickness Door thickness 44-50mm 58-65mm 70mm Measure the distance between the centre of the lock and the inside of the door to select the correct tailbar. I N S I D E I N S... -
Page 8: Installing The Actuator
Installing The Actuator Choose suitable size screw for door I N S I D E I N S I D E I N S I D E Once installed in the door, turn the tailbar left and right, do not turn past angle shown on diagram. -
Page 9: Installing Handles
Installing External Handle Refer to current fixing screw positions You may need to screw in an additional lug from fixing pack A. - Page 10 Installing Internal Fixing Plate (08) Ensure correct fixing pack is used for width of door. Do not fully tighten as the handle needs to be aligned in the next step. Fixing pack B, C or D screws. Remove...
- Page 11 Aligning Handle (09) Ensure exterior handle and fixing (09) plate are parallel before finally tightening screws. (09) INSIDE OUTSIDE INSIDE OUTSIDE INSIDE OUTSIDE Please ensure that alignment tool is flat against the door as screws are tightened. This ensures the motor is aligned correctly.
- Page 12 Installing Internal Handle Do not turn thumbturn until installation is complete Turn until arrows are facing each other...
- Page 13 Installing Internal Handle Remove Take care when removing cable if adjustments are needed Tuck excess cable into slot Do not trap cable!
- Page 14 Installing Internal Handle Check seal! Then tighten screws Inserting Module...
-
Page 15: Handing The Lock
Handing The Lock If these steps are not completed the door will not lock. If the lock sounds like it is struggling to lock, check actuator installation shown on page 8 Hold ‘R’ Button for 15sec until “Beep Beep” Return handle to centre “Beep Beep”... -
Page 16: Installing The Yale Access Module And Connect Wi-Fi Bridge
Yale Access Module & Yale Connect Wi-Fi Bridge Set-up Guide 1) Download the Yale Access App from the Google Play Store or the Apple App store and follow the on-screen instructions to create your Yale Access account. 2) To set up a device - When prompted, please scan the QR code which can be found on the back of the Yale Access Module or below and follow the in-app instructions. -
Page 17: Locking The Conexis® Smart Lock L2
Locking the Conexis® Smart Lock L2 Please make sure your door remains open “Beep Beep Beep” Check that the handle is locked... -
Page 18: Unlocking With Key Card Or Key Tag
Unlocking with Key Card or Key Tag* *This process should be done after module is added. “Beep Beep Beep”... -
Page 19: Installation Checklist
Push the lever handle down and make sure it returns by itself. Lift the lever handle to lock again. Tap the paired card or tag on the outside handle under the Yale logo. Make sure it unlocks and the lever can be pushed down. -
Page 20: Battery Indicator
Battery Indicator When the battery is low, you will receive a notification in the Yale Access app and Low Battery via text message. “Beep beep beep, beep beep beep, beep beep beep...” Replace with Alkaline Batteries No Battery... -
Page 21: Factory Reset
Factory Reset Factory reset the lock in the Yale Access App before you do a factory reset of the escutcheons! (19) Locking “Beep beep beep” Disconnect cable Do not pull cable. To prevent damage, pull at base of connector Press and hold ‘R’... - Page 22 Part of ASSA ABLOY The 2 year guarantee for this Customer Services: product is active from the date Visit: yalehome.co.uk/help-support of Purchase. Yale UK, School Street, Willenhall, WV13 3PW Issue No. 3A...
Need help?
Do you have a question about the Conexis Smart Lock L2 and is the answer not in the manual?
Questions and answers
The batteries died but I didn’t receive a warning in the app or a text. The 9 volt back up option did not work - why is this? I’m now worried if this happens again, as I had to pay a locksmith to effect entry via a different door.