Advertisement
Table of Contents
- 1 Table of Contents
- 2 In the Box
- 3 Requirements
- 4 Install Athenanet Device Manager (ADM) and Drivers
- 5 Ingenico Terminal Installation
- 6 Testing a Credit Card Payment
- 7 Usage
- 8 Troubleshooting and Installation Notes
- 9 Terminal Software Updates
- 10 Advanced Network Troubleshooting
- 11 Advanced Device Connectivity Troubleshooting
- Download this manual
Ingenico Credit Card Terminal Installation, Testing & Usage
Table of Contents
In the Box
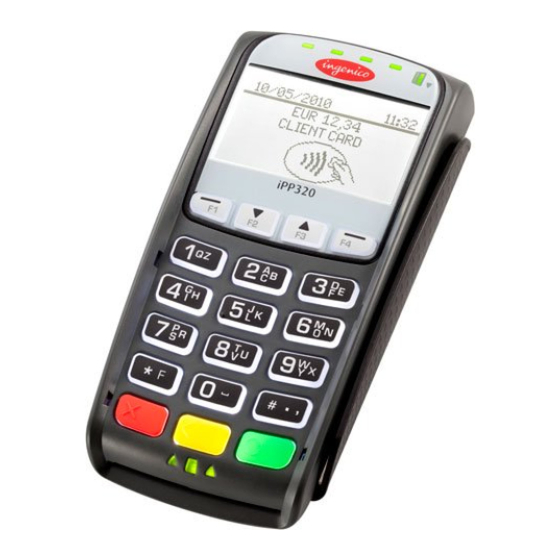
Your Ingenico iPP320 comes with the following items included as standard equipment from Elavon:
•
iPP320 Terminal (pictured above)
•
AC Power Supply
•
Magic Box (pictured on page 4)
•
1x Ethernet Cable, 7'
•
1x USB A/B cable, 6'
•
An Installation and Quick Reference Guide from Ingenico
Note: athenahealth recommends you ignore the above guide during the installation process
o
and follow the instructions provided in this guide instead.
U
1
sing the industry-standard Kensignton® locking port on the device requires the purchase of a separate lock.
© 2017 athenahealth, Inc.
1
Credit Card Plus: Ingenico iPP320
1
2
2
4
7
8
11
16
19
20
Rev 1.52 - Page 1
Advertisement
Table of Contents
Troubleshooting

Subscribe to Our Youtube Channel
Related Manuals for Ingenico iPP320


Summary of Contents for Ingenico iPP320
-
Page 1: Table Of Contents
Troubleshooting and Installation Notes Terminal Software Updates Advanced Network Troubleshooting Advanced Device Connectivity Troubleshooting In the Box Your Ingenico iPP320 comes with the following items included as standard equipment from Elavon: • iPP320 Terminal (pictured above) • AC Power Supply •... -
Page 2: Requirements
Install athenaNet Device Manager (ADM) and Drivers Important Note: Do not connect the Ingenico Credit Card terminal to your computer until instructed to do so. Before you can begin Ingenico Credit Card terminal installation process, you must first install athenaNet Device Manager (ADM), an application that will allow you to use device supported by athenaNet. - Page 3 Selected to choose the departments that can use the device. 6. Click Save. A new row will appear in the Devices table below for the Ingenico device. 7. In the Devices table, click the install link in the ADM Module column to install the module for the Ingenico. •...
-
Page 4: Ingenico Terminal Installation
Ingenico Terminal Installation 12. The Ingenico “Magic Box” is the rounded box shown in the center of the figure below. Connect the USB cable to the Magic Box and to your computer, as shown below. Note: It is not necessary to disconnect any other devices (ex: RDM check scanner) from the computer unless you need a free USB port. - Page 5 17. Select Device Management in the My Configurations section. 18. In the Devices table, verify that the Ingenico row is present, displays a green circle in the Status column, and a version number displays in the ADM Module column instead of an install link. If both the green circle ©...
- Page 6 Credit Card Plus: Ingenico iPP320 and the version number display as shown below, your terminal is properly installed. Your terminal is now ready for use with athenaNet. Note: The version number you see may be different from that shown above.
-
Page 7: Testing A Credit Card Payment
Credit Card Plus: Ingenico iPP320 Testing a Credit Card Payment We recommend conducting a test transaction once you complete installation to verify that the system is working correctly. Note that this step can only be done once you have gone live on CCP. -
Page 8: Usage
Credit Card Plus: Ingenico iPP320 Usage Using Swipe/Manual card entry (non EMV cards or over-the-phone transactions) • Swipes: Cards without a chip (non-EMV) should be swiped using the magnetic stripe reader on the side of the device (see image below) when prompted by the terminal. If an EMV card is swiped before attempting the insert method, the terminal will prompt for the card to be inserted (see next section). - Page 9 • Most US cards will be "chip-and-signature" early on in the EMV transition. Using contactless payments (includes mobile device payments) Currently, the following contactless payment methods are known to work with the Ingenico devices and athenaNet: • Apple Pay •...
- Page 10 Credit Card Plus: Ingenico iPP320 Other General Usage Tips • When the terminal screen does not display the athenahealth logo during a transaction, you may cancel an incomplete transaction as long you have not progressed to the “Processing” stage by using the red cancel key.
-
Page 11: Troubleshooting And Installation Notes
• Physical Space: The iPP320 terminal measures 6.9 x 2.95 x 1.38" in size. It is designed to be a patient-facing device, which is an important consideration for EMV PIN # entry. Practices may wish to secure the terminal using the Kensington® locking port (lock not included). - Page 12 Q: Can I move a terminal between different physical locations/merchant accounts? So long as you are within the athenahealth network, yes. Any Ingenico terminal running the Simplify software should be usable with any properly configured merchant account in athenaNet. The merchant account information is not encoded into the terminal.
- Page 13 MAC address to setup DHCP properly. This can be found on the label on the back of the device. If your setup needs a static IP assignment, see “Q: How do I assign a static IP address to an Ingenico terminal?”.
- Page 14 Note that this terminal firmware version number is not the same as that shown on the ADM page. The version number on the ADM page refers to the version of the installed ADM software “module” to support the Ingenico terminal, whereas the number displayed on the terminal itself (below) refers to the firmware version installed on the terminal.
- Page 15 For security, future compatibility, and practical reasons, athenahealth does not support using static IP addressing on the Ingenico terminals. The terminals only support IP address assignment via the industry- standard DHCP mechanism. For most users, this means letting your router auto-assign a random internal IP address to your device, and no further effort is required.
-
Page 16: Terminal Software Updates
1. Hold down the yellow and # buttons on the Ingenico terminal until you hear it chirp, then release the buttons. - Page 17 Credit Card Plus: Ingenico iPP320 3. Wait for a full 60 seconds. While the terminal may not appear to be doing anything, it is actually acquiring an IP address from the network in the background. If you don’t wait long enough and go to the next step too quickly, you will get an error about DNS, and will need to reboot and try again.
- Page 18 Credit Card Plus: Ingenico iPP320 6. At the end of the process, the device will reboot and boot up normally. Once you get back to “Powered by athenahealth”, press the ‘0’ key. Look at the version information (see FAQ item on pg. 14).
-
Page 19: Advanced Network Troubleshooting
Credit Card Plus: Ingenico iPP320 Advanced Network Troubleshooting Important Note: This section designed for IT specialists and departments to help troubleshoot uncommon problems that you may encounter during setup. These problems usually only apply to large enterprise environments due to the way such networks are setup. Before using the techniques in this section for... -
Page 20: Advanced Device Connectivity Troubleshooting
1. Connect the Ingenico device to your computer. 2. Navigate to Control Panel\System and Security\System, and open the Device Manager. 3. Expand out Ports (COM & LPT). Right click on Ingenico iPP3xx/iPP4xx Comm Port. Click on Properties: © 2018 athenahealth, Inc. - Page 21 Credit Card Plus: Ingenico iPP320 4. In the Port Settings tab, click Advanced… (Note: Do not navigate to the Force COM port tab.) 5. For the COM Port Number dropdown, select a COM port that is significantly higher than any currently in use.
Need help?
Do you have a question about the iPP320 and is the answer not in the manual?
Questions and answers