
Related Manuals for AVProEdge AC-MX-88X


Summary of Contents for AVProEdge AC-MX-88X
- Page 1 User Manual 8K 8×8 Matrix with Ultrawide, 40Gbps Bandwidth Input and Output Stages AC-MX-88X...
-
Page 2: Table Of Contents
I N T R O D U C T I O N � � � � � � � � � � � � � � � � � � � � � � � � � � � � � � � � � � � � � � � � � � � � � � � � � � � � � � � � � � � � � � � � � � � � � � � � � � � � � � � � � � � � � � � � � � � � � � � � � � � � � � 4 F E AT U R E S �... - Page 3 F R O N T PA N E L C O N T R O L - S W I T C H I N G � � � � � � � � � � � � � � � � � � � � � � � � � � � � � � � � � � � � � � � � � � � � � � � � � � � � � � � � � � � � � � � � � 3 1 F R O N T PA N E L C O N T R O L - E D I D �...
-
Page 4: Introduction
Introduction Simply stated, the AVPro Edge AC-MX-88X is a classic transformed into an icon. Our engineers focused on re-imagining the venerable AC-MX-88, boosting bandwidth to an ultrawide 40Gbps with 8K input and output stages, for a world-first, Next-Gen 8 input / 8 output matrix switching platform providing a foundation for all possibilities that follow. -
Page 5: Specifications
Specifications... -
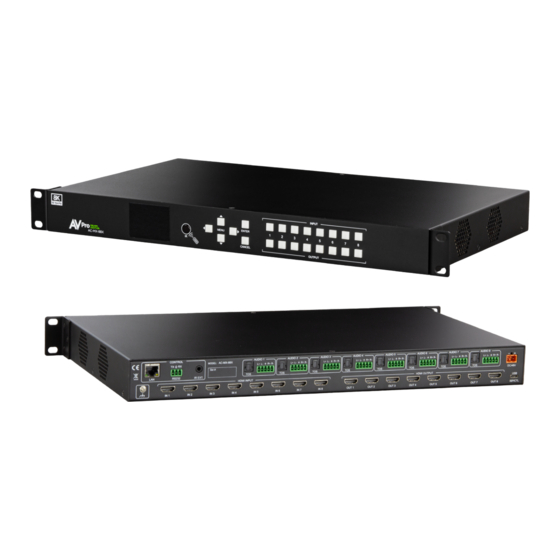
Page 6: Front And Rear Panel Overview
Front and Rear Panel Overview Front Panel Navigation Input Select Display Button Buttons Output Select IR Eye Buttons LAN Connection Extracted 3pin Audio RS-232 3.5mm IR Power Control Extension Ground HDMI USB-C HDMI Strap Outputs ISP/Control Inputs... -
Page 7: Initial Setup: Webui
Initial Setup: WebUI The AC-MX-88X can be controlled using the USB-C port, 3pin RS232, or over TCP/IP using the LAN connection. For initial setup it is recommended to connect the matrix to a local area network (LAN) and use a computer on the same network in conjunction with the built in WebUI. - Page 8 With the AVProEdge WebUI open, navigate to System. Click on the Privacy Policy and Terms of Use, this will open these documents in a new tab for review. Once read click on the boxes next to each to agree. When both are checked the switch for Enable Cloud Services will be selectable (will be red or disabled by default).
- Page 9 Once the progress bar hits 100% click the CLOSE button, the firmware upgrade process is complete. With the Firmware up to date it’s time to start setting up the matrix. With the AVProEdge WebUI open, navigate to the I/O Conifg section. Label the applicable Inputs (Apple TV, Cable Box, Roku, etc) under the Input Settings - Label.
-
Page 10: A D Va N C E D S E T U P : W E B U I I N P U T S E T T I N G S - E D I
Set the HDMI Video Scaling if needed. Each HDMI OUTPUT has a drop-down with x3 options for scaling. • No Scaling (default) - No scaling will be applied to that output. • 4K to 1080P - Any signal above 1080P will be down-scaled to 1080P •... -
Page 11: A D Va N C E D S E T U P : G L O B A L I N P U T S E T T I N G
Advanced Setup: Global Input Settings Under the Input settings is a section called Global Input Settings. These two settings apply to all eight of the HDMI Inputs. Default these are both off (unchecked) but depending on the system both of these may need to be check for optimum performance. - Page 12 Under the Video Scaling mode you can choose Auto, No Scaling (off), 4K to 1080P, or 1080P to 4K. · Auto - Will automatically scale based on the connected syncs EDID · No Scaling (Default) - Signal remains untouched · 4K to 1080P - Down-scales any 4K signal down to 1080P ·...
- Page 13 Other available settings for the extracted audio ports include · Enable/Disable Switch · Volume control (1-100) - Enter a numbered value, or use the slider bar to adjust · EQ presets (7 generic preset options to choose from) Disabled Enabled ·...
- Page 14 Delay (eight settings in 90 millisecond increments) None (default), 90, 180, 270, 360, 450, 540, and 630.
-
Page 15: W E B U I : V I D E O M At R I
WebUI: Video Matrix Use this page to route the video INPUTS and OUTPUTS. · Click on the INPUT number to select (example below shows IN 1) · With the INPUT selected simply click on the OUTPUT you want to send that source to. ·... -
Page 16: W E B U I : Au D I O M At R I
WebUI: Audio Matrix Use this page to route the extracted audio. NOTE: The extracted audio ports can only be manually changed (matrixed) when in Matrix Mode. If the extracted audio is set to Bind to Input (default) or Bind to Output then this tab will not be visible, example below. See Page 14 “Advanced Setup: WebUI Extracted Audio Output Settings”... -
Page 17: W E B U I : I / O C O N F I G - I N P U T S E T T I N G
WebUI: I/O Config - Input Settings Input Settings Label - Use this to give an name/alias to your inputs (Apple TV, Cable Box, Roku, etc). Note: There is a 15 character limit to this field, the name will replace the default “IN #” throughout the rest of the WebUI (for instance the Video Matrix tab). -
Page 18: W E B U I : I / O C O N F I G - I N P U T S E T T I N G S C O N
WebUI: I/O Config - Input Settings Cont Input Settings EDID - Use these four drop-downs to select your preferred EDID. The available combinations are as follows. 1. 1080P_2CH 9. 4K30HZ_3D_8CH 17. 1080P_6CH_HDR 25. 4K60HzY420_3D_2CH_HDR 2. 1080P_6CH 10. 4K60HzY420_3D_2CH 18. 1080P_8CH_HDR 26. -
Page 19: W E B U I : I / O C O N F I G - O U T P U T S E T T I N G
WebUI: I/O Config - Output Settings Output Settings Label - Use this to give an name/alias to your outputs (Living Room, Den, Kitchen, etc). Note: There is a 15 character limit to this field, the name will replace the default “OUT #” throughout the rest of the WebUI (for instance the Video Matrix tab). - Page 20 WebUI: I/O Config - Output Settings Cont. Output Settings Label - Use this to give an alias/name to your extracted audio outputs. Note: There is a 15 character limit to this field, the name will replace the default “OUT #” throughout the rest of the WebUI (for instance the Video Matrix tab).
-
Page 21: W E B U I : I / O C O N F I G - O U T P U T S E T T I N G S C O N
WebUI: I/O Config - Output Settings Cont. Output Settings Balance - Use this slider to adjust the Left/Right balance. Note: Default is 0 (zero), value can be -10~10 Output Settings Delay (ms) - Audio delay drop-down has eight available settings, these are measured in milliseconds. None (default), 90ms, 180ms, 270ms, 360ms, 450ms, 540ms, and 630ms. -
Page 22: W E B U I : S Y S T E M - I P S E T T I N G
WebUI: System - IP Settings This area contains relevant network information of the AC-MX-88X. Host Name - Devices name on the network. This field is automatically filled with Model Name by default. Model Name - Displays the AVProEdge Model/Part number. -
Page 23: W E B U I : S Y S T E M - T E L N E T S E T T I N G
WebUI: System - Telnet Settings This area contains relevant Telnet settings for the AC-MX-88. There are two fields that can changed, Enable Disable switch and the Port Number. · Enable - This switch has two options, Green/Enabled (Default) and Red/ Disabled. -
Page 24: W E B U I : S Y S T E M - U S E R W E B I N T E R Fa C
WebUI: System - User Web Interface This switch has two options, Red/Disabled (Default) and Green/Enabled. When enabled (green) there will be three fields that appear, Username, Password, and Confirm Password. NOTE: The Admin Web Interface must first be Enabled and setup before this field will be available to change. Default Username - user Default Password - user123 Once the desired Username and Password has been entered, click the green APPLY... -
Page 25: W E B U I : S Y S T E M - C L O U D S E R V I C E
WebUI: System - Cloud Services By enabling Cloud Services your device will have the ability to connect to firmware servers for over-the-air (OTA) updates and enable third-party remote management services. If Cloud Services are disabled, your device will opt-out of any previously enabled services and will not be able to access OTA updates. -
Page 26: W E B U I : S Y S T E M - F I R M Wa R E U P D At E C O N
WebUI: System - Firmware Update Cont. Once the firmware file has been uploaded, it will display all containing firmware files. Here you can select individual firmware files to load or simply leave all files/options selected. If the version currently installed not newer, then that update will be skipped automatically. -
Page 27: W E B U I : D I A G N O S T I C S - H D M I I
WebUI: Diagnostics - HDMI IN Input Settings Label - Use this to give an name/alias to your inputs (Apple TV, Cable Box, Roku, etc). Note: There is a 15 character limit to this field, the name will replace the default “IN #” throughout the rest of the WebUI (for instance the Video Matrix tab). -
Page 28: W E B U I : D I A G N O S T I C S - H D M I I N C O N
WebUI: Diagnostics - HDMI IN Cont. On the left, you will see the current applied EDID information. In the example above, you will see a canned 1080P - No 3D - SDR - 2CH EDID applied to IN 1. Any EDID change, once applied will display here. Signal Info shows the connected source’s current output information. -
Page 29: W E B U I : D I A G N O S T I C S - H D M I O U
WebUI: Diagnostics - HDMI OUT HDMI Output Label, State, and Connection Reset. Connected Device EDID shows the connected sync’s preferred EDID information and current state. This includes · Manufacturer · Monitor Name · Sink Device Type · Preferred Timing · Supported Audio Formats ·... -
Page 30: W E B U I : C O N S O L
WebUI: Console There is a built in Command Console Using the command API (command list) you can send device specific commands or use as a live monitor while sending commands from a control system (helpful in troubleshooting). Example Click in the white box and type GET STA Click the green arrow or hit ENTER/RETURN on your keyboard... -
Page 31: F R O N T Pa N E L C O N T R O L - S W I T C H I N
Front Panel Control - Switching The AC-MX-88X can be switched from the front panel by first pressing the desired OUTPUT (bottom row) button first, then by pressing the desired INPUT button (top row). 1. Press the OUTPUT button (1 through 4) on the bottom row that corresponds with the OUTPUT (Display, or Sink Device) you would like to send to a source. -
Page 32: F R O N T Pa N E L C O N T R O L - E D I
Front Panel Control - EDID This matrix has 29 factory defined EDID settings. It also has 3 user defined EDID memories. The user EDID memories are independent to each input and can be set differently. The user defined EDID can be uploaded using the free PC Control software or RS-232. -
Page 33: F R O N T Pa N E L C O N T R O L - Au D I
Front Panel Control - Audio Once in “Matrix” mode for audio, the extracted audio routing on the AC-AXION-8 can be controlled from the front panel. To Control: 1. Navigate to the Audio Menu. 2. Use the arrow key to highlight “Audio Mode” and press OK to select. The field will turn red. 3. -
Page 34: I R C O N T R O L : I R R E M O T
IR Control: IR Remote IR Window IR Remote Control: When routing HDMI, the matrix can be controlled by using the IR remote supplied When routing HDMI, the matrix can be controlled by using the IR remote supplied with the product (battery not included, requires CR2025). The labels on the left are the OUTPUT numbers. -
Page 35: R S - 2 3 2 A N D T C P / I P C O N T R O
RS-232 and TCP/IP Control The AC-MX-88 can be controlled with either RS-232 or TCP/IP commands. Certain switching or format configurations can only be done using these commands. We recommend using either the MyUART (RS-232 - free) or Hercules (TCP/IP - free) apps as they are very easy to use for sending commands to the machine. For TCP/IP control commands use Telnet Port 23. -
Page 36: C O M M A N D L I S
Command List · Baudrate: 57600 · Bit Num: 8 · Checksum: None · Stop Bit: 1... -
Page 37: C O M M A N D L I S T C O N T I N U E
Command List Continued... - Page 38 Command List Continued...
-
Page 39: E X T R A C T E D Au D I
Extracted Audio The extracted audio ports have three distinct operating modes. Your desired mode can be set to suite your particular installation. The 3 modes are: Bind to Input ~ This is the default configuration. In this mode the audio port number corresponds to the INPUT signal. -
Page 40: Au D I O O U T P U T L O G I C A N D C A B L E P R E
Audio Output Logic and Cable Prep You can extract audio from Toslink or balance 2CH Audio. 2CH Balanced Audio Port - Supports 2CH PCM audio only, which is ideal for 2 Channel systems and zoned audio systems. No Down-mixing on this version, see AC-AXION-4. Toslink Audio Port - Toslink extracted audio ports support up to 5.1 digital audio. -
Page 41: T R O U B L E S H O O T I N
· Diagnostics page indicates everything is good but still not getting a picture, this may be a bandwidth limitation. See Bandwidth Chart on pages to verify the signal is not exceeding the bandwidth of any of the devices in the chain. · Still experiencing issues, contact our technical support for further assistance 1-877-886-5112 605-274-6055 support@avproedge.com... -
Page 42: B A N D W I D T H C H A R
Bandwidth Chart... -
Page 43: B A N D W I D T H C H A R T C O N T I N U E
Bandwidth Chart Continued... -
Page 44: M A I N T E N A N C
Maintenance To ensure reliable operation of this product as well as protecting the safety of any person using or handling this device while powered, please observe the following instructions. · Use the power supplies provided. If an alternate supply is required, check voltage, polarity and that it has sufficient power to supply the device it is connected to. -
Page 45: Wa R R A N T
Support Should you experience any problems while using this product, first, refer to the Troubleshooting section of this manual before contacting Technical Support. When calling, the following information should be provided: · Product name and model number · Product serial number ·... - Page 46 Dealers, Re-sellers, and Installers can request an RMA AVPro Edge Tech Support Rep or their Sales Engineer. Or you may email support@avproedge.com or fill out the general contact form at www.avproedge.com End users may not request and RMA directly from AVPro Edge and will be referred back to the Dealer, Re-seller or Installer.
- Page 49 Thank you for choosing AVProEdge! Please contact us with any questions, we are happily at your service! AVProEdge 2222 E 52nd St N ~ Sioux Falls, SD 57104 1-877-886-5112 ~ 605-274-6055 support@avproedge�com...
Need help?
Do you have a question about the AC-MX-88X and is the answer not in the manual?
Questions and answers