
Related Manuals for AVProEdge AC-MX-82


Summary of Contents for AVProEdge AC-MX-82
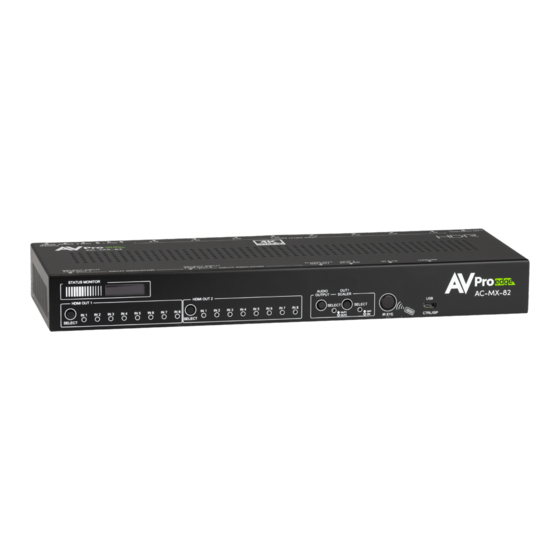
- Page 1 User Manual 18Gbps True 4K60 4:4:4, 8x2 Matrix & Auto Switch/AVR Bypass AC-MX-82...
-
Page 2: Table Of Contents
I N T R O D U C T I O N � � � � � � � � � � � � � � � � � � � � � � � � � � � � � � � � � � � � � � � � � � � � � � � � � � � � � � � � � � � � � � � � � � � � � � � � � � � � � � � � � � � � � � � � � � � � � � � � � � � 4 F E A T U R E S ... - Page 3 E D I D M A N A G E M E N T : � � � � � � � � � � � � � � � � � � � � � � � � � � � � � � � � � � � � � � � � � � � � � � � � � � � � � � � � � � � � � � � � � � � � � � � � � � � � � � � � � � � � � � � � � 2 9 I R ...
-
Page 4: Introduction
Introduction The AC-MX-82 is a 8x2 HDMI matrix switch. Supporting HDMI 2.0(a/b), HDCP 2.3 and previous, up to 4K video resolution, and up to 18Gbps bandwidth. This switch allows any source (Blu-ray, satellite receiver, game consoles, PCs, etc. ) to show on any connected displays. In addition, this matrix equalizes and amplifies the output to ensure the HDMI signal will transmit through long HDMI cables without loss of quality. -
Page 5: Specifications
Specifications... -
Page 6: Front And Rear Panel Overview
Front and Rear Panel Overview Front Panel Display Audio Output IR Receiving Select Button Micro USB OUT1 Scaler OUT1 Input OUT2 Input Port Button Select Button Select Button Power Extracted Port LAN Connection Audio L/R RS-232 Port HDMI HDMI Inputs Outputs Extracted Audio Toslink... -
Page 7: Initial Setup: Webui
Initial Setup: WebUI The AC-MX-82 can be controlled using the Micro USB port, 3pin RS232, or over TCP/IP using the LAN connection. For initial setup it is recommended to connect the matrix to a local area network (LAN) and use a computer on the same network in conjunction with the built in WebUI. After making all the physical connections, the first step will be to check for any Firmware Updates. - Page 8 Firmware OTA (over the air). This will compare the firmware versions currently loaded on the AC-MX-82 and compare to the latest available. If it is up to date, you will see a prompt stating “No update available!”...
- Page 9 12. Once the firmware file has been uploaded, it will display all containing firmware files. Here you can select individual firmware files to load or simply leave all files/options selected. If the version currently installed is not newer (does not need to be updated), then that update will be skipped automatically. Click the UPLOAD button to start.
- Page 10 16. Set the HDMI Video Scaling if needed. HDMI OUT 1 has two options for scaling, they are: · No Scaling - Default setting, HDMI OUT1 · 4k to 1080P - This will downscale a 4K signal down to 2k (1080P) on HDMI OUT1 17. With the system and all it’s components powered up it’s time to verify signal path from source to the sync.
-
Page 11: A D V A N C E D S E T U P : W E B U I I N P U T S E T T I N G
Advanced Setup: WebUI Input Settings After verifying good signal path from source to sync now it is time to go through the rest of the settings to maximize the setup. Starting with the input side with the EDID and Audio Mode settings. 1. With the WebUI open, navigate to the I/O Conifg tab and focus on the Input Settings section at the top. -
Page 12: A D V A N C E D S E T U P : W E B U I O U T P U T S E T T I N G
Advanced Setup: WebUI Output Settings 8. Now navigate to the Video Output Settings under I/O Config 9. In addition to the output Label (name/alias), there are 3 settings for each HDMI output. 10. Under State, you can enable/disable that port (turn that port on or off), turn on downscaling on HDMI OUT1 (HDMI you can choose to No Scaling or 4K to 1080P), and you can Enable or Disable the Bitstream Audio (slider icon Green=ON, Red=OFF). -
Page 13: A D V A N C E D S E T U P : W E B U I E X T R A C T E D A U D I O O U T P U T S E T T I N G
Advanced Setup: WebUI Extracted Audio Output Settings 1. Now navigate to the Extracted Audio Output Settings under I/O Config. 2. The extracted audio ports have 2 distinct operating modes, use the drop-down at the top to select. The two options are. Matrix (Default)- This mode allows you to matrix the extracted audio ports independently from the HDMI outputs. -
Page 14: W E B U I : V I D E O M A T R I
WebUI: Video Matrix Use this page to route the video INPUTS and OUTPUTS. · Click on the INPUT number to select (example below shows IN 1) · With the INPUT selected simply click on the OUTPUT you want to send that source to. ·... -
Page 15: W E B U I : I / O C O N F I G - I N P U T S E T T I N G
WebUI: I/O Config - Input Settings Input Settings Label - Use this to give an name/alias to your inputs (Apple TV, Cable Box, Roku, etc). Note: There is a 15 character limit to this field, the name will replace the default “IN #” throughout the rest of the WebUI (for instance the Video Matrix tab). -
Page 16: W E B U I : I / O C O N F I G - I N P U T S E T T I N G S C O N
WebUI: I/O Config - Input Settings Cont� Input Settings Signal - The Signal Indicator on the HDMI INPUTS shows the current state of the connection HDMI source. Green means the HDMI source is detected, red means that the source is not detected. If red verify that source is powered on and that the HDMI cable is properly connected to the source and to the back of the matrix. -
Page 17: W E B U I : I / O C O N F I G - A U D I O S E T T I N G
• Enable - This switch has two options, Green/Enabled (Default) and Red/Disabled. • Port - This field is used to change the Telnet Port of the AC-MX-82. You can use the text filed to enter a number or use the Up/Down arrow buttons to increase/decrease the number. -
Page 18: W E B U I : S Y S T E M - A D M I N W E B I N T E R F A C
WebUI: System - Admin Web Interface This switch has two options, Red/Disabled (Default) and Green/Enabled. When enabled (green) there will be three fields that appear, Username, Password, and Confirm Password. Default Username - admin Default Password - admin Once the desired Username and Password has been entered, click the green APPLY button to set. -
Page 19: W E B U I : S Y S T E M - U S E R W E B I N T E R F A C
WebUI: System - User Web Interface This switch has two options, Red/Disabled (Default) and Green/Enabled. When enabled (green) there will be three fields that appear, Username, Password, and Confirm Password. NOTE: The Admin Web Interface must first be Enabled and setup before this field will be available to change. -
Page 20: W E B U I : S Y S T E M - C L O U D S E R V I C E
With the Cloud Services enabled you can use the System tab to check for new Firmware OTA (over the air). This will check the firmware versions currently loaded on the AC-MX-82 and compare to the latest available. If it is up to date, you will see a prompt stating “No update available!” click CLOSE to exit. -
Page 21: W E B U I : S Y S T E M - F I R M W A R E U P D A T E C O N
4. 45 Seconds Keypad Lock - Enable or Disable (default) the front panel Keypad Lock. MCU/Version - Lists the current Firmware Versions UPDATE FIRMWARE - Check/upload firmware. FACTORY RESET - Restores matrix to Factory Defaults REBOOT - Reboots the AC-MX-82... -
Page 22: W E B U I : D I A G N O S T I C S - H D M I I
WebUI: Diagnostics - HDMI IN Input Settings Label - Use this to give an name/alias to your inputs (Apple TV, Cable Box, Roku, etc). Note :There is a 15 character limit to this field, the name will replace the default “IN #” throughout the rest of the WebUI (for instance the Video Matrix tab). -
Page 23: W E B U I : D I A G N O S T I C S - H D M I I N C O N
WebUI: Diagnostics - HDMI IN Cont� On the left, you will see the current applied EDID information. In the example above, you will see a canned 1080P - No 3D - SDR - 2CH EDID applied to IN 1. Any EDID change, once applied will display here. Signal Info shows the connected source’s current output information. -
Page 24: W E B U I : D I A G N O S T I C S - H D M I O U
WebUI: Diagnostics - HDMI OUT HDMI Output Label, State, and Connection Reset. Connected Device EDID shows the connected sync’s preferred EDID information and current state. This includes · Manufacturer · Monitor Name · Sink Device Type · Preferred Timing · Supported Audio Formats · 3d Support ... -
Page 25: W E B U I : C O N S O L
WebUI: Console There is a built in Command Console Using the command API (command list) you can send device specific commands or use as a live monitor while sending commands from a control system (helpful in troubleshooting). Example 1. Click in the white box and type GET STA Click the green arrow or hit ENTER/RETURN on your keyboard The the command response will show in the field below. -
Page 26: F R O N T P A N E L C O N T R O L - F U N C T I O N A L M O D E B U T T O
2. Press the OUT2 SELECT button to cycle through the 4 available inputs. Front Panel Control - DA Mode Switching The AC-MX-82 can switch the two OUTPUTS at the same time from the front panel by pressing either the OUT1 SELECT or OUT2 SELECT button. 1. Press the OUT1 SELECT button to cycle through the 4 available inputs on both outputs. -
Page 27: F R O N T P A N E L C O N T R O L - A U D I O O U T P U
Front Panel Control - Audio Output The Audio Output Select button has two states, they are as follows. Single press the button to change between the two. 1. AUDIO OUTPUT LED will be off - this means the extracted audio ports will follow HDMI OUT1. 2. -
Page 28: F R O N T P A N E L C O N T R O L - E D I D M A N A G E M E N
Front Panel Control - EDID Management: This matrix has 30 factory defined EDID settings. It also has 3 user defined EDID memories. The user EDID memories are independent to each input and can be set separately. The user defined EDID can be uploaded using the free PC Control software or RS-232. In addition, you can choose to read the EDID from the de- sired output and the captured EDID will automatically store and overwrite the EDID in “USER EDID 1”... -
Page 29: E D I D M A N A G E M E N
EDID Management:... -
Page 30: I R C O N T R O L : I R R E M O T
IR Control: IR Remote IR Remote Control: When routing HDMI, the matrix can be controlled by using the IR remote supplied with the product (battery not included, requires CR2025). The labels on the right are the OUTPUT numbers. *Not Included The left arrow button decrements to the next input port, and the right arrow increments to the next input port. -
Page 31: R S - 2 3 2 A N D T C P / I P C O N T R O
RS-232 and TCP/IP Control: The AC-MX-82 can be controlled with either RS-232 or TCP/IP commands. Certain switching or format configurations can only be done using these commands. We recommend using either the MyUART (RS-232 - free) or Hercules (TCP/IP - free) apps as they are very easy to use for sending commands to the machine. -
Page 32: C O M M A N D L I S
Command List: · Baudrate: 57600 · Checksum: None · Bit Num: 8 · Stop Bit: 1 ... -
Page 33: C O M M A N D L I S T C O N T I N U E
Command List Continued:... -
Page 34: E X T R A C T E D A U D I
Extracted Audio: The extracted audio ports have three distinct operating modes. Your desired mode can be set to suite your particular installation. The 3 modes are: Bind to Input ~ This is the default configuration. In this mode the audio port number corresponds to the INPUT signal. -
Page 35: T R O U B L E S H O O T I N
Troubleshooting · Verify Power - Check that the power supply is properly connected and on an active circuit. · Verify Connections - Check that all cables are properly connected. · IR Issues - Verify correct connections - Page(s) · Lights indicate everything is good but still not getting a picture, this may be a bandwith lim- itation. -
Page 36: M A I N T E N A N C
Maintenance To ensure reliable operation of this product as well as protecting the safety of any person using or handling this device while powered, please observe the following instructions. · Use the power supplies provided. If an alternate supply is required, check voltage, polarity and that it has sufficient power to supply the device it is connected to. -
Page 37: S U P P O R
Support Should you experience any problems while using this product, first, refer to the Troubleshooting section of this manual before contacting Technical Support. When calling, the following information should be provid- · Product name and model number · Product serial number ·... - Page 38 Dealers, Re-sellers, and Installers can request an RMA AVPro Edge Tech Support Rep or their Sales Engineer. Or you may email support@avproedge.com or fill out the general contact form at www.avproedge.com End users may not request and RMA directly from AVPro Edge and will be referred back to the Dealer, Re- seller or Installer.
- Page 39 The maximum liability of AVPro Global Holdings LLC under this limited warranty shall not exceed the actual purchase price paid for the product. AVPro Global Holdings LLC is not responsible for direct, special, incidental or consequential damages resulting from any breach of warranty or condition, or under any other legal theory to the maximum extent permitted by law.
- Page 42 Thank you for choosing AVProEdge! Please contact us with any questions, we are happily at your service! AVProEdge 2222 E 52nd St N ~ Sioux Falls, SD 57104 1-877-886-5112 ~ 605-274-6055 support@avproedge�com...
Need help?
Do you have a question about the AC-MX-82 and is the answer not in the manual?
Questions and answers