3onedata IPS7112G-4GS-8GPOE User Manual
Managed industrial ethernet switch
Hide thumbs
Also See for IPS7112G-4GS-8GPOE:
- User manual (6 pages) ,
- Quick installation manual (3 pages)

Related Manuals for 3onedata IPS7112G-4GS-8GPOE


Summary of Contents for 3onedata IPS7112G-4GS-8GPOE
- Page 1 IPS7112G-4GS-8GPOE Managed Industrial Ethernet Switch User manual Version 1.0.0, Jun. 2017 www.3onedata.com...
- Page 2 Trademarks Notice is registered trademarks of 3onedata Co., Ltd. All other trademarks or registered marks in this manual belong to their respective manufacturers. Agreement As the product version upgrades or other reasons, this document is subject to change without notice.
-
Page 3: Table Of Contents
6.2.8 Diagnosis ................................19 6.2.8.1 Ping................................19 6.2.8.2 Traceroute ..............................20 6.2.8.3 Port loopback .............................. 20 6.3 Port Configuration ..............................21 6.3.1 Port Settings ..............................21 6.3.2 Storm control ..............................23 6.3.3 Port rate-limit ..............................25 6.3.4 Mirror.................................. 26 www.3onedata.com... - Page 4 6.5.1 Access control ..............................51 6.5.2 ACL configuration .............................. 52 6.5.2.1 ACL group configuration ..........................52 6.5.2.2 Time range configuration ..........................52 6.5.2.3 MAC ACL configuration ..........................53 6.5.2.4 IP ACL configuration ........................... 54 6.5.3 IEEE802.1x configuration........................... 56 6.5.3.1 Global configuration ............................ 56 www.3onedata.com...
- Page 5 6.7.3 Reboot ................................78 6.7.4 Restore ................................78 6.7.5 Firmware ................................79 Chapter 7 Repair and Service ............................. 80 7.1 Internet Service ................................. 80 7.2 Make a call to our technical office ..........................80 7.3 Repair or Replace ..............................80 www.3onedata.com...
- Page 6 User manual Appendix 1 Glossary table ..............................81 Appendix 2 Treatment of common problem ........................83 www.3onedata.com...
-
Page 7: Chapter 1 Summarize
Chapter 1 Summarize 1.1 Introduction IPS7112G-4GS-8GPOE is an industrial grade, managed and redundancy Ethernet switch which supports 8 Gigabit PoE Ports and 4 Gigabit SFP slots. It provided some kinds of advanced network managed function, like as: SW-Ring redundancy ring network, STP/RSTP/MSTP, VLAN, Trunking, 802.1X, SNMP, LLDP, SSH, Quality of Service, Speed control, port mirroring, fault alarm and firmware upgrade online. -
Page 8: Chapter 2 Hardware Description
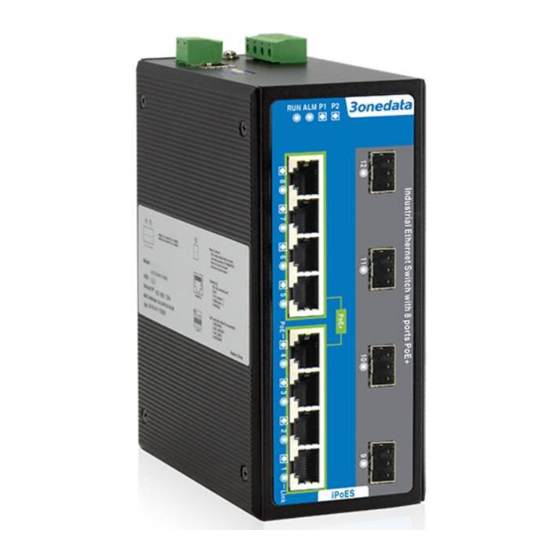
4. Terminal block for power input (PWR1, PWR2) 5. DIP switches 6. DIN-Rail mounting kit 7. System running indicator 8. Relay alarm indicator 9. Power input P1(P2) LED 10. PoE port Link/ACT indicator 11. Ethernet port Link/ACT indicator 12. Gigabit PoE port 13. Gigabit SFP port www.3onedata.com... -
Page 9: Power Input
2.5 Console port This series product provided 1pcs procedure test port based in serial port. It adopts RJ45 interface, located in top panel, can configure the CLI command through RJ45 to DB9 female cable. www.3onedata.com... -
Page 10: Communication Port
8→5, are used as cross wiring in the MDI-X port of Converter and HUB. In MDI/MDI-X, 100/1000Base-TX PIN defines is as follows: MDI-X BI_DA+/TX+ BI_DB+/RX+ BI_DA-/TX- BI_DB-/RX- BI_DB+/RX+ BI_DA+/TX+ BI_DC+/— BI_DD+/— BI_DC-/— BI_DD-/— BI_DB-/RX- BI_DA-/TX- BI_DD+/— BI_DC+/— BI_DD-/— BI_DC-/— Note:10Base-T/100Base-TX, “TX±”transmit data±, “RX±”receive data±, “—”not use. 10/100Base-T(X) MDI (straight-through cable) 10/100Base-T(X) MDI-X (Cross over cable) www.3onedata.com... - Page 11 TX port is transmit side, must connect to RX (receive side). The fiber interface support loss line indicator. Suppose: If you make your own cable, we suggest labeling the two sides of the same line with the same letter (A-to-A and B-to-B, shown as below, or A1-to-A2 and B1-to-B2). www.3onedata.com...
-
Page 12: Led Indicator
2. Examine the cables and plugs that installation requirements. 3. Examine whether the cables be seemly or not (less than 100m) according to reasonable scheme. 4. Power: support 48VDC power supply 5. Environment: working temperature: -40~70℃ Storage Temperature: -40~85℃ Relative humidity: 5%~95% www.3onedata.com... - Page 13 8. Pigtail cannot be tied and swerved as less as possible. Swerving radius cannot be too small (small swerving causes terrible loss of link). Its banding should be moderate, not too tight, and should be separated from other cables; 9. It should have corresponding simple signal at both sides of the cable for maintaining. www.3onedata.com...
-
Page 14: Chapter 3 Appearance And Dimension
User manual Chapter 3 Appearance and Dimension 3.1 Appearance 3.2 Dimension Unit (mm) www.3onedata.com... -
Page 15: Chapter 4 Packing List
Please check the packaging and accessories by your first using. Please inform us or our distributor if your equipments have been damaged or lost any accessories, we will try our best to satisfy you. Description Quantity Industrial PoE switch User manual Documentation and software CD Warranty card Certificate of quality DIN-Rail mounting kit www.3onedata.com... -
Page 16: Chapter 5 Network Configuration
But in the IGMP polling and IEEE 802.1x polling windows system cannot handle correctly, Unix-like system does not have this problem. The advanced users have to pay attention to this issue. www.3onedata.com... -
Page 17: Chapter 6 Web Management
Refresh the page and then enter the correct user name and password, log on to the Web Server, it will recommend to modify the user name and password. Please contact our customer service center if you have more questions. (Figure 6.1.1) www.3onedata.com... - Page 18 GMRP config Set the relevant port parameters and view the multicast address Access control access control Attack protection Anti attack setting Network related configuration, including group security ACL config configuration, time range configuration, IP ACL and MAC ACL configuration www.3onedata.com...
-
Page 19: System Configuration
Web configuration interface again, the system will remind user and returns to the login dialog box. Users need to log in again if operating is needed. The timeout time is 300s. 6.2 System Configuration 6.2.1 System information (Figure 6.2.1.1) www.3onedata.com... - Page 20 Current devices use memory size information Hardware address of the device. It is a unique address which is made up of CPU MAC hexadecimal number with 48 bits (6 bytes) in length. Language switching (Figure 6.2.1.2) Port information (Figure 6.2.1.3) www.3onedata.com...
-
Page 21: Configuration Network
Default gateway in the host PC is generally called default route. Default route refer to a kind of router that destination address of IP data packet will choose when it don‟t find other existing route. All data packets of destination address which don‟t exist in the list of router will choose default route. www.3onedata.com... -
Page 22: User Configuration
Log configuration of the main functions of the role: to view the device log information (history configuration information records), upload device log information to the TFTP server. In the menu bar, click on the "main menu", "system configuration", "Device log configuration", enter the log configuration interface. www.3onedata.com... -
Page 23: Sshd Configuration
DNS and IP. There is also an additional advantage is that the transmission of the data is compressed, so you can speed up the transmission speed. In the menu bar, click on the "main menu", "system configuration", "SSHD configuration", enter the SSHD configuration interface. (Figure 6.2.5.1) www.3onedata.com... -
Page 24: Telnet Configuration
1, the establishment of the environment, only the computer network port through the LAN and the network port of the switch connection. 2, through the Telnet login the switch before you need to enter the „Telnet+ space + switch‟s IP‟ to verify. (Figure 6.2.6.2) www.3onedata.com... -
Page 25: Https Configuration
IP address of the machine and to target IP address to send a data packet, and then ask to return a similarly sized packets to determine two network machine is connected and communicated, check the size of the delay. www.3onedata.com... -
Page 26: Traceroute
In the menu bar, click on the "main menu", "system configuration", "diagnostic ", " Port loopback ", enter the port loop configuration interface. www.3onedata.com... -
Page 27: Port Configuration
The port configuration interface mainly includes port type (Electric port or optical port), setup speed mode and duplex mode, flow control. Only when the port is enabled for the port speed, duplex, flow control will work. Select auto-negotiation, speed, and duplex auto-negotiation. (Figure 6.3.1) www.3onedata.com... - Page 28 OFF. Only enable this port, all settings about this port will be valid. This item provides a kind of safety mechanism to protect the port from illegal use. It is not allowed to disable all the ports. Duplex Mode www.3onedata.com...
-
Page 29: Storm Control
In the menu bar in order to click on the "main menu", "port configuration", "storm control" into the storm suppression configuration interface. www.3onedata.com... - Page 30 Step 1: in the broadcast text box, enter the inhibit value, range is 0-1000000; Step 2: in the unknown multicast text box to enter the value, the range is 0-1000000; Step 3: in the unknown unicast text box, enter the inhibit value, range is 0-1000000; Step 4: click the "Apply" button. www.3onedata.com...
-
Page 31: Port Rate-Limit
Step 3: in the output rate of the text box to fill in the output rate value, the range is 0-1000000; Step 4: in the output burst of unexpected text box to fill in the output burst value, the range is 0-1000000; Step 5: click the "Apply" button. www.3onedata.com... -
Page 32: Mirror
Destination port: The group defines a port for monitoring, and the device outputs data from the port to the specified direction. Direction: This parameter specifies the direction of the monitoring port data, a total of "ingress", "egress", www.3onedata.com... -
Page 33: Alarm Setting
If the alarm selection normally closed, when there is an alarm, the alarm light, the relay is in the open state; if the choice is normally open, when there is an alarm, the alarm lamp is not bright, and the relay is in a closed state. www.3onedata.com... -
Page 34: Poe Configuration
POE total power (1-120W), the corresponding port power values are: 10W, 15W, 30W. Each port output maximum power of 30W. 6.3.6.1 Global configuration In the menu bar, click "Main Menu", "Port Config", "POE Config", "Global Config" to enter the global configuration interface. www.3onedata.com... -
Page 35: Poe Port Configuration
Based on an IEEE802.3ad standard LACP (link aggregation control protocol) protocol is an implementation of dynamic link aggregation protocol, operation equipment of the agreement between the mutual LACPDU (link aggregation control protocol data unit) to make information related to interlink polymerization. www.3onedata.com... -
Page 36: Static Configuration
Src & Dst Mac: according to the source and destination MAC address for load sharing, when the source and destination MAC address at the same time, the message in the same port through, otherwise, the message from different ports through. www.3onedata.com... -
Page 37: Lacp Configuration
Passive: Port usually do not send LACP message, once received the LACP message on the end, it will normally send LACP message. Configure LACP steps: Step 1: select the dynamic (LACP) in the type of the drop-down box; Step 2: select Active or Passive in the mode of the drop-down box; www.3onedata.com... -
Page 38: Isolate-Port Configuration
Step 1: check the port isolation in the check box or cancel the check box; Step 2: click the "Apply" button. 6.3.9 Port statistic 6.3.9.1 Port state In the menu bar, click on the "main menu", "port configuration", "Port Statistics", "port state", enter the port summary statistics interface. www.3onedata.com... -
Page 39: Detail Port State
In the menu bar, click the "main menu", "port configuration", "Port Statistics", "Detail port state ", enter the port with statistics interface. In the interface, we can view to every port of different kinds of packet reception and transmission. www.3onedata.com... -
Page 40: Layer 2 Configuration
Access: port can only belong to 1 VLAN, generally used to connect the user equipment. All of the default ports belong to the access port; Trunk: port can belong to more than one VLAN, you can receive and send multiple VLAN packets, generally used for network equipment connection; www.3onedata.com... -
Page 41: Trunk Configuration
Did not take the mark when transmit Tagged Take the mark when transmit The port type of Access, Tranlate port can only be Untag; the port type of Trunk port can be either Untag or Tag. Trunk configuration steps: www.3onedata.com... -
Page 42: Vlan Configuration
MAC address of the message, and sends the specified message to the Tag of the VLAN. This feature is usually combined with security (such as 802.1X) technology to achieve terminal security, flexible access. In the menu bar, click on the "main menu", "layer 2 configuration", "mac-vlan", enter the mac-vlan configuration interface. www.3onedata.com... -
Page 43: Mac Configuration
In the menu bar, click "main menu", " layer 2 configuration", "MAC configuration", "MAC configuration" into MAC configuration interface, the interface can be set dynamic MAC address aging time and view the MAC address of the static and dynamic information. www.3onedata.com... -
Page 44: Static Mac
Static MAC manually set by the user, not aging. In the menu bar in order to click on the "main menu", "layer 2 configuration", "MAC configuration", "static MAC" into the static MAC configuration interface, in the interface, you can source MAC address binding. (Figure 6.4.2.2) www.3onedata.com... -
Page 45: Spanning-Tree
6.4.3.1 Bridge setting In the menu bar, click the "main menu", "layer 2 configuration", "spanning tree" and " bridge setting", into the bridge configuration interface, the interface can be spanning tree configuration parameters. www.3onedata.com... -
Page 46: Instance Setting
Step 5: click the "Apply" button. 6.4.3.2 Instance setting In the menu bar, click on the "main menu", "layer 2 configuration", "spanning tree ", "instance setting" into the instance configuration interface, the interface can be configured with VLAN mapping. www.3onedata.com... -
Page 47: Bridge Port
In the menu bar, click "main menu", "layer 2 configuration", "spanning tree", "bridge port" to enter the bridge port configuration interface, the interface can be enabled ports in spanning tree, configuration port type, link type and BPDU protection function. (Figure 6.4.3.3) Configuration item meaning BPDU Guard Configuration BPDU protection function www.3onedata.com... -
Page 48: Instance Port Configuration
In the menu bar in order to click on the "main menu", "layer 2 configuration", "spanning tree ", "instance port configuration" into the instance port configuration interface, the interface can configure the port priority and cost. (Figure 6.4.3.4) Rapid Spanning Tree of concepts: www.3onedata.com... -
Page 49: Igmp-Snooping
Work process of IGMP Snooping: the switch snoops messages between the host computer and the router and tracks multicast information and the port applied for. When the switch snoops IGMP Report message sent from the host computer to the router, the switch would add this port to multicast forwarding list; when www.3onedata.com... -
Page 50: Static Multicast
Step 2: in the multicast source of the text box to fill in the multicast source IP address; Step 3: in the multicast address of the text box to fill in the multicast IP address; Step 4: select the port in the port checkbox in the list; www.3onedata.com... -
Page 51: Sw-Ring
6.4.5.2 Node configuration In the menu bar, click "main menu", " layer 2 configuration", "Sw-Ring configuration" and "node configuration" into the node configuration interface and the interface can add and remove ring group, only when enabled Sw-Ring, can of node configuration. www.3onedata.com... - Page 52 BlueEyes software search the switches, the topology of the ring network is as below figure. Dual ring configuration Double ring as shown below figure, we can send dual ring is 2 rings combining, the point is number 105 switch. www.3onedata.com...
- Page 53 Set up Port 1 and 2 of Device 107, 108, 109 to be Ring Ports in Ring Group 1, Network ID is 1, Ring Type is Single; Set up Port 4 and 5 of Device 102, 103, 104 to be Ring Port in Ring Group 1, Network www.3onedata.com...
- Page 54 Step 5: in the ring network port 2 in the drop-down box to select the port, and cannot be the same as the ring network port 1; Step 6: fill in the value of the Hello Time in the Hello Time text box; Step 7: click the "add" button. www.3onedata.com...
-
Page 55: Gmrp Configuration
6.4.6.1 GMRP global configuration In the menu bar, click on the "main menu", "layer 2 configuration", "GMRP configuration", "GMRP global configuration" to enter the GMRP global configuration interface, the interface can enable / disable GMRP. www.3onedata.com... -
Page 56: Gmrp Port Configuration
Leave message will be sent to the outside. When the switch is started, the LeaveAll timer will be started at the same time, and LeaveAllTime the LeaveAll message will be sent out after the time out. Registration register GMRP port configuration step: www.3onedata.com... -
Page 57: Gmrp Group
In the menu bar, click on the "main menu", "network security", "access control" access control interface, the interface can be configured to access rules and filtering rules. (Figure 6.5.1) Access control configuration: Step 1: fill in the IP address in the text box of the IP address; www.3onedata.com... -
Page 58: Acl Configuration
Cycle time period: the rule that takes a week for a cycle (e.g., 8 to 12 points per week) to come into effect. Absolute time period: indicates that the rule is valid for a specified time period (e.g., 18 points from 8 www.3onedata.com... -
Page 59: Mac Acl Configuration
MAC ACL to identify a specific message, and according to the preset strategy to deal with it. In the menu bar in order to click on the "main menu", "network security", "ACL configuration", "MAC ACL configuration" into the ACL MAC configuration interface, the interface can add, delete MAC access list. www.3onedata.com... -
Page 60: Ip Acl Configuration
Step 9: click the "add" button; Step 10: in the ACL-GROUP configuration MAC access list ID in the text box to fill in the value of the MAC access list group ID. 6.5.2.4 IP ACL configuration www.3onedata.com... - Page 61 Step 8: fill in the blank in the source source mask or mask in the text box; Step 9: fill in the blank in the source port or port source text box; Step 10: fill in the blank in the destination IP address or IP text box; www.3onedata.com...
-
Page 62: Ieee802.1X Configuration
Authenticator: Such as wireless access points, switches, etc. In the menu bar, click the "main menu", "network security", "802.1X configuration", "global configuration" to enter the 802.1X global configuration interface. (Figure 6.5.3.1) 802.1x 802.1x is used to enhance the security of the authentication. www.3onedata.com... -
Page 63: Port Configuration
Step 3: fill in the IP server's Radius address, port, authentication and sharing password and authentication repeat times; Step 4: click "Apply". 6.5.3.2 Port configuration (Figure 6.5.3.2) Port configuration steps: Step 1: select the authentication port; Step 2: select the authentication mode; Step 3: click "add". www.3onedata.com... -
Page 64: Advanced Configuration
QN (to the weights of the time slice) and a variable DN (difference). In the menu bar, click "main menu", "advanced configuration", "QoS configuration", "global configuration" into QoS global configuration interface, the interface can configure QoS scheduling strategy, cos queue map and DSCP queue mapping. www.3onedata.com... -
Page 65: Port Configuration
Cos value 0-3, and then click the "apply" button. 6.6.1.2 Port configuration In the menu bar in order to click on the "main menu", "advanced configuration", "QOS configuration", "port configuration" into the QOS port configuration interface, the interface can configure the default port COS. www.3onedata.com... -
Page 66: Lldp Configuration
6.6.2.1 Global configuration In the menu bar in order to click on the "main menu", "advanced configuration", "LLDP configuration", "global configuration" into the LLDP global configuration interface, the interface can be configured with the relevant parameters of LLDP. (Figure 6.6.2.1) www.3onedata.com... -
Page 67: Port Configuration
6.6.2.2 Port configuration In the menu bar followed by click on the "main menu", "advanced configuration" and "LLDP configuration", port configuration into LLDP port configuration interface, the interface can port configured for sending and receiving mode and management address. www.3onedata.com... -
Page 68: Lldp Neighbors
Step 4: click the "Apply" button. 6.6.2.3 LLDP neighbors In the menu bar in order to click on the "main menu", "advanced configuration", "LLDP configuration", "LLDP neighbor" into the LLDP interface, the interface can be viewed in the neighborhood of the relevant information. www.3onedata.com... -
Page 69: Snmp Configuration
SNMP community name defines the relationship of SNMP NMS and SNMP Agent. User can choose the following one or more features related to community name. 1. Defines MIB view of community name. www.3onedata.com... -
Page 70: System Information
Fill in the name of the view as well as the mode, node OID. (Figure 6.6.3.2) View configuration steps: Step 1: fill in the name of the view; Step 2: select mode; Step 3: fill in the node OID; Step 4: click "add". 6.6.3.3 Community www.3onedata.com... -
Page 71: V3 User
NMS and agent, so as not to be tapped. Using authentication and encryption functions, can provide a higher security for the communication between NMS and Agent. (Figure 6.6.3.4) www.3onedata.com... -
Page 72: Trap
In the menu bar followed by click on the "main menu", "advanced configuration" and "RMON configuration", "event group" in RMON event group configuration interface, the interface can add, delete event group and view the configuration information for a set of events. www.3onedata.com... -
Page 73: Statistical
Serial number is used to identify a specific application interface, when the serial number is the same as the serial number of the application interface, the previous configuration will be replaced. www.3onedata.com... -
Page 74: History
(Figure 6.6.4.3) Sampling interval: the interval of each two times to obtain statistical data. Maximum number of samples: a list of items to be retained. Configuration history group step: Step 1: fill in the serial number in the text box; www.3onedata.com... -
Page 75: Alarm
Step 1: in the serial number of the text box to fill in the alarm group number; Step 2: select the port in the drop - down box at the sampling port; Step 3: select the alarm parameter in the drop box of the alarm parameter; www.3onedata.com... -
Page 76: Dhcp Server Configuration
6.6.5.2 DHCP pool configuration In the menu bar, click "main menu", "advanced configuration" and "DHCP server configuration", "address pool configuration into the address pool configuration interface, the interface can add, delete address pool and view address pool configuration information. www.3onedata.com... -
Page 77: Leases List
Step 8: click the "add" button. 6.6.5.3 Leases list In the menu bar in order to click on the "main menu", "advanced configuration", " DHCP Server configuration", "leases list" into the client list interface, the interface to view the DHCP client information. www.3onedata.com... -
Page 78: Static Leases Configuration
Step 3: in the MAC address of the text box to fill in the MAC address of the client; Step 4: click the "add" button. 6.6.5.5 Port binding configuration In the menu bar in order to click on the "main menu", "advanced configuration", "DHCP Server configuration", "port address binding configuration" into the port address binding configuration interface. www.3onedata.com... -
Page 79: Dhcp-Snooping
DHCP-ACK and DHCP-REQUEST messages and record the IP address and MAC address information. 6.6.6.1 Global configuration In the menu bar, click "main menu", "advanced configuration", "DHCP- snooping configuration", "global configuration" to enter the DHCP- snooping global configuration interface. (Figure 6.6.6.1) www.3onedata.com... -
Page 80: Static Binding
DHCP-Snooping trust function can control the DHCP server response message source, in order to prevent the possible existence of counterfeit or illegal DHCP server in the network to distribute IP address and other configuration information to other hosts. DHCP-Snooping trust feature port is divided into the port of trust and distrust: www.3onedata.com... -
Page 81: Dns Configuration
DNS allows users to use a string of common letters (domain name) to replace. In the menu bar in order to click on the "main menu", "advanced configuration", "DNS configuration" into the DNS configuration interface, the interface can be configured with the main DNS and standby DNS. www.3onedata.com... -
Page 82: Ntp Configuration
Step 1: select the checkbox to enable or disable in the mode of the; Step 2: in the time interval of the text box to fill in time interval; Step 3: fill in the IP address in the text box of the server 1~5; Step 4: click the "Apply" button. www.3onedata.com... -
Page 83: System Management
(Figure 6.7.1.1) 6.7.1.2 Management file In the menu bar in order to click on the "main menu", "system management", "management file ", "management file " into the configuration file management interface, the interface can be downloaded, uploaded profile. www.3onedata.com... -
Page 84: Save
In the menu bar, click on the "main menu", "system management", "Reboot" to reset the settings interface. (Figure 6.7.3) 6.7.4 Restore In the menu bar in order to click on the "main menu", "system management", "restore" to restore the factory settings interface. www.3onedata.com... -
Page 85: Firmware
Step 3: click the "Upload" button. 1, The upgrade process is prohibited without power, after the confirmation began to burn and write flash. 2, After the completion of the upgrade will automatically open a new page to the system state. www.3onedata.com... -
Page 86: Chapter 7 Repair And Service
Make a call to our technical office. Return or replace product. 7.1 Internet Service Please visit http://www.3onedata.com 7.2 Make a call to our technical office You can call our technical support office, the company has professional technical engineers to answer your questions and help you resolve your problems at the first time. - Page 87 Management Protocol) multicast group members. IEEE 802.1p Add the priority network traffic on MAC sub layer of data link layer. Define the VLAN bridge operation. To manage ,define and IEEE 802.1q operate VLAN on the bridge LAN www.3onedata.com...
- Page 88 Packaged in IP packet header of 8 bit domain to perform the ToS (Type of Service) different priority packets UDP (User Datagram Face to disconnected unreliable transmission layer protocol Protocol) (Unshielded Not shielded media out of twisted pair Twisted Pair) www.3onedata.com...
- Page 89 7. What about the order of port adaptive status detection? Port to detect the status in the following order: 100Mbps full duplex, 100Mbps half duplex, 10Mbps full-duplex, and 10Mbps half duplex, in descending order to detect and automatically connect with the highest speed. www.3onedata.com...
Need help?
Do you have a question about the IPS7112G-4GS-8GPOE and is the answer not in the manual?
Questions and answers