Advertisement
Available languages
Available languages
Quick Links
Montageanleitung
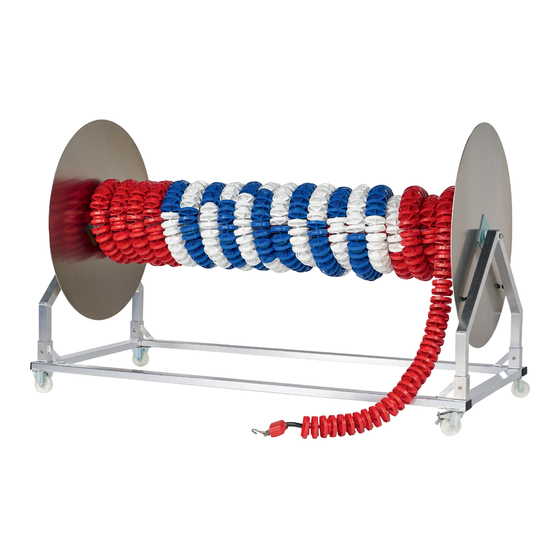
Schwimmleinenwagen
Art.-Nr.: 420, 4201
Vielen Dank, dass Sie sich für ein Haspo - Produkt entschieden haben. Damit Sie viel Freude an
diesem Produkt haben, erhalten Sie im Folgenden wichtige Hinweise für die Sicherheit sowie den
Gebrauch und die Wartung des Gerätes. Lesen Sie bitte diese Anleitung vollständig durch, bevor
Sie mit der Montage bzw. Nutzung beginnen.
1. Lieferumfang:
Bitte prüfen Sie den nachfolgend angegebenen Inhalt auf Vollständigkeit, bevor Sie mit
dem Aufbau beginnen.
Inhalt gesamt:
Stück Beschreibung
1
Grundrahmen
2
Rahmen-Seitenteile
2
Haspel-Seitenteil, rund
1
Haspelrohr
1
Zubehörbeutel
1
Advertisement

Related Manuals for Haspo Mini plus


Summary of Contents for Haspo Mini plus
- Page 1 Schwimmleinenwagen Art.-Nr.: 420, 4201 Vielen Dank, dass Sie sich für ein Haspo - Produkt entschieden haben. Damit Sie viel Freude an diesem Produkt haben, erhalten Sie im Folgenden wichtige Hinweise für die Sicherheit sowie den Gebrauch und die Wartung des Gerätes. Lesen Sie bitte diese Anleitung vollständig durch, bevor Sie mit der Montage bzw.
- Page 2 Art.-Nr. 420 Art.-Nr. 4201 Inhalt Zubehörbeutel: Stück Beschreibung Sechskantschraube M8 x 20mm, DIN 933 Sicherungs-Senkschraube mit Innensechskant M8 x 16mm, DIN 7991 Kerbstift V2A, DIN 1473, 3 x 20mm Zylinderschraube mit Innensechskant M6 x 70mm, DIN 912 Selbstsichernde Hutmutter M6, DIN 986 Mutter M8, DIN 934 Federring A8, DIN 127 Unterlegscheibe Ø...
- Page 3 Montage Räder und Verschlusskappen an Grundrahmen: Die nachfolgenden Abbildungen zeigen die Montage am Beispiel des Schwimm- leinenwagens Art.-Nr. 420. Den Grundrahmen mit den an- geschweißten Eckplatten nach oben zeigend flach auf den Boden legen. An einer Rahmenseite 2 Stck. Bockrollen (1) und an der gegen- überliegenden Seite 1 Stck.
- Page 4 4. Zusammenbau der Haspel: (Die nachfolgende Montage mit 2 Personen durchführen.) Zur Vorbereitung für die nachfolgende Montage jeweils 2 Stck Muttern M8, DIN 934 auf 2 Stck. Gewinderingösen M8 x 25mm bis zum Gewindeende aufschrauben. Das Haspelrohr waagerecht auf eine geeignete Hilfs- konstruktion legen (Böcke/Tisch o.ä., Höhe ca.
- Page 5 5. Montage Rahmen-Seitenteil: Jeweils 1 Stck. Polyamid-Buchse auf die Zapfen an der Zapfenplatte aufstecken. Dann nacheinander beide Rahmen-Seitenteile mit der quadratischen Aufnahme auf die Polyamid- Buchsen schieben. Ein Seitenteil ist mit einer aufgeschweißten Hülse für eine spätere Haspelarretierung ausgestattet. Dies hat jedoch beim Aufstecken der Seitenteile vorerst keine Bedeutung.
- Page 6 7. Montage der Haspelarretierung: Der Schwimmleinenwagen ist aus Sicherheitsgründen für den Transport und gegen unkontrolliertes Abrollen der Schwimmleine mit einer Haspel-Arretierung ausgestattet. Auf einem der beiden Haspelträger ist eine Rohrhülse mit Gewinde M8 aufgeschweißt. Durch die Hülse hindurch mit einem Bohrer Ø 9,5mm, Länge mind. 125mm, eine Bohrung für die Arretierung an einer beliebigen Stelle in das runde Seitenteil bohren.
- Page 7 Chemikalien verwenden! Hinweis: Aufgrund unserer kontinuierlichen Qualitätsprüfung der Produkte können sich technische Änderungen ergeben. _____________________________________________________________________________ Die Urheberrechte an enthaltenen Abbildungen und Texten liegen bei der Haspo Sportgeräte GmbH & Co. KG. Eine Nutzung ist nicht gestattet bzw. erst nach Absprache erlaubt.
- Page 8 Assembly Instruction Lane Marker Trolley Cat.-no.: 420, 4201 Thanks for choosing Haspo equipment. In order to enjoy this product please note the following instructions for safety, use and maintenance before assembly. 1. Scope of delivery: Please check the following content before assembly.
- Page 9 Cat.-no.: 420 Cat.-no.: 4201 Accessories: Piece Description hexagon socket screws M8 x 20mm, DIN 933 hexagon socket countersunk head screws M8 x 16mm, DIN 7991 grooved pin V2A, DIN 1473, 3 x 20mm hexagon socket head cap screws M6 x 70mm, DIN 912 self-locking cap nuts M6, DIN 986 nuts M8, DIN 934 spring washers A8, DIN 127...
- Page 10 3. Assembly of whelels and caps at base frame: The following illustrations show the assembly by the example of the lane marker trolley cat.-no. 420. Lay base frame on the ground, welded plates facing upwards. Place 2 fixed rollers (1) on one side and 1 guide roller (2) as well as 1 guide roller with locking device (2) on the other side.
- Page 11 4. Assembly of reels: (fort he assembly 2 persons are necessary) At first screw 2 nuts M8, DIN 934 on 2 threaded eyes M8x25mm. Place reel tube on a suitable construction (supports, table or similar, height approx. 600 mm). Connect reel tube, side parts and plates as follows: - Set side part against the flange of reel tube - Hold plug plate at side part - Adjust all parts and holes...
- Page 12 5. Assembly of side part: Stick polyamide liners on the plugs. Then push both side parts one after the other on the polyamide liners. One side part is equipped with a welded sleeve to lock the reel later. Screw and tighten prepared screwing devices in the threads at the plug plates. Make sure that the reel can move freely.
- Page 13 7. Assembly of reel lock: For safety reasons during transport the trolley is equipped with a reel lock and to avoid unrolling of lane markers. A sleeve with thread M8 is welded on one of the reel supports. Bore a hole for the lock through the sleeve with drill Ø...
- Page 14 Only use water to clean surfaces and no alcohol or aggressive substances! Note: Due to our continuous quality check of products and equipment technical modifications are possible. _____________________________________________________________________________ All images and texts are intellectual property of Haspo Sportgeräte GmbH & Co. KG. Any usage requires explicit permission.
Need help?
Do you have a question about the Mini plus and is the answer not in the manual?
Questions and answers