Table of Contents
Advertisement
Quick Links
Advertisement
Table of Contents

Related Manuals for 2N T58W Pro


Summary of Contents for 2N T58W Pro
- Page 1 Yealink T58W Pro User Guide Yealink SIP-T58W | VP59 | SIP-T58A | 22Q4 - 10.25.22...
-
Page 2: Table Of Contents
Table of Contents Table of Contents Before You Begin Related Documentation Summary of Changes Changes for Release V86, Guide Version V86.11 Changes for Release V86, Guide Version V86.10 Changes for Release V85, Guide Version V85.1 Getting Started Hardware Overview VP59 Hardware T58 Hardware BTH58 Hardware Power LED Indicator... - Page 3 Placing a Call from the Directory Placing an Anonymous Call Placing a Call from the Google Contacts Answering Calls Answering a Call Answering a Call When in a Call Answering a Call Automatically Disabling Call Waiting Switching Among the Handset, Speakerphone and Headset Modes Audio-only/Video Call Selection Placing an Audio-only/Video Call Answering a Video Call...
- Page 4 Redirecting Incoming Calls Forwarding All Incoming Calls to a Contact Forwarding All Incoming Calls on All Lines Forwarding All Incoming Calls on a Specific Line Deactivating Call Forward Forwarding an Incoming Call Manually Forwarding Incoming Calls with a Forward Key Diverting Calls to a Contact Transferring Calls Performing a Blind Transfer...
- Page 5 Setting a Paging Group Sending Pages by a Paging List Key Deleting a Paging Group Receiving Multicast Paging Managing a Paging Call Sharing Content during a Call Advanced Call Features Using Call Completion Call Pickup Picking up a Call Directly Picking up a Group Call Directly Picking up a Call with a Pick Up Key Picking up a Call with a Group Pickup Key...
- Page 6 Visual Alert for BLF Parked Call Monitor Picking up a Remote Call by BLF List Key Transferring a Call by BLF List Key Performing a Blind Transfer Performing a Semi-attended/Attended Transfer Parking a Call by a BLF List Key Retrieving a Call by a BLF List Key Barging in an Active Call by BLF List Key Retrieving a Call Parked to the Monitored Line Shared Line...
- Page 7 Yealink T58W User Guide Moving a Local Directory Contact to Blocklist Moving a Local Directory Contact to the Shared Directory Searching for Contacts Blocklist Adding a Blocklist Contact Viewing Blocklist Contacts Editing a Blocklist Contact Deleting Blocklist Contacts Deleting a Blocklist Contact Deleting All Blocklist Contacts Moving a Blocklist Contact to the Local Directory Mobile Contacts...
- Page 8 Yealink T58W User Guide Table of Contents Removing a Widget from the Idle Screen Creating a Folder Renaming a Folder Managing Running Applications APP Accounts Adding APP Accounts Syncing APP Account Information Removing APP Accounts File Manager Viewing Files Searching Files Copying Files Cutting Files (Moving Files) Uploading Files...
- Page 9 Yealink T58W User Guide Taking Pictures Recording Videos Camera Settings Email Signing in Email Sending Emails Reading Emails Deleting Emails Marking/Printing Email Adding Multiple Email Accounts Using Email Widget Sending Files via Email Browser Browsing a Web Page Managing Bookmarks Adding a Web Page to the Bookmarks Library Accessing a Web Page from the Bookmarks Library Editing a Bookmark...
- Page 10 Yealink T58W User Guide Table of Contents Screen Saver Changing the Waiting Time for Screen Saver Setting the Screen Saver Type Changing the Screen Backlight and Time Changing the Language Changing the Input Method Time & Date Setting the Time and Date Manually Changing the Time and Date Format Setting a Key as Send Phone Lock...
- Page 11 Yealink T58W User Guide Yealink SIP-T58W Phones User Guide Renaming the Paired Bluetooth Device Unpairing the Bluetooth Device Sending Files via Bluetooth Receiving Files via Bluetooth Disconnecting the Bluetooth Device Deactivating the Bluetooth Mode Wireless Network Activating the Wi-Fi Mode Connecting to the Wireless Network Connecting to an Available Wireless Network Manually Connecting to the Wireless Network Using Wi-Fi Protected Setup...
- Page 12 Yealink T58W User Guide Table of Contents Configuring the Flash Time Basic Call Features Conference Recording Using a USB Flash Drive Unavailable Features for PSTN Using DECT Handsets with Your Phone Attaching the DECT USB Dongle DD10K Handset Registration Setting the Phone to the Handset Registration Mode Registering a Handset to the Phone De-registering a Handset on the Handset De-registering a Handset on the Phone...
- Page 13 Yealink T58W User Guide Diagnosing the Network Rebooting Your Phone Resetting to Factory Settings Updating the Phone Configuration Clearing User's Personalized Configuration Settings Appendix - Menu Structure...
-
Page 14: Before You Begin
Smart Business Phone SIP-T58A with Camera Smart Business Phone T58W Smart Business Phone T58W Pro Smart Business Phone T58W with Camera Smart Business Phone T58W Pro with Camera The following types of related documents are available on each support page on Yealink support page: Release Notes, which details bug fixes and feature enhancements when an update is released. -
Page 15: Changes For Release V85, Guide Version V85.1
Yealink T58W User Guide Major updates have occurred to the following sections: Placing an Anonymous Call You can select All On to turn on local anonymous for all lines. Changes for Release V85, Guide Version V85.1 The following sections are new for this version: Wireless Access Point Creating a Multi-Party Conference with a Conference Key Using Your Phone with PSTN Account... -
Page 16: Getting Started
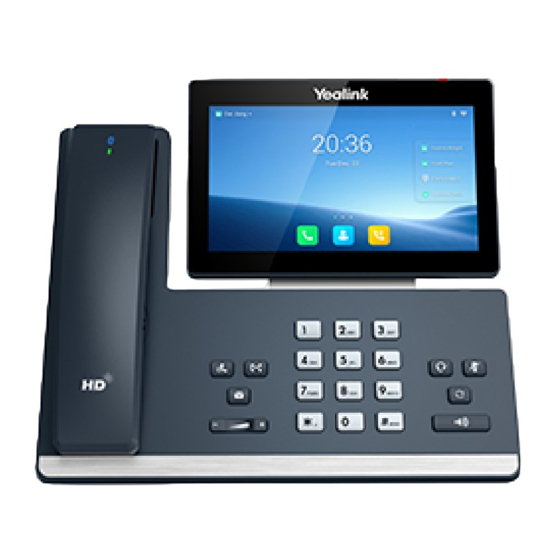
Yealink T58W User Guide Getting Started Getting Started Before you use your phone, take some time to get familiar with its features and user interface. The terms "the phone" and "your phone" refer to any of the IP phones. Unless specifically noted in this guide, all phone models are operated in similar ways. - Page 17 Yealink T58W User Guide Item Description Power LED Indicates call status, message status and phone’s system status. Indicator Allows you to select items and navigate menus on the touch-sensitive screen. Tap to select Touch Screen and highlight screen items. Shows information about calls, messages, time, date and other relevant data. •...
-
Page 18: T58 Hardware
(both near site and far site) will also be shown on the external mon- itor during a video call. Allows you to connect an optional USB device (for example, USB flash drive, DD10K) to USB2.0 Port your phone. T58 Hardware The Yealink USB camera CAM50 is optional for T58A/T58W/T58W Pro phones. - Page 19 Yealink T58W User Guide Item Description Power LED Indicates call status, message status and phone’s system status. Indicator Allows you to select items and navigate menus on the touch-sensitive screen. Tap to select Touch Screen and highlight screen items. Shows information about calls, messages, time, date and other relevant data. Toggles and indicates the headset mode.
-
Page 20: Bth58 Hardware
Yealink T58W User Guide Getting Started Item Description information on how to adjust the reversible tab, refer to Yealink Wall Mount Quick Install- ation Guide for Yealink IP Phones • Picking up the handset from the handset cradle, the hookswitch bounces and the phone Hookswitch connects to the line. -
Page 21: Camera Led Indicator
Yealink T58W User Guide LED Status Description Solid red The phone is initializing. Fast-flashing red (0.3s) The phone is ringing. Slowly-flashing red (1s) The phone receives a voice mail. Solid red for 0.5s and off for 3s alternately The phone enters the power-saving mode. Note : The above introduces the default LED status. -
Page 22: Screen And Icons
Yealink T58W User Guide Getting Started LED Status Description Solid red The handset is charging. Red for 3s The handset powers off automatically. Red and green flashing alternately The handset is finding the phone. Red, green and orange flashing alternately The handset is upgrading. - Page 23 Yealink T58W User Guide T58W Name Description Time and date Display the phone’s time and date. Tap to access the Camera when the phone is idle. Video Tap to stop transmitting video during a video call. Tap to turn on/off DND quickly. Forward Tap to enter Call Forward setting screen.
-
Page 24: Idle Screen
Yealink T58W User Guide Getting Started Name Description to delete all notifications. : tap to go back to the previous screen. : tap to return to the idle screen. Android Keys : tap to view and manage the list of recently used applications. You can swipe up from the bottom of the screen to hide this screen. - Page 25 Yealink T58W User Guide Name Description Status Bar Displays the phone’s default account, icons and time. Time The phone’s time is displayed on the right of the status bar. Icons Icons are displayed in the middle of the status bar. The label of the default account is displayed on the left of the status bar.
-
Page 26: The Second Idle Screen
Yealink T58W User Guide Getting Started Name Description Phone Dialer Tap to enter the dialing screen. Directory Tap to enter the Directory screen and view contacts. History Tap to enter the History screen and view call history. Screen Indicator Indicates which idle screen is displayed. Wallpaper Shows the specified wallpaper, which can be customized. -
Page 27: Icons In The Status Bar
Yealink T58W User Guide Widget Description Calendar Displays the data and upcoming events. Email Displays email list of the specified folder. Icons in the Status Bar The icons in the status bar help you easily get the current phone status, such as call and message status. Icons Description Icons... -
Page 28: Line Key Icons
Yealink T58W User Guide Getting Started Icons Description Icons Description Always Forward Phone Warning No Answer Forward PSTN box is detected Busy Forward Wireless Access Point Line Key Icons By viewing the line key icons, you can easily get the function of the line key. Icon indicators (associated with line key features) Icons Description... -
Page 29: Entering Information
Yealink T58W User Guide Gesture Action Touch an item on the screen with your finger, and then lift your finger. Touch an item for about 2 seconds without lifting your finger from the screen till an action Long Tap occurs. Touch and move. -
Page 30: English (Uk) Input Method
Yealink T58W User Guide Getting Started If you want to Action 3. Tap CUT/COPY on the top of the phone screen. 4. Long tap the desired field. 5. Tap PASTE. • Long tap the entered character(s). Drag / to select the characters you want to delete. Delete more characters at a time. - Page 31 Yealink T58W User Guide Item Description Tip: You can also tap at the bottom right corner of the phone screen to change the input method. Tap to access input options to configure Input languages or Android Key- board Settings (AOSP). You can use AOSP to configure Android keyboard including Input languages, Auto-capitalization, Sound on keypress and so to switch to the numeric&symbolic input mode.
-
Page 32: Google Pinyin Input Method
Yealink T58W User Guide Getting Started Item Description • Tap to enter special characters. Special Characters • Long tap a key then slide to choose one of the options to enter an alternate character. • Tap to delete the entered characters one by one. Delete Key •... - Page 33 Yealink T58W User Guide Tap (for T58W, long tap ) to switch to the Chinese input mode as shown below: T58A/VP59 T58W Tap to switch to the numeric&symbolic input mode as shown below: to switch to the symbolic input mode as shown below:...
-
Page 34: Using The Phone Keypad And Dial Pad
Yealink T58W User Guide Getting Started Related Topic Changing the Input Method Using the Phone Keypad and Dial Pad You can use the keypad on your phone or dial pad to enter data. The dial pad only provides digit keys, # key, and * key. -
Page 35: Call Features
Yealink T58W User Guide Call Features Call Features You can use the phone to place and answer calls, ignore incoming calls, transfer a call to someone else, conduct a conference call and perform other basic call features. Topics Changing the Default Account Placing Calls Answering Calls Switching Among the Handset, Speakerphone and Headset Modes... -
Page 36: Placing A Call From The Dialer
Yealink T58W User Guide Placing a Call from the Dialer Placing Multiple Calls Placing a Call with a Speed Dial Key Placing a Call Back to the Last Incoming Number Redialing a Number Dialing a Hotline Number Placing an International Call Placing a Call from the Call History Placing a Call from the Directory Placing an Anonymous Call... -
Page 37: Placing A Call Back To The Last Incoming Number
Yealink T58W User Guide Call Features 1. 1. Swipe left or right to go to the second idle screen. 2. Go to Settings > Features > Dsskey. 3. Select the desired line key. 4. Select SpeedDial from the Type field. 5. -
Page 38: Placing An International Call
Yealink T58W User Guide 1. 1. Swipe left or right to go to the second idle screen. 2. Go to Settings > Features > Hot Line. 3. Do one of the following: Enter the desired number in the Number field. Select and select the desired contact. -
Page 39: Placing A Call From The Google Contacts
Yealink T58W User Guide Call Features 1. Swipe left or right to go to the second idle screen. 2. Go to Settings > Features > Anonymous. 3. Select the desired line. 4. Turn on Local Anonymous. 5. (Optional.) Select On Code or Off Code from the Send Anonymous Code field. 6. -
Page 40: Answering Calls
Yealink T58W User Guide Before You Begin Make sure the Google Contacts feature is enabled. Procedure 1. Go to ) > Google Contacts. 2. Tap the desired contact or tap If the selected contact has multiple numbers, tap the desired number. Related Topics Enabling the Google Contacts Feature Searching for Google Contacts... -
Page 41: Answering A Call Automatically
Yealink T58W User Guide Call Features Answering a Call Automatically Auto answer enables you to automatically answer an incoming call in speakerphone (hands-free) mode when your phone is idle. Procedure 1. 1. Swipe left or right to go to the second idle screen. 2. -
Page 42: Switching Among The Handset, Speakerphone And Headset Modes
Yealink T58W User Guide Switching Among the Handset, Speakerphone and Headset Modes You can select the desired mode before placing a call or can alternate among Speakerphone, headset, and hand- set modes during a call. Procedure 1. During the call, pick up the handset, press the Speakerphone key , or press the HEADSET key For example, if you're using the handset, press the HEADSET key ) to switch to the headset, or press the Speakerphone key to switch to the speakerphone. -
Page 43: Switching Between Video Call And Audio-Only Call
Yealink T58W User Guide Call Features 1. Tap Audio or Video to establish an audio-only call or video call. Switching between Video Call and Audio-only Call Your system administrator can make you have the option to switch between a video call and an audio-only call dur- ing the active call. -
Page 44: Going Back To The Idle Screen During A Call
Yealink T58W User Guide Returning to the Talking Screen Going Back to the Idle Screen during a Call During the call, you can go back to the idle screen to access other applications. Procedure 1. Tap to go back to the idle screen. For T58W, tap More >... -
Page 45: Swapping Video
Yealink T58W User Guide Call Features Hiding the Local Video Window Swapping Video During a video call, you can switch the locations of near-site video and far-site video. Procedure 1. Tap the small video window during a video call. Changing the Video Layout to the Full Screen Mode You can change the video layout from “one large, other small”... -
Page 46: Capturing A Screenshot When The Phone Is Idle
Yealink T58W User Guide The screenshots are saved in "*.png" format in the internal SD card with the name consisting of a prefix “Screen- shot” and date & time stamp. You can view the screenshots by File Manager or Gallery. : You can view the screenshots on either the phone itself or on a computer using an application capable of viewing "*.png"... -
Page 47: Silencing Or Rejecting Incoming Calls
Yealink T58W User Guide Call Features Silencing or Rejecting Incoming Calls When you receive an incoming call, you can choose to silence or reject the call instead of answering. Topics Silencing a Call Rejecting a Call Manually Rejecting Anonymous Calls Rejecting Calls with Do Not Disturb (DND) Silencing a Call You can silence a call to stop your phone from ringing. -
Page 48: Rejecting Calls With Do Not Disturb (Dnd)
Yealink T58W User Guide 5. (Optional.) Select On Code or Off Code in the Send Anonymous Rejection Code field. 6. Enter the anonymous call rejection on code and off code respectively in the On Code and Off Code field beneath the Send Anonymous Rejection Code field. 7. -
Page 49: Rejecting Calls With Dnd On A Specific Line
Yealink T58W User Guide Call Features Rejecting Calls with DND on a Specific Line By default, the DND feature applies to all lines on your phone. Your system administrator can change the DND mode to Custom so that you can enable DND for specific lines. Before You Begin The DND mode is set to Custom. -
Page 50: Ending Calls
Yealink T58W User Guide All Off You can tap > at the top right to deactivate DND for all lines. Ending Calls You can end the current call at any time. Procedure 1. Do one of the following: If you are using the handset, select End Call or hang up the handset. If you are using the headset, select End Call. -
Page 51: Muting/Unmuting Audio
Yealink T58W User Guide Call Features Muting/Unmuting Audio When you are in a call, you can mute the audio, so that you can hear the other person, but they cannot hear you. Procedure 1. Press the MUTE key ) during a call. The mute key LED glows red. -
Page 52: Holding And Resuming Calls
Yealink T58W User Guide 2. Press the MUTE key ) again to deactivate the mute state. Holding and Resuming Calls You can place an active call on hold and resume the call when you are ready. When you place a call on hold, the held party may hear the music played by its sever. -
Page 53: Redirecting Incoming Calls
Yealink T58W User Guide Call Features 1. Press the HOLD key or select Resume. If multiple calls are placed on hold, select the desired call first. Note : When you have multiple calls on the phone and the current call is active, you can tap the call directly to swap to the held call. -
Page 54: Forwarding All Incoming Calls On A Specific Line
Yealink T58W User Guide Forward If you have not configured the call forward type, tapping will turn to the Always Forward setting screen. Forwarding All Incoming Calls on a Specific Line By default, the forwarding setting applies to all lines on your phone. Your system administrator can change the for- ward mode to Custom so that you can forward all incoming calls for specific lines. -
Page 55: Forwarding Incoming Calls With A Forward Key
Yealink T58W User Guide Call Features 3. Select Forward ( The phone prompts a call forward message. Forwarding Incoming Calls with a Forward Key When the phone receives an incoming call, you can easily tap the Forward key to forward the incoming call to a spe- cific contact. -
Page 56: Performing A Blind Transfer
Yealink T58W User Guide Performing Transfer with a Transfer Key Performing a Blind Transfer You can transfer a call to another contact immediately without consulting with her/him first. Topics Performing a Blind Transfer Normally Performing a Blind Transfer Conveniently Performing a Blind Transfer Normally You can enter the number, or select a contact from directory or history to perform a blind transfer. -
Page 57: Performing A Semi-Attended/Attended Transfer
Yealink T58W User Guide Call Features Then the call is connected to the number specified in the Value field of the speed dial or BLF key. When there is an active call and one or more calls on hold, drag the active far-site window to another held one. And then tap Transfer from the screen. -
Page 58: Performing Transfer With A Transfer Key
Yealink T58W User Guide 3. Do one of the following: When you hear the ringback tone, press the TRANSFER key or select Transfer to finish the semi-atten- ded transfer. After the contact answers the call, press the TRANSFER key or select Transfer to finish the attended transfer (consultative transfer). -
Page 59: Performing A Semi-Attended/Attended Using A Transfer Key
Yealink T58W User Guide Call Features Performing a Semi-attended/Attended Using a Transfer Key After you have set a Transfer key with a specific contact, you can perform a semi-attended/attended transfer by using it. Before You Begin Confirm with your system administrator that the transfer mode has set to perform attended transfer. Procedure 1. -
Page 60: Local Conference
Yealink T58W User Guide Avoid tapping or rustling papers near the microphone. Speak in your normal voice without shouting. Topics Local Conference Network Conference Local Conference You can create up to ten-way audio-only and video mixed local conference including a maximum of three-way video calls. -
Page 61: Creating A Hybrid Conference
Yealink T58W User Guide Call Features And then tap Conference from the pop-up box. Tap the desired active call for a conference and tap Conference. On the T58W phones, select Invite. Tap the Hold call to join the calls in the conference. Creating a Hybrid Conference You can merge the calls on your phone, and connected mobile phone into a hybrid conference. -
Page 62: Creating A Multi-Party Conference With A Conference Key
Yealink T58W User Guide Related Topic Pairing and Connecting the Bluetooth-enabled Mobile Phone Creating a Multi-Party Conference with a Conference Key You can create a multi-party conference using a Conference key on the idle screen. Topics Setting a Conference Key Initiating a Multi-Party Conference Setting a Conference Key You can set a conference key to create a multi-party conference. -
Page 63: Holding Or Resuming A Conference Call
Yealink T58W User Guide Call Features Setting a Conference Key Holding or Resuming a Conference Call When you place a conference call on hold, other participants cannot hear each other until you resume the held con- ference call. Procedure 1. Press the HOLD key or tap Hold to place the conference on hold. -
Page 64: Setting Up A Network Conference
Yealink T58W User Guide Setting Up a Network Conference You can set up a network conference with multiple parties. Procedure 1. Place a call to the first party. 2. Select Conference to place a new call. For T58W, select Invite. The active call is placed on hold. -
Page 65: Recording A Conference
Yealink T58W User Guide Call Features Recording a Conference You can record conference calls in the same way as other calls. All conference participants are recorded while recording. The following lists exceptions: If one of the participants holds the conference call, only that participant is recorded. When a conference call is placed on hold, recording of the conference is paused. -
Page 66: Checking Storage Space
Yealink T58W User Guide Checking Storage Space You can check the total space or available space of the phone or connected USB flash drive. Procedure 1. Swipe left or right to go to the second idle screen. 2. Go to Settings > Status > Storage. Multicast Paging Multicast Paging allows you to broadcast instant audio announcements to users who are listening to a specific mul- ticast group on a specific channel. -
Page 67: Sending A Paging By A Multicast Paging Key
Yealink T58W User Guide Call Features 1. 1. Swipe left or right to go to the second idle screen. 2. Go to Settings > Features > Dsskey. 3. Select the desired line key. 4. Select Key Event from the Type field. 5. -
Page 68: Setting A Paging Group
Yealink T58W User Guide 4. Select Key Event from the Type field. 5. Select Paging List from the Key Type field. 6. (Optional.) Enter the string that will display on the phone screen in the Label field. 7. Select Edit : By default, you can drag the line key to the field to set it. -
Page 69: Receiving Multicast Paging
Yealink T58W User Guide Call Features The phone prompts you to delete the paging group or not. 4. Select OK. If you want to delete all paging groups, you can tap on the top-right of the phone screen. Receiving Multicast Paging Your system administrator has set a listening paging group for you, you can automatically receive a paging call when the phone is idle. - Page 70 Yealink T58W User Guide Scene 2-Far site does not support video During the call, party A shares content from the computer A using Yealink VC Desktop with party B. Phone A prompts that it is sharing content, and the Yealink VC Desktop on computer B displays the shared content from party A.
-
Page 71: Advanced Call Features
Yealink T58W User Guide Advanced Call Features Advanced Call Features You can perform some server-dependent tasks on the phone. Contact your system administrator to find out if your phone supports these advanced call features. Topics Using Call Completion Call Pickup Call Park and Call Retrieve Busy Lamp Field (BLF) BLF List... -
Page 72: Call Pickup
Yealink T58W User Guide Call Pickup You can use call pickup to answer someone else’s incoming call on your phone. The phone supports the following two call pickup features: Directed Call Pickup: allows you to pick up incoming calls to another phone. Group Call Pickup: allows you to pick up incoming calls to any phone within a predefined group. -
Page 73: Picking Up A Group Call Directly
Yealink T58W User Guide Advanced Call Features Picking up a Group Call Directly When any phone within a predefined group receives an incoming call, you can pick up that call on your phone. If there are multiple incoming calls on the group at the same time, you can only pick up the first incoming call. Before You Begin Your system administrator has enabled the group call pickup and set the group call pickup code. -
Page 74: Call Park And Call Retrieve
Yealink T58W User Guide Procedure 1. 1. Swipe left or right to go to the second idle screen. 2. Go to Settings > Features > Dsskey. 3. Select the desired line key. 4. Select Key Event from the Type field. 5. -
Page 75: Retrieving A Parked Call In The Fac Mode
Yealink T58W User Guide Advanced Call Features 2. Do one of the following: If you want to park the call against the local extension, press the # key. If you want to park the call against the desired extension, enter the extension (for example, 4606) where you want to park the call and press the # key. -
Page 76: Retrieving A Parked Call In The Transfer Mode
Yealink T58W User Guide The call will be directly transferred to the shared parking lot. : You can use a Call Park key to park a call to a specific shared parking lot directly. Related Topic Parking or Retrieving a Call with a Park or Retrieve Key Retrieving a Parked Call in the Transfer Mode You can retrieve a parked call in the transfer mode from any phone in the same network. -
Page 77: Retrieving A Parked Call Using A Retrieve Key
Yealink T58W User Guide Advanced Call Features 3. Select the desired line key. 4. Select Key Event from the Type field. 5. Select Call Park from the Key Type field. 6. (Optional.) Select the desired line from the Account ID field. 7. -
Page 78: State Indicator Of Remote Line By Blf Key
Yealink T58W User Guide Parking or Retrieving a Call by BLF Key State Indicator of Remote Line by BLF Key You can get the monitored line's status by viewing the icon indicator of the BLF key. Icons Description Icons Description The monitored line is idle The monitored line is ringing. -
Page 79: Setting A Blf Key
Yealink T58W User Guide Advanced Call Features Setting a BLF Key You can set a BLF key to monitor a specific line for status changes on the phone. Procedure 1. 1. Swipe left or right to go to the second idle screen. 2. -
Page 80: Performing A Semi-Attended/Attended Transfer
Yealink T58W User Guide Check with your system administrator if the Transfer Mode via Dsskey is set to Blind Transfer. Procedure 1. During a call, tap the BLF key of the monitored line which you want to transfer this call to. Performing a Semi-attended/Attended Transfer During a call, you can transfer the call to the monitored contact in the semi-attended/attended-transfer way. -
Page 81: State Indicator Of Remote Line By Blf List Key
Yealink T58W User Guide Advanced Call Features Topics State Indicator of Remote Line by BLF List Key Audio Alert for BLF Pickup Visual Alert for BLF Pickup Ring Type for BLF Parked Call Monitor Visual Alert for BLF Parked Call Monitor Picking up a Remote Call by BLF List Key Transferring a Call by BLF List Key Parking a Call by a BLF List Key... -
Page 82: Ring Type For Blf Parked Call Monitor
Yealink T58W User Guide Ring Type for BLF Parked Call Monitor The Audio Alert for BLF Parked Call Monitor feature allows your phone to play a tone when a call is parked against the monitored user’s phone number. Topic Setting an Alert Tone for the BLF Parked Call Monitor Setting an Alert Tone for the BLF Parked Call Monitor You can set the alert ring type when there is a call parked to the monitored lines. -
Page 83: Picking Up A Remote Call By Blf List Key
Yealink T58W User Guide Advanced Call Features Picking up a Remote Call by BLF List Key When the monitor user is not at his/her desk and someone rings his/her line, you can pick up the call simply by tap- ping the flashing BLF List key. Before You Begin Check with your system administrator to find out if this feature is available on your phone. -
Page 84: Parking A Call By A Blf List Key
Yealink T58W User Guide The phone will dial out the number of the monitored line. 2. Tap the BLF List key of the monitored user again or Transfer to complete the transfer when the monitored user receives ringback or after the monitored user answers the call. Parking a Call by a BLF List Key You can use the BLF List key to park a call to the monitored user who is idle. -
Page 85: State Indicator Of Shared Line
Yealink T58W User Guide Advanced Call Features Placing Calls on a Shared Line Answering Calls on a Shared Line Placing a Call on Public Hold Placing a Call on Private Hold Retrieving a Held Call on a Shared Line Barging in an Active Call on a Shared Line Pulling a Shared Call on a Shared Line State Indicator of Shared Line You can get the shared line's status by viewing the icon indicator of the shared line key. -
Page 86: Placing A Call On Private Hold
Yealink T58W User Guide Procedure 1. During a call, press the HOLD key or Hold. Placing a Call on Private Hold In the SCA scenario, you can place a call on private hold that only you can retrieve the held call. The PriHold soft key can be preset by your system administrator, you can also set a line key as the private hold key manually if the PriHold soft key is not available on your phone. -
Page 87: Pulling A Shared Call On A Shared Line
Yealink T58W User Guide Advanced Call Features 1. Long tap the desired line key. The Cancel, CallPull, NewCall and Barge In appear on the screen. 2. Select Barge In to interrupt the active call. Pulling a Shared Call on a Shared Line In SCA scenario, both you and other users can pull an existing call from another shared phone that is an active or hold state. -
Page 88: State Indicator Of The Intercom Key
Yealink T58W User Guide Topics State Indicator of the Intercom key Placing an Intercom Call Picking up an Incoming Call of the Target Extension Answering an Intercom Call State Indicator of the Intercom key You can get the intercom status by viewing the icon indicator of the Intercom key. Icons Description Icons... -
Page 89: Answering An Intercom Call
Yealink T58W User Guide Advanced Call Features Before You Begin Get the directed call pickup code from your system administrator. Procedure 1. Drag the Intercom key to the Edit field. 2. Enter the directed call pickup code in the Extension field. 3. -
Page 90: Video/Voice Mail
Yealink T58W User Guide Video/Voice Mail Voice mail feature allows you to leave voice/video mails for someone or listen to your voice/video mail messages on your phone. This feature is set up on the server side and not all servers support this feature. To send video mails, you need to connect a USB camera to the phone in advance. -
Page 91: Using The Hot Desking
Yealink T58W User Guide Advanced Call Features Using the Hot Desking You can use hot desking to log out from the current account and then log in to a new account. So many users can share one phone resource at different times. Note : Hot desking is not available on all servers. -
Page 92: Changing The Acd Status
Yealink T58W User Guide 1. Tap the ACD key when the phone is idle. 2. Enter your ACD account information. 3. Select Login. Changing the ACD Status You can tap the ACD key to change your current ACD user status. Procedure 1. -
Page 93: Directory
Yealink T58W User Guide Directory Directory The phone provides several types of phone directories, which can be customized by your system administrator. Topics Local Directory Blocklist Mobile Contacts Google Contacts Remote Phone Book Local Directory You can store up to 1000 contacts and 48 groups in your local directory, you can search, add, edit and delete a con- tact. -
Page 94: Deleting Contact Groups
Yealink T58W User Guide For T58W, select after the desired group and then select Rename. 3. Edit the group name. 4. Select Deleting Contact Groups When you delete a contact group, the contacts in the group will not be deleted. You can view the contacts in All Contacts (Local Directory) list. -
Page 95: Editing Contacts
Yealink T58W User Guide Directory Editing Contacts You can update your contacts' information. Procedure 1. Select 2. If you want to view a contact to the specified contact group, select the contact group first. 3. Select after the desired contact. For T58W, tap the desired contact and then select 4. -
Page 96: Moving A Local Directory Contact To The Shared Directory
Yealink T58W User Guide 3. Select after the desired contact. For T58W, tap the desired contact and then select 4. Select Blocklist. For T58W, select Move to Blocklist. The phone prompts you to move this contact to the blocklist or not. 5. -
Page 97: Blocklist
Yealink T58W User Guide Directory Blocklist Incoming calls from the Blocklist are rejected automatically. You can store up to 30 contacts in the blocklist to block unwanted callers. Topics Adding a Blocklist Contact Viewing Blocklist Contacts Editing a Blocklist Contact Deleting a Blocklist Contact Moving a Blocklist Contact to the Local Directory Adding a Blocklist Contact... -
Page 98: Deleting Blocklist Contacts
Yealink T58W User Guide For T58W, tap the desired contact and then select 3. Edit the blocklist contact information. 4. Select or OK. Deleting Blocklist Contacts You can delete one or all blocklist contacts. If a contact is removed from the blocklist, you can answer the call from the contact normally. -
Page 99: Mobile Contacts
Yealink T58W User Guide Directory 3. Select Local Directory from the Group field. 4. Select or OK. Mobile Contacts You can synchronize the contacts on your mobile phone to your IP phone. The mobile phone contacts will be impor- ted to your IP phones and stored under the Mobile Contacts directory. You can save mobile contacts to the local directory, but you cannot save a local contact to the Mobile Contacts dir- ectory. -
Page 100: Updating The Mobile Contacts
Yealink T58W User Guide Select Search or Enter your search criteria. The contacts whose name or phone number matches the search string will be displayed in the result list. Select the desired letter (for example, T) along the right side to jump to the contacts whose names start with T or t. -
Page 101: Viewing Google Contacts
Yealink T58W User Guide Directory 1. Swipe left or right to go to the second idle screen. 2. Go to Settings > Basic Settings > Google Contacts. 3. Mark the On radio box. Related Topic Adding APP Accounts Viewing Google Contacts After enabling the Google contacts feature, you can view a list of the Google contacts on your phone. -
Page 102: Deleting A Google Contact
Yealink T58W User Guide 3. Tap the desired field to edit the contact information. 4. Tap or OK. Deleting a Google Contact You can delete any contact in the Google Contacts. The operation will sync on the Google contact server. Procedure 1. -
Page 103: Searching For Remote Phone Book Contacts
Yealink T58W User Guide Directory Searching for Remote Phone Book Contacts In the Remote Phone Book, you can enter search criteria to find your desired contact quickly. Procedure 1. Select ) > Remote Phone Book. 2. Select the desired remote phone book. 3. -
Page 104: Call History
Yealink T58W User Guide Call History Call History The call history list includes Missed Calls, Placed Calls, Received Calls and Forwarded Calls, and each list holds 100 entries. Topics Call History Icons Viewing History Records Saving a History Record to Local Directory Saving a History Record to Blocklist Adding a History Record to Shared Directory Deleting History Records... -
Page 105: Adding A History Record To Shared Directory
Yealink T58W User Guide 1. Tap 2. Select the desired list. 3. Select > Blocklist. 4. Edit the contact information. 5. Select or OK. Adding a History Record to Shared Directory After you view your history record, you can add the entry to the Shared Directory. Before You Begin Make sure the Shared Directory is available on your phone. -
Page 106: Disabling History Record
Yealink T58W User Guide Call History 1. Select 2. Select the desired list. 3. Select Settings. For T58W, tap 4. Select Select All. 5. Select The phone prompts you to delete all the records or not. 6. Select OK. Disabling History Record If you disable history record, you cannot save any call log on the phone. -
Page 107: System Applications
Yealink T58W User Guide System Applications System Applications The system applications are pre-installed on your phone and they cannot be uninstalled. Topics Managing Applications and Widgets Managing Running Applications APP Accounts File Manager Gallery Recorder Email Browser Calendar Calculator Clock Managing Applications and Widgets You can add widgets to the idle screen for easy use, and adjust the location of applications and widgets. -
Page 108: Moving An Application Or Widget
Yealink T58W User Guide 2. Drag the border of the frame to adjust the size. Moving an Application or Widget You can move an application or widget to a different spot on the idle screen or to a different idle screen. Before You Begin Before moving an application or widget, you should know the following: You can drag an application or widget to the rightmost of the third idle screen to add a new screen. -
Page 109: Creating A Folder
Yealink T58W User Guide System Applications 1. Long tap the desired item for about 2 seconds. The Remove field will appear on the top of the phone screen. 2. Drag the item to the Remove field to remove it. Creating a Folder You can create a folder to organize your applications. -
Page 110: Renaming A Folder
Yealink T58W User Guide A new folder containing the selected applications is automatically created. The folder will be deleted automatically if there is only one application in the folder. Renaming a Folder You can rename a folder to make it easier to be recognized. It is not available to T58W phones. -
Page 111: App Accounts
Yealink T58W User Guide System Applications Procedure Do one of the following: Swipe the desired application left or right to stop the running application. Tap to stop all running applications. Tap the desired application to access the application. If there are no running applications, the phone screen will prompt “Your recent screens appear here”. APP Accounts Before using Email and Calendar, or you want to sync contacts with Google, you need to register an APP account. -
Page 112: Syncing App Account Information
Yealink T58W User Guide 4. Select the desired APP account type. 5. Register your APP account according to the wizard. Syncing APP Account Information After registering the APP account, you can sync the account information if required. Procedure 1. Swipe left/right to go to the second idle screen. 2. -
Page 113: File Manager
Yealink T58W User Guide System Applications 1. Swipe left/right to go to the second idle screen. 2. Go to Settings > Basic Settings > APP accounts. 3. Tap the desired account type. 4. Select the desired account. 5. Tap > Remove account. The phone prompts you whether to remove the account. -
Page 114: Copying Files
Yealink T58W User Guide Copying Files You can copy the files that stored in the USB flash drive to internal SD card, or vice versa. Procedure 1. Swipe left or right to go to the second idle screen. 2. Tap ) to launch File Manager. -
Page 115: Uploading Files
Yealink T58W User Guide System Applications 6. Tap the destination storage device. 7. Tap The files are cut successfully with a prompt. Uploading Files You can upload the files to the server designated by the administrator. Procedure 1. Swipe left or right to go to the second idle screen. 2. -
Page 116: Sharing Pictures/Videos/Audio Via Bluetooth
Yealink T58W User Guide Sharing Pictures/Videos/Audio via Bluetooth You can share files in the File Manager with other Bluetooth devices. Before You Begin Make sure the Bluetooth mode is enabled, and the Bluetooth device is discoverable. Procedure 1. Swipe left or right to go to the second idle screen. 2. -
Page 117: Gallery
Yealink T58W User Guide System Applications 1. Swipe left or right to go to the second idle screen. 2. Tap ) to launch File Manager. 3. Tap Photos/Videos/Audios in Local Storage field. If a USB flash drive has been connected to your phone, you can tap Photos/Videos/Audios in the USB Storage field to view the files stored in USB flash drive. -
Page 118: Editing Pictures
Yealink T58W User Guide Procedure 1. Swipe left or right to go to the second idle screen. 2. Tap ) to launch the Gallery. By default, the pictures/videos are displayed as thumbnails in the albums arrangement mode. 3. (Optional.) Tap Albums. You can tap Albums/Locations/Times/People/Tags to view the pictures/videos in different arrangement modes. -
Page 119: Adding A Filter For Pictures
Yealink T58W User Guide System Applications Procedure 1. Swipe left or right to go to the second idle screen. 2. Tap ) to launch the Gallery. 3. Tap the desired picture album. 4. Tap the desired picture. 5. Tap > Rotate left/Rotate right to rotate the picture left/right 6. -
Page 120: Coloring Pictures
Yealink T58W User Guide Tap Mirror to flip the picture symmetrically. Tap Draw to draw the picture. 7. Tap SAVE. Coloring Pictures You can color pictures to make the pictures displayed better. Procedure 1. Swipe left or right to go to the second idle screen. 2. -
Page 121: Taking A Picture/Video
Yealink T58W User Guide System Applications 1. Swipe left or right to go to the second idle screen. 2. Tap ) to launch the Gallery. 3. Tap the desired album. 4. Do one of the following: Long tap the desired picture/video. Go to >... - Page 122 Yealink T58W User Guide Before You Begin Before sharing pictures/videos via Bluetooth, make sure the Bluetooth device is discoverable. Procedure 1. Swipe left or right to go to the second idle screen. 2. Tap ) to launch the Gallery. 3. Tap the desired picture album. 4.
-
Page 123: Sharing Pictures/Videos Via Email
Yealink T58W User Guide System Applications You can tap the notification to view the detail information about the shared files. Sharing Pictures/Videos via Email You can share the pictures/videos in the Gallery via Email. Before You Begin Make sure you have signed in an email account. Procedure 1. -
Page 124: Recorder
Yealink T58W User Guide 7. Enter the email account you want to send the email to in the To field. 8. (Optional.) Enter the email subject in the Subject field. 9. Tap to send the email. The pictures/videos are transferred as a mail attachment. Note : The attachment files size must be within 5MB. -
Page 125: Playing A Recorded Call
Yealink T58W User Guide System Applications 1. Swipe left or right to go to the second idle screen. 2. Tap ) to launch the Recorder. 3. Tap to start recording. 4. Do one of the following: Tap to pause the recording. Tap ... -
Page 126: Renaming The Recording
Yealink T58W User Guide Procedure 1. Tap to stop the playing. Renaming the Recording You can rename the recording for better recognition. Procedure 1. Swipe left or right to go to the second idle screen. 2. Tap ) to launch the Recorder. 3. -
Page 127: Checking Storage Space
Yealink T58W User Guide System Applications 3. Tap The phone prompts you whether to delete all the audio files. 4. Tap OK. Checking Storage Space You can check the total space or available space of the phone or connected USB flash drive. Procedure 1. -
Page 128: Recording Videos
Yealink T58W User Guide 1. Swipe left or right to go to the second idle screen. 2. Tap ) to launch the Camera. 3. (Optional.) Tap , and then do the following: to turn on the camera grid. to configure the camera timer. 4. -
Page 129: Signing In Email
Yealink T58W User Guide System Applications Adding Multiple Email Accounts Using Email Widget Sending Files via Email Signing in Email When launching the Email for the first time, a wizard will be provided for you to set up the email account step by step. -
Page 130: Marking/Printing Email
Yealink T58W User Guide If the email you want to delete is not in the inbox, you can tap on the top-left of the phone screen to select the folder that contains the email you want to delete. 3. Long tap the desired email. 4. -
Page 131: Using Email Widget
Yealink T58W User Guide System Applications Using Email Widget After you sign in the email, you can choose the desired folder to display on the widget. If you add an email widget to display the unread emails, and you want the widget to display the incoming emails, you should add a new widget. -
Page 132: Browsing A Web Page
Yealink T58W User Guide Browsing a Web Page You can use the Browser just like normal browsers to browse websites. Procedure 1. Swipe left or right to go to the second idle screen. 2. Tap ) to launch the Browser. 3. -
Page 133: Editing A Bookmark
Yealink T58W User Guide System Applications 4. Tap the web page you want to visit. Editing a Bookmark You can edit the details of your bookmark for better recognition. Procedure 1. Swipe left or right to go to the second idle screen. 2. -
Page 134: Setting A Home Page
Yealink T58W User Guide 1. Swipe left or right to go to the second idle screen. 2. Tap ) to launch the Browser. 3. Tap to access the BOOKMARKS list. All pre-configured bookmarks are in the list. 4. Long tap the bookmark you want to delete. 5. -
Page 135: Signing Into Calendar
Yealink T58W User Guide System Applications Signing Into Calendar Before creating an event, you should sign into the calendar with an email account first. If you have registered an account on the Email already, you can skip this step. Procedure 1. -
Page 136: Checking Events
Yealink T58W User Guide 5. Edit the event. 6. Tap DONE. Checking Events On the calendar, you can check the information about an event you have added. Procedure 1. Swipe left or right to go to the second idle screen. 2. -
Page 137: Calculator
Yealink T58W User Guide System Applications 1. Swipe left or right to go to the second idle screen. 2. Tap ) to launch the Calendar. 3. Go to > Settings. 4. Customize the general settings and account settings. Calculator You can use the Calculator to perform simple or complex calculations. Procedure 1. -
Page 138: Editing An Alarm Clock
Yealink T58W User Guide 6. You can do the following: Select the Repeat check box, and then tap the repeat day of the alarm. Tap . Select a desired ring tone for the alarm, and then tap OK. Tap the Label field. Enter a label for the alarm, and then tap OK. -
Page 139: Clock
Yealink T58W User Guide System Applications 3. Tap > Settings. 4. You can do the following: Tap the desired lasting time of the alarm bell from the Silence after field. The alarm clock will automatically stop after this specified period of time. Tap the desired snooze time from the Snooze length field, and tap OK. -
Page 140: Setting A Stopwatch
Yealink T58W User Guide 1. Tap the digital clock widget on the home screen. 2. Tap 3. Enter the time by tapping the digits on the right of the screen. You can tap to delete the entered numbers. 4. Tap When the timer is running, you can do the following: to add an additional minute. -
Page 141: Customizing Your Phone
Yealink T58W User Guide Customizing Your Phone Customizing Your Phone You can make your phone more personalized by customizing various settings. Topics Changing the Administrator Password Wallpaper Screen Saver Changing the Screen Backlight and Time Changing the Language Changing the Input Method Time &... -
Page 142: Adding A Wallpaper From A Usb Flash Drive
Yealink T58W User Guide 3. Select Gallery or Wallpapers and then select the desired image. 4. Select Set wallpaper. Adding a Wallpaper from a USB Flash Drive You can use a picture that is stored on a USB flash drive as the background image of your phone. When USB flash drive is connected to your phone, the pictures on the USB flash drive are shown in the album. - Page 143 Yealink T58W User Guide Customizing Your Phone Backlight Time: The delay time to change the brightness of the phone screen when the phone is inactive. Backlight time includes the following settings: Always On: Backlight is on permanently. 30min, 1h, 2h,4h, 6h, 8h or 12h: Backlight is changed when the phone is inactive after the designated time. Procedure 1.
-
Page 144: Changing The Language
Yealink T58W User Guide Changing the Language Your phone supports several languages that you can choose to use on the phone. Contact your system administrator to find out exactly which languages are supported on your phone. Procedure 1. Swipe left or right to go to the second idle screen. 2. -
Page 145: Time & Date
Yealink T58W User Guide Customizing Your Phone Time & Date You can set the time and date manually. The time and date formats are also variable. Topics Setting the Time and Date Manually Changing the Time and Date Format Setting the Time and Date Manually If your phone cannot obtain the time and date automatically, you can set it manually. -
Page 146: Phone Lock
Yealink T58W User Guide You can also disable “#” and ”*" to be used as the send key. Procedure 1. Swipe left or right to go to the second idle screen. 2. Go to Setting > Features > Key As Send. 3. -
Page 147: Unlocking Your Phone
Yealink T58W User Guide Customizing Your Phone Unlocking Your Phone You can use an unlock PIN to unlock the phone. If you forget the unlock PIN, you can enter the administrator password to unlock your phone, and then automatically access the PIN change screen. Procedure 1. -
Page 148: Changing The Locations Of The Line Keys
Yealink T58W User Guide When there is at least a line key configured, tap on the bottom-left of the line key list. Swipe left or right to go to the second idle screen, go to Settings > Features > Dsskey. Tap the desired line key. -
Page 149: Deleting A Line Key
Yealink T58W User Guide Customizing Your Phone The following shows the locations of two line keys after exchange: Deleting a Line Key You can delete a line key when you no longer need the corresponding function. Procedure 1. Drag the desired line key to the Delete field. The phone prompts you to delete the DSS key or not. - Page 150 Yealink T58W User Guide 2. Select OK.
-
Page 151: Audio Settings
Yealink T58W User Guide Audio Settings Audio Settings You can change the basic audio settings on your phone. Topics Adjusting the Volume Setting the Ring Tone Disabling the Key Tone Enabling Touch Tone Configuring Notification Sound Enabling Silent Mode Adjusting the Volume You can adjust the volume of the ringer, media, and audio during a call. -
Page 152: Setting A Ring Tone For A Group
Yealink T58W User Guide 5. Select Setting a Ring Tone for a Group You can select a unique ring tone for various groups in your Local Directory. Note : You can only set a ring tone for a group that is added manually. Procedure 1. -
Page 153: Configuring Notification Sound
Yealink T58W User Guide Audio Settings 1. Swipe left or right to go to the second idle screen. 2. Go to Settings > Basic Settings > Sound > Touch Tone. 3. Turn on Touch Tone. 4. Select Configuring Notification Sound The phone will produce a notification sound when receiving a notification (for example, incoming email notification). -
Page 154: Bluetooth
Yealink T58W User Guide Bluetooth Bluetooth Bluetooth enables low-bandwidth wireless connections within a range of 10 meters (32 feet). The best performance is in the 1 to 2 meters (3 to 6 feet) range. You can activate the Bluetooth mode, and then pair and connect the Bluetooth device with your phone. You can pair up to countless Bluetooth devices with your phone;... -
Page 155: Pairing And Connecting The Bluetooth-Enabled Mobile Phone
Yealink T58W User Guide The connection will be completed successfully with a prompt appears under the Bluetooth headset name. The Bluetooth icon appears in the status bar. Related Topic Activating the Bluetooth Mode Pairing and Connecting the Bluetooth-enabled Mobile Phone When you need to use the phone to handle the mobile phone's calls, you can pair and connect the Bluetooth- enabled mobile phone. -
Page 156: Pairing And Connecting Two Bluetooth Devices
Yealink T58W User Guide Bluetooth The phone prompts you to sync phone contacts temporarily. 6. Tap OK to enable the mobile contacts sync feature and the phone will sync the mobile contacts temporarily, or tap Cancel to disable mobile contacts sync feature. The connection will be completed successfully with a prompt appears under the Bluetooth-enabled mobile phone name. -
Page 157: Enabling The Mobile Contacts Sync Feature
Yealink T58W User Guide Viewing Your Mobile Contacts Enabling the Mobile Contacts Sync Feature You can choose to enable the phone to sync the mobile contacts. Before You Begin Make sure that the Bluetooth-enabled mobile phone is paired and connected to your phone and the phone audio feature is enabled. -
Page 158: Configuring The Phone Audio Feature
Yealink T58W User Guide Bluetooth Answer a call. An incoming call to your mobile phone is also shown on the phones, you can answer the call on the phone. The phone will firstly match the contacts in the mobile contacts directory to present the caller identity. -
Page 159: Disabling Bluetooth Device Discovery
Yealink T58W User Guide 3. Enter the desired name in the Device Name field. 4. Select Related Topics Activating the Bluetooth Mode Disabling Bluetooth Device Discovery Disabling Bluetooth Device Discovery After the Bluetooth is activated, the phone is automatically placed in Open Discover mode to make it visible to other Bluetooth devices. -
Page 160: Sending Files Via Bluetooth
Yealink T58W User Guide Bluetooth Sending Files via Bluetooth You can use the Gallery or File Manager to share pictures, videos or audio with an available Bluetooth device in your area. Related Topics Sharing Pictures/Videos via Bluetooth Sharing Pictures/Videos/Audio via Bluetooth Receiving Files via Bluetooth The available Bluetooth devices in your area can share pictures, audio, videos, documents with your phone. - Page 161 Yealink T58W User Guide Procedure 1. Do one of the following: Swipe down from the top of the screen. Swipe left or right to go to the second idle screen, go to Settings > Basic Settings > Bluetooth. 2. Turn off the Bluetooth. The Bluetooth icon disappears from the status bar.
-
Page 162: Wireless Network
Yealink T58W User Guide Wireless Network Wireless Network The phone can be connected to the wireless network if Wi-Fi is available within the area. Note : Enabling Bluetooth may degrade your wireless network connection. For improved wireless network performance, you should disable Bluetooth when it is not in use. -
Page 163: Connecting To The Wireless Network Using Wi-Fi Protected Setup
Yealink T58W User Guide 3. (Optional.) To research the available network, select > Scan. 4. Tap the desired wireless network (SSID) to connect to it. 5. Enter the desired password in the Password field. 6. (Optional.) Tap to make the password visible. 7. -
Page 164: Viewing The Wireless Network Information
Yealink T58W User Guide Wireless Network Procedure 1. Swipe left or right to go to the second idle screen, go to Settings > Basic Settings > Wi-Fi. 2. Select > Add. 3. Enter the desired value in the Network SSID field. 4. -
Page 165: Wireless Access Point
Yealink T58W User Guide Wireless Access Point The IP phone supports creating AP hotspots and sharing its wired network with other devices. Topics Enabling the Wireless Access Point Configuring Wireless Access Point Viewing the Connected Devices Adding Connected Devices to the Blocklist Removing Devices from the Blocklist Disabling the Wireless Access Point Enabling the Wireless Access Point... -
Page 166: Removing Devices From The Blocklist
Yealink T58W User Guide Wireless Access Point Procedure 1. Swipe left or right to go to the second idle screen. 2. Go to Settings > Basic Settings > Wi-Fi AP > AP Client List. 3. Select after the desired device. The phone prompts whether to move the device into the blocklist. -
Page 167: Optional Accessories With Your Phone
Yealink T58W User Guide Optional Accessories with Your Phone Optional Accessories with Your Phone The phone can use optional accessories when you need to extend your phone’s capabilities. The following optional accessories need to be purchased separately if required for your phone: Analog Headset YHS33/YHS34/YHS36 USB Headset Expansion Module EXP50 (only for T58A/T58W) -
Page 168: Using Headsets
Yealink T58W User Guide For the information on how to connect a USB headset, see the Quick Start Guide for your phone on Yealink Support. For a list of supported USB headsets, refer to Tested headset list compatible with Yealink IP Phone for your IP phones on Yealink... -
Page 169: Connecting The Expansion Module
Yealink T58W User Guide Optional Accessories with Your Phone Connecting the Expansion Module You can connect the expansion module to your phone, using the supplied materials in the expansion module's packaging. Procedure 1. Connect the expansion module to the phone using the connecting sheet and screws. 2. -
Page 170: Connecting The Bluetooth Handset (Bth58)
Yealink T58W User Guide We recommend that you add a picture less than 4.2 megapixels. Either the smaller or larger picture will be scaled proportionally to fit the screen. Before You Begin Make sure that the picture is in the root directory of your USB flash drive, and the USB flash drive is connected to your EXP50 successfully. -
Page 171: Using Your Phone With Pstn Account
Yealink T58W User Guide Using Your Phone with PSTN Account Using Your Phone with PSTN Account You can connect an optional expansion PSTN box CPN10 to extend functions of the conference phone. You can make PSTN calls. Up to 2 cascaded PSTN Boxes can be installed to a conference phone. Topics Connecting the Expansion PSTN Box CPN10 Configuring the PSTN Account... -
Page 172: Configuring The Flash Time
Yealink T58W User Guide 1. Swipe left or right to go to the second idle screen. 2. Go to Settings > Basic Settings > Country. 3. Select the desired country. 4. Select Configuring the Flash Time You can configure the flash time to adjust the length of time before a hook flash times out (or the call disconnects). Flash time can be configured from the following options: Auto: It depends on the country that is selected for the phone. -
Page 173: Conference
Yealink T58W User Guide Using Your Phone with PSTN Account Conference As one PSTN account can only support one call, you need to activate a hook flash to set up a conference. A hook flash is a quick off-hook/on-hook/off-hook cycle (just like picking up a handset, laying the handset down on the handset cradle, and then picking it up again). -
Page 174: Using Dect Handsets With Your Phone
Yealink T58W User Guide Using DECT Handsets with Your Phone Using DECT Handsets with Your Phone You can turn Yealink IP phone into the corded-cordless phone. The corded-cordless phone consists of a VP59/T58A/T58W phone, a DECT USB dongle DD10K and at least a handset. -
Page 175: Registering A Handset To The Phone
Yealink T58W User Guide Registering a Handset to the Phone The corded-cordless phone acts as a base station and Handset 1. You can register other handsets to the phone. Before You Begin Make sure the phone is in the handset registration mode. Procedure 1. -
Page 176: Dect Intercom
Yealink T58W User Guide Using DECT Handsets with Your Phone DECT Intercom When the handset is registered to the phone successfully, you can place/receive a DECT intercom call to/from the handset registered to your phone. Topics Configuring Auto Intercom Placing a DECT Intercom Call on the Handset Placing a DECT Intercom Call on the Phone Placing a DECT Intercom Call with a DECT Intercom Key Performing a Blind Transfer to the Handset... -
Page 177: Placing A Dect Intercom Call With A Dect Intercom Key
Yealink T58W User Guide 2. Tap the desired handset. The corresponding handset will ring. Related Topics Handset Registration Placing a DECT Intercom Call on the Handset Placing a DECT Intercom Call with a DECT Intercom Key You can quickly dial a handset registered to your phone through the DECT Intercom key. Procedure 1. -
Page 178: Repeater Mode
Yealink T58W User Guide Using DECT Handsets with Your Phone Repeater Mode Repeater mode extends the radio coverage of the phone. The repeater has the same radio coverage as the base station. This feature is especially useful for users who require mobility in large dwellings. If the repeater mode is enabled, and a repeater is registered to the base station, the handset registered to the base station can be used either in the base station or the repeater coverage area, thereby providing users with greater freedom in mobility. -
Page 179: Satellite Mode
Yealink T58W User Guide When DECT LED glows green/orange, the registration to the phone is successful. Related Topics Enabling the Repeater Mode Setting the Phone to the Repeater Registration Mode Satellite Mode You can bind a W53H/W56H/W59R handset with the VP59/T58A/T58W phone to use the satellite mode. The phone account is applied to the handset, and all line statuses (for example, DND) on the phone and the hand- set are synchronized. -
Page 180: Pull An Active Call From The Handset
Yealink T58W User Guide Using DECT Handsets with Your Phone The phone is during a call, and the satellite mode is selected as Take over call. And make sure there is only one call on the phone. Procedure 1. Swipe the soft key area left and then tap Call Shift. The call is automatically connected on the handset. -
Page 181: Viewing Shared Contacts
Yealink T58W User Guide 1. Go to ) > Share Directory. 2. Tap 3. Enter the shared contact's information. 4. Tap Viewing Shared Contacts You can view the shared contacts from the Shared Directory on your phone. Procedure 1. Go to ) >... -
Page 182: Moving A Shared Contact To The Blocklist Directory
Yealink T58W User Guide Using DECT Handsets with Your Phone Procedure 1. Go to ) > Share Directory. 2. Tap Search or 3. Enter the name or number you are looking for in the search field. The contacts will be displayed in the result list. Moving a Shared Contact to the Blocklist Directory You can move a shared contact to the Blocklist directory. -
Page 183: Renaming The Handset
Yealink T58W User Guide Renaming the Handset You can personalize the handset name on the phone. Procedure 1. Swipe left or right to go to the second/third idle screen. 2. Go to DECT Settings > Handsets. 3. Tap beside the handset name. 4. -
Page 184: Maintaining Your Phone
Yealink T58W User Guide Maintaining Your Phone Maintaining Your Phone When your phone is unable to operate properly, you need to investigate or troubleshoot issues along with other tasks your system administrator may ask you to perform. Topics Investigating Warnings Clearing Warning Icon Diagnosing the Network Rebooting Your Phone... - Page 185 Yealink T58W User Guide 3. Do one of the following: Select Ping, then enter the desired IP address or URL in the Ping IP or URL field. Select Trace Route, then enter the desired IP address or URL in the Trace Route IP or URL field. 4.
- Page 186 Yealink T58W User Guide Maintaining Your Phone 3. Enter the provision information in the corresponding field. 4. Select The phone prompts you whether to provision now. 5. Select OK. Clearing User's Personalized Configuration Settings You can clear the personalized configuration settings manually on the phone. Before You Begin Your system administrator has enabled the phone to keep the user's personalized settings after auto provisioning.
- Page 187 Yealink T58W User Guide Appendix - Menu Structure Appendix - Menu Structure Note : The menus with gray box are not available when the DECT USB dongle DD10K is not attached to the phone.
Need help?
Do you have a question about the T58W Pro and is the answer not in the manual?
Questions and answers