Table of Contents
Advertisement
Quick Links
Advertisement
Table of Contents

Related Manuals for TESTO 338


Summary of Contents for TESTO 338
- Page 1 338 · Density gauge Instruction manual...
-
Page 3: Table Of Contents
Performing settings ................ 22 6.2.1. Date/time ....................... 22 6.2.2. Configuration menu..................22 6.3. Preparing measurements .............. 23 6.4. Measuring ..................24 6.5. Viewing, printing and deleting saved measurement results ... 25 6.6. Data transfer to testo easyEmission software ........ 26... - Page 4 1 Contents Maintaining the product ............... 27 7.1. Removing TopSafe from the testo 338 ......... 27 7.2. Emptying the condensate trap ............28 7.3. Changing the rechargeable battery ..........29 7.4. Changing the filter paper ............... 30 7.5. Replacing the particle filter ............33 7.6.
-
Page 5: Safety And The Environment
2 Safety and the environment Safety and the environment 2.1. About this document > Please read this documentation through carefully and familiarize yourself with the product before putting it to use. Pay particular attention to the safety instructions and warning advice in order to prevent injuries and damage to the products. -
Page 6: Ensure Safety
> Carry out only the maintenance and repair work on this instrument that is described in the documentation. Follow the prescribed steps exactly. Use only original spare parts from Testo. > Improper use of rechargeable batteries can lead to destruction or injuries by means of current surges, fire or escaping chemicals. -
Page 7: Protecting The Environment
> Dispose of faulty rechargeable batteries/spent batteries in accordance with the valid legal specifications. > At the end of its useful life, send the product to the separate collection for electric and electronic devices (observe local regulations) or return the product to Testo for disposal. -
Page 8: Specifications
3 Specifications Specifications 3.1. Functions and use The soot concentration meter is a hand-held measuring device for determining the soot concentration (mg/m ), as well as the Filter Smoke Number (FSN) or the Bosch number for diesel engines. ® The Bluetooth option may only be operated in countries in which it is type approved. - Page 9 Printer: IR, IRDA Software: Bluetooth (only 0632 3382) Dimensions 270 x 92 x 127mm Weight 770g (including battery) Warranty 2 years, warranty conditions: see www.testo.com/warranty EU Directive 2004/108/EC Under reference conditions of +25°C and 1000 hPa ® Bluetooth module (option) ®...
-
Page 10: Declaration Of Conformity
3 Specifications 3.3. Declaration of Conformity... -
Page 11: Measuring Principle
The ambient pressure depends on the height above sea level and weather (high/low-pressure region). In the case of the testo 338, the current height above sea level (with an accuracy of ± 200 m) must be entered manually. The sample volume... -
Page 12: Paper Blackening (Pb)
3 Specifications Measurements are assessed optically and are therefore dependent on the optical property of the soot. The optical properties of the soot vary depending on the engine and fuel, which can lead to inaccuracies during the calculation of the mass. 3.4.2. -
Page 13: Measurement Units
405 mm (under reference conditions: 1000 mbar, +25 °C) on the filter paper. In the case of the testo 338, a longer flue gas column is drawn through the filter paper to increase sensitivity. This is converted to a reference length after the measurement. -
Page 14: Bosch Number [Bosch]
Filter smoke number/paper blackening The Bosch number is calculated in the testo 338 as follows: 1 With the measured paper blackening (at reference pressure and temperature), the effective filter loading (FL ) is calculated. -
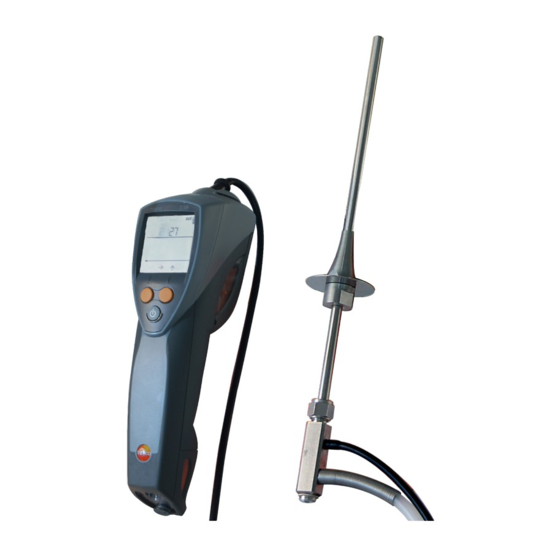
Page 15: Product Description
4 Product description Product description 1 IR- / IrDA interface 2 Display: Instrument status icons: Icon Meaning Error message Pump running Printing Memory menu open Query: Clear data? Data transfer (printer or memory) Note: Feed probe into flue gas duct Note: Remove probe from flue gas duct. - Page 16 4 Product description Icon Meaning Engine operating point percentage Battery capacity: >75% / >50% / >25% / <10% Engine number + two- digit number Probe volume mode (set automatically by the instrument irrespective of the FSN value of the last measurement): •...
- Page 17 4 Product description Button Function Right function Function changes depending on the key: instrument status: Begin leakage test [test Open configuration menu [set] Change selection Save measuring values Delete measuring values [NO] Apply setting/measuring value 4 Mains socket 5 Condensate outlet 6 Gas inlet 7 Service lid: access to filter paper, battery 8 Eyelet for wrist strap...
-
Page 18: First Steps
Best storage conditions: 50-80 % residual capacity, 10 to 20°C / 50 to 68°F ambient temperature. Due to the high energy requirement of the testo 338, it is not possible to charge the battery while the instrument is switched on. -
Page 19: Switching The Instrument On/Off
> Check that the service lid is secured before switching on the instrument. Testo recommends performing a leakage test before every series of measurements: > Seal off the probe shaft before switching on the instrument and close the hose clamp on the bypass. - Page 20 5 First steps The stability time is started: lights up and a 60 s countdown runs down. During the stability time, the ambient temperature is measured, which is required for calculating the Bosch number. To ensure correct Bosch number calculation: >...
-
Page 21: Using The Product
> Check whether the condensate trap is inserted and closed correctly. > Repeat the leakage test: press [Start]. > Contact your dealer or Testo Customer Service if you receive another error message. 2. After the test, open the clamp on the bypass again and ensure that the hose is not squashed. -
Page 22: Performing Settings
6 Using the product 6.2. Performing settings 6.2.1. Date/time ✓ The date/time menu has been opened, see Switching the instrument on/off, page 19. The date and time are displayed alternately. 1. Press [set] while the date is displayed. 2. Set the date with (increase value) and (switch to the next value). -
Page 23: Preparing Measurements
6 Using the product 5. Select the printer used: press • 0545: Testo report printer (IR) 0554 0545 • 0547: Testo report printer (IrDA) 0554 0547 • 0549: Testo report printer (IrDA) 0544 0549 6. Press [OK]. Bosch flashes. 7. Set measurement unit: press 8. -
Page 24: Measuring
6 Using the product Ensuring measuring accuracy > Recommendation: Carry out a leakage test prior to every series of measurements, see Switching the instrument on/off, page 19. > Adjust the height entry after changing the measuring location, see Configuration menu, page 22. >... -
Page 25: Viewing, Printing And Deleting Saved Measurement Results
6 Using the product 5. Press [OK] to apply the value or [NO] to delete the value. > To remove the output filter paper strip: Hold the paper just above the paper outlet and pull sideways. CAUTION The instrument may become damaged! >... -
Page 26: Data Transfer To Testo Easyemission Software
The data is transferred to the report printer ( flashes). 6.6. Data transfer to testo easyEmission software A data transfer to the testo easyEmission software is only possible ® for instruments with Bluetooth (article no. 0632 3382). Please read the instruction manual for the testo easyEmission software (0970 0360). -
Page 27: Maintaining The Product
1. Unplug the instrument from the mains and switch it off before opening the TopSafe. 2. Push down the locking clip (1) to release the guard. 3. Open guard (2). 4. Open the TopSafe cover (3). 5. Remove the testo 338 from the TopSafe (4). -
Page 28: Emptying The Condensate Trap
7 Maintaining the product 7.2. Emptying the condensate trap CAUTION The flue gas pump may become damaged as a result of condensate entering the gas path! > Do not empty the condensate trap while the flue gas pump is running. The condensate consists of a weak mix of acids: >... -
Page 29: Changing The Rechargeable Battery
(3). 6. Remove the rechargeable battery from the instrument and insert a new battery. Only use the Testo rechargeable battery 0515 0107! 7. Close the battery lock by pressing the grey button and simultaneously pushing opposite the direction of the arrow until the battery engages. -
Page 30: Changing The Filter Paper
1. Isolate the instrument from the mains and switch it off before changing the filter paper (1). 2. Remove TopSafe, see Removing TopSafe from the testo 338, page 27. 3. Open the lock of the service lid (2). - Page 31 7 Maintaining the product 7. Slide a new paper roll onto the winder (6). 8. Align the paper roll as shown (6) and fasten the winder in the bracket (7). 9. Unwind approx. 10 cm of paper from the roll (8). 10.
- Page 32 7 Maintaining the product 11. Slide the end of the paper strip through under the guide tabs on the side and under the draw roll (10). Carefully pull the paper strip approx. 3 cm out of the guide (11). 12. Insert the service lid in the retaining hinge (12) and close it (13). 13.
-
Page 33: Replacing The Particle Filter
1. Unplug the instrument from the mains and switch it off before changing the particle filter. 2. Remove TopSafe from the testo 338, see Removing TopSafe from the testo 338, page 27. 3. Remove the condensate trap from the instrument (1). -
Page 34: Cleaning The Instrument And Topsafe
7 Maintaining the product 7.6. Cleaning the instrument and TopSafe Housing and TopSafe > If the instrument housing and TopSafe is contaminated, clean it with a damp cloth. Do not use any aggressive cleaning agents or solvents! Mild household cleaning agents and soap suds may be used. Protecting glass of the measuring lens CAUTION There is a risk of the protective glass of the measuring lens... -
Page 35: Calibration
7.8. Calibration In order to guarantee measurement accuracy, we recommend having the instrument checked once a year. Please contact your dealer or Testo customer service. For contact data, see back of this document or web page www.testo.com/service-contact... -
Page 36: Tips And Assistance
The optical (smoke number) evaluation is outside the permissible range. > Clean the protective glass of the measuring lens, see Cleaning the instrument and TopSafe, page 34 > Measuring lens is defective: contact Testo Service. lights up Unknown error > Contact Testo Service. -
Page 37: Accessories And Spare Parts
8 Tips and assistance If we could not answer your question or the solutions given during troubleshooting did not help: please contact your dealer or Testo Customer Service. Contact data see back of this document or website www.testo.com/service-contact. 8.2. Accessories and spare parts Description Article no. - Page 38 0970 3380 en 02 V01.00...
Need help?
Do you have a question about the 338 and is the answer not in the manual?
Questions and answers