
Related Manuals for socomec ATyS d H


Summary of Contents for socomec ATyS d H
- Page 1 INSTALLATION AND OPERATING MANUAL ATyS Remotely Operated Transfer Switching Equipment www.socomec.com/en/atys-dh...
-
Page 2: Table Of Contents
............20 5.6.7. Interfacing the ATyS C55/C65 with the ATyS d H . - Page 3 ............... .41 ATyS d H - 544077E - SOCOMEC...
-
Page 4: General Safety Instructions
One must also refer to and respect markings on the product prior to installation and commissioning for values and limits specific to that product. • Using the product outside the intended scope, outside SOCOMEC recommendations or outside the specified ratings and limits can cause personal injury and/or damage to equipment. -
Page 5: Introduction
• Self powered actuator through Source I and Source II power terminals. • Compatibility with virtually any make of ATS, AMF, Genset controller. (Typically a SOCOMEC ATyS C55/C65 ATS Controller and driven through volt free contacts). • Power supply continuity for most applications. -
Page 6: The Atys Family Product Range
This instruction manual includes details and instructions specific to the “ATyS d H” RTSE only. For all other ATyS family of products please refer to the specific instruction manual related to that product. (Available for download on www.socomec.com). An overview of the ATyS range below up to 3200A is presented below: Just the right ATyS for your application…... - Page 7 Peak shaving functionality • 4 - 20mA communication module (Optional) • KWh Pulsed output module (Optional) • Counters KWh, permutation… • LCD display for programming, metering, timers and counters • Possibility to add optional functionality ATyS d H - 544077E - SOCOMEC...
-
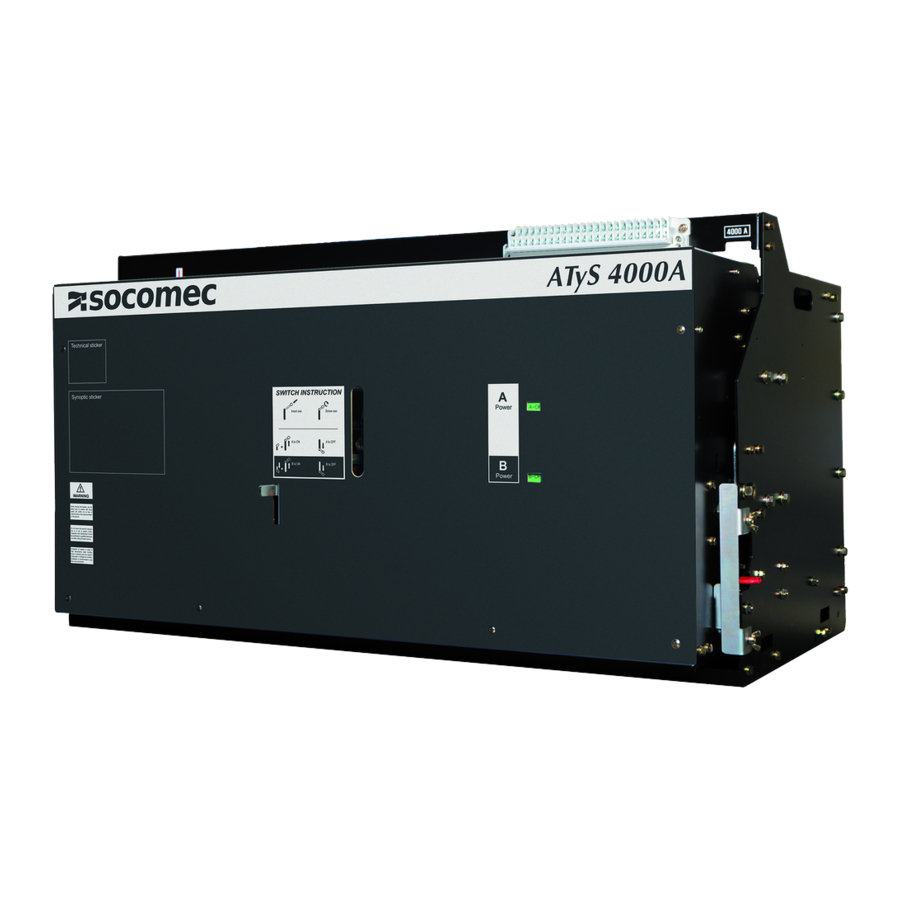
Page 8: General Overview
5. Auxiliary wiring terminal block 6. Position indicator for switch I (A power : I On – OFF) 7. Position indicator for switch II (B power : II On – OFF) 8. Circuit diagram ATyS d H - 544077E - SOCOMEC... -
Page 9: Atys D H : Rtse Sticker Identification And Details
AC 230 V 50/60 Hz AC 220 V 50 Hz ‘A‘-Power Aux Switch 65 A 65 A ‘B‘-Power Aux Switch 65 A 65 A Draw out 4.2.3. Manual operation guide and warning stickers ATyS d H - 544077E - SOCOMEC... -
Page 10: Atys D H : Atse Environmental
(Recommendation : To be stored in dry, non corrosive and non saline atmospheric conditions) 4.3.3.3. Storage position • On a flat surface capable of handling >200kg and respecting the markings on the packaging. Attn: This product is relatively heavy! Do not stack. ATyS d H - 544077E - SOCOMEC... -
Page 11: Volume And Shipping Weights By Reference Atys D H
(ATSE) to safely transfer from a load supply from the normal to the alternative source as and when required. SOCOMEC recommend to use the ATyS C55 or C65 ATS controller depending on the application. Refer to the ATyS C55/C65 instruction manual for wiring with these products. -
Page 12: Installation
Note: when installing the ATyS dH in a panel it is recommended to allow a minimum height of 700 mm from the bottom of the product to the floor of the enclosure for ease of access. ATyS d H - 544077E - SOCOMEC... -
Page 13: Mounting Orientation
(Refer to chapter 5.6.7, page 21 for wiring with an ATyS C55/C65 ATS controller). Note: on A1,A2,B1,B2 connections, a 6mm cable and 65A peak protection devices must be used. ATyS d H - 544077E - SOCOMEC... -
Page 14: Power Circuits And Bar Connections
100mm x 10mm 45Nm 12 kV 12 kV 0 V 50/60 Hz AC 220 V 50 Hz 65 A 65 A 6300 A 100mm x 10mm 45Nm 65 A 65 A Draw out ATyS d H - 544077E - SOCOMEC... -
Page 15: Assembly Of Customer Mounted Accessories
• Ethernet, SNMP, BACnet using DIRIS M-70 gateway. Includes Webserver. • A DIRIS Digiware D-70 gateway can be used as a remote display for multiple ATyS C65 controllers; the D-70 also provides Ethernet, SNMP & BACnet connectivity. ATyS d H - 544077E - SOCOMEC... -
Page 16: Typical Configurations
Voltage sensing Outputs Inputs Load shedding Transfer Switch 5.6.3. ATyS C55/C65 references Part Number Image Description ATyS C55 1600 0055 ATS Controller with mid-level functionalities ATyS C65 1600 0065 ATS Controller with advanced functionalities ATyS d H - 544077E - SOCOMEC... -
Page 17: Atys C55/C65 Interface
MANUAL mode and, in order to facilitate the commissioning, a smart wizard will appear to drive the user through the main configuration parameters. Switch & Language Time & date Source config Product Name Communication Application ATyS d H - 544077E - SOCOMEC... -
Page 18: Mounting & Connecting Controller
Cable must be more than 10mm away from the RTC battery cover and USB. Do not drill holes above the controller after it has been mounted. 10 mm Screw Tightening torque PH1 / 0.2 Nm / 1.77 lb.in ATyS d H - 544077E - SOCOMEC... - Page 19 Drill mounting holes in the backplate to match the fixing holes as shown and indicated below. Fix the controller through the mounting legs to the backplate with a maximum screw diameter of 6mm/0.22in. ATyS d H - 544077E - SOCOMEC...
-
Page 20: Atys C55/C65 Controller Wiring
NC : Ground Connection point for I/O 10 optional accessories & Digiware* DIGIBUS RJ 45 digiware cable digiware connection (must use 24 VDC input) * For more information check I/O module instruction sheet ref 545597 ATyS d H - 544077E - SOCOMEC... -
Page 21: Interfacing The Atys C55/C65 With The Atys D H
5.6.7. Interfacing the ATyS C55/C65 with the ATyS d H The ATyS d H includes 4 inputs to control the supply source selector and switch positions: Terminals Name Description AC1, AC2 Input “Source I” A power closing terminal BC1, BC2 Input “Source II”... - Page 22 14 : Aux contact output – A Power Switch I is closed (ON) SOURCE 2 (L1-L2-L3-N) : 3 phase & N sensing power source B 34 : Aux contact output – B Power Switch II is closed (ON) ATyS d H - 544077E - SOCOMEC...
- Page 23 IN1 IN2 IN3 IN4 IN5 IN6COM INPUTS OUT 1 OUT 2 OUT 3 OUT 4 OUT 5 OUT 6 DIGIWARE DIGIWARE SOURCE 1 SOURCE 2 RS485 L1 L2 L3 N L2 L3 N I1 I2 I3 IN GNDGND ATyS d H - 544077E - SOCOMEC...
- Page 24 SOURCE 1 (L1-L2-L3-N) : 3 phase & N sensing power source A 42 : Aux contact output - B Power Switch II in position 0 (OFF) SOURCE 2 (L1-L2-L3-N) : 3 phase & N sensing power source B ATyS d H - 544077E - SOCOMEC...
-
Page 25: Atys D H Controller Programming
6. ATYS D H CONTROLLER PROGRAMMING The ATyS d H can be controlled by an ATyS C55/C65 ATS controllers. ATyS C55/C65 Menus & Programming. For complete details concerning the programming refer to the C55/65 instruction manual downloadable from www.socomec.com - Short press on this button to go back one level. -
Page 26: Atys D H Operating Modes
A-ON Check that indicator ATTENTION: Follow A-OFF A is in the OFF this instruction position. carefully. Press and hold “B power selection B-OFF lever” as shown with the left hand. B-ON ATyS d H - 544077E - SOCOMEC... -
Page 27: Transfer From "B" To "A" Power
B-OFF A-ON lever up to the full. Check that the A-ON B-ON position indicator A is -ON. In case the indicator does not show A-ON, repeat the above B-OFF mentioned step B-OFF ATyS d H - 544077E - SOCOMEC... -
Page 28: Atys D H Characteristics
9. ATYS D H FAMILY: ORDERING INFORMATION The following is an ordering guide for ATyS d H remotely operated transfer switching equipment. This guide is intended so as to explain the logic behind SOCOMEC ATyS reference numbers. When ordering please consult the latest SOCOMEC catalogue. -
Page 29: Spares And Accessories
8 pole relay HR7 Bridge rectifier DD11 Silicon rectifier 6A Main solenoid coil SPG Contact SOCOMEC Selective solenoid coil DS3 Limit switch DZ10 Limit switch 215G Limit switch V163 Shock absorber MAK Arc chamber AC ATyS d H - 544077E - SOCOMEC... -
Page 30: Preventive Maintenance
Damage or rust on the Replace the damage parts springs Loose bolts and nuts Tighten to the specified torque Loose or damaged E ring, shock absorbers and/or Fix or replace in the right position stoppers ATyS d H - 544077E - SOCOMEC... -
Page 31: Maintenance And Trouble Shooting
& SC2 12.4.2 page 35 12.4.3 page 36 contacts check contacts check Diode check Diode check 12.4.4 page 37 12.4.4 page 37 Main coil check Main coil check 12.4.4 page 37 12.4.4 page 37 ATyS d H - 544077E - SOCOMEC... -
Page 32: The Atys D H Fails To Switch To A-Off Or B-Off (Position I Or Position Ii To Off)
12.4.2 page 35 contacts check Diode check Diode check 12.4.4 page 37 12.4.4 page 37 Main coil check Main coil check 12.4.4 page 37 12.4.4 page 37 ATyS d H - 544077E - SOCOMEC... -
Page 33: The Atys D H Fails To Switch To B-On (Position Ii)
Check contacts of operation check operation check switch ATS1 & ATS2 switch BTS1 & BTS2 12.4.3 page 36 12.4.3 page 36 MGT contacts check Diode check 12.4.4 page 37 Main coil check 12.4.4 page 37 ATyS d H - 544077E - SOCOMEC... -
Page 34: Loop Checks
MGA for contact continuity and correct operation. • Should there be no output phase / neutral voltage between CP – CN terminals with B1 – B2 active, check relay R and contactor MGB for contact continuity and correct operation. ATyS d H - 544077E - SOCOMEC... -
Page 35: Change Mgc Circuit Check (Contactor Closing Coil)
• Similarly give the B-ON order by powering BC1 and BC2 terminals with an impulse command. • If MGS is not operating properly then check that contacts SC1 and SC2 operate solenoid SC. Action required: Replace any component found defective. ATyS d H - 544077E - SOCOMEC... -
Page 36: Mgt Circuit Check (Relay Tripping Coil)
• If MGS is not operating properly then check that contacts BTS1, BTS2. • If MGS does not operate then check the that micro-switch SC1 and SC2 operate selective coil SC. Action required: Replace any component found defective. ATyS d H - 544077E - SOCOMEC... -
Page 37: Diode Rectifier & Main Coil Check
• If the diode is found to be OK check the voltage and resistance value of the main coil. The diode must be put out of circuit to check measure resistance of the main coil. • The resistance should be 2.2 Ω ATyS d H - 544077E - SOCOMEC... -
Page 38: Construction Of The Main Components
Silicon Rectifier 6A100 Screw M4x25 Screw M4x40 Screw M5x10 Split pin Ø 2x30 Nut M5 Note: the selective coil assemblies SC are placed on either side of the main electro-mechanical switching assembly shown above. ATyS d H - 544077E - SOCOMEC... -
Page 39: Main Coil
Parts name CC Main-coil - 2.2 Ω SPP1460 Screw M8x20 12.5.3. Arc chamber Parts name SPG1780 BMC1600 Screw M6x16 Screw M6x30 When to replace the Arc chamber? Typically when > 2mm detection of grit accumulates ATyS d H - 544077E - SOCOMEC... -
Page 40: Lubrication
12.6. Lubrication Grease shall be injected onto specific points in the mechanical cradle evenly and “MUST” only be applied to parts and in the marked positions as shown below. Grease Grease Grease ATyS d H - 544077E - SOCOMEC... -
Page 41: Circuit Diagram
13. CIRCUIT DIAGRAM ATyS d H - 544077E - SOCOMEC... - Page 42 CORPORATE HQ CONTACT: SOCOMEC SAS 1-4 RUE DE WESTHOUSE 67235 BENFELD, FRANCE www.socomec.com 544077E...
Need help?
Do you have a question about the ATyS d H and is the answer not in the manual?
Questions and answers