
Related Manuals for Ropox Medi2 50-50676


Summary of Contents for Ropox Medi2 50-50676
- Page 1 Ropox Nursing Table Medi 2 User Manual Mounting Instructions Keep this manual with the product at all times TF 200.01.0052_eng / Date 28-09-2022...
-
Page 2: Table Of Contents
Table of Contents Symbols used in this manual ....................... 3 General safety ............................3 2.1 Product Unit label ............................. 5 General requirements ........................... 6 3.1 Product information ..........................6 3.2 Product description ..........................6 3.3 Intended use ............................6 3.4 Intended operator ............................. 7 3.5 Essential performance .......................... -
Page 3: Symbols Used In This Manual
1. Symbols used in this manual Warning Symbol Indication of potentially hazardous situation. If not avoided, it can result in serious injury or death. Caution Symbol Indication of potentially hazardous situation which may result in minor or moderate injury. It may also be used to alert against unsafe practices. Notification Symbol This symbol is used to notify correct use and handling of the product. - Page 4 The information in this manual is based on correct installation in accordance with installation instructions for this product. Ropox cannot be held liable if the product is used in any way that differs from stated in this manual and/or installation instruction.
-
Page 5: Product Unit Label
2.1 Product Unit label This product is UKCA-marked in accordance with: UK SI 2008 No. 1597 - The Supply of Machinery (Safety) Regulations 2008, and its amendments This product is CE-marked in accordance with: Council Directive 2006/42/EC on machinery Manufacturer name and address Date of production Stock number Serial number... -
Page 6: General Requirements
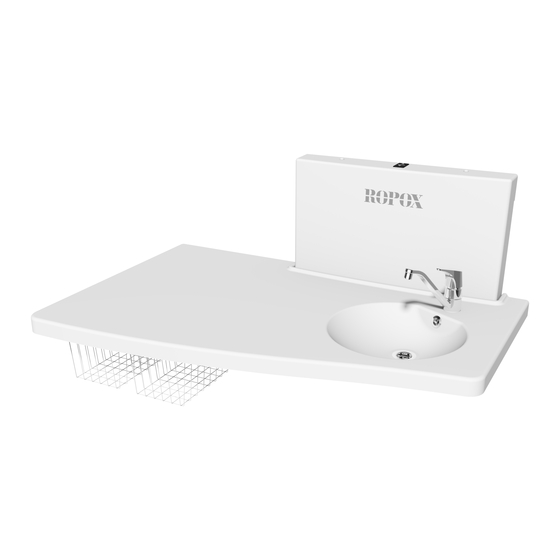
50-50696 Basket unit with washbasins 3.2 Product description Ropox Nursing Table Medi2 is a height adjustable nursing table, which makes it easier for a carer to change a child’s diaper or clothes, in a comfortable height. 3.3 Intended use Ropox Nursing Table Medi2 is a height adjustable nursing table, which is designed specifically for users, who must change diapers or clothes on children multiple times a day. -
Page 7: Intended Operator
3.4 Intended operator Reading and understanding this manual will be sufficient training for an intended operator. Children are excluded in this definition. 3.5 Essential performance The product does not have essential performance, as the patient and user do not experience any risk in case of loss of product function/performance. - Page 8 50-50678 (90cm) Note! All dimensions in mm TF 200.01.0052_eng...
-
Page 9: Operation
3.9 Operation Press the up symbol to raise the product, and the down symbol to lower it. Actuation stops as soon as the button is released. Fixed control switch (Standard) Hand control with spiral cable (option) Warning! The product should always be able to travel the full range of actuation without colliding with objects. -
Page 10: Mounting Instruction
4. Mounting instruction 4.1 Installation interfaces Construction The wall must be made of material suitable for screwing. Load tested in accordance with the machinery directive. Max user weight is 75kg / 165lbs. Max. load of upper screws: 20kg/44lbs / screw. Power Recommended positioning of power supply point in wall can be seen below. -
Page 11: List Of Components
4.2 List of components Ropox Nursing Table Medi 2 50*50670-279 Lifting unit 1 pc. Incl. 50*50670-247 Upper cover for lifting unit 1 pc. 50*50670-254 Tabletop unit for 50-50676 1 pc. 50*50670-258 Tabletop unit for 50-50678 1 pc. Incl. 97001160 Flexible drain hose Ø40/40, 40-110cm 1 pc. -
Page 12: Dimensions
4.3.1 Dimensions Belt Actuator Control box Power 4.3.2 Mounting instructions The holes for fastening can be marked up on the wall, four possibilities in the top, and two in the bottom of the frame. Place the frame against the wall and make sure it is horizontal. Remove the frame and drill the holes. - Page 13 1. Start by removing the outer cover from the lifting unit. Then, when it has been determined where the unit should be mounted in the room, the unit is mounted on the wall. Make sure the unit is level. Also keep in mind where the power will be placed.
- Page 14 2. Re-mount the outer cover. TF 200.01.0052_eng...
- Page 15 3. The tabletop unit can now be mounted on the lifting unit. The tabletop unit comes pre-assembled. Caution! When the tabletop has been mounted, measure between the tabletop and the wall. There must be 4mm of distance at most. If it is more than 4mm, there’s a risk of entrapment/squeezing.
- Page 16 4. Connect the safety stop cable as shown. 5. The water and drain can now be mounted. Drain hoses and water hoses come with the version with a sink. TF 200.01.0052_eng...
- Page 17 TF 200.01.0052_eng...
- Page 18 6. The nursing table is now installed. If the tabletop unit is still not level, it’s possible to adjust it. This is done by tightening/loosening the screws in the sides. TF 200.01.0052_eng...
-
Page 19: Wire Diagram
4.4 Wire diagram The nursing table is supplied with the control box already mounted on the frame. The wire diagram shows how the cables are connected. Every plug is waterproof; hence they might be difficult to plug into or dismount from. Make sure the cable is turned in the correct direction before plugging it into the control box. -
Page 20: Residual Risks
4.5 Residual risks Warning! Never place your hands, fingers or feet between the tabletop and the wall or lifting unit. Adults must ensure that children on the nursing table keep away from these, while the table is being actuated! Warning! Be aware of loose cables and hoses! Do not let children play near these, as... -
Page 21: Performance Test
5. Performance test After installation and prior to use, all functions of the nursing table must be tested. The test must be carried out by competent personnel. Subsequently the test shall be carried out at least once a year: Testing prior to connection of mains voltage: Check that the mounting instructions have been followed. -
Page 22: Troubleshooting
➢ Dismount every cable, then re-mount them ➢ Contact Ropox for support ➢ Adjust the tabletop. This is connected with Velcro. It can be loosened, and readjusted. Make sure to always keep The safety stop is blocked or stuck at most 4mm of distance from wall to tabletop. -
Page 23: Maintenance
Ropox will make parts list and circuit diagrams available for maintenance and repair beyond what is described in this manual. Only use Ropox original spare parts as replacement parts. If other parts are used, the guarantee may become void. Repair beyond what is described in this manual may only be done by Ropox designated service personnel. -
Page 24: Service Schedule, Operation, And Maintenance
8.4 Service schedule, operation, and maintenance Service and maintenance Serial No. Service and maintenance Serial No. Date: Date: Signature: Signature: Remarks: Remarks: Service and maintenance Serial No. Service and maintenance Serial No. Date: Date: Signature: Signature: Remarks: Remarks: Service and maintenance Serial No. Service and maintenance Serial No. -
Page 25: Spare Parts
Only use original Ropox spare parts as replacement parts. If other parts are used, the warranty may be void. 10. Accessories For Ropox Nursing Table Maxi 2 the following products can be purchased as accessories. Do Note, some accessories must be ordered together with the product. This will be in the description. Item... - Page 26 Side covering, white compact laminate 50-50682 82 x 105 cm. For mounting on floor/wall Side covering, white compact laminate 50-50683 61 x 105 cm. For mounting on floor/wall Side Bed Guard for Medi2/Maxi2 130 50-50688 82 x 24 cm. Mounted on worktop Not for retrofitting Side Bed Guard for Medi2/Maxi2 90 cm 82 x 24 cm.
-
Page 27: Environmental Protection
For Maxi 2 and Medi 2 with safety stop Support legs for Medi 2 – 90/130cm 50-50687 50-50697 Ropox Basket unit without wash basin 50-50696 Ropox Basket unit with wash basin 11. Environmental protection The product is not intended to be disposed as municipal waste. Proper disassembly, sorting and disposal of components must be done by waste disposal professionals. -
Page 28: Electromagnetic Compatibility
Otherwise, degradation of the performance of this equipment could result. 13. Complaints See General Terms of Sale and Delivery on www.ropox.com ROPOX A/S Ringstedgade 221 DK – 4700 Næstved Tel.: +45 55 75 05 00 Fax.: +45 55 75 05 50 E-mail: info@ropox.dk www.ropox.dk...
Need help?
Do you have a question about the Medi2 50-50676 and is the answer not in the manual?
Questions and answers