Table of Contents
Advertisement
Pro3 Series
3D Printer
User Manual
* Please review this entire manual before operating the printer.
WARNING
This is a class A product. In a domestic environment this product may cause radio
interference in which case the user may be required to take adequate measures.
www.raise3d.com
EN.2.0.20220426
Advertisement
Table of Contents

Related Manuals for Raise3D Pro3 Series


Summary of Contents for Raise3D Pro3 Series
- Page 1 Pro3 Series 3D Printer User Manual * Please review this entire manual before operating the printer. WARNING This is a class A product. In a domestic environment this product may cause radio interference in which case the user may be required to take adequate measures.
- Page 2 The contents of this User Manual may be updated overtime. For the latest version, scan the QR code or visit the link below. https://support.raise3d.com/Pro3-Series/user-manual-26-1399.html...
-
Page 3: Table Of Contents
Raise3D Pro3 Series Printer User Manual Menu Safety Precautions ............................. 1 Marks ................................5 A. Declarations and Safety Statements ..................... 6 B. Technical Specifications ......................... 9 C. List of Parts ............................10 D. Hardware Installation ........................... 13 E. ideaMaker Installation .......................... 17 F. -
Page 4: Safety Precautions
Raise3D Pro3 Series Printer User Manual Safety Precautions Safety Precautions Please read the safety information to ensure that you use the appliance safely. General Information You can find general information about this instruction manual here. ▪ Read this instruction manual carefully. Only this will ensure you use the appliance safely and efficiently. - Page 5 Raise3D Pro3 Series Printer Safety Precautions Safe Installation Take note of the safety instructions when installing the appliance. WARNING - Risk of electric shock! ▪ Improper installation is dangerous. Connect and operate the appliance only in accordance with the specifications on the rating plate.
- Page 6 Raise3D Pro3 Series Printer Safety Precautions ▪ Children may put packaging material over their heads or wrap themselves up in it and suffocate. Keep packaging material away from children. Do not let children play with packaging material. WARNING - Risk of injury! ▪...
- Page 7 Raise3D Pro3 Series Printer Safety Precautions Do not sit on or lean against the appliance door. Do not place any objects on the appliance door. ▪ Reaching into the chamber while the three-axis system is still moving may cause hand injuries.
-
Page 8: Marks
Raise3D Pro3 Series Printer Marks Marks Hot Surface: The hot surface sign indicates the presence of devices with high temperatures. Always be extremely careful when working around heated components. Wait half an hour after switching off the printer before handling parts to prevent burns. -
Page 9: Declarations And Safety Statements
This product is marked with "UKCA" and in conformity with the relevant UK statutory requirement: Radio Equipment Regulations 2017. Full text of the UK declaration of conformity is available at https://www.raise3d.com. UK sales partner company name:3DGBIRE Ltd UK sales partner company address: 3DGBIRE, Unit 44/45 Chorley North Industrial Estate,... - Page 10 Declarations and Safety Statements Electromagnetic Compatibility - EMC Simplified EU Declaration of Conformity Raise3D declares that this device is in compliance with the essential requirements and other relevant provisions of Directive 2014/53/EU. Full text of the EU declaration of conformity is available at https://www.raise3d.com.
- Page 11 The printer can be stored at room temperature for 4-6 hours before operating. 2. Filament and Electrical Precautions It is strongly recommended to use Raise3D official filaments and/or default settings for better performance. The Raise3D printer is designed with strong compatibility with Raise3D official filaments.
-
Page 12: Technical Specifications
Raise3D Pro3 Series Printer Technical Specifications Technical Specifications Printer Pro3 Pro3 Plus Build Volume Single Extruder Print Dual Extruder Print Single Extruder Print Dual Extruder Print (W×D×H) 300×300×300mm 255×300×300mm 300×300×605mm 255×300×605mm Machine Size (W×D×H) 620×626×760 mm 620×626×1105mm Power Supply Input 100-240VAC, 50/60 Hz 230V @ 3.3A... -
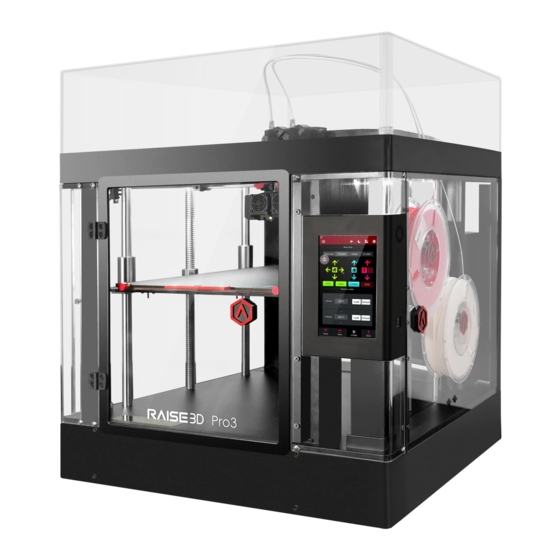
Page 13: List Of Parts
Raise3D Pro3 Series Printer List of Parts List of Parts Pro3 G.Camera H.Filament Guide Tube A.Top Cover B.Extruder I.Flat Cable C.Fans J.Filament Run-out Sensor D.Hot End E.Touch Screen K.Air Flow Manager L.Filament Box M.Electric Control System F.Print Bed N.USB Port O.Power Inlet... - Page 14 Raise3D Pro3 Series Printer List of Parts A. Top Cover The upper cover of the printer. B. Extruder The part extruding filament to the hot end. Brand-new unitized extruders, which are more convenient for the assembly and dismounting, which are featured on this printer. The printer’s dual extrusion structure can adapt to a variety of filaments.
- Page 15 Raise3D Pro3 Series Printer List of Parts O. Power Inlet The place to connect power cable. P. Ethernet Port RJ45 is connected to the port to connect your printer to a network. Q. Switch The power switch to turn on/off the printer R.
-
Page 16: Hardware Installation
Raise3D Pro3 Series Printer Hardware Installation Hardware Installation Remove, but do not cut, the four shipping zip ties Before powering on the printer, make sure to for fixing the Z axes. Keep the shipping zip ties peel off all the yellow stickers and remove the 24 safe for further installation and subsequent security spacers. - Page 17 Raise3D Pro3 Series Printer Hardware Installation After the printer is powered on, the printer will enter the boot process. It takes about 60 seconds for the printer to enter the Start-up Wizard. As shown in the left figure, the printer has entered the Start-up Wizard.
- Page 18 Raise3D Pro3 Series Printer Hardware Installation After taking out the accessory box, keep following the Start-up Wizard to complete the basic settings such as printer’s name, network, and RaiseCloud. After completing these basic settings, the printer will carry out a 5-Step Offset Calibration. The whole process takes about 1 hour.
- Page 19 Raise3D Pro3 Series Printer Hardware Installation Raise3D Supplies and Accessories Power Cable (×5) Hex Wrenches Filament (×2) Filament Guide Tube (×2) USB Storage Heat Resistant Filament Holder (×2) Spatula Gloves Nozzle Cleaning Kit Tweezers Thumb Screws& 0.3 mm Feeler Other Accessories...
-
Page 20: Ideamaker Installation
Raise3D Pro3 Series Printer ideaMaker Installation ideaMaker Installation The slicing software, ideaMaker, is available on the USB storage device included with your printer. Additional downloads and versions are available online at: https://www.raise3d.com/download/. Open the installer and select the installation language. Select the appropriate ideaMaker install... - Page 21 Raise3D Pro3 Series Printer ideaMaker Installation Follow the instructions provided by the guide, and click “Install”. After the installation is finished, click “Next” to go to the next step. Click “Finish” and ideaMaker is installed.
- Page 22 Installation Double-click the icon of the ideaMaker installer. This is located in the USB storage included with your printer. Alternatively, you can download the latest version from:https://www.raise3d.cn/download/. Next, drag the ideaMaker icon(left) into the Application folder on the right side.
-
Page 23: Ideamaker Initial Settings
“Next”. Select the diameter of your filament. Click “Finish” to finalize the initial settings. Note: All Pro3 series printers use 1.75 mm filaments. Click "+" to import the model file named “Giveaway Spinner” included in the USB storage. -
Page 24: Use Ideamaker
Raise3D Pro3 Series Printer Use ideaMaker Use ideaMaker Click “ Start Slicing” button to begin slicing the model. Confirm that the selected printer type and the filament are correct. Then select the standard slicing template. Click “Edit” to select the type of Platform Addition and the type of Support. - Page 25 Raise3D Pro3 Series Printer Use ideaMaker Make sure you insert the USB flash drive to your computer. Save the sliced files (.gcode and .data) by exporting them to your USB flash drive. Note: File names that do not conform to the Western Latin character set may not display properly.
-
Page 26: Dual Extruder Printing-Loading
Open the side door of the printer and install the filament holder to the installation point. Take out a spool of Raise3D Premium PLA printing filament and install it on the holder. Note: If the filament is installed at points B and D, it is recommended to place the filament in a clockwise direction. - Page 27 For example, the default loading temperature of Raise3D Premium PLA is 215°C. Here, the left nozzle temperature can be set to 215°C. Note: Generally, the recommended loading and unloading temperature of the filament should be 5-10°C higher than the printing temperature.
-
Page 28: Dual Extruder Printing (Beginner)
Raise3D Pro3 Series Printer Dual Extruder Printing (Beginner) Dual Extruder Printing (Beginner) Open ideaMaker and click “+” to import the model (.stl/.obj/3mf file format). The model used in this manual is the test model included in the USB flash drive in the accessory box. - Page 29 Raise3D Pro3 Series Printer Dual Extruder Printing (Beginner) Select another model, click “View>Model Info>Extruder” on the left, and select the right nozzle in the drop-down list. Press the “Ctrl” and “A” keys at the same time to select all models. Then click “Move>Align Together”...
- Page 30 Raise3D Pro3 Series Printer Dual Extruder Printing (Beginner) You can select the type of the Platform Addition in the “Edit Template” drop-list. There are three types of Platform Addition: Raft/Brim/Skirt. Raft is to print several layers similar to the base structure before printing the model. Raft can enhance the adhesion between the model and the build plate and reduce the risk of model warping.
- Page 31 Raise3D Pro3 Series Printer Dual Extruder Printing (Beginner) In the “Edit Template” interface, click “Save and Close”, ideaMaker will automatically return to the “Select Template” interface. Click “Slice” to slice the model. After the model is sliced, click “Export” in the pop-up window “Estimated Print Result” to save and import the .gcode and .data files into your USB flash drive.
-
Page 32: Dual Extruder Printing (Advanced)
Retraction Amount of Extruder-switch refers to the amount of filament retraction for an extruder change. 0 refers to no retraction at all. Note: It is recommended to use the default parameters for Raise3D official filaments. For third-party filaments, appropriate adjustments are required. - Page 33 Raise3D Pro3 Series Printer Dual Extruder Printing (Advanced) Users can adjust parameters such as “Wipe Wall” in the “Oozing” tab. Enable Wipe Wall will add extra shell(s) around the model during dual-extruder printing. This wall(s) can help clean the oozing filament from the unused nozzle to reduce the oozing of the model on the model.
- Page 34 Dual Extruder Printing (Advanced) Dual-extruder printing with Multiple Filament Types Printing with multiple filament types may limit printing compatibility. The table below lists all the officially- supported dual-extruder printer material combinations currently possible on the Pro3 series printers. Icon Meaning √...
- Page 35 Raise3D Pro3 Series Printer Dual Extruder Printing (Advanced) Method 2 After the parameter is edited, you can click “OK” on the “Advanced Settings” interface to save the parameters, and click “Slice” on the “Select Template” interface to slice the model.
-
Page 36: Dual Extruder Printing-First Print
Raise3D Pro3 Series Printer Dual Extruder Printing (Advanced) Dual Extruder Printing-First Print Insert the USB device that contains your sliced model files (.gcode or .data) into the USB port on the side of the touchscreen. USB Flash Drive Select “Print” on the touchscreen, and choose “USB Storage”... -
Page 37: Remove The Printed Model
Raise3D Pro3 Series Printer Remove the Printed Model Remove the Printed Model Make sure the printer is idle, and there is at least a 10 cm gap between the printed model’s top and the nozzle. This is to prevent the nozzle from scratching the model or damaging the model when it is taken out. - Page 38 Raise3D Pro3 Series Printer Remove the Printed Model Bend the printing surface repeatedly along the longer span of the model until the model is detached from the printing surface. Note: Do not directly touch the edge of the printing surface to avoid injury. Do not over-bend the printing surface to avoid damaging the plate or causing the plate to bounce off from hands.
-
Page 39: User Interface
Raise3D Pro3 Series Printer User Interface User Interface · Status Bar EVE, Menu title, Settings button · · Hot end and heated bed temperatures · Current model name, total print time, current printing status and height · Visual display of current model ·... - Page 40 Raise3D Pro3 Series Printer User Interface · Moving step distance setting · Disable Motor button · X/Y/Z axes move/home · Load and unload function for the L&R extruders Utilities · Choose where to load the print job from · Check uploading list, recovery task list, printing statistics Print *Contents of this manual could be changed without written notice.
-
Page 41: Experiencing Difficulties/ Contact Information
Experiencing Difficulties/ Contact Information If you run into any issues during this guided setup, please contact our expert technicians by creating a ticket online at support.raise3d.com. - Page 42 US Office: Raise 3D Technologies Inc. 43 Tesla, Irvine, CA, USA Tel: +1 888 963 9028 EU Office: Raise3D B.V. Stationsplein 45 Unit A4.004, Rotterdam, Netherlands Manufacturer: Shanghai Fusion Tech Co., Ltd. Floor 4 B5, 1688 North Guoquan Road, Yangpu District, Shanghai, P.R. China Tel: +86 400 6367 888 (For the Mainland of China only) www.raise3d.com...
Need help?
Do you have a question about the Pro3 Series and is the answer not in the manual?
Questions and answers