Heta SCAN-LINE 40B Operating Instructions Manual
Hide thumbs
Also See for SCAN-LINE 40B:
- Operating instructions manual (20 pages) ,
- Operating and installation instructions (28 pages)

Related Manuals for Heta SCAN-LINE 40B


Summary of Contents for Heta SCAN-LINE 40B
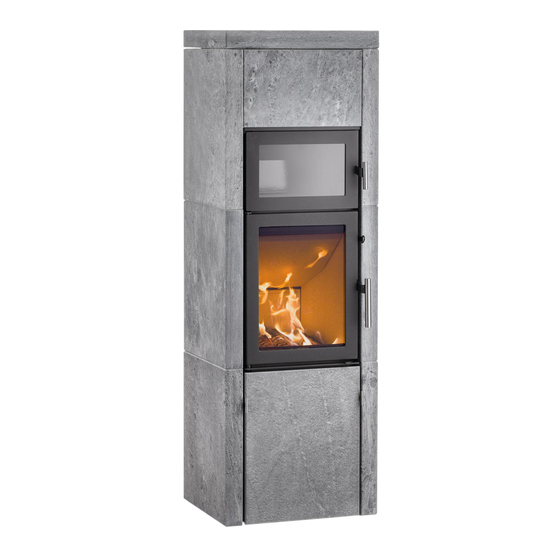
- Page 1 OPERATING INSTRUCTIONS SCAN-LINE 40B AND 50B www.heta.dk DANISH DESIGN . DANISH QUALITY . DANISH PRODUCTION...
- Page 2 The Scan-Line 40B and 50B have been With your new stove you should have approved according to the EN 13240 / received the following: NS 3058.
- Page 3 “closed” position. If local regulations at nominal output is 246°C when expel- permit, two contained fireplaces can be led to an exterior temperature of 20°C. connected to the same chimney. Howe- The flue gas mass flow is 4,7 g/sec. The ver, you must abide by local regulations chimney draft is generated by the diffe- regarding the distance between the two...
- Page 4 INSTRUCTIONS FOR USE First firing Wood kg/m Wood kg/m The stove paint is fully cured from the Beech Alder factory, but a minor unpleasant odour could still arise. Scotch pine Fuel Larch Your new stove is EN approved for firing with wood fuel. You must there- Maple Lime fore only burn clean, dry wood in your...
- Page 5 the operating handle at the front of the embers. Distribute the embers across stove. The secondary airflow is complet- the bottom grate, place pieces of fuel ely open when the handle is to the left (max. 2 kg) on the embers in a single side position, fig.
-
Page 6: Operational Problems
of soot can become so thick and sticky A risk of explosion can possibly arise if that the sealing rope can, for example, too much wood is placed in the stove. become detached when the door is This may result in the production of opened the next day. - Page 7 Cleaning after sweeping the chimney and replacing the stones. Fig 3-6 GUARANTEE The model Scan-Line 40B and 50B Damage resulting from incorrect use stoves are subjected to stringent quality Transport costs in connection with control procedures both throughout the...
- Page 8 CONNECTION OF EXTERNAL AIR FLOW (FRESH AIR) There is 140 cm from the outside of rear soapstone to the center of the hole for the external air flow connection through the floor. The pipe must fit a flexible ø100 mm hose.
-
Page 9: Installation Instructions
INSTALLATION INSTRUCTIONS Scan-Line 40B and 50B Please read carefully before installing If required, lubricate the pin holes with the stove. NB! Before assembling the a small amount of silicon. Can also be soapstones, ensure that the underlay/ applied between the stones. - Page 10 SCAN-LINE 40B 10 x standard brackets 12 x standard pins 2 small pins (see fig. 2) Scan-Line 40B...
- Page 11 The handle is fitted by placing it into the groove in the stone and the ash pan frame. Adjust the handle so that is it placed in the middle of the ash pan frame. Tighten the handle with the supplied two M5x6 screws. Scan-Line 40B...
- Page 12 The open cover should be placed here. Fig. 4 Continue with sidestones as shown i fig. 4. and place Brackets under. Then place the backstone with hole for convection and finish the first round with af sidestone. Fig. 5 Scan-Line 40B...
- Page 13 Scan-Line 40B...
- Page 14 Scan-Line 40B...
- Page 15 Scan-Line 40B...
- Page 16 Put brackets and pins in as shown. fig. Fig. 6 Continuing with the next row. Start with sidestone, backstone and then sidesto- ne again. Place brackets and pins. Fig. 7 Fig. 7 Scan-Line 40B...
- Page 17 Step 3 Step 4 Continue with 3. row. Again start with the sidestone and then the small stone on top op the backing oven. (Place it down on the 2 small pins). fig. 8 (and fig. Fig. 8 Scan-Line 40B...
- Page 18 Place brackets on top. No pins loose on top. If the stove has a top flue, are nessesary Fig. 9 break of the inner ring. Fig. 10 Fig. 9 Fig. 10 Top flue - break of inner ring. Scan-Line 40B...
- Page 19 Regulate the convection air flow by turning the handle on the side of the stove. Open Closed Scan-Line 40B...
- Page 20 SCAN-LINE 50B 14 x standard brackets 20 x standard pins 2 small pins (see fig. 2) Scan-Line 50B...
- Page 21 Place the stone into the groove on the door so that it is equidistant to both sides. Important! The stone must be manually held in place until the handle is fitted. Fig. 3 The handle is fitted by placing it into the groove in the stone and the ash pan frame.
- Page 22 NB: Behind the stove, the stone with hole for convection, must be placed at the bottom. The next stone with hole is put on top if there is smoke outlet behind. Fig. 3 The closed cover should be placed here unless the stove should be mounted with back outlet The open cover should be placed here.
- Page 23 Scan-Line 50B...
- Page 24 Scan-Line 50B...
- Page 25 Scan-Line 50B...
- Page 26 Fig. 6 Put brackets and pins in as shown. fig. Continuing with the next row. Start with sidestone, backstone and then sidesto- ne again. Place brackets and pins. Fig. 7 Fig. 7 Scan-Line 50B...
- Page 27 THERMASTONES Optional thermastones are also availa- The thermastone must be added after ble. Four thermastones can be installed the soapstones have been placed and in this stove. the stove/firebox has been adjusted. Step 1 Step 2 Step 3 Continue with 3. row. Again start with the sidestone and then the small stone on top op the backing oven.
- Page 28 Continue with back stone and then a Last row of soapstone is placed. Start sideston. Place brackets and pins on with the front stone, then side stone, the top. Fig. 9 then back stone and then the last side stone. Place brackes.
- Page 29 Finish with the topstone - place it loose on top. If the stove has a top flue, break Fig. 11 of the inner ring. Fig. 10 Finish with the topstone - place it loose on top. If the stove has a top flue, break of the inner ring.
- Page 30 Regulate the convection air flow by turning the handle on the side of the stove. Open Closed Scan-Line 50B...
Need help?
Do you have a question about the SCAN-LINE 40B and is the answer not in the manual?
Questions and answers