Advertisement
Quick Links
Advertisement

Related Manuals for Waters Extraction+


Summary of Contents for Waters Extraction+
- Page 1 USER MANUAL Extraction+ ©2022 Waters Corporation...
-
Page 2: Safety Instructions
• The device is intended for indoor use only. • With the exception of filter cartridge replacement, device maintenance is exclusively reserved for Waters servicing and support representatives. • If the device is used in any way other than those specified by the manufacturer, the user protection provided by the device may be impaired. - Page 3 Waters. Waters assumes no responsibility for any inaccuracies that may be contained in this User Manual. Waters makes no commitment to update or keep current the information in this User Manual, and reserves the right to make improvements to this User Manual or to the products described herein at any time without notice.
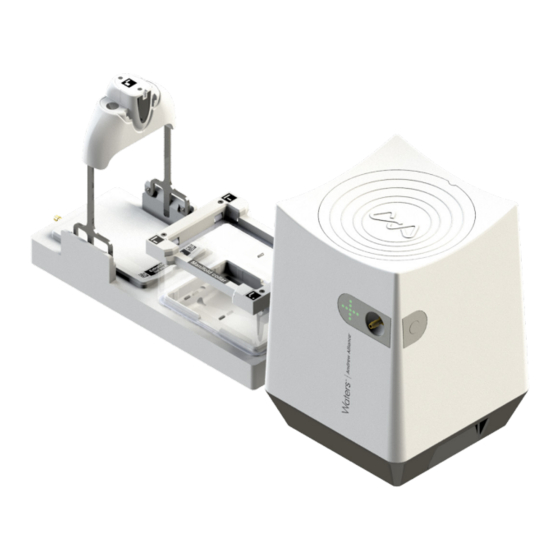
- Page 4 Product overview & setup Extraction+ manifold Collar lifter Extraction labware (column in adapter or cartridge) Manifold collar Collection labware (tubes in adapter or plate with manifold spacers) Manifold base, waste collector Silicone vacuum hose Extraction+ vacuum pump Maintenance hatch LED indicator Vacuum inlet Power button Waste container (can substitute any...
-
Page 5: Getting Started
Getting started A. Install the vacuum pump and liquid trap system Place the Extraction+ vacuum Place the waste container pump (GL45-threaded bottle) On or under the workbench, On or under the workbench, or on the floor. or on the floor. Bottle smaller than one liter can also be placed on the Extraction+... - Page 6 B. Installation of the manifold When used with the Andrew+ Pipetting Robot, the Extraction+ vacuum manifold is always placed at the same deck location: Domino location 5 Setup for cartridge Plug the between silicone hose the waste container and the Extraction+ manifold This hose must be connected to the elbow port of the thread.
- Page 7 Small skirt Long skirt Collection consumable Small skirt Waters 2-mL 96-square well 1 × 3 mm spacer 1 × 17 mm spacer collection plate, cut corner H1 on top of 1 × 3 mm spacer Waters 0.7-mL 96-round well 1 ×...
- Page 8 Sample available in the packaging Ordering info: Adhesive Seal for 96-well and 384-well Plates, 100/pk, Waters p/n: 186006336C Cut off the desired dimensions and Contact your Waters representative.
- Page 9 C. Connection to OneLab Before If you do not have a OneLab account, create one at: you begin https://onelab.com/signup If you have a OneLab account, plug Wait for the LED indicator to your Extraction+ vacuum pump turn blue and blink. into a power source.
- Page 10 Feel free to contact the Waters Chat with our support team Send us an email at support team aa_support@waters.com directly in OneLab We reply within one business day Operations Design your protocol Our drag-n-drop editor makes it easy to with all...
-
Page 11: Technical Data
Technical data Extraction+ pump 13 L/min Maximum pump rate 0–1030 mbar Measurement range (absolute) 25.9 mbar Measurement accuracy TEB 0.1 mbar Resolution 100 mbar Minimum pressure at 370m 6 mm/1/4 inch Compatible hose inner diameter 80% at 37 °C Relative humidity 2000 m Maximum operating altitude +4 to +37 °C... - Page 12 Maintenance–Filter cartridge replacement Open the maintenance Remove the hatch Unplug the filter shell Unplug the small hose hatch by pushing from the filter port down the back of the hatch Unplug the big hose Take a new filter, and Plug in the small hose Plug the filter in to the plug in the big hose first filter port...
- Page 13 Unit end of life When a unit reaches the end of its useful life, contact Waters for directions and information on the end-of-life policy. This is in accordance with the European Union Directive 2002/96/EC on Waste Electrical and Electronic Equipment (WEEE).
Need help?
Do you have a question about the Extraction+ and is the answer not in the manual?
Questions and answers