Advertisement
Quick Links
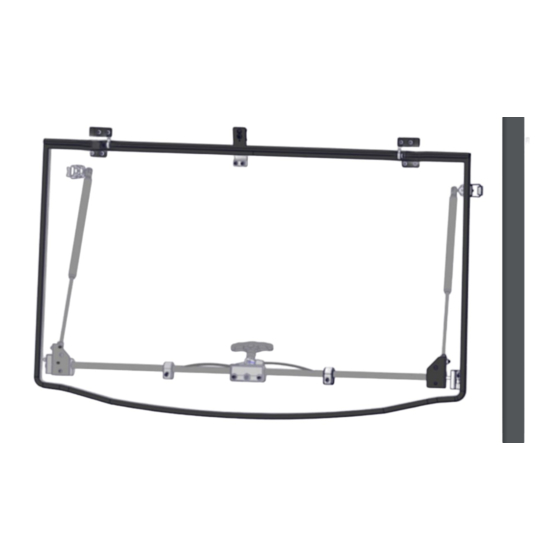
Installation & Operations Manual : FR Flip-Up Windshield, Polaris Mid-Size Pro-Fit Ranger
Installation Information:
This product does not require any modifications to your vehicle. Please familiarize yourself with all the steps before
beginning assembly.
Falcon Ridge was established to help UTV owners adapt their vehicles for the great outdoors, Falcon Ridge
provides innovative, practical, and rugged UTV products to provide owners the confidence to work, play, or explore
in whatever conditions they may encounter.
Were fueled by your passion!
Parts List:
1.
50-50221; 50-50838 MS Ranger Windshield
2.
54-91032 Gasket
3.
54-96047 Tube Assembly
4.
54-96061 Brace Mounting Block Cover
5.
54-96064 T Handle
6.
54-96058 Shim (2)
7.
54-96080 Ball Bracket, Driver
8.
54-96081 Ball Bracket, Pass.
9.
54-96086 Gas Spring (2)
10.
54-96071 Center Retainer
11.
54-96072 Rub Plate
12.
54-96089 Strike Plate, Driver
13.
54-96090 Strike Plate, Pass.
14.
54-96085 Hinge Half, Upper (2)
15.
54-96084 Hinge Half, Lower (2)
16.
54-96055 Ball Stud Clamp (2)
17.
54-96053 MS Ranger Hardware Bag
Installation Video
Scan code with your phone's
camera and follow the link
Part Number 50-50221KIT; 50-50838KIT
Tools Needed:
•
4mm, 5mm, 6mm Allen Wrenches
•
10mm, 12mm, 13mm Open End Wrench
•
Socket Wrench with 13mm Socket
•
Small Flathead Screwdriver
•
T40 Torx Socket
1
Advertisement

Related Manuals for FALCON RIDGE 50-50221KIT


Summary of Contents for FALCON RIDGE 50-50221KIT
- Page 1 This product does not require any modifications to your vehicle. Please familiarize yourself with all the steps before beginning assembly. Falcon Ridge was established to help UTV owners adapt their vehicles for the great outdoors, Falcon Ridge provides innovative, practical, and rugged UTV products to provide owners the confidence to work, play, or explore in whatever conditions they may encounter.
- Page 2 Parts Brace Mounting Block Small Mounting Block Brace Mounting Block Small Mounting Block End Mounting Block End Mounting Block...
- Page 3 Hardware In Tube Assembly: M6x45 Button Head M6x40 Button Head M6 Nylon Lock Nut M6x50 Button Head In Hardware Bag: M8x16 Button Head M8x50 Button Head M8x30 Socket Head M6x20 Socket Head M6x30 Button Head M6x18 Button Head M6 Flange Nylon Lock Nut M8 Jam Nut M6 Nylon Lock Nut x 12...
- Page 4 Place the windshield down on a large flat surface with Take the Ball Brackets and orient them on the inside something under it to prevent scratching. It should be of the windshield as shown. Shown above is Ball oriented with the Gasket bulb-side up. This is the Bracket, Driver.
- Page 5 Place the Tube assembly on the inside of the Insert two M6x45 Button Head Bolts through the windshield, and then through the Brace Mounting windshield with the pockets for captive nuts in each of Block. Put the outer two M6 Nylon Lock Nuts in their the mounting blocks facing upwards.
- Page 6 There is a gap for the Shim to be snapped in place Remove the two M8 ball studs from each Gas Spring. over the M6x50mm Button Head Bolt in between the There will be 4 total ball studs. Do this by prying up End Mounting Block and the Ball Bracket.
- Page 7 Now install the Center Retainer on the inside of the Now attach each Hinge Half, Lower to the outer side windshield using 2 - M6x30 Button Head Bolts and 2 - of the windshield with the angle coming away from the M6 Nylon Lock Nuts.
- Page 8 Thread one M8 Ball Stud into each Ball Stud Clamp Attach the Ball Stud Clamp to the vehicle frame by loosening it’s two M8x30 Socket Head Bolts until able to fit clamp over the tubing. Space the Ball Stud Clamp from the Strike Plate so that its bottom edge is 12.0 inches away from the top edge of the strike plate.
- Page 9 Shown above is both assembled Hinge Halves, Upper Use a 5mm hex and a 13mm socket wrench to loosely and their orientations on the frame of the vehicle. fasten two M8x16mm button head bolts and two M8 Nylon Lock Nuts for each Hinge Half, Upper on each side of the vehicle.
- Page 10 Check the alignment of the windshield. These two Press the bottom corners of the windshield in gently to *do not slam the bolts on either side of the windshield can be loosened latch the strikers in the Strike Plates. windshield closed yet * to allow for adjustment of the windshield alignment.
- Page 11 This piece of the Rub Plate has two orientations. If the With the windshield held open, install the Rub Plate, bracket isn’t tight enough, flip this piece 180° and from inside the vehicle, by sliding the hooked piece tighten. under the center retainer and then fastening to the piece shown in the next step.
-
Page 12: Troubleshooting
Repeat this process for the smaller diameter end of To Close: With the windshield open, pull the T Handle swiftly and in a straight line towards you to engage the Gas Spring. Install this end’s clip over the ball the strikers in the strike plates and close the stud near the End Mounting Block on the Tube windshield. - Page 13 Troubleshooting: Windshield closing without fully compressing gasket? • The Shims from step 9 can be removed if the windshield is closing without compressing the Gasket enough. Removing these shims will make the Gasket compress more when the strikers latch on the Strike Plates Windshield wobbling when closing? •...
Need help?
Do you have a question about the 50-50221KIT and is the answer not in the manual?
Questions and answers