Table of Contents
Advertisement
Quick Links
NOTICE: Please check contents of package for any damage and make sure all parts fit correctly and you
are happy with the product before removing protective film. Once the film is removed you cannot return
1. Check over the parts included in the cartons with the parts list shown below:
2" Stainless Bolts
1 1/4" Stainless Bolts
5/8" White Nylon Spacers
Metal Brackets
White Nylon Washers
Lock Nuts
Thumb Nuts
Large Polycarbonate Pieces
54" Adhesive Rubber Padding ½" Wide
22" Adhesive Rubber Padding ½" Wide
54" Adhesive Rubber Padding 1½" Wide
Rear Window
If any parts are damaged or missing please contact customer service at (606) 845-7439.
2. Start by pulling it out of the box; find a clean area to lay it down and install the hardware.
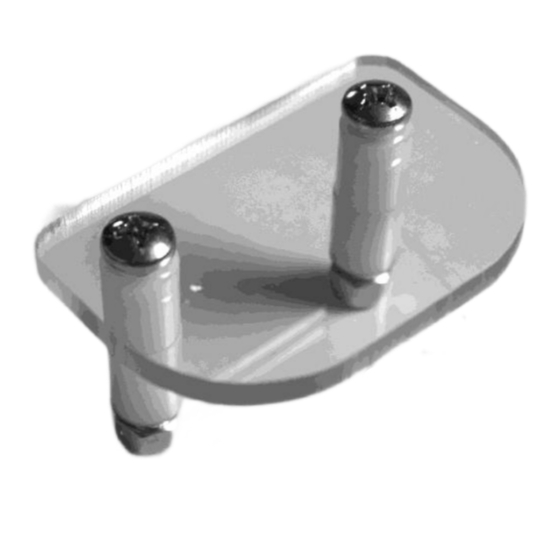
3. Begin attaching the two bottom brackets before you put the window on the U-Force. These brackets are
made up from several different parts that must be put together first. Below is a picture of the parts
needed to make the bracket.
2515 Bypass Rd. Flemingsburg, KY 41041
Instructions for Installation and Care of CF Moto U-Force 1000
Full Polycarbonate Rear Window
CF-U-1000-RW02 / 50-40064
the product for a full refund.
606-845-7439
8 each
6 each
16 each
2 each
4 each
12 each
2 each
6 each
1 each
2 each
1 each
1 each
Advertisement
Table of Contents

Related Manuals for FALCON RIDGE CF-U-1000-RW02


Summary of Contents for FALCON RIDGE CF-U-1000-RW02
- Page 1 Instructions for Installation and Care of CF Moto U-Force 1000 Full Polycarbonate Rear Window CF-U-1000-RW02 / 50-40064 NOTICE: Please check contents of package for any damage and make sure all parts fit correctly and you are happy with the product before removing protective film. Once the film is removed you cannot return the product for a full refund.
- Page 2 4. Take the 2" bolts and run them through the polycarbonate pieces as shown in the photo below. Do this four times. 5. Then take the nylon spacers and put 2 of them on the bolts as shown in the photo below.
- Page 3 6. Now take the plates and spacers and insert them into the holes along the bottom so that the plates are on the inside of the windshield. See the photo on the next page. 7. Now secure them in place with a lock nut on the front side of the Rear Window as shown in the photo below...
- Page 4 8. Before placing the Rear Window on the vehicle take the adhesive rubber padding and install it around the perimeter of the Frame that will hold the window in place. The 1” wide pieces go on the top and sides while the 1 ½” strip goes across the bottom as shown in the pictures below.
- Page 5 9. Now that the padding and bottom brackets are in place it's time to place the Rear Window in place on the vehicle. The brackets are designed to hold the window in place along the bottom of the frame in behind the seats as shown in the photo below.
- Page 6 11. On the sides you will use the metal brackets. Take a 11/4" bolt and run them through the bracket and then through the slot along the sides from the inside out. Then screw on a thumbnut on the outside and tighten down.
- Page 7 Falcon Ridge. This will ensure many seasons of clarity and keep scratching and swirling to a minimum. Never use cleaners such as Windex that contain ammonia as doing so may adversely affect the rear window.
- Page 8 Warranty To The Owner of this Product: Thank you for purchasing one of our Falcon Ridge Cab Enclosures, Tops &/or Windshields! Below are the terms under which your product is covered under our manufacturer’s warranty. 30 Day Warranty which includes and is not limited to replacing the enclosure, tops and/or windshield due to defect of the product.
Need help?
Do you have a question about the CF-U-1000-RW02 and is the answer not in the manual?
Questions and answers