
Related Manuals for Storage Canopy C2640R


Summary of Contents for Storage Canopy C2640R
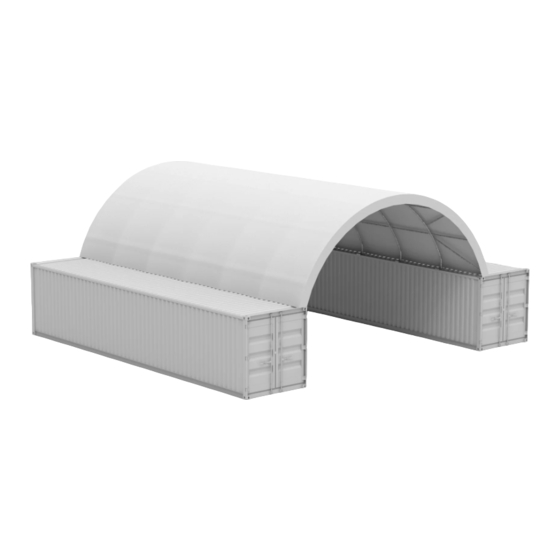
- Page 1 Shipping Container Roof Single Truss Round Style Model# C2640R 26’x40’x10’ (6’7’’ arch space) Assembly Instructions...
-
Page 2: Equipment List
Equipment List Speed Wrench 22#.23#.24# Hammer (30lb) Rope (12#) Long Tape (50m) Hammer Drill*1 Lifter*2 Crane*1 Forklift*1 Protective equipment... -
Page 3: Safety Precautions
YOU MUST READ THIS DOCUMENT BEFORE YOU BEGIN TO ASSEMBLE THE SHELTER. Thank you for purchasing our shelter. When properly assembled and maintained, this product will provide years of reliable service. These instructions include helpful hints and important information needed to safely assemble and properly maintain the shelter. - Page 4 ANCHORING THE CONTAINER Make sure you have: Welder. Cement. Four 3” x 3” x 6 feet ¼” Square steel angle As shown in the diagram 1, make a 3 ft deep hole right beside one of the front and opposite rear corners of the container, in which the 6ft square steel will be installed.
- Page 5 Highly Recommended 1. All container canopy covers need to be removed during windstorm of 60 mph, leaving frame assembled. Customer responsibility. 2. All container canopy covers need to be removed before a snowstorm of 1-2 inches (for single truss Shipping container roofs) and 3-4 inches (for double truss Shipping container roofs), leaving the frame assembled.
- Page 6 26’x40’x10’ Parts List Part Description Code Roof Roof Bent Joist Middle Bent Joist Lower Bent Joist Purlin Support Tube Base Plate Base Plate Lower Tensioning Tube for Roof Cover, (6+1) 2 sets pcs/set Winch for tensioning of roof cover (four corners) Tube Clip with bolt M10x50 for support tube Bolt M8x70 for swaged tube...
- Page 7 Carriage Bolt M10x80 for purlin End Plug Belt for Winch on base plate Knitting Rope for roof cover (2 bundles) 1 pack Roof Cover Duct Tape Expansion Bolt...
-
Page 8: Installation Process
INSTALLATION PROCESS Note: Make sure to fix the container firmly before installing the shelter. 1. Weld base plates (No.6 & No.7) to the top of container. Please refer to the diagram (Figure 1) to mark the position of base plates. Figure 1... - Page 9 2. Connect the bent joist (No.1, 2, 3) by bolt M8x70 (No.11) to be one arch. 3. Put one end of the arch into the base plate (No.6 & No.7) and fasten it by bolt M8x70 (No.11), then try to put the other end into opposite base plate. 4.
-
Page 10: Cover Installation
Purlin and Support Tube Installation Cover Installation 1. Put the cover EVENLY, CAREFULLY AND SLOWLY on the frame. Insert the tensioning tube (No.8) into the cover pipe pockets and loosely secure the belt (No.14) in the winch on based plate. DO NOT TIGHTEN. - Page 11 Roof Cover Now your installation is completed.
Need help?
Do you have a question about the C2640R and is the answer not in the manual?
Questions and answers