
Related Manuals for Belling BEL FS50ET SIL


Summary of Contents for Belling BEL FS50ET SIL
- Page 1 BEL FS50ET SIL/444443922 BEL FS50ET BLK/444443921 BEL FS50ET WHI/444443920 OPERATING AND INSTALLATION INSTRUCTIONS OF ELECTRIC TWIN CAVITY...
- Page 2 Dear Customer, Thank you for purchasing this Cooking Appliance. The safety precautions and recommendations in these instructions are for your own safety and that of others. They will also provide a means by which to make full use of the features offered by your appliance. Please keep this booklet in a safe place.
-
Page 3: Table Of Contents
CONTENTS: LAYOUT OF COOKER WARNINGS INSTALLATING YOUR COOKER USING THE PRODUCT CLEANING AND MAINTENANCE SERVICE AND TRANSPORT... -
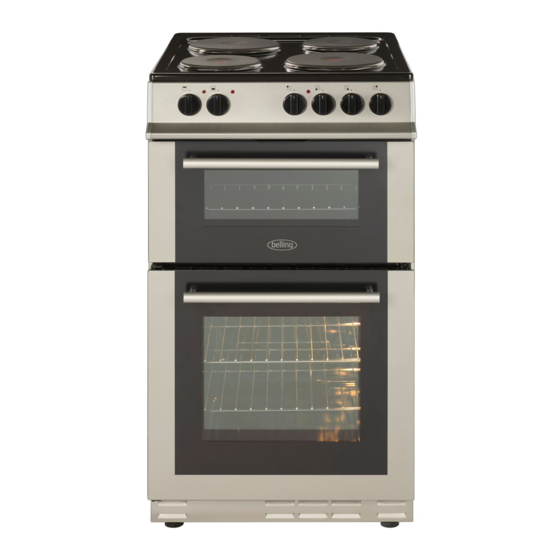
Page 4: Layout Of Cooker
PART 1: LAYOUT OF COOKER List of Components 1. Cooktop 2. Control panel Rack 2 Rack 1 3. Top oven door 4. Oven door handle 5. Main oven door 6. Grid 7. Supply leg Rack 5 Rack 4 Rack 3 Rack 2 Rack 1... -
Page 5: Warnings
PART 2: WARNINGS PLEASE READ THE ENTIRE INSTRUCTION MANUAL CAREFULLY BEFORE USING YOUR APPLIANCE. MAKE SURE TO KEEP THE MANUAL SOMEWHERE SAFE IN CASE YOU NEED IT FOR FUTURE REFERENCE. THIS INSTRUCTION MANUAL HAS BEEN WRITTEN WITH OUR OTHER COOKER MODELS IN MIND, AS WELL AS YOUR MODEL, THEREFORE SOME OF THE FEATURES THAT YOU SEE EXPLAINED IN THIS MANUAL WILL NOT BE APPLICABLE TO YOUR COOKER. - Page 6 - WARNING: If the surface is cracked, switch off the appliance to avoid the possibility of electric shock. - For hobs incorporating a lid, any spillage should be removed from the lid before opening. And also the hob surface should be allowed to cool before closing the lid.
- Page 7 - WARNING: Ensure that the appliance is switched off before replacing the lamp to avoid the possibility of electric shock. - CAUTION: Accessible parts may be hot when the cooking or grilling is in use. Young children should be kept away. •...
- Page 8 During usage • When you first run your oven a certain smell will emanate from the insulation materials and the heater elements. For this reason, before using your oven, run it empty at maximum temperature for 45 minutes. At the same time you need to properly ventilate the environment in which the product is installed.
-
Page 9: Installating Your Cooker
PART 3: INSTALLING YOUR COOKER Manufactured with the best quality parts and material, this modern, functional and practical cooker aims to meet all your cooking needs. Read the manual carefully to familiarise yourself with the functions of the appliance so that you know how to use it successfully and safely. - Page 10 3.2 ADJUSTING THE LEVELLING LEGS This cooker stands on 4 levelling legs. As the legs are initially on a lower position, you must adjust them to make sure the cooker is balanced before using it. If you need to balance the cooker, the legs can be adjusted by turning them clockwise. You can raise the cooker by a maximum of 15mm with the levelling legs.
- Page 11 Connection diagram is given below. This appliance must be earthed. For this connection, ‘ Twin and Earth 6242Y’ type cable should be used.
- Page 12 3.4 INSTALLING THE ANTI-TILTING BRACKET...
-
Page 13: Using The Product
180mm rapid hotplate 2000W The availability of a heating element varies according to the specification of products. 4.2. USING YOUR COOKER The control panel of the cooker is shown below. BEL FS50ET SIL - BEL FS50ET BLK - BEL FS50ET WHI... - Page 14 4.3. USING THE COOKTOP BURNERS There are 2 types hotplates Standard hotplate Rapid hotplate (which is marked by the red dot on the hotplate surface) The hob part of the cooker is operated by 4 control knobs, one for each burner. Each control knob has 7 positions on the control panel for a more precise heat control.
- Page 15 4.4 USING THE OVEN 4. 4. 1 Using the Top Oven Grill function Grill Function This function will grill dishes and snacks. Please use the grill pan supplied with your cooker when you come to grill to prevent food splatters from dripping down to the shelves below.
- Page 16 Bottom heating function This function is appropriate for heating food rather than cooking it. Turn your main oven's switch as it will show the sign of this function and place the tray on the grid. At the end of heating period, turn the main oven switch off. Take the cooking tray out and put it onto a safe place.
- Page 17 4.5. USING THE GRILL PAN HANDLE SET Warning : Always use an oven glove to protect your hand when using the grill as all the metal parts can become very hot! This grill pan has a detachable handle, so make sure the handle is centralised and attached securely as in the picture on the next page.
- Page 18 4.6. HEAT DEFLECTOR Warning: When operating the grill for periods in excess of 15 minutes, always fit the heat deflector provided, avoiding exposure to exposure to excessive control knob temperature. Care should be taken when returning the grill door to the vertical closed position, avoiding hand contact with the deflector.
- Page 19 4.7. COOKING RECOMMENDATIONS 4.7.1. Top oven cooking chart Food Cooking Temperature Time(min.) Rack position Small Cakes 160-185 20-25 1(From Bottom) Burgers Max position 20-25 2(From Bottom) Beef Max position 25-30 2(From Bottom) Toast Max position 5-10 2(From Bottom) 4.7.2. Main oven cooking chart Food Cooking Temperature Time(min.)
-
Page 20: Cleaning And Maintenance
PART 5: CLEANING AND MAINTENANCE 5.1 GENERAL - Before cleaning your cooker, make sure that all control knobs are in the “0” position and that the oven has cooled down. - Before you clean, check whether the cleaning equipment and detergents you use are appropriate for the cooker, and what is recommended by the manufacturer. - Page 21 5.3 REMOVING AND REASSEMBLING THE OVEN DOOR To remove the oven door; • Open the oven door(1). • Open the saddle bracket up to end position(2). • Close the door till it almost reaches to rd the full closed position as shown in 3 figure and remove the door by pulling it Saddle towards yourself.
-
Page 22: Service And Transport
PART 6: SERVICE AND TRANSPORT 6.1 TROUBLESHOOTING BEFORE CONTACTING A REPAIR SERVICE If the oven is not working: 1. Make sure the cooker is plugged in and switched on. 2. Check other appliances to make sure there hasn't been a power cut. 3. - Page 23 Brand BEL FS50ET SIL Model BEL FS50ET BLK BEL FS50ET WHI Type of Oven ELECTRIC Mass 40,7 Energy Efficiency Index - conventional Energy Efficiency Index - fan forced Energy Class Energy consumption (electricity) kWh/cycle - conventional Energy consumption (electricity) kWh/cycle...
- Page 24 Brand BEL FS50ET SIL Model BEL FS50ET BLK BEL FS50ET WHI Type of Hob Electric Number of Cooking Zones Heating Technology-1 Hotplate Size-1 Ø14,5 Energy Consumption-1 Wh/kg 193,0 Heating Technology-2 Hotplate Size-2 Ø14,5 Energy Consumption-2 Wh/kg 194,0 Heating Technology-3 Hotplate Size-3 Ø18,0...
- Page 25 The symbol on the product or on its packaging indicates that this product may not be treated as household waste. Instead it shall be handed over to the applicable collection point for the recycling of electrical and electronic equipment. By ensuring this product is disposed of correctly, you will help prevent potential negative consequences for the environment and human health, which could otherwise be caused by inappropriate waste handling of this product.
Need help?
Do you have a question about the BEL FS50ET SIL and is the answer not in the manual?
Questions and answers