Advertisement
Quick Links
Advertisement

Summary of Contents for 3DTALK DF100
- Page 1 Jiangsu Ouring 3D Technology co.,Ltd User Guide of 3DTALK DF100 Version: V3.0...
-
Page 2: Table Of Contents
Jiangsu Ouring 3D Technology co.,Ltd Catalogue 1. Product Description..............3 2. Product View................5 3. Printer Preparation..............12 4. Software introduction.............20 5. Printing Process...............37 6. Resin vat release film replacement instruction....39 7. Printer use instruction............41 8. Warranty..................43... -
Page 3: Product Description
Jiangsu Ouring 3D Technology co.,Ltd 1. Product Description General 3DTALK-DF100 series printer is a high-tech digital 3D resin printer developed and produced by Jiangsu Ouring 3D Technology Co., Ltd. (referred to as Ouring). Users of 3DTALK-DF100 are advised to read the product manual carefully before start. - Page 4 Jiangsu Ouring 3D Technology co.,Ltd Warning: Do not place objects on the top of the printer to avoid falling into the printer and causing printing problems and safety hazards. Warning: Keep the printer, resin, and alcohol away from fire. Warning: Please use the power cord that comes with the printer, and ensure that the power supply voltage is stable.
-
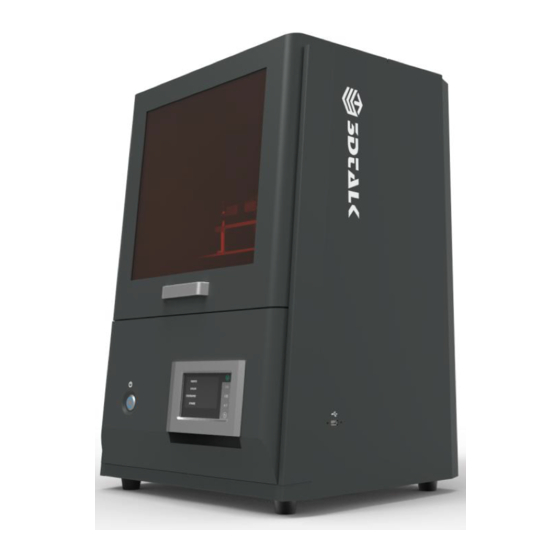
Page 5: Product View
Jiangsu Ouring 3D Technology co.,Ltd 2.Product View Open Handle Touch screen USB connector Screen button Building plate Resin vat Power socket... - Page 6 Jiangsu Ouring 3D Technology co.,Ltd Spare Parts Flat shovel X 1 Open end wrench Hex wrench(2, 2.5, 3mm) (6 - 7mm) Protective gloves X 2 Protective glasses X 1 U Drive X 1 Resin vat X 2 Cleaning Vat X 1 Resin Scraper X 1 Cleaning brush X 1 Sandpaper (400mesh) X 2...
- Page 7 Jiangsu Ouring 3D Technology co.,Ltd accessories. 3DTALK accessory purchase link: https://list.tmall.com/search_product.htm?q=3dtalk&type=p&vmarket=&spm=87 5.7931836%2FB.a2227oh.d100&from=mallfp..pc_1_searchbutton Performance Parameter 3D Technology LCD Light Curing Printer Size 525 X 460 X 725mm (L * W * H) Working Tem 18 - 28℃ Build Volume 68 X 120 X 200mm (X * Y * Z)...
- Page 8 Jiangsu Ouring 3D Technology co.,Ltd File format 3D Format:.stl、.obj、amf、3mf etc; Printing File:.zip Resin vat Detachable integrated resin vat Cooling system Liquid cooling system Sealing Dustproof, anti-static Resin Dental resin, Jewel resin, Normal UV resin Transfer USB drive, wifi Power input AC110/220V 50/60Hz 400W Environmental Requirements ...
- Page 9 Jiangsu Ouring 3D Technology co.,Ltd Please place the printer in a clean office environment that meets the above conditions.; In view of the size of the printer, please prepare the desk length and width ≥ device length in advance.; ...
- Page 10 Jiangsu Ouring 3D Technology co.,Ltd [Local file] is stored in the model print file of the printer. All files printed by the printer will be stored in this location.; [Udisk file] After the USB disk is inserted into the printer, the print ...
- Page 11 Jiangsu Ouring 3D Technology co.,Ltd [Operation Control] Controls the Z-axis of the printing build plate to move up & down and return to zero; Note: The bottoming operation in Operation Control must confirm that there is no solid impurities inside the printing build plate and resin vat. It can be operated after being leveled。...
- Page 12 Jiangsu Ouring 3D Technology co.,Ltd About Interface DF100 Display the model, hardware version, software version, and IP address of the device. Dental Resin Introduction Resin Mode Color Character Dental Application High precision, Dental Model smooth surface, no Orange Prosthodontics...
-
Page 13: Printer Preparation
Jiangsu Ouring 3D Technology co.,Ltd 3.Printer Preparation Printer installation 1.Take out the fixed strip and protective cotton of the printer from the packing box and place the printer on the horizontal tabletop; 2.Open the printer compartment door and take out all the protection devices and random accessories from the printer;... - Page 14 Jiangsu Ouring 3D Technology co.,Ltd 5. Rotate the four positioning screws downwards to fix the vat to ensure that the vat does not shake (see the picture below). Build Plate Leveling Note: When the model fails to print before the first printing and during the use of printer, please perform the build plate leveling operation.
- Page 15 Jiangsu Ouring 3D Technology co.,Ltd Follow the steps below to complete the platform leveling: Printer components introduction (1)Locking handle (2)Hand screw (3)Locking screw (4)Locating pin (5)Printing build plate Rotate the four locking screws on the Z-axis bracket through the tool wrench counterclockwise and loosen them to the height of the screw as far as possible from the bottom black bracket (see the picture below)
- Page 16 Jiangsu Ouring 3D Technology co.,Ltd 2. Manually rotate the four units hand screw on the Z-axis bracket counterclockwise to the highest position (See below picture) If the hand screw cannot be rotated counterclockwise, please hold the printing build plate, loosen the locking handle and then try to rotate. 3.
- Page 17 Jiangsu Ouring 3D Technology co.,Ltd 4.Click the [Reset] button, when the printing build plate stops moving upwards, click the [Bottom] button, the printing build plate can freely descend into the vat. (See the picture below) 。 5.When the printing build plate is lowered into the vat, loosen the locking handle to ensure that the printing build plate and the release film are fully fitted (see the figure below)
- Page 18 Jiangsu Ouring 3D Technology co.,Ltd 6. Align the four positioning pins on the Z-axis bracket with the four positioning holes on the printing build plate. (See below pictures) 7. Rotate the four units hand screw down to ensure that the printing build plate is completely attached to the bottom surface of the vat without sloshing (see the picture below).
- Page 19 Jiangsu Ouring 3D Technology co.,Ltd 8. Use hand to turn the locking handle clockwise to tighten it (see the picture below) 9. Use a tool wrench to rotate the four locking screws clockwise to tighten (see the picture below)
-
Page 20: Software Introduction
Jiangsu Ouring 3D Technology co.,Ltd Filling resin material 1. Shake the material inside the bottle before pouring it into the resin material of the trough every time ,when we poured out ,we should ensure the uniform density of the material . 2. - Page 21 Jiangsu Ouring 3D Technology co.,Ltd Sliced software homepage Software installation process 1. Choose [Next] button...
- Page 22 Jiangsu Ouring 3D Technology co.,Ltd 2. choose the software storage path → [Everyone] → [Next]...
- Page 23 Jiangsu Ouring 3D Technology co.,Ltd 3. Click [Next] button...
- Page 24 Jiangsu Ouring 3D Technology co.,Ltd 4. Click [Close] button Set Software language After installation, the initial version of software is English version. You can set the software language through the followingpath. 1. Click [File] → [Configuration]...
- Page 25 Jiangsu Ouring 3D Technology co.,Ltd 2. Click the text box on behind of [Interface language] to switch the software language version. After the language switching is finished, click [Save]. 3. Click [OK] to restart the software.
- Page 26 Jiangsu Ouring 3D Technology co.,Ltd Software slicing process Import model Select [Open File] / [Import File] in the [File] option and import the model file that needs to be sliced. Note: Only the following model file formats can be recognized by the software:...
- Page 27 Jiangsu Ouring 3D Technology co.,Ltd Model editing Model perspective Model display layer bylayer Move the model to the center position Select the model and click Model movement Method 1: Select and click the model, make it in a directional movement...
- Page 28 Jiangsu Ouring 3D Technology co.,Ltd Method 2: After the model is selected, hold the arrow in the X, Y, and Z directions to move...
- Page 29 Jiangsu Ouring 3D Technology co.,Ltd Model rotation Method 1: Select the model and click , rotate it in the appointeddirection.
- Page 30 Jiangsu Ouring 3D Technology co.,Ltd Method 2: After the model is selected, hold the arc in the X, Y, and Z directions and rotate. Keep model surface on bottom Click and then click the side that needs to be bottomed. Automatic typesetting model Click after the model is imported into the software.
- Page 31 Jiangsu Ouring 3D Technology co.,Ltd...
- Page 32 Jiangsu Ouring 3D Technology co.,Ltd Combination/dissolution model When multiple models need to add support, it is slow to add one by one. You can combine multiple models into one model file, so that we could add support to multiple models at the same time. Operation method: select all the models that need to add support in the software and click , thus can combine all them into one model file.
- Page 33 Jiangsu Ouring 3D Technology co.,Ltd 2. After confirming the shelling parameters, click [Hollow mesh]...
- Page 34 Jiangsu Ouring 3D Technology co.,Ltd Hollow mesh model comparison Model after hollow mesh Model before hollow mesh...
- Page 35 Jiangsu Ouring 3D Technology co.,Ltd Model add side row holes 1. Select the [Support Mode] button for the model; 2.Select to add side row hole to the model...
- Page 36 Jiangsu Ouring 3D Technology co.,Ltd 3. Side row hole setting Select the side row holes to be set under the mode of support editing, and set the parameters in the parameter area on the right of the software Click the [Apply to Selection] button to take effect.
- Page 37 Jiangsu Ouring 3D Technology co.,Ltd Add model base 1. Select the [Support Mode] button of the model Select , the model generate the base automatically...
- Page 38 Jiangsu Ouring 3D Technology co.,Ltd 3. Pedestal setting Click the pedestal in edit status, and set the parameters in the parameter area on the right of the software. After setting, click [apply to selection] button.
- Page 39 Jiangsu Ouring 3D Technology co.,Ltd Support use Support mode: it can edit supporting on the model Finish support mode: After finish editing, click [Finish Support Mode] to close editing. Support profile Click Generate Supports button , the current model will generate support according to the parameters of Support Configuration File.
- Page 40 Jiangsu Ouring 3D Technology co.,Ltd Default density 100% -it can be reset according to the actual situation of the model. Tip diameter The contact area between the support body and themodel. Default 0.5 -can be modified according to the actual situation of the model. The final density Critical construction Angle- Bending Angle of support body The default 30% The sample strategy - Default creases and surfaces (suitable for normal models)
- Page 41 Jiangsu Ouring 3D Technology co.,Ltd The pole widening factor defaults to 2.0 The position above 0 Click √to enable this function, Edit the spacing of the model anomaly when supporting click √ to enable this function , This Internal support is starting fuction is enabled by default Feet high The default of 1.0 mm...
- Page 42 Jiangsu Ouring 3D Technology co.,Ltd Support editing function Generate support Click to generate support effect diagram, preview support effect Editing support production point, Edit points Click the original generation point to delete, click the blank of the model generation point to add, After editing, click [Apply Changes] to edit Remove support...
- Page 43 Jiangsu Ouring 3D Technology co.,Ltd Support base parameter editing Support the base of the selected model in the edit state. After the base turns yellow, you can edit parameters on the right side of the software. When you're done, click [apply] to finish the base edit.
- Page 44 Jiangsu Ouring 3D Technology co.,Ltd Set up the print profile The configuration file sets thepath...
- Page 45 Jiangsu Ouring 3D Technology co.,Ltd The figuration file sets the content...
- Page 46 Jiangsu Ouring 3D Technology co.,Ltd...
- Page 47 Support editing function Generate Click to generate support effect diagram, support preview support effect Editing support production point, Click the original Edit points generation point to delete, click the blank of the model generation point to add, After editing, click [Apply Changes] to Edit Remove Clear all support for the selected model...
- Page 48 Support base parameter editing Support the base of the selected model in the edit state. After the base turns yellow, you can edit parameters on the right side of the software. When you're done, click [apply] to finish the base edit. Set up the print profile The configuration file sets thepath Click the Start Slice button in the main interface of the software.
- Page 49 Select the USB flash drive to receive the slice file. Click the Material and Print Profile [Edit] button.
- Page 50 The figuration file sets the content Please set the appropriate value for Slice Thickness (μm) on the page, select SVG format for Slice Export Format, and Preview 1 and Preview 2 in Preview. Set the Horizontal Size Compensation on the page to the appropriate value based on the actual printed material.
- Page 51 The parameters in the page are properly set according to the actual printing resin. Generate new profile: modify profile name and profile Settings and click [Save] Modify configuration file Configuration File Name remains unchanged. Modify Configuration File Settings and click[Save]. Name of parameter Repair model Guide model...
- Page 52 Delay time when reaching top Resume exposure time after pausing 4800 4500 5500 (First layer only) Resin pump time Generate slice file Confirm that there is no need to modify the parameters in the overview of slicing interface and click [Start Slicing]. Printer:DF100...
-
Page 53: Printing Process
1.Material and print profile: select the print profile that matches the current resin material Print job folder name: print file name(editable) Start slicing: click this button when you confirm in the General Slicing page that all parameters need not be modified 2.Click [Start Slicing] and the Slicing Progress dialog box will appear. - Page 54 5. Remove the printings build plate from the printer, and close the warehouse door after taking it out 6. Use a shovel knife to remove the model from the printing build plate and place it in a wash with sufficient alcohol (90-95%). The vat is ready for cleaning. Wipe the printing build plate and assemble it in the original position of the printer through locking handle,hand tighten and fix, model post-processing.
- Page 55 the material inside being cured. 1. After putting the printing build plate in place, the post-processing operation of the model is started 2. Leave trees on the surface of the model placed in the cleaning vat with alcohol (90-95%) and soft bristle brush. The grease is cleaned off, and then the ultrasonic cleaning printer is used for secondary cleaning (The second cleaning time is determined by the power of the ultrasonic cleaning printer 35w-90s.
-
Page 56: Resin Vat Release Film Replacementinstruction
impurities, please use the vat cleaning function. The solid impurities in the resin vat must be cleaned up before printing the secondary model. Note: Do not use metal spatula when cleaning or inspecting solid impurities in the vat, in case of cutting the release film and causing leakage phenomenon occurrence, using the function of vat cleaning, the material at the bottom of the vat will be solidified into a block, and the solidified block will be taken out with a plastic scraper, after taking out the solidified block, clean it again through the plastic... - Page 57 Solution B: 1.Replace the whole set of vat (including vat+ release film) (If you want to know details, please contact the sales representative and the manufacturer's after-sales staff) Resin vat 3DTALK spare parts link: https://list.tmall.com/search_product.htm?q=3dtalk&type=p&vmarket=&spm=875.7931836% 2FB.a2227oh.d100&from=mallfp..pc_1_searchbutton...
-
Page 58: Printer Use Instruction
7. Printer use instruction Thank you for choosing 3DTALK-DF100 3D printers. In order to keep the printer running normally, please make sure to spend time on read product tips for future... - Page 59 use. Before using 1. To ensure the normal power supply before the printer starts to use, please confirm whether the connected power output is stable. Source instability can damage printer. 2. The printer is placed on a horizontal plane. Before use, please place the printer on a stable horizontal table due to the resin.
- Page 60 the feed vat. If there is cured resin, please clean it. If it's not solidified, after removing the material vat and printing build plate, use the "light path control" function of the printer to check whether the display screen is normallyoutput. 2.
-
Page 61: Warranty
Principle of the warranty 1. 3DTALK-DF100 printers purchased through formal channels authorized by our company will be available within 7 days from the date of purchase Under normal operating conditions (non-artificial damage), the product appears quality failure, not dismantled and repaired, and the random parts and packaging are complete and intact,though... - Page 62 2. 3DTALK-DF100 printers purchased through formal channels authorized by our company will enjoy free maintenance, repair for one year from the purchase date 3.
- Page 63 Jiangsu Ouring 3D Technology co.,Ltd 模型编辑过程中可通过上下拖动此箭头对模型每层的 细节进行检查...
Need help?
Do you have a question about the DF100 and is the answer not in the manual?
Questions and answers