Chapters
Table of Contents

Related Manuals for CORNING AXYGEN AxySpin R


Summary of Contents for CORNING AXYGEN AxySpin R
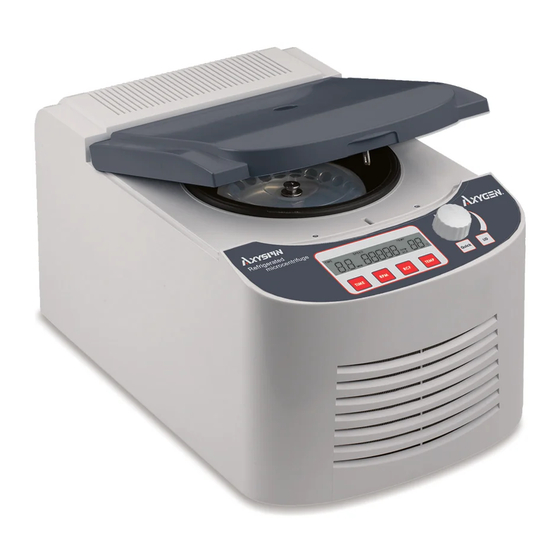
- Page 1 Instruction Manual AxySpin R Refrigerated Microcentrifuge Cat. Nos. 601-05-031 – 120 US 601-05-021-230 – EU/UK 601-05-011 – 100 US © 2016 Corning Incorporated. All Rights Reserved.
- Page 2 This manual is designed to assist you in the optimal usage of your Axygen® Axyspin R refrigerated microcentrifuge. The manual is available in English, French, German, Italian, Portuguese, and Spanish on our website at www.corning.com/lifesciences. © 2016 Corning Incorporated. All Rights Reserved. Axyspin R Refrigerated Microcentrifuge...
-
Page 3: Table Of Contents
6.3. Cleaning the Rotor ......9 6.4. Disinfection ......... 9 6.5. Replacing the Rotor ......9 6.6. Replacing fuses ........9 Troubleshooting ........10 Appendix A: Technical Specifications ..11 Appendix B: Warranty ........12 © 2016 Corning Incorporated. All Rights Reserved. -
Page 4: Safety Precautions
Repair should be carried out by Axygen Scientific' authorized service personnel only. Use original spare parts and accessories only. Warning Label: Please be aware of the danger of electric shock or other dangers. © 2016 Corning Incorporated. All Rights Reserved. AxySpin R™ Refrigerated Microcentrifuge... -
Page 5: General Description
If there are any items missing, damaged, or not according to your order, please contact your distributor or sales representative immediately. Note: Please use 7A fuse in power source 100~120/50~60Hz countries, while 3.15A fuse is for power source 200~230V/50~60Hz countries. © 2016 Corning Incorporated. All Rights Reserved. -
Page 6: Initial Operation
Attention: To reduce air friction and noise, the rotor lid should be attached to the rotor during centrifugation. Make sure that the rotor lid snaps securely into place, by pressing down on center catch. © 2016 Corning Incorporated. All Rights Reserved. AxySpin R™ Refrigerated Microcentrifuge... -
Page 7: Starting And Stopping A Run
Emergency Lid Release Plug ( Please refer Figure 2 ) on the right-hand side of the machine. Third, pull the wire (attached to the plug) while gently pushing downward on the lid. The lid will now release. © 2016 Corning Incorporated. All Rights Reserved. -
Page 8: Overview
Knob or g force TIME button To adjust run time setting RPM button To adjust speed setting RCF button To adjust RCF setting © 2016 Corning Incorporated. All Rights Reserved. AxySpin R™ Refrigerated Microcentrifuge... - Page 9 The audible signal function can be resumed by pressing button six times again. Definition of the audible sounds are shown in the table below. Audible Sound Operation 2 beeps Power on machine 3 beeps End of a run © 2016 Corning Incorporated. All Rights Reserved.
-
Page 10: Operation
(START/STOP) knob to store and run the selection. The flashing of TEMP value will stop and the value will be stored automatically if no button is pressed after 6 seconds of the adjustment. © 2016 Corning Incorporated. All Rights Reserved. AxySpin R™ Refrigerated Microcentrifuge... -
Page 11: Cooling
The new values are stored and executed by pressing the function button again or by waiting 6 seconds. Service and Maintenance Always unplug the power plug before service and maintenance. © 2016 Corning Incorporated. All Rights Reserved. -
Page 12: Centrifuge Service
Remove the innermost (operative) fuse from its retaining tabs and replace the fuse if necessary. A spare fuse is located in the outer most chamber of the fuse drawer. Replace only with a fuse of the exact same value as the original. © 2016 Corning Incorporated. All Rights Reserved. AxySpin R™ Refrigerated Microcentrifuge... -
Page 13: Troubleshooting
Check the fuse and replace if necessary Lid Lock will Defective lid lock Open manually and not release have unit serviced No power from PC Call for service board Lid lock jammed Call for service © 2016 Corning Incorporated. All Rights Reserved. -
Page 14: Appendix A: Technical Specifications
280 x 430 x 248 mm Weight (with Rotor) 22 Kgw Certification Complies with CE, Class B (EN60101-1-2, EN 55011) Complies RoHS Note: 1. Specifications are subject to change without prior notice © 2016 Corning Incorporated. All Rights Reserved. AxySpin R™ Refrigerated Microcentrifuge... -
Page 15: Appendix B: Warranty
Consequently, the buyer shall follow the instructions for reuse and recycling of waste electronic and electrical equipment (WEEE) provided with the products and available at the following link: www.corning.com/weee © 2016 Corning Incorporated. All Rights Reserved. - Page 16 © 2016 Corning Incorporated. All Rights Reserved. AxySpin R™ Refrigerated Microcentrifuge...
- Page 17 Instruction Manual AxySpin R Cat. Nos. 601-05-031 – 120 US 601-05-021-230 – EU/UK 601-05-011 – 100 US © 2016 Corning Incorporated. All Rights Reserved.
- Page 18 Kühl-Mikrozentrifuge Axyspin R...
- Page 19 Inhaltsverzeichnis 1. Sicherheitsmaßnahmen....................3 1.1. Maßnahmen für sicheren Betrieb ................3 2. Allgemeine Beschreibung ....................5 2.1. Eigenschaften ......................5 3. Nutzungsbeginn....................... 6 3.1. Auspacken……………………………………………………………………………………..6 3.2. Inbetriebnahme des Gerätes ..................6 3.3. Die Abdeckung öffnen und schließen ................. 7 3.4. Den Rotor beladen ..................... 7 3.5.
-
Page 20: Sicherheitsmaßnahmen
1. Sicherheitsmaßnahmen Vor der Erstinbetriebnahme der Kühl-Mikrozentrifuge AxySpin R die gesamte Bedienungsanleitung genau zu lesen. Um einen reibungslosen und sicheren Betrieb zu gewährleisten ist es wichtig, die nachfolgenden Punkte zu beachten: 1.1. Maßnahmen für sicheren Betrieb Bei der Nutzung von Infektions-, radioaktiven und toxischen Lösungen sowie von anderen Lösungen, die eine Gefahr für die Gesundheit darstellen können, sind angemessene Sicherheitsmaßnahmen zu beachten. - Page 21 Motorwelle sicher installiert werden. Den Rotor immer symmetrisch belasten.Für jedes Reagenzglas soll Gegengewicht durch ein anderes Reagenzglas der gleichen Art und mitdfem gleichen Gewicht bestehen. Um entsprechende Lüftung zu gewährleisten, ist sicherzustellen, dass rund um die Zentrifuge, auch hinten, ein Abstand von mindestens 30 cm vorhanden ist.
-
Page 22: Allgemeine Beschreibung
2. Allgemeine Beschreibung Kühl-Mikrozentrifuge AxySpin Rist eine kompakte Tischzentrifuge, die für Anwendungen in Forschungslabors sowie in klinischen Labors geeignet ist. Der Motor ist ein bürstenloser, wartungsfreier Motor. Die Zentrifuge ist mit einem Rotor für 24 Mikroreagenzgläser 1,5/2,0ml ausgestattet. Höchstgeschwindigkeit beträgt 13500 U./Min. (17135 RCF). der Zentrifuge AxySpin R Temperaturbereich: von –10°C bis 40°C. -
Page 23: Nutzungsbeginn
3. Nutzungsbeginn Auspacken 3.1. Die Zentrifuge wird in einer Kartonverpackung mit Schutzverkleidung PE-Schaum geliefert. Zentrifuge Verpackungsmaterial herausnehmen. Behalten Sie die Verpackung solange, festgestellt wird, dass Zentrifuge ordnungsgemäßfunktioniert. öffnen, um Die Verpackung mit der Zentrifuge AxySpin festzustellen, ob alle Elemente enthalten sind: ... -
Page 24: Die Abdeckung Öffnen Und Schließen
Stromversorgungsschalteer einschalten. Nach dem Einschalten der LCD-Anzeige und zweimaligem Ertönen des Summers ist die Zentrifuge betriebsbereit. 3.3. Die Abdeckung öffnen und schließen Die Abdeckung kann nur dann geöffnet werden, wenn die Zentrifuge eingeschaltet ist. Drücken Sie die Taste , um die Abdeckung zu öffnen. -
Page 25: Den Schleudervorgang Beginnen Und Anhalten
Sicherungsschraube Abbildung 1 Den Rotor beladen Den Schleudervorgang beginnen und anhalten 3.5. Machen Sie sich, bitte, mit Abschnitt 5 „Bedienung“ vertraut und konfigurieren bevorzugte Zeit-, Geschwindigkeit- Temperatureinstellungen. Um den Schleudervorgang zu beginnen, drücken Sie den Regelknopf (START/STOP). Nach Ablauf der gewählten Zeit wir die Zentrifuge automatisch stoppen. -
Page 26: Die Abdeckung Im Notfall Öffnen
Hinweis: 1. Aus Sicherheitsgründen ist der Regelknopf (START/STOP) nach dem Öffnen der Abdeckung deaktiviert.Das Symbol “ ” wird so lange blinken bis die Abdeckung geschlossen wird. Die Abdeckung im Notfall öffnen 3.6. Lässt sich die Abdeckung durch Drücken der Taste nicht öffnen, kann sie vom Benutzer manuell geöffnet werden. -
Page 27: Übersicht
4. Übersicht Dieser Abschnitt enthält eine Übersicht unterschiedlicher Komponente der Zentrifuge AxySpin R sowie des Steuerpultes (siehe Abbildung 2), sowie Symbole und Kennzeichnungen auf der LCD-Anzeige (siehe Abbildung 3). Öffnung Abdeckungsverriegelung Lüftungsöffnungen Stromversorgungs schalter und Sicherungshalter Steckstift zum Öffnen der Abdeckung im Notfall Abbildung 2. - Page 28 Tastenfunktionen Taste Symbol Funktionsbeschreibung Starten/Stoppen Betriebs durch Drücken. START/STOP - Zeit-, Temperatur-, Werteinstellun Geschwindigkeits- oder gs-Regelknopf Zentrifugalkraftwerte durch Drehen erhöhen/reduzieren. Dauer TIME-Taste Schleudervorgangs einstellen. RPM-Taste Geschwindigkeit einstellen Zentrifugalkraftwert RCF-Taste einstellen TEMP-Taste Den Temperaturwert einstellen ...
-
Page 29: Bedienung
5. Bedienung Vor Beginn des Schleudervorgangs können Benutzer die Zeit, die Temperatur und die Geschwindigkeit voreinstellen (U./Min. / RCF). HINWEIS: Eine Zentrifuge, deren Rotor oder Adapter Anzeichen einer Korrosion oder einer mechanischen Beschädigung aufweist, darf nicht eingeschaltet werden. Niemals stark ätzende Stoffe zentrifugieren, die den Rotor, das Zubehör oder die Schüssel des Gerätes beschädigen können. -
Page 30: Die Zentrifugalkraft Einstellen (Rcf)
U./Min. eingestellt werden. Drücken Sie auf die Taste , um die Geschwindigkeitseinstellungen zu ändern. Auf der Anzeige werden 5 Geschwindigkeits-Ziffern blinken.Um den Wert zu erhöhen oder zu (START/STOP). Drücken reduzieren, drehen Sie den Regelknopf , um die Wahl zu bestätigen oder drücken Sie erneut auf die Taste (START/STOP) um die gewählte Option zu Sie den Regelknopf... -
Page 31: Kühlen
Wird innerhalb von 6 Sekunden nach Vornahme einer Einstellung keine Taste gedrückt werden, wird der TEMP-Wert nicht mehr blinken und dieser Wert wird automatisch gespeichert werden. Kühlen 5.5. Die Temperatur kann in dem Bereich von -10 bis zu 40°C eingestellt werden. -
Page 32: Schnelles Schleudern
1. Um die Lebensdauer des Aggregats zu verlängern, ist das Dauerkühlen immer auszuschalten (durch Einstellen der vorgegebenen Temperatur einen über Umgebungstemperatur hinausgehenden Wert) oder die nicht benutzte Zentrifuge von der Stromversorgung zu trennen. 2. Nach dem Öffnen der Abdeckung wird das Dauerkühlen nach 3 Minuten ausgeschaltet werden. -
Page 33: Servicemaßnahmen Und Wartung
6. Servicemaßnahmen und Wartung Vor der Durchführung von Service- und Wartungsmaßnahmen immer die Stromversorgungsleitung trennen. Servicemaßnahmen an der Zentrifuge 6.1. Der bürstenlose Motor AxySpin Rist wartungsfrei. Alle erforderlichen Service-Maßnahmen sollen ausschließlich vom autorisierten und qualifizierten Personal durchgeführt werden. Reparaturen, die von unbefugten Personen vorgenommen... -
Page 34: Den Rotor Austauschen
Den Rotor austauschen 6.5. AxySpin Rist mit einem montierten, kompletten Standardrotor mit 24 Reagenzglasplätzen ausgestattet. Um den Rotor herauszunehmen, ist die Befestigungsschraube des Rotors an der Motorwelle durch Anlegen Rotorschlüssels beide Öffnungen Sicherungsschraube zu lösen (siehe Abbildung 1). Den Rotor vertikal nach oben heben. - Page 35 machen Sie sich, bitte, zwecks Behebung der Fehler- oder Mangelmeldungen mit den in der nachfolgenden Tabelle enthaltenen Lösungen vertraut. Sollte die Problemlösung mit nachfolgenden Lösungen nicht möglich sein, nehmen Sie mit der Service-Abteilung von Axygen Scientific Inc. Kontakt auf, um die Durchführung eines autorisierten Services zu vereinbaren.
-
Page 36: Anlage A: Technische Daten
nicht ordnungsgemäß ordnungsgemäß kann nicht schließen gestartet geschlossen werden Geschwindigkeit oder Die Geschwindigkeit obwohl Zeit wurden nicht und/oder Zeit Gerät gewählt. einstellen eingeschaltet ist Zentrifuge Stromversorgung fehlt Stromversorgung startet nicht. überprüfen Den Anschluss der Stromversorgungsl eitung überprüfen Qualität Stromversorgungsl eitung überprüfen. - Page 37 Anlaufzeit < 17 Sekunden Abbremszeit: < 18 Sekunden von –10°C bis +40°C Temperaturbereich Max. Rotorkapazität 24 Reagenzgläser 2,0/1,5ml Mit einfachem Schließen Rotorabdeckung von 0,5 bis 99 Min. oder Zeitbereich „Dauerbetrieb” Zulässige Probendichte 1,2 kg/ml Lärm bei max. 56 dB Geschwindigkeit von 5°C bis 30°C Betriebstemperatur Betriebsfeuchtigkeit...
-
Page 38: Anlage B: Garantie
Anlage B: Garantie Kühl-Mikrozentrifugen AxySpin R unterliegen einer Zwei-Jahre- Garantie auf Material- und Fertigungsmängel. Die Garantiezeit beginnt mit dem Einkaufsdatum und innerhalb dieser Zeit werden alle mangelhaften Teile von Axygen Scientific Inc. kostenlos erneuert. Die Garantie umfasst keine Schäden, die durch übermäßigen Verschleiß... - Page 39 Recyclinganlage zu entsorgen. Der Benutzer ist verpflichtet, das Gerät vor der Entsorgung von den biologischen, chemischen bzw. radiologischen Rückständen zu desinfizieren Mehr Informationen bezüglich der Entsorgung der Geräte von Corning gemäß der Richtlinie WEFE sind der Internetseite www.corning.com/weee zu entnehmen. Kühl-Mikrozentrifuge Axyspin R...
- Page 40 Kühl-Mikrozentrifuge Axyspin R...
- Page 41 Instruction Manual AxySpin R Cat. Nos. 601-05-031 – 120 US 601-05-021-230 – EU/UK 601-05-011 – 100 US © 2016 Corning Incorporated. All Rights Reserved.
- Page 42 Microcentrifugador refrigerado Axyspin R...
- Page 43 Tabla de contenidos 1. Precauciones ....................3 2. Descripción general ................... 5 2.1. Características ..................5 3. Inicio de uso ....................6 3.1. Desembalaje ..................6 3.2. Arranque del equipo ................6 3.3. Abertura y cierre de la cubierta ............. 8 3.4.
-
Page 44: Precauciones
1. Precauciones Antes del primer uso del microcentrifugador refrigerado AxySpin R lea detenidamente todo el manual de instrucciones. Para garantizar el uso seguro y sin problemas es importante respetar los siguientes puntos: 1.1.Medidas de uso seguro Al usar soluciones infeccionas, radioactivas, tóxicas y otras que puedan resultar nocivas para la salud, deben emplearse medidas de seguridad adecuadas. - Page 45 Siempre cargue el rotor simétricamente. Cada tubo de ensayo debe equilibrarse por otro tubo del mismo tipo y peso. Para garantizar una ventilación adecuada, asegúrese de que el centrifugador dispone de por los menos 30 cm de espacio libre por todos los lados.
-
Page 46: Descripción General
2. Descripción general El microcentrifugador refrigerado AxySpin R es un centrifugador compacto de mesa, idóneo para aplicaciones en laboratorios de investigación y clínicos. El motor es un motor sin cepillos y no requiere mantenimiento periódico. El centrifugador está dotado de un rotor para 24 micro tubos de ensayo de 1,5/2,0 ml. -
Page 47: Inicio De Uso
3. Inicio de uso 3.1. Desembalaje El centrifugador se suministra en una caja de cartón con revestimiento de protección hecho de espuma PE. Retire el centrifugador de la caja. Guarde el envase hasta el momento de comprobar el funcionamiento correcto del centrifugador. Abra el envase con el microcentrifugador AxySpin R para comprobar su integridad: ... - Page 48 centrifugador con el interruptor de potencia. Una vez encendida la pantalla LCD y emitido el sonido doble, el centrifugador está preparado al uso. Microcentrifugador refrigerado Axyspin R...
-
Page 49: Abertura Y Cierre De La Cubierta
3.3. Abertura y cierre de la cubierta La tapa se puede abrir solo cuando el centrifugador está encendido. Presione el botón para abrir la tapa. Al presionar el borde frontal la tapa se bloquea automáticamente. ¡No cierre la tapa bruscamente! Nota: 3.4. -
Page 50: Inicio Y Parada De Centrifugado
Tornillo Tornillo de seguridad segurida Figura 1 Carga del rotor 3.5. Inicio y parada de centrifugado Lea el Capítulo 5 Manipulación para configurar los ajustes preferidos de tiempo, velocidad y temperatura. Para iniciar el centrifugado presione la perilla (INICIO/PARADA). Una vez transcurrido el tiempo seleccionado, el centrifugador parará automáticamente. -
Page 51: Abertura De Emergencia De La Cubierta
Nota: 1. Por razones de seguridad, después de abrir la tapa la perilla está desactivado.El símbolo “ ” (INICIO/STOP) parpadeará hasta el momento de cerrar la tapa. 3.6. Abertura de emergencia de la cubierta Si no se puede abrir la tapa presionando el botón , el usuario podrá... -
Page 52: Revisión
4. Revisión Esta sección incluye la descripción de distintos componentes del microcentrifugador AxySpin R del panel de mando (véase Figura 2), así como los símbolos y marcados en la pantalla LCD (véase Figura Agujero de bloqueo de la tapa Ventosas Interruptor de potencia y portafusibles... - Page 53 Funciones de los botones Botón Símbolo Descripción de las funciones Inicio/Parada de funcionamiento mediante la pulsación. Perilla Aumento/Reducción del valor de INICIO/PARAD A y Ajustes de tiempo, temperatura, velocidad o fuerza centrífuga mediante el valores giro. Ajuste del tiempo de duración Botón TIME del centrifugado.
-
Page 54: Manipulación
5. Manipulación Antes de empezar el centrifugado los usuarios pueden ajustar el tiempo, la temperatura y velocidad (rpm / RCF). NOTA: No se puede alimentar / encender el centrifugador cuyo rotor o adaptador muestre síntomas de corrosión o daño mecánico. Nunca centrifugue materiales muy agresivos que puedan dañar el rotor, los accesorios o la cubeta del equipo. -
Page 55: Ajuste De La Fuerza Centrífuga (Rcf)
presionar el botón para confirmar la selección o presione la perilla (INICIO/PARADA) para guardar y activar la opción seleccionada. El parpadeo del valor de rotaciones por minuto para y este valor se guarda automáticamente, si durante 6 segundos después de hacer el ajuste no se presiona botón alguno. - Page 56 Refrigeración inicial La refrigeración inicial inicia el funcionamiento a temperatura controlada con 6.000 rpm. Permite la refrigeración rápida del rotor hasta la temperatura consignada. La refrigeración desde la temperatura ambiente hasta 4°C dura aprox. 8 min. (máx. 16 min.) Para activar la función de refrigeración inicial presione y mantenga presionado el botón , luego presione el botón...
-
Page 57: Centrifugado Rápido
5.6. Centrifugado rápido Al presionar y mantener presionado el botón se puede activar el centrifugado por corto tiempo. El centrifugador trabajará hasta que el botón esté presionado y el tiempo medido en segundos se visualice en la pantalla. La velocidad y temperatura de centrifugado se basan en el último ajuste guardado en la memoria. -
Page 58: Limpieza Del Centrifugador
y competente. Las reparaciones realizadas por personas no autorizadas podrán causar la expiración de la garantía. 6.2.Limpieza del centrifugador Siempre se debe mantener limpios los accesorios del centrifugador, la cámara del rotor, el rotor y sus accesorios. Todas las partes deben limpiarse con un paño suave de vez en cuando. -
Page 59: Sustitución De Los Fusibles
Para sustituir el rotor, primero asegúrese de que el eje del motor y el orificio de montaje del rotor están limpios. Coloque el rotor en el eje del motor. Enrosque el tornillo de fijación del rotor en el eje del motor girándolo a la derecha. - Page 60 Síntoma Solución Causa posible Presione la perilla Cierre la tapa. Error “ ” (INICIO/PARADA) cuando la tapa está abierta. Sensor del bloqueo Llame al servicio. de la tapa dañado Los tubos de ensayos Coloque tubos Error “ ” no están colocados simétricamente.
-
Page 61: Anexo A: Datos Técnicos
alimentación. Fusible quemado Compruebe el fusible y, en su caso, proceda a su sustitución. La cerradura de Bloqueo de la tapa Abra a mano y entregue dañado. la tapa no se el equipo al servicio. abre. Ausencia Llame al servicio. alimentación desde la placa PC. -
Page 62: Anexo B: Garantía
de 5°C a 30°C Temperatura de trabajo Humedad de trabajo 20~80% 100V/50~60 Hz, 6,0A Alimentación 110V/ 50~60 Hz, 5,5A 230V/ 50~60 Hz, 2,8A Medidas (ancho x profundo x 280 x 430 x 248 mm alto) Peso (con rotor) 22 kg Cumple las normas CE, Clase B Certificados (EN60101-1-2, EN 55011),... - Page 63 El usuario tiene la obligación de desinfectar los productos a eliminar removiendo peligros biológicos, químicos y/o radiológicos. La información adicional sobre la eliminación de los equipos de Corning de acuerdo con la Directiva WEEE está disponible en la página www.corning.com/weee. Microcentrifugador refrigerado Axyspin R...
- Page 64 Kühl-Mikrozentrifuge Axyspin R...
- Page 65 Instruction Manual AxySpin R Cat. Nos. 601-05-031 – 120 US 601-05-021-230 – EU/UK 601-05-011 – 100 US © 2016 Corning Incorporated. All Rights Reserved.
- Page 66 Micro-centrifugeuse réfrigérée Axyspin R...
- Page 67 Sommaire 1. Mesures de sécurité….…………………………………………………………3 1.1. Exploitation assurant la sécurité ............3 2. Description générale ..................5 2.1.Caractéristiques ..................5 3. Commencement d'exploitation ..............6 3.1. Déballage ....................6 3.2. Démarrage de l'appareil ................ 6 3.3. Ouverture et fermeture du couvercle ............ 7 3.4.
-
Page 68: Mesures De Sécurité
1. Mesures de sécurité Avant la première utilisation de la micro-centrifugeuse réfrigérée AxySpin R il faut lire attentivement le mode d'emploi. Pour assurer une exploitation sans problèmes et sans dangers, il est important de respecter les points suivants : 1.1. Exploitation assurant la sécurité Lors d'utilisation des solutions contagieuses, radioactives, toxiques et autres pouvant constituer un risque pour la santé, il faut respecter les mesures de sécurité... - Page 69 Le rotor et le couvercle du rotor doivent toujours être installés correctement sur l'arbre moteur. Toujours chargez le rotor symétriquement. Chaque tube devrait être contrebalancée par une autre tube de même type et de même masse. En vue d'assurer la ventilation appropriée, il faut s'assurer que la centrifugeuse a au moins 30 cm d'espace libre de tous les côtés, y compris à...
-
Page 70: Description Générale
2. Description générale La micro-centrifugeuse réfrigérée AxySpin R est une centrifugeuse compacte de table, utilisée dans les laboratoires de recherche et les laboratoires cliniques. Le moteur est un moteur sans balais et ne nécessite pas d'entretien périodique. La centrifugeuse est équipée d'un rotor pour 24 micro-tubes de 1,5/2,0 ml. -
Page 71: Commencement D'exploitation
3. Commencement d'exploitation Déballage 3.1. La centrifugeuse est livrée dans un emballage extérieur en carton avec une couche de protection en éponge de polyéthylène. Sortez la centrifugeuse de son emballage. Conservez l'emballage et la couche en éponge jusqu'à ce que vous vous assurez que la centrifugeuse fonctionne correctement. -
Page 72: Ouverture Et Fermeture Du Couvercle
centrifugeuse et puis à la source d'alimentation. Mettre la centrifugeuse en marche en utilisant l'interrupteur d'alimentation. Après l'allumage de l'écran LCD et le double signal sonore, la centrifugeuse est prête à l'utilisation. Ouverture et fermeture du couvercle 3.3. Le couvercle peut être ouvert uniquement avec la centrifugeuse allumée. -
Page 73: Commencement Et Arrêt De La Centrifugation
Vis de protection Figure 1. Chargement du rotor Commencement et arrêt de la centrifugation 3.5. Nous vous prions de vous familiariser avec le Chapitre 5 Exploitation pour configurer les paramètres du temps, de la vitesse et de la température correctement. Pour commencer centrifugation,... -
Page 74: Ouverture D'urgence Du Couvercle
Attention : 1. Pour des raisons de sécurité, le bouton (START/STOP) est désactivé après l'ouverture du couvercle. Le symbole « » clignotera jusqu'au moment de la fermeture du couvercle. Ouverture d'urgence du couvercle 3.6. Si le couvercle ne peut pas être ouvert en appuyant sur le bouton l'utilisateur peut l'ouvrir manuellement. -
Page 75: Revue
4. Revue Cette section contient une revue de différents éléments de la micro- centrifugeuse AxySpin R et du panneau de commande (voir la Figure 2), ainsi que des symboles et des libellés apparaissant sur l'écran LCD (voir la Figure 3). Ouverture de blocage du couvercle Conduits d'aération Interrupteur... - Page 76 Fonctions des boutons Bouton Symbole Description des fonctions poussoir Mise marche/Arrêt Bouton fonctionnement en appuyant. Augmentation/réduction START/STOP et Paramétrage valeur temps, température, de la vitesse ou de des valeurs la force centrifuge en tournant. Réglage temps Bouton TIME centrifugation.
-
Page 77: Exploitation
5. Exploitation Avant de commencer la centrifugation, les utilisateurs peuvent présélectionner temps, température vitesses (tours/min./FCR). ATTENTION : Il est interdit de mettre en marché la centrifugeuse dont le rotor ou l'adaptateur manifestent des signes de corrosion ou d'endommagement mécanique. Ne jamais faire centrifuger les matériaux fortement corrosifs qui peuvent endommager le rotor, les accessoires ou le bol de l'appareil. -
Page 78: Réglage De La Force Centrifuge (Fcr)
pour modifier les paramètres de la vitesse. Appuyez sur le bouton 5 chiffres de la vitesse clignoteront sur l'afficheur. Pour augmenter ou réduire la valeur, tournez le bouton (START/STOP). Appuyez encore une fois sur le bouton en vue de confirmer le choix ou appuyez sur le bouton (START/STOP) pour enregistrer et démarrer l'option sélectionnée. -
Page 79: Réfrigération
Réfrigération 5.5. La température peut être réglée entre -10 et 40°C. La température choisie peut être modifiée pendant le fonctionnement de l'appareil. Réfrigération préliminaire réfrigération préliminaire commence à température contrôlée avec la rotation de 600 tours/min. Elle permet de réfrigérer rapidement le rotor pour atteindre la température désirée. -
Page 80: Centrifugation Rapide
2. Après l'ouverture du couvercle la fonction de réfrigération permanente se désactivera après 3 minutes. Centrifugation rapide 5.6. plus longtemps, il est possible de démarrer En pressant le bouton la centrifugation instantanée. La centrifugeuse tournera le temps que sera pressé et le temps en secondes sera affiché sur le bouton l'écran. -
Page 81: Nettoyage De La Centrifugeuse
devraient être effectuées uniquement par le personnel autorisé et qualifié. Les réparations effectuées par des personnes non-autorisées peuvent résulter en une perte de garantie. Nettoyage de la centrifugeuse 6.2. Les accessoires de la centrifugeuse, la chambre de rotor, le rotor et ses accessoires doivent toujours rester propres. -
Page 82: Remplacement Des Fusibles
(voir la Figure 1). Soulever le rotor directement vers le haut. Pour remplacer le rotor, assurez-vous si l'arbre moteur et l'ouverture d'assemblage du rotor sont propres. Placez le rotor sur l'arbre moteur. Serrez le vis de fixation du rotor à l'arbre moteur en la tournant à droite. - Page 83 Symptôme Cause possible Solution » Appuyez sur le bouton Fermez le couvercle. Erreur« (START/STOP) avec le couvercle ouvert. Le capteur de blocage Appelez le service du couvercle défaillant Les tubes ne sont pas Distribuez les tubes Erreur « » distribuées symétriquement (pas d'équilibre symétriquement...
-
Page 84: Appendice A : Données Techniques
Le fusible est grillé Vérifiez le fusible et remplacez-le, nécessaire La serrure du Le blocage du couvercle Ouvrez manuellement défaillant couvercle et envoyez l'appareil s'ouvre pas au service Pas d'alimentation de la Appelez le service carte électronique Blocage du couvercle Appelez le service bloqué... -
Page 85: Appendice B : Garantie
Température de travail de 5°C à 30°C Humidité de travail 20~80% 100V/50~60 Hz, 6,0A Alimentation 110V/ 50~60 Hz, 5,5A 230V/ 50~60 Hz, 2,8A Dimensions (largeur x 280 x 430 x 248 mm longueur x hauteur) Poids (avec rotor) 22 Kgw Respecte les normes CE, Classe B Certificats (EN60101-1-2, EN 55011),... - Page 86 Utilisateur est obligé de faire la désinfection du matériel destiné à l'utilisation pour éliminer les dangers biologiques, chimiques et/ou radiologiques. Informations additionnelles concernant l'utilisation du matériel Corning conformément à la Directive WEEE sont accessibles sur le site www.corning.com/weee. Micro-centrifugeuse réfrigérée Axyspin R...
- Page 87 Kühl-Mikrozentrifuge Axyspin R...
- Page 88 Instruction Manual AxySpin R Cat. Nos. 601-05-031 – 120 US 601-05-021-230 – EU/UK 601-05-011 – 100 US © 2016 Corning Incorporated. All Rights Reserved.
- Page 89 Mikro-centrifuga refrigerata Axyspin R...
- Page 90 Indice Mezzi di sicurezza ....................3 1.1. Uso sicuro ......................3 Descrizione generale ..................5 2.1. Caratteristiche ....................5 Primo utilizzo ..................... 6 3.1. Disimballaggio ....................6 3.2. Messa in funzione ....................6 3.3. Apertura e chiusura del coperchio ..............7 3.4.
-
Page 91: Mezzi Di Sicurezza
1. Mezzi di sicurezza Prima di procedere all’utilizzo della micro-centrifuga AxySpin R, leggere attentamente l’intero manuale d’uso. Al fine di garantire sicuro ed agevole uso, osservare i seguenti punti: 1.1. Uso sicuro Durante l’impiego delle soluzioni di tipo infettivo, radioattivo, tossico e altro che possono essere nocive alla salute, osservare gli adeguati mezzi di sicurezza. - Page 92 tipo e dello stesso peso. Al fine di garantire l’adeguata ventilazione, assicurarsi che la centrifuga ha almeno 30 cm dello spazio libero da tutti i lati, inclusa la parte posteriore. Le riparazioni vanno eseguite esclusivamente dall’incaricato servizio di assistenza dell’azienda Axygen Scientific Inc. Utilizzare soltanto i ricambi e gli accessori originali.
-
Page 93: Descrizione Generale
2. Descrizione generale La micro -centrifuga refrigerata AxySpin R è una centrifuga compatta da tavolo, adatta per laboratori di ricerca e laboratori clinici. Il motore brushless non richiede la manutenzione periodica. La centrifuga è dotata di rotore per 24 microprovettte da 1,5/2,0 ml. La velocità massima della centrifuga AxySpin R è... -
Page 94: Primo Utilizzo
3. Primo utilizzo Disimballaggio 3.1. La centrifuga viene consegnata nell’imballaggio di cartone con separatori di sicurezza in schiuma PE. Togliere la centrifuga dall’imballaggio. Conservare l'imballaggio fino a quando si è sicuri che il dispositivo funziona correttamente. Aprire l'imballaggio con micro-centrifuga AxySpin R per verificare se contiene tutti gli elementi: ... -
Page 95: Apertura E Chiusura Del Coperchio
Attaccare il cavo di alimentazione alla presa della centrifuga e di seguito alla fonte di alimentazione. Accendere la centrifuga con pulsante di alimentazione. Una volta acceso il display LCD e dopo un doppio segnale acustico, la centrifuga è pronta all’uso. Apertura e chiusura del coperchio 3.3. -
Page 96: Inizio E Arresto Della Centrifugazione
Vite di protezione Figura 1. Caricamento del rotore Inizio e arresto della centrifugazione 3.5. Leggere attentamente il Capitolo 5 Funzionamento e configurare le preferite impostazioni del tempo, della velocità e della temperatura. Per cominciare la centrifugazione, premere la manopola (START/STOP). Una volta scaduto il tempo prescelto, la centrifuga si ferma nel modo automatico. -
Page 97: Apertura D'emergenza Del Coperchio
Nota: 1. Per motivi di sicurezza, dopo aver aperto il coperchio, la (START/STOP) viene disattivata. Il simbolo “ manopola ” lampeggia fino alla chiusura del coperchio. Apertura d’emergenza del coperchio 3.6. Qualora il coperchio non possa essere aperto premendo il pulsante , l’utente può... -
Page 98: Schema
4. Schema La presente sezione contiene lo schema di vari componenti della e del pannello di controllo (cfr. Figura 2) nonché centrifuga AxySpin R l’elenco dei simboli e della segnaletica sul display LCD (cfr. Figura 3). Foro di bloccaggio del coperchio Aeratori Interruttore di alimentazione e... - Page 99 Funzioni di pulsanti Pulsante Simbolo Descrizione della funzione Premendo il pulsante, viene attivato Manopola Inizio /Arresto del funzionamento. START/STOP e Ruotando la manopola, viene Impostazione di attivato Aumento / Diminuzione del valori valore del tempo, della temperatura, della velocità o della forza relativa. ...
-
Page 100: Uso
5. Uso Prima cominciare centrifugazione, utenti possono preimpostare il tempo, la temperatura e la velocità (giri/min. / RCF). ATTENZIONE: Non accendere mai la centrifuga il cui rotore o il cui l'adattatore presenta tracce di corrosione o danni meccanici. Non sottoporre mai alla centrifugazione materiali corrosivi che possono danneggiare il rotore, gli accessori o il corpo del dispositivo. -
Page 101: Impostazione Di Velocità (Giri/Min.)
Impostazione di velocità (giri/min.) 5.2. Il valore della velocità può essere impostato entro il limite composto tra 500 fino a 13.500 giri/min. Premere il pulsante per cambiare le impostazioni della velocità. Sul display lampeggiano 5 cifre della velocità. Al fine di aumentare o diminuire il valore, girare la manopola (START/STOP). -
Page 102: Raffreddamento
di aumentare o diminuire il valore, girare la manopola (START/STOP). Premere nuovamente il pulsante per confermare la scelta oppure premere la manopola (START/STOP) per salvare e lanciare l’opzione prescelta. Il valore TEMP smette di lampeggiare e viene salvato nel modo automatico se entro 6 secondi a partire dal momento dell’impostazione non viene premuto nessun pulsante. -
Page 103: Centrifugazione Veloce
preimpostata. Nota: 1. Per prolungare la vita del compressore, occorre sempre spegnere Raffreddamento continuo (aumentando temperatura preimpostata fino al valore superiore alla temperatura ambiente) oppure staccarlo dall’alimentazione quando non in uso. 2. Una volta aperto il coperchio, il Raffreddamento continuo viene spento dopo 3 minuti. -
Page 104: Conservazione E Manutenzione
6. Conservazione e manutenzione Prima di eseguire le operazioni di conservazione e manutenzione, staccare sempre il cavo di alimentazione. Conservazione della centrifuga 6.1. Il motore brushless della centrifuga AxySpin R non richiede la manutenzione periodica. Qualsivoglia operazione di conservazione dovrà essere eseguita esclusivamente dal personale appositamente autorizzato e qualificato. -
Page 105: Sostituzione Del Rotore
protezione. Sostituzione del rotore 6.5. è dotata del rotore completo standard La centrifuga AxySpin R con 24 posti per provette. Per estrarre il rotore, svitare la vite di fissaggio della centrifuga dall’albero del motore mettendo la chiave del rotore su entrambi i fori della vite di protezione (cfr. Figura 1). Sollevare il rotore direttamente in alto nella direzione verticale. - Page 106 se si verificano i guasti, per rimuoverli leggere attentamente le soluzioni indicate in tabella sottostante. Se le soluzioni proposte non risolvono il problema, contattare il Servizio d’Assistenza dell’azienda Axygen Scientific Inc. concordare l’intervento dell’autorizzata assistenza. Sintomo Possibile causa Soluzione Premere la manopola Chiudere il coperchio.
-
Page 107: Allegato A: Dati Tecnici
Verificare il collegamento del cavo di alimentazione Verificare la qualità del cavo di alimentazione Fusibile bruciato Verificare il fusibile e sostituirlo se necessario La chiusura del Guasto del blocco del Aprire a mano e coperchio non si coperchio consegnare il apre dispositivo presso il... - Page 108 Coperchio del rotore Con chiusura dritta da 0,5 a 99 min. oppure “continuo” Ambito del tempo Densità ammissibile di 1,2 kg/ml campioni Rumorosità alla velocità max 56 dB Temperatura d’esercizio da 5°C a 30°C Umidità d’esercizio 20~80% 100V/50~60 Hz, 6,0A Alimentazione 110V/ 50~60 Hz, 5,5A 230V/ 50~60 Hz, 2,8A...
-
Page 109: Allegato B: Garanzia
Maggiori informazioni riguardanti lo smaltimento dei prodotti Corning ai sensi della Direttiva WEEE sono disponibili sul sito web www.corning.com/weee. Mikro-centrifuga refrigerata Axyspin R... - Page 110 Kühl-Mikrozentrifuge Axyspin R...
- Page 111 Instruction Manual AxySpin R Cat. Nos. 601-05-031 – 120 US 601-05-021-230 – EU/UK 601-05-011 – 100 US © 2016 Corning Incorporated. All Rights Reserved.
- Page 112 Chłodząca mirkowirówka Axyspin R...
- Page 113 Spis treści 1. Środki bezpieczeństwa ..................3 1.1. Środki bezpiecznej eksploatacji ............... 3 2.Opis ogólny ......................5 2.1. Cechy ........................5 3.Rozpoczęcie użytkowania ..................6 3.1. Rozpakowanie ..................... 6 3.2. Uruchomienie urządzenia ..................6 3.3. Otwieranie i zamykanie pokrywy ................7 3.4.
-
Page 114: Środki Bezpieczeństwa
1. Środki bezpieczeństwa Przed pierwszym użyciem mikrowirówki z chłodzeniem AxySpin R, należy dokładnie przeczytać całą instrukcję obsługi. W celu zapewnienia bezproblemowej i bezpiecznej eksploatacji, istotne jest przestrzeganie następujących punktów: 1.1. Środki bezpiecznej eksploatacji Podczas używania roztworów zakaźnych, radioaktywnych, toksycznych i innych, które mogą stanowić zagrożenie dla zdrowia, należy przestrzegać... - Page 115 czynności serwisowych, np. wymiany bezpieczników, wyłącz zasilanie. Wirnik i pokrywa wirnika muszą być zawsze w bezpieczny sposób zainstalowane na wale silnika. Zawsze obciążaj wirnik symetrycznie. Każda probówka powinna być zrównoważona przez inną probówkę tego samego rodzaju i o tej samej masie. W celu zapewnienia odpowiedniej wentylację, należy upewnić...
-
Page 116: Opis Ogólny
2. Opis ogólny Mikrowirówka z chłodzeniem jest kompaktową, wirówką AxySpin R stołową, która nadaje się do zastosowań w laboratoriach badawczych, jak i klinicznych. Silnik jest silnikiem bezszczotkowym i nie wymaga okresowej konserwacji. Wirówka jest wyposażona w wirnik na 24 mikroprobówki 1,5/2,0 ml. Maksymalna prędkość wirówki AxySpin R to 13500 obr./min. -
Page 117: Rozpoczęcie Użytkowania
3. Rozpoczęcie użytkowania Rozpakowanie 3.1. Wirówka jest dostarczana w zewnętrznym opakowaniu kartonowym z ochronną amortyzacją pianki Otwórz opakowanie z mikrowirówką AxySpin R, aby stwierdzić, czy zawiera wszystkie Należy zachować opakowanie, momentu elementy. stwierdzenia, że wirówka działa prawidłowo. W opakowaniu powinny być zawarte następujące elementy: ... -
Page 118: Otwieranie I Zamykanie Pokrywy
Podłącz przewód zasilający do gniazda zasilania wirówki, a następnie do źródła zasilania. Włącz wirówkę za pomocą przełącznika zasilania. Po włączeniu wyświetlacza LCD i dwukrotnym sygnale brzęczyka, wirówka jest gotowa do pracy. Otwieranie i zamykanie pokrywy 3.3. Pokrywę można otworzyć tylko wtedy, gdy wirówka jest włączona. Naciśnij przycisk , aby otworzyć... -
Page 119: Rozpoczynanie I Zatrzymywanie Wirowania
Śruba zabezpieczająca Rysunek 1. Ładowanie wirnika Rozpoczynanie i zatrzymywanie wirowania 3.5. Proszę zapoznać się z rozdziałem: 5. Obsługa i skonfigurować preferowane ustawienia czasu, prędkości i temperatury. W celu rozpoczęcia wirowania naciśnij pokrętło (START/STOP). Po upływie wybranego czasu, wirówka zatrzyma się automatycznie. W celu zatrzymania wirówki przed upływem ustawionego czasu należy nacisnąć... -
Page 120: Awaryjne Otwieranie Pokrywy
Uwaga: 1. Ze względów bezpieczeństwa, po otworzeniu pokrywy, pokrętło (START/STOP) jest dezaktywowane. Symbol ” ” będzie migał do momentu zamknięcia pokrywy. Awaryjne otwieranie pokrywy 3.6. Jeżeli pokrywy nie można otworzyć przez naciśnięcie przycisku to użytkownik może otworzyć ją ręcznie. Najpierw należy wyłączyć zasilanie wirówki. -
Page 121: Przegląd
Przegląd Ta sekcja zawiera przegląd różnych przycisków i ich symboli na panelu sterowania (patrz Rysunek 2), oraz wyświetlaczu LCD (patrz Rysunek 3) mikrowirówki AxySpin R. Otwór blokady pokrywy Wywietrzniki Włącznik zasilania i oprawa bezpieczników Zatyczka awaryjnego otwierania pokrywy Rysunek 2. Panel sterowania mikrowirówki z chłodzeniem AxySpin R Pokrętło Rysunek 3. - Page 122 Funkcje przycisków Przycisk Symbol Opis funkcji Rozpoczynania/Zatrzymywanie Pokrętło działania poprzez przyciskanie. Zwiększanie/zmniejszanie START/STOP wartości czasu, temperatury, i ustawiania wartości prędkości lub siły odśrodkowej poprzez obracanie. Ustawianie czasu trwania Przycisk TIME wirowania. Ustawianie prędkości Przycisk RPM Ustawianie wartości siły...
-
Page 123: Obsługa
5.Obsługa Przed rozpoczęciem wirowania użytkownicy mogą wstępnie ustawić czas, temperaturę i prędkości (obr./min. / RCF). UWAGA: Nie wolno zasilać i włączać wirówki, której wirnik lub adapter wykazuje oznaki korozji lub uszkodzenia mechanicznego. Nigdy nie wiruj materiałów silnie żrących, które mogą uszkodzić wirnik, akcesoria lub miskę... -
Page 124: Ustawianie Siły Odśrodkowej (Rcf)
(START/STOP). Ponownie naciśnij przycisk w celu potwierdzenia wyboru lub naciśnij pokrętło (START/STOP) w celu zapisania i uruchomienia wybranej opcji. Miganie wartości obrotów na minutę zatrzyma się, a wartość ta zostanie automatycznie zapisana, jeśli w ciągu 6 sekund po dokonaniu ustawienia nie zostanie naciśnięty żaden przycisk. -
Page 125: Chłodzenie
Chłodzenie 5.5. Temperaturę można ustawić w zakresie od -10 do 40°C. Ustawioną temperaturę można zmienić w trakcie pracy urządzenia. Chodzenie wstępne Chodzenie wstępne rozpoczyna działanie w kontrolowanej temperaturze przy 6000 obr./min. Umożliwia szybkie schłodzenie wirnika do zadanej temperatury. Schładzanie z temperatury pokojowej do 4°C zajmuje ok. -
Page 126: Szybkie Odwirowywanie
2. Po otworzeniu pokrywy Stałe chłodzenie wyłączy się po 3 minutach. Szybkie odwirowywanie 5.6. Naciskając i przytrzymując przycisk można na krótki czas włączać wirowanie. Wirówka będzie wirować tak długo, jak długo przycisk będzie wciśnięty, a czas mierzony w sekundach zostanie wyświetlony na wyświetlaczu. -
Page 127: Czyszczenie Wirówki
wykonywane wyłącznie przez autoryzowany i wykwalifikowany personel. Naprawy wykonywane przez osoby nieuprawnione mogą spowodować utratę gwarancji. Czyszczenie wirówki 6.2. Akcesoria wirówki, komorę wirnika, wirnik oraz jego akcesoria należy zawsze utrzymywać w czystości. Wszystkie części należy okresowo przecierać miękką szmatką. Dla lepszego efektu, należy użyć miękkiej szmatki z neutralnym środkiem czyszczącym (pH między 6 i 8). -
Page 128: Wymiana Bezpieczników
W celu wymiany wirnika, najpierw upewnij się czy wał silnika i otwór montażowy wirnika są czyste. Umieść wirnik na wale silnika. Przykręć śrubę mocującą wirnika do wału silnika, obracając ją w prawo. Jedną ręką przytrzymaj wirnik i dokręć śrubę, używając klucza. Wymiana bezpieczników 6.6. - Page 129 Możliwa przyczyna Rozwiązanie Objaw Naciśnięte pokrętło Zamknij pokrywę. Błąd “ ” (START/STOP) przy otwartej pokrywie. Uszkodzony czujnik Wezwij serwis blokady pokrywy Probówki Ułóż probówki Błąd “ ” są umieszczone w sposób (brak symetrycznie w otworach symetryczny równowagi wirnika wirnika) Ilości cieczy Upewnij się, w każdej w probówkach...
-
Page 130: Załącznik A: Dane Techniczne
i wymień go jeśli jest taka potrzeba Otwórz ręcznie Zamek Uszkodzona blokada i oddaj urządzenie do pokrywy pokrywy otwiera się serwisu Brak zasilania z płyty PC Wezwij serwis Blokada pokrywy Wezwij serwis zablokowana Patrz „Wirówka nie Zasilanie nie dociera do wirówki uruchamia się”... -
Page 131: Załącznik B: Gwarancja
Wilgotność robocza 20~80% 100V/50~60 Hz, 6,0A Zasilanie 110V/ 50~60 Hz, 5,5A 230V/ 50~60 Hz, 2,8A Wymiary (szer. x dł. x wys.) 280 x 430 x 248 mm Waga (z wirnikiem) 22 Kgw Spełnia normy CE, Klasa B Certyfikaty (EN60101-1-2, EN 55011), zgodny z RoHS Uwaga: 1. - Page 132 Obowiązkiem użytkownika odkażenie sprzętu jest do utylizacji zagrożeń biologicznych, chemicznych i/lub radiologicznych przed utylizacją. Dodatkowe informacje dotyczące utylizacji sprzętu Corning zgodnie z Dyrektywą WEEE można uzyskać na stronie www.corning.com/weee. Chłodząca mirkowirówka Axyspin R...
- Page 133 LN305000 Kühl-Mikrozentrifuge Axyspin R...
Need help?
Do you have a question about the AXYGEN AxySpin R and is the answer not in the manual?
Questions and answers
Hi, I had to take the rotor out and once I put it back it seemed to be more loose than it used to be. Additionally, the lid button seems to not be functioning properly anymore. Could you please advice what I should do?
If the rotor of your CORNING AXYGEN AxySpin R is loose, follow these steps:
1. Remove the rotor securing screw from the motor shaft using the rotor wrench.
2. Lift the rotor straight upward to remove it.
3. Ensure the motor shaft and rotor mounting hole are clean.
4. Place the rotor back onto the motor shaft.
5. Reinstall the rotor securing screw by turning it clockwise.
6. Hold the rotor with one hand and tighten the securing screw using the rotor wrench.
If the lid button is not functioning properly, check the following:
1. Ensure the lid is completely closed.
2. If the issue persists, there may be a defective lid lock sensor, and you should call for service.
This answer is automatically generated