Table of Contents
Advertisement
Quick Links
Advertisement
Table of Contents

Subscribe to Our Youtube Channel
Related Manuals for HIKVISION DS-PEA1-21


Summary of Contents for HIKVISION DS-PEA1-21
- Page 1 Estación de alarma de pánico Manual de usuario...
- Page 2 SURVEILLANCE LAWS VARY BY JURISDICTION. PLEASE CHECK ALL RELEVANT LAWS IN YOUR JURISDICTION BEFORE USING THIS PRODUCT IN ORDER TO ENSURE THAT YOUR USE CONFORMS THE APPLICABLE LAW. HIKVISION SHALL NOT BE LIABLE IN THE EVENT THAT THIS PRODUCT IS USED WITH ILLEGITIMATE PURPOSES.
- Page 3 Panic Alarm Station User Manual Regulatory Information FCC Information Please take attention that changes or modification not expressly approved by the party responsible for compliance could void the user’s authority to operate the equipment. FCC Compliance: This equipment has been tested and found to comply with the limits for a Class B digital device, pursuant to part 15 of the FCC Rules.
- Page 4 Panic Alarm Station User Manual Applicable Models This manual is applicable to the models listed in the following table. Model Product Panic Alarm Station DS-PEA1-21 Box Panic Alarm Station DS-PEA2-21 DS-PEA3M-21 Pole Panic Alarm Station DS-PEA3M-21H Symbol Conventions The symbols that may be found in this document are defined as follows.
- Page 5 Panic Alarm Station User Manual When any laser equipment is in use, make sure that the device lens is not exposed to the laser beam, or it may burn out. Do not expose the device to high electromagnetic radiation or extremely hot, cold, dusty, or damp environments, the appropriate temperature is -40℃...
-
Page 6: Table Of Contents
Panic Alarm Station User Manual Table of Content Chapter 1 Overview ....................................6 Description .....................................6 Key Features ..................................6 Chapter 2 Structure Description ................................7 Mainboard Description ................................7 Appearance Description ................................8 2.2.1 Panic Alarm Station ...............................8 2.2.2 Box Panic Alarm Station ..............................9 2.2.3 Pole Panic Alarm Station .............................10 Installation and Connections ...............................10 2.3.1... -
Page 7: Chapter 1 Overview
Panic Alarm Station User Manual Chapter 1 Overview Description DS-PEA series of active panic alarm station supports multiple networks. It provides live view, two-way audio, and customized audio input. It supports linkage with the surrounding cameras and external lamp, sound box, etc. It helps to realize alarm aid in emergency. Key Features ... -
Page 8: Chapter 2 Structure Description
Panic Alarm Station User Manual Chapter 2 Structure Description Mainboard Description Figure 2-1 Mainboard of panic alarm station... -
Page 9: Appearance Description
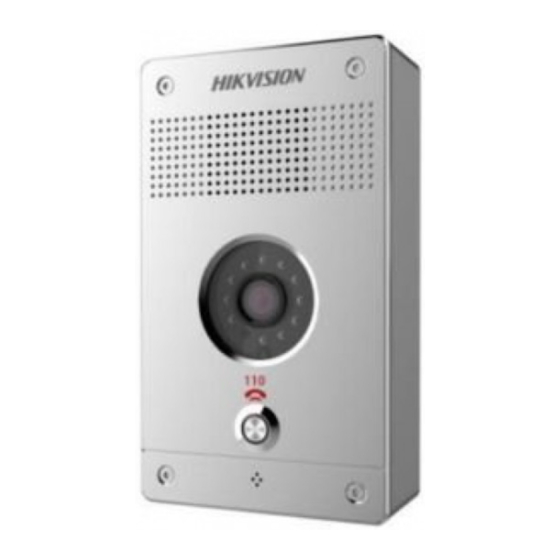
Panic Alarm Station User Manual Appearance Description 2.2.1 Panic Alarm Station Table 2-1 Panel Description Description Loudspeaker IR Light Camera Light Sensor Panic Alarm Button Microphone Figure 2-2 One-touch Panic Alarm Station... -
Page 10: Box Panic Alarm Station
Panic Alarm Station User Manual 2.2.2 Box Panic Alarm Station Table 2-2 Panel Description Description Audible Alarm Lamp Loudspeaker IR Light Camera Light Sensor Panic Alarm Button Microphone Figure 2-3 Case Panic Alarm Station... -
Page 11: Pole Panic Alarm Station
Panic Alarm Station User Manual 2.2.3 Pole Panic Alarm Station Table 2-3 Panel Description Description Audible Alarm Lamp Microphone IR Light Camera Light Sensor Loudspeaker Panic Alarm Button Figure 2-4 Pole Panic Alarm Station Installation and Connections The product is suitable for mounting on concrete or other non-combustible surface only. ... -
Page 12: Power Supply Wiring
Panic Alarm Station User Manual 2.3.1 Power Supply Wiring Figure 2-5 Power Supply Wiring 2.3.2 Network Wiring Power Interface Mainboard Port Port Switch Figure 2-6 Network Wiring... -
Page 13: Audible And Visual Alarm Wiring
Panic Alarm Station User Manual 2.3.3 Audible and Visual Alarm Wiring Figure 2-7 Audible and Visual Alarm Wiring 2.3.4 Alarm Input Wiring (Normally Open) Figure 2-8 Alarm Input Wiring (Normally Open) -
Page 14: Pole Panic Alarm Station Installation
Panic Alarm Station User Manual 2.3.5 Pole Panic Alarm Station Installation Pole Panic Alarm Station (without Speed Dome Bracket)Dimension Lock 260 mm 450 mm Front View Side View Top View Figure 2-9 Pole Panic Alarm Station (without Speed Dome Bracket)Dimension... - Page 15 Panic Alarm Station User Manual Pole Panic Alarm Station (with Speed Dome Bracket)Dimension Lock 260 mm 450 mm Front View Side View Top View Figure 2-10 Pole Panic Alarm Station (with Speed Dome Bracket)Dimension...
- Page 16 Panic Alarm Station User Manual Pole Panic Alarm Station Grounding Cage Dimension(without Speed Dome Bracket) 4 – M20 C25 Concrete Conduit Diameter ≥30mm Reinforced Rebar Foundation Bolt Rubble 420mm 370mm 20mm Basement Basement Weld ⌀8Rebar with Foundation Bolt 150 mm 150 mm 700 mm 450 mm...
- Page 17 Panic Alarm Station User Manual Pole Panic Alarm Station Grounding Cage Dimension(with Speed Dome Bracket) 4-M20 C25 Concrete Conduit Diameter ≥30mm Reinforced Rebar Foundation Bolt Rubble 370 mm M20 420 mm Basement Basement Weld ⌀8Rebar with Foundation Bolt 150 mm 150 mm 700 mm 450 mm...
-
Page 18: Chapter 3 Activating The Control Panel
Panic Alarm Station User Manual Chapter 3 Activating the Control Panel Purpose: You are required to activate the control panel first before you can use the control panel. Activation via SADP, and Activation via client software are supported. Activation via SADP Software SADP software is used for detecting the online device, activating the device, and resetting the password. - Page 19 Panic Alarm Station User Manual 6. Input the password and click the Modify button to activate your IP address modification. Activation via Client Software The client software is versatile video management software for multiple kinds of devices. Get the client software from the supplied disk or the official website, and install the software according to the prompts. Follow the steps to activate the control panel.
- Page 20 Panic Alarm Station User Manual Click the Device Management icon to enter the Device Management interface, as shown in the figure below. Click Add Device Type to enter the adding device type page. Select Security Control Panel. Click Security Control Panel in the Organization list. Check the device status from the device list, and select an inactive device.
- Page 21 Panic Alarm Station User Manual Change the device IP address to the same subnet with your computer by either modifying the IP address manually or checking the checkbox of Enable DHCP. Input the password to activate your IP address modification.
-
Page 22: Chapter 4 Device Remote Operation
Panic Alarm Station User Manual Chapter 4 Device Remote Operation For properly running the system, set a login password to activate the panic alarm station before the first use. You can activate the device via SADP or client software. The factory settings are show as follows. IP address: 192.0.0.65 Port No.: 8000 Admin User NameP: admin... -
Page 23: Edit A Device
Panic Alarm Station User Manual Input the required information. Nickname: Edit a name for the device as you want. Address: Input the device’s IP address or domain name. Port: Input the device port number. The default value is 8000. User Name: Input the device user name. Password: Input the device password. -
Page 24: Status
Panic Alarm Station User Manual 4.1.4 Status Click Remote Configuration > Status to view status of the partition, zone, trigger, siren ,and storage battery. Remote Configurations Purpose: In this section, you are able to configure device parameters remotely. Click the Remote Configuration button to enter the interface. 4.2.1 System Information Settings Purpose:... - Page 25 Panic Alarm Station User Manual In this section, you can configure the system parameters (such as time, log, user, security, system maintenance and so on) for the device. General Settings Steps: Click Remote Configuration > System > General to enter the general parameters configuration interface. Input the device name and device number.
- Page 26 Panic Alarm Station User Manual Timing Settings Purpose: Before you start configuring the security control panel, you need to do timing for the device first. Steps: Click Remote Configuration > System > Time to enter the time configuration interface. Click Synchronization to do timing. System Maintenance The device supports system maintenance remotely.
- Page 27 Panic Alarm Station User Manual Restart the System Click Reboot to restart the device. Restore Default Settings Click Restore Default Settings to restore the default settings. Except the IP address and user parameters, all other parameters of the device will be restored to factory default settings. ...
- Page 28 Panic Alarm Station User Manual User Settings Purpose: You can add, edit, or delete the user in this section. Add an admin User (Only one admin user can be added) Steps: Click Remote Configuration > System > User to enter the user configuration interface. Click to enter the interface of adding a network user.
- Page 29 Panic Alarm Station User Manual Enter the corresponding user information including the user type, user name, password, IP address, and MAC address. Select the permission of the user. Click OK to finish the settings. Edit a User Steps: Click to enter the interface of editing the selected user.
-
Page 30: Network Settings
Panic Alarm Station User Manual 4.2.2 Network Settings Purpose: You can edit the general network parameters in this section. General Network Parameters Settings Steps: Click Remote Configuration > Network > General to enter the general network configuration interface. Configure the NIC setting. Click Save to save the above settings. - Page 31 Panic Alarm Station User Manual Network Center Settings Purpose: In this section, you can configure the parameters (such as server type, IP address, port NO.,and so on) of the network center. Steps: Click Remote Configuration > Network > Network Center Configuration to enter the network center configuration interface. Click and select a network center.
- Page 32 Panic Alarm Station User Manual Select a center type (only center 1 is available). Enter the center name and phone number. The maximum length of center name is 32 characters. The phone number should be 31 characters and the input mode is ...
- Page 33 Panic Alarm Station User Manual Enter the corresponding DNS sever address. Enter the IP address and port NO. of the control panel. Click Save to save the settings. CMS Settings Purpose: CMS is used to configure EHome protocol parameters for the device. Steps: Click Remote Configuration >...
- Page 34 Panic Alarm Station User Manual Click the dropdown menu to select a sever type. Two sever types are available: IP4/IP6 and domain. Enter the IP address which is used to communicate with the service. Enter the port NO. for communicating with the service. The default port NO. for EHome protocol is 7660 and for privacy protocol is 10001.
-
Page 35: Storage
Panic Alarm Station User Manual Check Enable box to enbale the Sip server. Enter the Sip server parameters including IP address, port No., local No., display name, login cycle. The server port No. ranges from 1024 to 65535. The device ID ranges from 0 to 999999. - Page 36 Panic Alarm Station User Manual If the status of the HDD is Uninitialized, check the corresponding checkbox to select the disk and click to start initializing the disk. When the initialization completed, the status of disk will become Normal. Click Save to save the settings. This function is available only if the device is connected with HDD.
-
Page 37: Alarm Settings
Panic Alarm Station User Manual Enter the search criteria including camera name, property, start time and end time. Click Search to get the file list. 4.2.4 Alarm Settings Zone Settings Steps: Click Remote Configuration > Alarm > Zone to enter the Zone configuration interface. In the Alarm Input list, select an alarm input channel and click the icon to enter the zone setting interface. - Page 38 Panic Alarm Station User Manual Edit the general information of the Zone, including name, detector type, zone type, sensitivity and so on. Detector Type: Select the type of the detector. Zone Type: Select the type of Zone in the partition. Sensitivity: Select the response time of the Zone.
- Page 39 Panic Alarm Station User Manual Edit the general information of the trigger, including name, output delay and so on. Output Delay (0~5999s): Configure the alarm output time after the alarm being triggered. Click Copy to to copy all these settings to other Zones. Click Save to save the settings.
- Page 40 Panic Alarm Station User Manual Check Enable Alarm Lamp Flicking box. Enter the alarm lamp flashing duration (s). Enter the time interval for each flashing(s). Click Save to save the settings. If the duration is 180s and the time interval is 3600s, the alarm lamp flashes 3 minutes each hour. Voice Prompt Settings Steps: Click Remote Configuration >...
-
Page 41: Image Settings
Panic Alarm Station User Manual Check Enable Alarm Lamp Flicking box. Select Female/Male voice for center busy file, refuse, and voice talking prompt. Select the ring tone. Slick Save to save the settings. 4.2.5 Image Settings Video& Audio Settings Steps: Click Remote Configuration >... - Page 42 Panic Alarm Station User Manual Check the corresponding checkbox to select the display of camera name, date or week if required. Edit the camera name in the text field of Camera Name. Select from the drop-down list to set the time format, date format and display mode. Check the checkbox in front of textbox to enable the on-screen display.
-
Page 43: Event Settings
Panic Alarm Station User Manual You can also click Default Value to restore the default values. 4.2.6 Event Settings Schedule Settings Click Remote Configuration > Events > Schedule to enter the record schedule configuration interface. Record Schedule Settings Steps: Select the camera needs to be configured. -
Page 44: Operation
Panic Alarm Station User Manual Optionally, you can select the schedule time bar, And then click the icon to delete the selected time bar, Or click the icon to delete all the time bars, Or click the icon to copy the time bar settings to the other dates. Click Save to save the template, or click cancel to exit the interface. -
Page 45: Zone Settings
Panic Alarm Station User Manual Zone Settings 4.3.1 Zone Settings Steps: Click Device Management > Security Control Panel > Remote Configuration > Alarm > Zone to enter the Zone configuration interface. In the Alarm Input list, select an alarm input channel and click the icon to enter the zone settings interface. -
Page 46: Zone Event Settings
Panic Alarm Station User Manual Select the linked siren, alarm lamp, linked trigger and others. Click Copy to to copy all these settings to other zones. Click Save to save the settings. Four zone types in the Zone Parameters: Instant Zone, Fire Alarm Arming Zone, 24 Hour Non-voiced Zone and Shield Zone. -
Page 47: Alarm Pop-Up Window Settings
Panic Alarm Station User Manual Click Save to save the settings. The Alarm In is emergent by default. 4.3.3 Alarm Pop-up Window Settings Purpose When the devices are armed, the alarm intercom will pop up once the detectors are triggered. Enable Pop-up Window Function When the devices are arming, enable the pop-up window by following the steps bellow. -
Page 48: Broadcast Settings
Panic Alarm Station User Manual click to set volume of audio in and click to set the volume of audio out; click to capture picture; click to start videoing and click to stop videoing. Broadcast Settings Steps: Click Tool > Broadcast to enter the broadcast management interface. Click the corresponding item. - Page 49 Panic Alarm Station User Manual Grupo Instaladores ventas@rosarioseguridad.com.ar rosarioseguridadok https://www.facebook.com/groups/591852618012744/ +54 9 341 6708000 Rosario Seguridad +54 9 341 6591429 +54 9 341 6799822 Rosario Seguridad +54 9 341 4577532 Avenida Presidente Perón 3998 - Rosario - Santa Fe - Argentina...
Need help?
Do you have a question about the DS-PEA1-21 and is the answer not in the manual?
Questions and answers