Table of Contents
Advertisement
Quick Links
White Electric Flip Down Ceiling TV Mount
Instruction Manual
SKU: MOUNT-E-FD70W
Scan the QR code with your mobile device or follow the link
for helpful videos and specifications related to this product.
https://vivo-us.com/products/mount-e-fd70
GET IN TOUCH | Monday-Friday from 7:00am-7:00pm CST
help@vivo-us.com
www.vivo-us.com
Chat live with an agent!
309-278-5303
Advertisement
Table of Contents

Subscribe to Our Youtube Channel
Related Manuals for Vivo MOUNT-E-FD70W


Summary of Contents for Vivo MOUNT-E-FD70W
- Page 1 White Electric Flip Down Ceiling TV Mount Instruction Manual SKU: MOUNT-E-FD70W Scan the QR code with your mobile device or follow the link for helpful videos and specifications related to this product. https://vivo-us.com/products/mount-e-fd70 GET IN TOUCH | Monday-Friday from 7:00am-7:00pm CST help@vivo-us.com...
- Page 2 CAUTION! DO NOT INSTALL INTO DRYWALL ALONE. VERIFY YOUR WALL CONSTRUCTION. USE WOOD STUDS TO MOUNT. We include mounting for brick and concrete walls. If unsure, please contact us at vivo-us. com, email at help@vivo-us.com, or call us at 309-278-5303.
- Page 3 ASSEMBLY STEPS STEP 1 OPTION B: Concrete Ceiling OPTION A: Wood Ceiling Using ceiling template (C), mark exact location of Using ceiling template (C), mark exact location of mounting holes. Drill pilot holes 2.4” (60mm) mounting holes. Drill pilot holes 2.2” (55mm) deep deep, using a 3/8”...
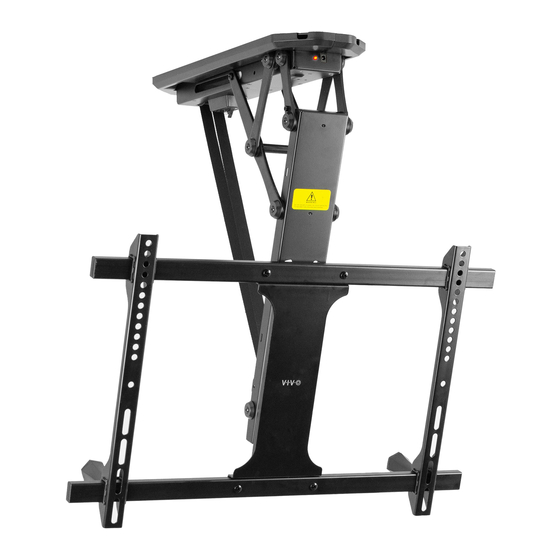
- Page 4 STEP 2 Assemble the bracket rails (F) to the center plate (B) using Phillips head bolts (L), washers (M) and hex nuts (N). Tighten with a Phillips screwdriver while holding nuts with a wrench. Slide VESA brackets (E) onto the rails as shown and insert hex socket head bolts (O) into the rails using the Allen wrench (P).
- Page 5 STEP 3 (Continued) OPTION B: Curved/Recessed Back TV Align the VESA bracket assembly with the mounting holes in the back of the TV screen. Install assembly to TV using appropriate screws (M-C, M-D, M-E), square washers (M-F) and spacers (M-G, M-H) according to your screen’s requirements. STEP 4 (Optional) Attach the leveling knobs (J) to the lower two set screws (K) as shown.
- Page 6 STEP 6 Run cables along edge of mount. Allow slack in cables for arm movement. Place decorative covers (D) over cables and snap into place. Using cable ties (I), fasten cables to the side of the arm. NOTE: Keep cables clear from inside of arm to avoid damage due to pinching.
- Page 7 STEP 7 Plug power adapter (G) into mount, and connect to AC outlet. NOTE: Plugging power supply into AC outlet prior to the mount may cause a large spark when connecting to the mount.
- Page 8 AVG. RESPONSE TIME help@vivo-us.com (within office hrs) - 23% within < 15m - 38% within < 30m - 61% within < 1hr - 83% within < 2hr - 92% within < 3hr FOR MORE VIVO PRODUCTS, CHECK OUT OUR WEBSITE AT: www.vivo-us.com...
Need help?
Do you have a question about the MOUNT-E-FD70W and is the answer not in the manual?
Questions and answers