Vivo MOUNT-E-FD55 Series Assembly Manual
Electric flip down ceiling tv mount
Hide thumbs
Also See for MOUNT-E-FD55 Series:
- Instruction manual (13 pages) ,
- User manual (4 pages) ,
- Instruction manual (5 pages)

Subscribe to Our Youtube Channel
Related Manuals for Vivo MOUNT-E-FD55 Series


Summary of Contents for Vivo MOUNT-E-FD55 Series
- Page 1 Electric Flip Down Ceiling TV Mount MOUNT-E-FD55 Series Assembly Manual Individual Product SKUs MOUNT-E-FD55 MOUNT-E-FD55W MOUNT-E-FD55_AU...
-
Page 2: We're Here For You
Saturday 8am-4pm CST US-Based Customer Support from Trained Professionals Email Us Chat with Live Agent Give Us a Call help@vivo-us.com www.vivo-us.com 309-278-5303 ext. 1 Assembly Video Available Navigate to the middle of the product page to watch as our product specialists walk you through the assembly process. -
Page 3: Please Read
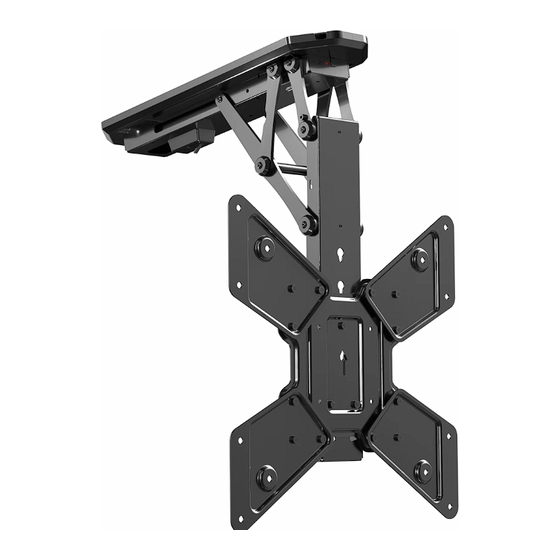
Returns: We offer a hassle-free 30 day return on all products. Contact customer support at 309-278-5303 or help@vivo-us.com. Please note: For items ordered in error or no longer needed, the return shipping charges will be at the buyer’s expense. Product Specific Warnings: WARNING: CHOKING HAZARD SMALL PARTS - NOT FOR CHILDREN UNDER 3 YEARS. - Page 4 Package Contents A (x1) B (x1) C (x1) D (x2) Mount VESA Plate Ceiling Template Decorative Cover E (x2) F (x2) G (x1) H (x1) VESA Adapter VESA Adapter AC Adapter Remote I (x4) Cable Tie Included Hardware & Tools M-A (x4) M-B (x4) M-C (x4)
-
Page 5: Assembly And Installation
User Guide Assembly & Installation Remote | Setup & Use pg. 16-19 pg. 6-15 Troubleshooting Tuya App | Setup & Use pg. 21-22 pg. 23-30 Voice Control | Setup & Use Amazon Alexa & Google Home pg. 31-34... -
Page 6: Assembly Steps
Assembly Steps STEP 1 - Option 1 - Solid Wood Mounting For Concrete Mounting, go to Page 8 Using Ceiling Template (C), mark exact location of mounting holes. Make sure the “UP” arrow points toward the end of the mount that will have the TV. Drill mounting holes at marked locations using infographic below. - Page 7 STEP 2 Hang Mount (A) so that the screws fit into the keyhole openings, then slide the Mount forward until it is supported by the screw heads. Secure Mount (A) using the remaining ST6.3x55mm Screws (W-A), Washers (W-C), and a Phillips screwdriver.
-
Page 8: Concrete Mounting
Assembly Steps STEP 1 - Option 2 - Concrete Mounting Using Ceiling Template (C), mark exact location of mounting holes. Make sure the “UP” arrow points toward the end of the mount that will have the TV. Drill mounting holes at marked locations using infographic below. Drill Bit: 3/8”... - Page 9 STEP 2 Hang Mount (A) so that the screws fit into the keyhole openings, then slide the Mount forward until it is supported by the screw heads. Secure Mount (A) using the remaining ST6.3x55mm Screws (W-A), Washers (W-C), and a Phillips screwdriver.
- Page 10 STEP 3 Remove the two bottom screws from the VESA Plate (B) and set aside for later use. Loosen the top screw leaving at least 5mm of threads exposed. Remove the screws from VESA Adapters (E, F). Attach VESA Adapters (E, F) to VESA Plate (B) using screws previously removed from VESA adapters.
- Page 11 STEP 4 Align the VESA plate assembly with the mounting holes in the back of your TV screen. Install VESA plate to TV using appropriate Screws (M-A~M-D), Washers (M-E), and Spacers (M-F,M-G). Flat TV Curved TV Make sure the “UP” arrow points toward the top of the TV.
- Page 12 STEP 5 Hang VESA Plate (B) on Mount (A) at desired height by inserting the loosened screw on VESA Plate into the Mount’s keyhole slot. Use screws previously removed from Step 2 to secure VESA Plate (B) to Mount (A). ≥15mm Clearance between the ceiling and top edge of TV should be no less than 15mm...
- Page 13 STEP 6 Run cables along edge of Mount (A). Allow slack in cables for arm movement. Place Decorative Covers (D) over cables and snap into place. Fasten cables using Cable Ties (I), leaving some slack in cables to allow for arm movement. DO NOT run cables across the arm to avoid pinching damage.
- Page 14 STEP 7 Plug AC Adapter (G) into Mount (A), then connect to an AC outlet. Use the Remote User Guide, pages 16-18, for Remote (H) operating instruction. If Remote is not paired to Mount, follow “Pairing the Remote” instructions on Page 18 to pair Remote to Mount. **Warning** Keep hands clear of moving mount to prevent injury.
- Page 15 Mount Installed On Angled/Sloped Ceiling? ** PLEASE FOLLOW PROGRAMMING INSTRUCTIONS BELOW ** FAILURE TO PROPERLY PROGRAM THE MOUNT PRIOR TO USE ON A SLOPED, PITCHED, OR ANGLED CEILING MAY RESULT IN DAMAGE TO THE INTERNAL MOTOR CAUSING THE MOUNT TO FAIL AND REMAIN STUCK IN THE UP POSITION. Fig 1: Retract Mount to Upright Position Belt is Tight:...
- Page 16 Remote User Guide...
- Page 17 Remote User Guide Stop Downward Upward Movement Movement Recall Memory Recall Memory Position 1 mem1 mem2 Position 2 mem1 mem2 Memory Button 1 Memory Button 2 Requires 2x AAA Batteries (not included) First Time Use 1. Install two AAA batteries (not included) in the Remote. 2.
- Page 18 Functions and Features Save & Recall Memory Settings To save a certain location to memory, press and hold the button for 1 second. The mount will beep, indicating the position has been saved to memory. To recall memory locations, press and the TV mount will automatically adjust to saved memory location of the corresponding memory button.
- Page 19 “Unpairing the Remote” instructions on Page 18. Then repeat the pairing steps using the individual Remotes for each Mount. Replacing Remote Replacing the Remote If the original remote has been lost, please contact us 309-278-5303 or help@vivo-us.com. To pair the replacement Remote with the Mount, follow the “Pairing the Remote” instructions on Page 18.
- Page 20 [ THIS PAGE HAS BEEN INTENTIONALLY LEFT BLANK ]...
-
Page 21: Troubleshooting
Troubleshooting... - Page 22 Mount. If so, plug the Power Adapter into a power source. If there is no buzzer tone or red light power indication, please contact us at 309-278-5303 or help@vivo-us.com to replace the Power Adapter. If the problem persists with the replacement Power Adapter, contact us to replace the product.
-
Page 23: Setup And Use
TUYA® Smart | Mobile App Setup & Use DOWNLOAD TUYA SMART APP IN YOUR APP STORE... -
Page 24: Standard Operation
Tuya App | Basic Functions UPWARD MOVEMENT STOP DOWNWARD MOVEMENT MEMORY MEMORY SET 1 RECALL 1 MEMORY MEMORY SET 2 RECALL 2 MEMORY MEMORY SET 3 RECALL 3 Standard Operation Using Arrow Keys UP: Tap the button to move the TV upward toward the ceiling. Press the button to stop the motion. - Page 25 Setting Up & Creating an Account TURN ON WIFI CREATE ACCOUNT Before you begin, ensure that Wifi is Open Tuya Smart App and select Sign-Up from enabled on your phone. start screen. Follow on-screen prompts. Pairing to Mount MOTORIZED TV SOLUTION ADD DEVICE Tap Motorized TV Solution in the Auto Tap Add Device or the + icon in upper...
- Page 26 Pairing to Mount - Cont’ d CONNECT TO WIFI CONNECTION SCREEN If Wifi connection was successful, Select your Wifi from available list connection to your TV mount will and enter password to enable mount begin. Please allow 10-60 seconds for access.
- Page 27 Unpairing Mount from App From the Home screen, locate your TV mount, then long press to open device options. Option 1: Select Remove Device at the bottom of the screen to unpair the mount from your app. Option 2: Long press the button on the remote for 5 seconds.
- Page 28 Syncing Other Mobile Devices To allow other mobile devices to control the TV mount, you will need to first create in the Home app and then invite other users to your Home. HOME MANGEMENT CREATE A HOME Select the ME ( ) icon to navigate to the Tap Create A Home to proceed.
- Page 29 Syncing Other Mobile Devices - Cont’ d INVITE OTHER MEMBERS JOINING A HOME Tap Add Member and choose an Once app is installed and registered, invitation method. New users will new user will tap the ME ( ) icon on receive link to download Tuya Smart the bottom right.
- Page 30 Syncing Other Mobile Devices - Cont’ d My Home... My Home... New Home Name Home Management No devices No devices Add Device Add Device Add Device CHANGING HOME SCREEN SELECT NEW HOME Select the icon to navigate to the From dropdown, select the name of the Home screen.
-
Page 31: Voice Control
Voice Control Amazon Alexa® & Google Home® Setup & Use... - Page 32 Setting Up Amazon Alexa DOWNLOAD AMAZON ALEXA APP SIGN IN Download the Amazon Alexa app from Click "Sign in with Amazon". the App Store or Google Play. Once installed, return to the Tuya app and tap on "me" in the bottom right corner, and tap "Alexa".
- Page 33 Setting Up Google Home DOWNLOAD GOOGLE HOME APP LINK Download the Google Home app from the Tap "Link with Google Assistant" to App Store or Google Play. Once installed, launch the Google Home app. return to the Tuya app and tap on "me" in the bottom right corner, and tap on "Google Assistant ".
-
Page 34: Voice Commands
Voice Commands Action Amazon Alexa® Google Home® Alexa, set <devicename> to up OK Google, set <deviceName> to up Upward Movement Downward Movement Alexa, set <devicename> to down OK Google, set <deviceName> to down Stop Alexa, set <devicename> to stop OK Google, set <deviceName> to stop Save Current Position as Alexa, set <devicename>... - Page 35 Securely store your PC in Clamp on & under desk and more with our clamp-on an under desk mount or keyboard tray options for and wall mount solutions. cart for easy access. all setup types. Explore Endless Workspace Solutions www.vivo-us.com...
- Page 36 Need Help? We’re Here For You Monday-Friday from 7am-7pm CST Saturday 8am-4pm CST Email Us Chat with Live Agent Give Us a Call help@vivo-us.com www.vivo-us.com 309-278-5303 ext. 1 FOR MORE GREAT VIVO PRODUCTS, CHECK OUT OUR WEBSITE AT: WWW.VIVO-US.COM VIVO-us @vivo_us @VIVOus VIVO...
Need help?
Do you have a question about the MOUNT-E-FD55 Series and is the answer not in the manual?
Questions and answers