Table of Contents
Advertisement
Quick Links
Advertisement
Table of Contents

Related Manuals for OPTO-EDU A23.0910


Summary of Contents for OPTO-EDU A23.0910
- Page 1 A23.0910 Zoom Stereo Microscope, Parallel Light, 0.63x~8x,1:12.5 Instruction Manual To ensure the safety and obtain satisfactory performance, please study this instruction manual thoroughly before start to use your instrument. www.optoedu.com Page 1 of 14 sale@cnoec.com...
-
Page 2: Table Of Contents
A23.0910 Contents Before Use 1. Components..........................4 2. Assembling ..........................5 2-1 Assembling Scheme ......................5 2-2 Assembling Steps ......................6 3. How to Use ..........................9 3-1 Set Illumination ....................... 9 3-2 Adjust the Reflector ......................9 3-3 Adjust the Focusing Tension ...................... 9 3-4 Adjust the Diopter and Focus .................. -
Page 3: Before Use
A23.0910 Before Use 1. Operation Notice 1. As the microscope is a high precision instrument, always operate it with care, and avoid physical shake during the operation. 2. Do not expose the microscope in the sun directly, either not in the high temperature, damp, dust or acute shake. -
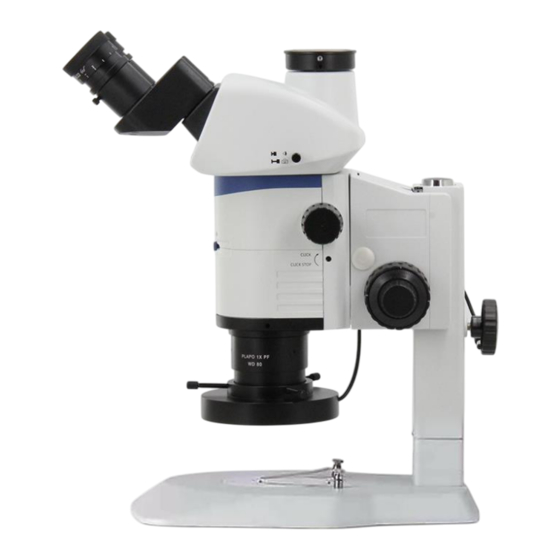
Page 4: Components
1. Components A23.0 Light Path Trinocular Selecting Pole Head Eyepiece Zooming Knob Focusing Bracket Group Microscope Body Lock Aperture Diaphragm Knob Adjusting Rod Tension Adjusting Knob Fine Coarse Focusing Focusing Knob Knob Main Objective Worktable Base Group Clip Reflector Knob www.optoedu.com Page 4 of 14 sale@cnoec.com... -
Page 5: Assembling
2. Assembling A23.0910 2-1 Assembling Scheme Following is the Assembling Scheme to describe how to assemble the components, and the numbers denote the assembling order. ★ Before assembling, make sure there is no dust, dirt or other materials which will disturb it. -
Page 6: Assembling Steps
A23.0910 2-2 Assembling Steps 2-2-1 Assemble the Focusing Bracket Group Loosen the lock knob① of the focusing bracket group, insert the hole② of focusing bracket group into the column③, until the focusing bracket group to the lowest position. Then tighten the lock knob① to prevent the microscope from turning. - Page 7 A23.0910 2-2-4 Assemble the Head 1) Loosen the head lock-screw① fully with a M4 inner hexagon spanner. 2) Make the two tubes face forward, from a little rear position of the center, insert the coattail interface on the bottom of head into the hole of body with a little rear inclined.
- Page 8 A23.0910 2-2-7 Assemble the Clip 1) Use the clip to avoid the specimen moving. 2) Insert the clip① into the two holes of the base, as the arrowhead direction shown in the figure. (See Fig. 10) 2-2-8 Fix the Microscope Body Position 1) Loosen the lock knob①, and rotate the microscope...
-
Page 9: How To Use
3. How to Use A23.0910 3-1 Set Illumination 1) Put through the power and turn on the main power switch to“ON”. 2) Adjust the light adjustment knob ② until illumination is comfortable for observation. Rotate the light adjustment knob clockwise to raise the brightness. -
Page 10: Adjust The Diopter And Focus
A23.0910 3-4 Adjust the Diopter and Focus ★ Before operating, make sure the eyepiece lock screw is tighten. Left diopter Right diopter 1) Rotate the zoom knob to the maximum adjustment adjustment magnification. (See Fig. 15) ring ring 2) Rotate the focusing knob if the image is unclear when observed with the right eyepiece. -
Page 11: Turn On/Off The Magnification Fixed Position Function
A23.0910 3-7 Turn on/off the Magnification Fixed Position Function ◎ Magnification fixed position function is providing a ticking sound stop position for every zoom magnification indicated value of the zoom knob. When the ticking sound stop position function is turned to STOP, the zoom magnification can be finely adjusted around the zoom magnification indicated value. -
Page 12: Adjust The Aperture Diaphragm
A23.0910 3-9 Adjust the Aperture Diaphragm Adjust the aperture diaphragm by the aperture diaphragm adjusting pole①. Pull it to the left to enlarge the aperture diaphragm, while pull it to the right to decrease the aperture diaphragm. (See Fig. 21) In actual use, adjust the aperture diaphragm according to the size of the sample image contrast, until it’s... -
Page 13: Assemble And Use The Polarizer Device
A23.0910 3-12 Assemble and Use the Polarizer Device 1) Take off the worktable② from the base, and fix the polarizer group① onto the base with a M3 sunk key (make the flat side of polarizer group① close to the pillar), then put back the worktable②. (See Fig. 24) 2) Loop the analyzer group③... -
Page 14: Troubleshooting
4. Troubleshooting A23.0910 As the performance of microscope can’t play fully due to unfamiliar operations, the table below can provide some solutions. Problem Cause Solution 1. Optical System (1) The image is too bright Inappropriate adjustment to Readjust brightness or too dark.
Need help?
Do you have a question about the A23.0910 and is the answer not in the manual?
Questions and answers