
Related Manuals for OPTO-EDU A23.1502 Series


Summary of Contents for OPTO-EDU A23.1502 Series
- Page 1 A23.1502 S e r i e s Zoom Stereo Microscope Instruction Manual Please read this manual carefully before use microscope! www.optoedu.com Page 1 of 14 sale@cnoec.com...
-
Page 2: Before Use
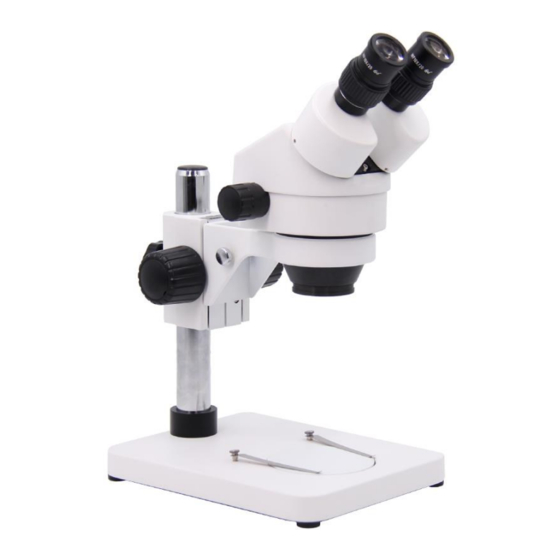
1 Before use NOTICE 1) Microscope ought to be placed in a dry and clean place. Do not expose the microscope in the sun directly. Avoid high temperature and violent vibration. 2) As microscope is a precision instrument, handle with care, avoiding impact or abrupt movement during transportation. - Page 3 2 Nomenclature 2-1 A23.1502 Eyepiece shield Eyepiece Diopter adjusting ring Head Illumination device Zoom control knob Focusing Lamp lock-screw Glass stage Clip Base Top variable light control Fuse Bottom variable light control Switch www.optoedu.com Page 3 of 14 sale@cnoec.com...
- Page 4 2-2 A23.1502 Diopter ad justin g ring E yep iece sh ield Zoo m con tro l knob E yepiece Head lo ck -sc rew Head Focu sin g knob Glass stage Base Clip www.optoedu.com Page 4 of 14 sale@cnoec.com...
- Page 5 Assemble 3-1 A23.1502 Eyepiece shield Eyepiece Head Head lock-screw Clips Glass stage www.optoedu.com Page 5 of 14 sale@cnoec.com...
-
Page 6: Operation
4 Operation 4-1Use the glass stage 1) Press the glass stage on the sunken place then the other side of the glass stage will be lifted. (Fig.1) 4-2 Adjust the degree of tightness of the focusing arm. 1) If you want to adjust degree of tightness of the focusing arm, you can hold one of the focusing knobs and turn another one to attain a suitable position. - Page 7 the clips. 2) Turn on the light. 4-4 Adjust the specimen slide 1) Turn the zoom control knob to the maximum magnification. 2) Turn the diopter adjusting rings to the zero. 3) Observe the specimen through the right eyepiece and make the jkj image clear by turning the focusing knob.
- Page 8 4-10 Mount the photo eyepiece and the PK-mount adapter Put the photo eyepieces socket of the tri-ocular. Connect the PK-mount adapter with the photo eyepiece, and then tighten the lock-screw. (Fig.8) 4-11 Adjust the CTV C-mount Adjust the CTV to a suitable position by rotating C-mount. Note: The range of the adjustment: 1~2mm in general.(Fig.9) 4-12 Connect the Digital head With the Monitor or TV set 1) Plug one end of the PVA cable into the socket of the digital head.
- Page 9 window according to your linking 4) Draw out the pole and adjust the focusing knob, and then the image will appear on the computer screen clearly. 5) If no image or the image without color, it may be because the model of the input signal does not match the output signal of CCD or the model of C-VIDEO/S-VIDEO is not correct.
- Page 10 3) Put a new lamp into the jack thoroughly. 4) Recover the stage plate. (Fig.15) Note: ① Before replacing the lamps, turn off the power first. ② Avoid violence while the lamp is plugged into the jack. 4-22 Replace the fuse 1) Screw the fuse tube out with a screwdriver and then pull the fuse out of the tube①.
-
Page 11: Specification
Specification A23.1502 Zoom Stereo Microscope B1 T1 B31 T31 Head Binocular Head, 45° Inclined, 360° Rotatable, ± 5 Diopter Adjustable, Interpupillary Adjustment 54-75mm Trinocular Head, 45° Inclined, 360° Rotatable, ± 5 Diopter Adjustable, Interpupillary Adjustment 54-75mm, With Eyepiece Adatper + 1.0x C-Mount Magnification 7x-45x, Up to 3.5x-180x With Optional Eyepieces &... -
Page 12: Technical Parameter
7 Technical parameter A23.1502 Technical Data Sheet Auxiliary objectives Standard configuration 0.5X 1.5X Working Working Working distance Working distance Eyepiece distance100mm distance165mm 45mm 30mm Field Field Field Field Magnification Magnification Magnification Magnification view view view view 28.6 3.5X 57.1 10.5X 14.3 10X/20 22.5X... -
Page 13: General Troubleshooting
★ Total mag.= Zoom mag. X Eyepiece mag. X Auxiliary objective mag. Field number of eyepiece Diameter of field of view(mm)= Zoom mag.X Auxiliary objective mag. ★ Photo adaptor mag.= Zoom mag.( ×Auxiliary objective mag.)×Eyepiece mag. ★ TV adaptor mag.=Zoom mag.(Xauxiliary objective mag.)X C-mount TV adaptor middle ★... -
Page 14: Video Troubleshooting
No power supply Check the connection with the power supply 10、Bulb does not work when the The bulb was not inserted Insert it correctly switch is on correctly Bulb is wrong Replace with a new one Use the wrong bulb Replace with a correct one 11、Bulb is burned out suddenly The voltage is too high...
Need help?
Do you have a question about the A23.1502 Series and is the answer not in the manual?
Questions and answers