Advertisement
Quick Links
Advertisement

Related Manuals for Sage Oracle Touch SES990BST


Summary of Contents for Sage Oracle Touch SES990BST
- Page 1 Oracle Touch ™ Instruction Book – SES990...
-
Page 2: Table Of Contents
We design and your local electricity manufacture consumer company. products with the safety of you, ‰ • Your Sage appliance our valued customer, foremost in mind. In addition we ask includes a BS 13 amp that you exercise a degree of... - Page 3 • Wires are coloured the protective cover fitted to the power plug of this as follows: appliance. – Blue = Neutral – Brown = Live • Do not place the product near the edge of a bench • As the colours of the or table during operation.
- Page 4 If found damaged 30mA be installed in the in any way, immediately electrical circuit supplying cease use of the appliance and please contact Sage the appliance. See your Customer Service or go electrician for professional to sageappliances.com. advice.
- Page 5 SPECIFIC • Do not use any other liquid apart from cold INSTRUCTIONS mains/town water. FOR SES990 THE We do not recommend ORACLE TOUCH the use of highly filtered, ™ de-mineralised or distilled • This appliance is water as this may affect recommended for the taste of the coffee and household use only.
- Page 6 SPECIFIC • Use caution when using the de-scale feature as hot INSTRUCTIONS steam may be released. FOR WATER Before de-scaling, ensure FILTER drip tray is empty and inserted. Refer to page 22 • Filter cartridge should for further instructions. be kept out of reach •...
-
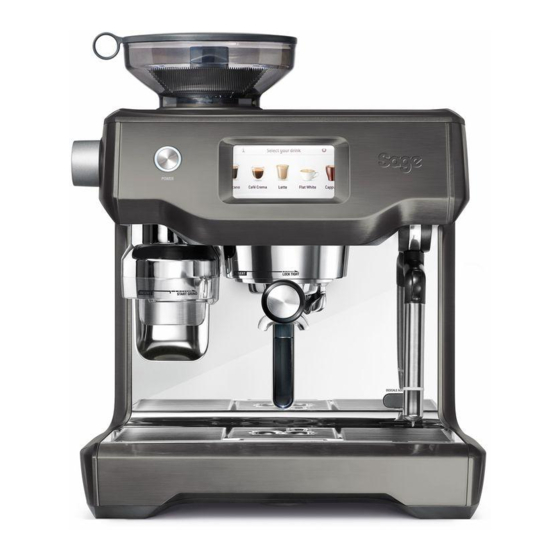
Page 7: Components
Components A. Integrated conical burr grinder H. Drop down swivel foot With removable 280g bean hopper. Lifts the machine upwards for easy manoeuvrability. B. Top-fill 2.5L removable water tank With integrated water filter and backlit I. Heated cup warming tray level indicator. - Page 8 ACCESSORIES A. Stainless steel milk jug H. Grind outlet brush & tamp removal magnet B. 2 cup filter basket I. Cleaning tool for steam wand tip C. 1 cup filter basket J. Two allen keys D. Water filter holder with filter K.
- Page 9 Oracle Touch ™ Features COLOUR TOUCH SCREEN PRECISION CONTROL CONTROL PANEL Electronic PID Temperature Control Swipe & Select from the drinks menu. Electronic temperature control delivers Adjust your coffee strength, milk texture precise water temperature for optimum or milk temperature, then save it as your espresso flavour.
-
Page 10: Assembly
• Set the reminder for next month of replacement. We recommend to replace the Assembly filter after 3 months. BEFORE FIRST USE Machine Preparation Remove and discard all labels and packaging • Insert the filter into the two parts of the filter materials attached to your espresso machine. -
Page 11: Functions
GRINDING OPERATION Functions Insert bean hopper into position on-top of the machine. Turn dial to lock into place. Fill hopper with fresh beans. FIRST USE 1. Press POWER button to turn the machine 2. Follow the instructions on screen to guide you through first use setup. - Page 12 DRINK SELECTION To enter Drinks Menu screen, touch the Home icon . Swipe & select your drink. Touch the 'Help & Tip' icon to see Oracle™ Touch Guide. Select your drink Espresso Long Black Latte Flat White Cappuccino NOTE Please keep the touch screen dry and clean to ensure that the machine functions properly. DRINK SCREEN In this screen, you can adjust your drink by touching the oval shaped buttons.
- Page 13 SELECTING GRIND SIZE GROUP HEAD We recommend you start at No. 30 and adjust GRIND OUTLET GRIND OUTLET as required to control espresso flow rate. There are 45 grind size settings (No.1 – finest, No. 45 – coarsest) to enable you to select the CENTER right grind size for your coffee beans and POSITION...
- Page 14 TEXTURING MILK When desired temperature is reached, touch the Milk Button to stop. Different brands and types of milk and milk Wipe the wand & tip with a clean damp cloth. alternatives will texture differently. You may Lower steam wand to the down position and need to adjust the froth level accordingly.
- Page 15 HOT WATER Time and Date Time and Date is optional. You can set time The HOT WATER function can be used and date. to pre-heat cups or add hot water manually. To start & stop hot water, touch 'Hot Water' on Clean Cycle the screen.
- Page 16 TRANSPORTING AND STORING We recommend draining both boilers completely before transporting the machine or storing for an extended period of time. Refer to the Descale section for the step by step instructions. This procedure is also intended as an anti-freeze measure in the event the machine is exposed to extreme cold temperatures.
-
Page 17: Tips
AUTOMATIC GRINDING, DOSING & TAMPING Tips • Ensure hopper is filled with fresh coffee beans. Never put pre-ground coffee in the hopper. • After automatic grinding, dosing & tamping, PRE-HEATING wipe any excess coffee from the rim of the filter basket to ensure a proper seal in the Heating your cup or glass group head is achieved. - Page 18 The flavour of your coffee will depend on many Always wipe the wand and tip with a damp factors, such as the type of coffee beans, degree cloth BEFORE returning the wand to the down of roast, freshness, coarseness or fineness of position.
-
Page 19: Care & Cleaning
COFFEE BEAN HINTS & TIPS Care & Cleaning • Fresh, quality coffee beans will give you the best possible extraction. • We recommend quality 100% Arabica beans with a ‘Roasted On’ date stamped on the bag, COLOUR TOUCH SCREEN DISPLAY not a ‘Best Before’... - Page 20 CLEANING CONICAL BURRS Regular cleaning helps the burrs achieve consistent grinding results which is especially important when grinding for espresso. Unlock hopper Remove beans Replace & lock Run grinder until empty Unlock & remove hopper hopper Remove upper Clean upper Clean lower Remove tamping Clean grind...
- Page 21 CLEANING THE STEAM WAND • The steam wand can be left immersed in the milk jug filled with water when not in use to reduce the risk of blockages. IMPORTANT After every use, thoroughly wipe the steam Steam Wand Cleaning Powder wand and tip with a damp cloth &...
- Page 22 CLEAR WATER BACKFLUSH NOTE • After each coffee making session we Do not clean any of the parts or accessories in recommend doing a clear water backflush the dishwasher. before you turn off the machine. Empty drip tray. Insert the cleaning disc into the filter DESCALE basket then insert the portafilter into the •...
-
Page 23: Troubleshooting
Troubleshooting PROBLEM POSSIBLE CAUSE WHAT TO DO • • Grinder Motor No coffee beans in Fill bean hopper with fresh coffee beans. • starts but no ground bean hopper. Remove bean hopper. Inspect bean hopper & grinding • coffee coming Grinder/bean burrs for blockage. - Page 24 / Hot demineralised content such as highly filtered, demineralised water outlet leaks or distilled water or distilled water. If problem persists, please contact which is affecting Sage Customer Service or go to sageappliances.com. how the machine is designed to function.
- Page 25 The machine is ‘On’ Turn machine off. Wait for 60 minutes and turn but won't operate machine back on. • If problem persists, call Sage Customer Service. • Steam pouring out Turn machine off. Wait for 60 minutes and turn of group head machine back on.
- Page 26 PROBLEM POSSIBLE CAUSE WHAT TO DO • • Coffee not hot Cups not Rinse cups under hot water outlet and place on cup enough pre-heated. warming tray. • • Milk not hot Increase the milk temperature in settings menu. enough (if making cappuccino or latté...
- Page 27 Sage Appliances GmbH Johannstraße 37, 40476 Düsseldorf, Deutschland Für den Kundendienst besuchen Sie bitte www.sageappliances.com BRG Appliances Limited Unit 3.2, Power Road Studios, 114 Power Road, London, W4 5PY Freephone (UK Landline): 0808 178 1650 Mobile Calls (National Rate): 0333 0142 970 www.sageappliances.com...
Need help?
Do you have a question about the Oracle Touch SES990BST and is the answer not in the manual?
Questions and answers