Kohler KD62V12 Service And Repair Manual
Hide thumbs
Also See for KD62V12:
- Manual (296 pages) ,
- Operation and maintenance manual (210 pages) ,
- Operation and maintenance manual (180 pages)

Related Manuals for Kohler KD62V12


Summary of Contents for Kohler KD62V12
- Page 1 Service and Repair Manual Original Instructions Diesel engine KD62V12 From serial number 2020730163 EN_US 33525088601_7_1 07-2021...
- Page 2 - If in an enclosed area, vent the exhaust to the outside. - Do not modify or tamper with the exhaust system. - Do not idle the engine except as necessary. For more information go to www.p65warnings.ca.gov/diesel © 2021 by Kohler Co. All rights reserved. KD62V12 33525088601_7_1 EN_US 2021-07...
- Page 3 2018-07 ment TB12 - Technical documentation First 3.02 engine version 2019-02 According to development and improve- ment TB12 - Technical documentation According to development and improve- 2021-07 ment © 2021 by Kohler Co. All rights reserved. KD62V12 33525088601_7_1 EN_US 2021-07...
- Page 4 Service and Repair Manual © 2021 by Kohler Co. All rights reserved. KD62V12 33525088601_7_1 EN_US 2021-07...
- Page 5 See “Service Assistance” section. Spare parts Only original KOHLER spare parts, or spare parts purchased by Kohler Co. should be used for repairing KOHLER Diesel engines. Kohler Co. will declare all possible undertakings carried out by Kohler Co. and/or their dealers, such as guarantees, service orders, etc.
- Page 6 Kohler Co. will cancel any obligations entered into by Kohler Co. and/or its dealers, such as guar- antees, service contracts etc., without advance notice if any parts other than original KOHLER parts or spare parts purchased from Kohler Co.
- Page 7 Service and Repair Manual Preface Other applicable documents Other applicable documents Document Application Operation and Maintenance Manual Operator's manual for the engine operation Kodia Operation Manual Description of Kodia, diagnosis software © 2021 by Kohler Co. All rights reserved. KD62V12 33525088601_7_1 EN_US 2021-07...
- Page 8 Prior to any intervention, read the complete task procedure through to the end. Various symbols are used and explained in chapter (For more information see: 2.1.2 Additional identifications, page 38.) Each task in this manual have the following structure: © 2021 by Kohler Co. All rights reserved. KD62V12 33525088601_7_1 EN_US 2021-07...
- Page 9 Specific values spreadsheet to check the nominal and tolerances values of critical components and data recording sheet, if required, to inform the engine manufacturer. Tightening sequence table if required Tightening specifications table for specific fastener © 2021 by Kohler Co. All rights reserved. KD62V12 33525088601_7_1 EN_US 2021-07...
- Page 10 Preface Service and Repair Manual General information © 2021 by Kohler Co. All rights reserved. KD62V12 33525088601_7_1 EN_US 2021-07...
- Page 11 Occupational references 2.2.4 Unauthorized personnel - servicing Intended use Limitation of liability Safety instructions 2.5.1 General safety instructions 2.5.2 Safety while commissioning 2.5.3 Safety when starting Preventing injuries © 2021 by Kohler Co. All rights reserved. KD62V12 33525088601_7_1 EN_US 2021-07...
- Page 12 3.3.2 Inlet and outlet rocker arms removal and installation 3.3.3 Rocker arms housing removal and installation Cylinder head (SL 224) 3.4.1 Cylinder head removal and installation Driving gear © 2021 by Kohler Co. All rights reserved. KD62V12 33525088601_7_1 EN_US 2021-07...
- Page 13 3.10.4 Thermostat LT and housing removal and installation (SL 217) 3.10.5 Coolant pump HT removal and installation (SL 216) 3.10.6 Coolant pump LT removal and installation (SL 215) 3.10.7 Fan drive (option) © 2021 by Kohler Co. All rights reserved. KD62V12 33525088601_7_1 EN_US 2021-07...
- Page 14 5.3.11 Assembling pipes with DKO connectors (EL, ET, EW, GZ, GZR, RED) 5.3.12 Standard torques for collar clamps Abbreviations - Acronyms Unit conversion tables 5.5.1 Length conversion factors 5.5.2 Mass conversion factors © 2021 by Kohler Co. All rights reserved. KD62V12 33525088601_7_1 EN_US 2021-07...
- Page 15 Power conversion factors 5.5.6 Moment of inertia and torque conversion factors 5.5.7 Fuel consumption conversion factors 5.5.8 Flow conversion factors 5.5.9 Temperature conversion factors 5.5.10 Density conversion factors Prefix © 2021 by Kohler Co. All rights reserved. KD62V12 33525088601_7_1 EN_US 2021-07...
- Page 16 Contents Service and Repair Manual © 2021 by Kohler Co. All rights reserved. KD62V12 33525088601_7_1 EN_US 2021-07...
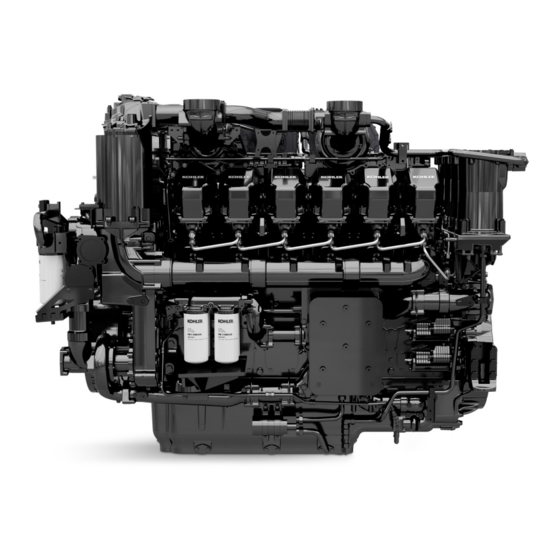
- Page 17 CS Coupling side (flywheel side) Exhaust gas turbocharger assembly Engine brackets Charge air cooler Flywheel Battery charging alternator Fuel filter Oil dipstick Crankcase breather system filter housing High-pressure fuel pump © 2021 by Kohler Co. All rights reserved. KD62V12 33525088601_7_1 EN_US 2021-07...
- Page 18 Fig. 3: Diesel engine / view from the vibration damper side CCS Engine front (vibration damper side) Cylinder head cover Vibration damper cover Charge air pipe Engine control unit (ECU) Starter Air intake Oil pan © 2021 by Kohler Co. All rights reserved. KD62V12 33525088601_7_1 EN_US 2021-07...
- Page 19 Direction of rotation Firing order Cylinder B6 is located on the engine right opposite the flywheel side. The rotational direction is on the left-hand side as viewed towards the flywheel. © 2021 by Kohler Co. All rights reserved. KD62V12 33525088601_7_1 EN_US 2021-07...
- Page 20 C=next higher power level… Emissions or fuel optimization. F=Fuel Opti- mized, E=Emissions Optimized C Application. C=COP; P=Prime; S=Stand by; D=Data center Tab. 2: Engine type description © 2021 by Kohler Co. All rights reserved. KD62V12 33525088601_7_1 EN_US 2021-07...
- Page 21 The engine serial number is stamped onto the engine nameplate. Designation Description 2016 0001 Engine serial number 2016 Year of manufacture Engine type code (73= KD62V12) (74= KD83V16) © 2021 by Kohler Co. All rights reserved. KD62V12 33525088601_7_1 EN_US 2021-07...
- Page 22 Tab. 3: Engine serial number Fig. 8: Serial number on nameplate Serial number Engine control nameplates Fig. 9: Example of engine control unit nameplates Software nameplate Hardware nameplate © 2021 by Kohler Co. All rights reserved. KD62V12 33525088601_7_1 EN_US 2021-07...
- Page 23 The information on the engine control unit nameplate corresponds to the delivery status (ex: works Kohler Co.). Depending on software updates in the field, it may be the case that this infor- mation is no longer up to date.
- Page 24 The connecting rod identification is stamped on the connecting rod and on the connected rod bearing cap. Fig. 13: Connecting rod number location Matching of the connecting rod and connecting rod bearing cap is identified by connecting rod number. © 2021 by Kohler Co. All rights reserved. KD62V12 33525088601_7_1 EN_US 2021-07...
- Page 25 The turbocharger company nameplate is mounted on the turbocharger. Oil cooler identification Fig. 15: Oil cooler nameplate The oil cooler company nameplate is mounted on the oil cooler. © 2021 by Kohler Co. All rights reserved. KD62V12 33525088601_7_1 EN_US 2021-07...
- Page 26 Injector identification Fig. 16: Injection number location The injector identification number is stamped on the side of the injector. High-pressure pumps identification Fig. 17: High pressure pump nameplate © 2021 by Kohler Co. All rights reserved. KD62V12 33525088601_7_1 EN_US 2021-07...
- Page 27 Technical description Fig. 18: High pressure pump number The high pressure pump number is stamped on the pump. Charge air cooler identification Fig. 19: Charge air cooler nameplates © 2021 by Kohler Co. All rights reserved. KD62V12 33525088601_7_1 EN_US 2021-07...
- Page 28 The charge air cooler company nameplate is mounted on the charge air cooler. Thermostat opening point value Fig. 20: Thermostat markings The opening point value of the thermostat is engraved on the thermostat. © 2021 by Kohler Co. All rights reserved. KD62V12 33525088601_7_1 EN_US 2021-07...
- Page 29 Service and Repair Manual Product description Technical data 1.2 Technical data Information Refer also to the “Technical data sheet”. (For more information see: 5 Appendix, page 262.) © 2021 by Kohler Co. All rights reserved. KD62V12 33525088601_7_1 EN_US 2021-07...
- Page 30 Smoking and open flames are forbidden in the vicinity of the engine. u Always start the engine according to the instructions in the instructions manual of the machi- nery. © 2021 by Kohler Co. All rights reserved. KD62V12 33525088601_7_1 EN_US 2021-07...
- Page 31 PCV 1 tion Bank B (Leakage) Low pressure pump Y728 and Y727 – Fuel pump Fuel cooler (optional) PCV 2 See next page for continuation of the image legend © 2021 by Kohler Co. All rights reserved. KD62V12 33525088601_7_1 EN_US 2021-07...
- Page 32 Prelubricating pump Support bearing Flywheel Oil sampling Bypass valve for cold start Gear box Intermediate gears HP Pump Turbochargers Flywheel See next page for continuation of the image legend © 2021 by Kohler Co. All rights reserved. KD62V12 33525088601_7_1 EN_US 2021-07...
- Page 33 Venting HT Coolant pump LT Elbow B Venting LT Mechanical thermostat ECU 2-HD Engine oil cooler Manual venting point See next page for continuation of the image legend © 2021 by Kohler Co. All rights reserved. KD62V12 33525088601_7_1 EN_US 2021-07...
- Page 34 Sensors list B708 – Coolant temperature S710 – HT Coolant Min level after engine alert B718 – Coolant temperature S711 – LT Coolant Min level before cooler alert © 2021 by Kohler Co. All rights reserved. KD62V12 33525088601_7_1 EN_US 2021-07...
- Page 35 - A side (on ECU 2-HD) B7811 - Exhaust gas temper- B7923 - Crankcase pressure ature before turbocharger 1&2 See next page for continuation of the image legend © 2021 by Kohler Co. All rights reserved. KD62V12 33525088601_7_1 EN_US 2021-07...
- Page 36 Aggregate support Turbocharger Venting point Charge air cooler - B side Air filter - A side Engine A bank See next page for continuation of the image legend © 2021 by Kohler Co. All rights reserved. KD62V12 33525088601_7_1 EN_US 2021-07...
- Page 37 B781 - Air intake pressure B703 - Charged air pressure switch - B side (clogging) A after charge air cooler Engine type Number of turbochargers Tab. 5: Blowby connections © 2021 by Kohler Co. All rights reserved. KD62V12 33525088601_7_1 EN_US 2021-07...
- Page 38 Identifies an action which has to be carried out. Result Identifies the result of an action. Listing Identifies a listing. Torque value Identifies special tightening torque or specification. Tab. 8: Additional symbols © 2021 by Kohler Co. All rights reserved. KD62V12 33525088601_7_1 EN_US 2021-07...
- Page 39 Follow these instructions and observe any additional or local rules and directives. Note the following points: – Safety regulations applicable on site – Guidelines provided by professional associations © 2021 by Kohler Co. All rights reserved. KD62V12 33525088601_7_1 EN_US 2021-07...
- Page 40 The work on engines, equipment as well as mechanical and electronic equipment includes: – Operating the machine and facilities – Performance of scheduled maintenance work – Assembly, installation, assessment, adjustment, testing and maintenance © 2021 by Kohler Co. All rights reserved. KD62V12 33525088601_7_1 EN_US 2021-07...
- Page 41 – The engines must only be installed by personnel who have been trained and familiarized here- with and are aware of the dangers. – Unauthorized changes on the engines or their components void the liability of Kohler Co. for any resulting property damage or personal injury.
- Page 42 Any other use above and beyond this is considered to be improper use. In this case, Kohler Co. is not liable for any damage. The risk is borne solely by the user.
- Page 43 Risk of engine failure by use of non-compliant operating fluids! Use of non-compliant operating fluids will lead to engine main failure. u Use only operating fluids tested and approved by Kohler Co. NOTICE Risk of engine failure by use of non-original spare parts! The use of original spare parts guarantees the compliance with the technical requirements estab- lished by Kohler Co.
- Page 44 Vibrations generated by the engine could result in death or serious injuries. u Standing in the vicinity of the engine while starting or operating the equipment is forbidden. © 2021 by Kohler Co. All rights reserved. KD62V12 33525088601_7_1 EN_US 2021-07...
- Page 45 Standing in the vicinity of the engine while starting or operating the machinery is forbidden. u Wear proper personal protective equipment. © 2021 by Kohler Co. All rights reserved. KD62V12 33525088601_7_1 EN_US 2021-07...
- Page 46 Check operating fluid levels only once the temperature has cooled down enough so that surfaces can be touched with bare hands. u Carefully open the cover in order to first reduce the excessive pressure. © 2021 by Kohler Co. All rights reserved. KD62V12 33525088601_7_1 EN_US 2021-07...
- Page 47 According to local regulations, the manufacturer of the specific application is responsible to design adapted fire protection system. Information Engines provided by Kohler Co. are not intended to be used in potentially explosive atmospheres according to Directive 2014/34/EC. © 2021 by Kohler Co. All rights reserved.
- Page 48 Noise reduction systems adapted to the machinery must be designed by the manufacturer, to comply with the local regulations. u In case of abnormal noises, rectify it immediately. © 2021 by Kohler Co. All rights reserved. KD62V12 33525088601_7_1 EN_US 2021-07...
- Page 49 The manufacturer of the machinery shall forbid any accessories and loose clothing. Following personal protective equipment is necessary: © 2021 by Kohler Co. All rights reserved. KD62V12 33525088601_7_1 EN_US 2021-07...
- Page 50 Must be worn in the direct vicinity of the engine Safety goggles Protection against flying objects and chemical splashes. Must be worn when handling operating materials and during mechanical operations. Tab. 9: Personal protective equipments © 2021 by Kohler Co. All rights reserved. KD62V12 33525088601_7_1 EN_US 2021-07...
- Page 51 – A – Engine front (damper side) – B – Engine sides – C – Engine rear (flywheel side) – D – Above the engine – E – Below the engine © 2021 by Kohler Co. All rights reserved. KD62V12 33525088601_7_1 EN_US 2021-07...
- Page 52 Initiating an emergency stop: u Press the emergency stop button. After an emergency stop: u Remedy to the emergency situation. u Acknowledge the emergency stop button and signals. © 2021 by Kohler Co. All rights reserved. KD62V12 33525088601_7_1 EN_US 2021-07...
- Page 53 Make sure that all residual risks according to the risk assessment are reflected in the system documentation. Provide documentation to the personnel according to the "Target audience". Tab. 10: Engine area signs requirement © 2021 by Kohler Co. All rights reserved. KD62V12 33525088601_7_1 EN_US 2021-07...
- Page 54 Switch over to appropriate backup/emergency functions for additional, restricted operation of the engine (for example, constant limp-home speed). u Make sure that the faults are immediately repaired. © 2021 by Kohler Co. All rights reserved. KD62V12 33525088601_7_1 EN_US 2021-07...
- Page 55 Before starting any task on the fuel system, ensure the build-up pressure in the circuit has been released, and the temperature of the engine has cooled down. u Keep the engine away from heat, sparks, open flame, or any other ignition source. © 2021 by Kohler Co. All rights reserved. KD62V12 33525088601_7_1 EN_US 2021-07...
- Page 56 Never use contaminated cleaning or testing fluids. u Remove new components from the original packaging immediately before use. u Use the original packaging of the new parts to ship removed parts. © 2021 by Kohler Co. All rights reserved. KD62V12 33525088601_7_1 EN_US 2021-07...
- Page 57 Use adapted leak-proof containers to drain lubricants and fuel. Use of food or drink containers is prohibited. u Dispose all scrap materials only at official locations in an environment-friendly manner. © 2021 by Kohler Co. All rights reserved. KD62V12 33525088601_7_1 EN_US 2021-07...
- Page 58 (leakage in the charge air circuit, parts ejection, and others). Mount any component according to: u For the KOHLER application, the “Operation and Maintenance Manual” and its "Service and Repair Manual". u For non KOHLER components, refer to the “Instructions” or “Assembly Instructions” from the supplier.
- Page 59 Not applicable. Special tools Not applicable. Consumables and equipment Not applicable. Overview Fig. 51: Task overview Screw (M8) Cover Protection plate Screw (M12) Removal u Remove screws 1. © 2021 by Kohler Co. All rights reserved. KD62V12 33525088601_7_1 EN_US 2021-07...
- Page 60 O = Engine oil XX = Loctite 243 YY = Loctite 577 **Refer to screws reuse rules. (For more information see: 5.3.2 Screws pre-tightening, reuse and marking, page 264.) © 2021 by Kohler Co. All rights reserved. KD62V12 33525088601_7_1 EN_US 2021-07...
- Page 61 Check the grounding connection to avoid any risk of electrical arc. u Observe the local safety regulations that apply to the machinery. Special tools Not applicable. Consumables and equipment – Rags – Cleaner © 2021 by Kohler Co. All rights reserved. KD62V12 33525088601_7_1 EN_US 2021-07...
- Page 62 Cover - front side Cover - back side Removal Fig. 54: Removing cover - front part u Remove screws 8 and lock washers 7. u Remove cover - front side 9. © 2021 by Kohler Co. All rights reserved. KD62V12 33525088601_7_1 EN_US 2021-07...
- Page 63 Remove nuts 6, vibration dampers 3, distance sleeves 2 and pins 1, 4. u Remove cover - back side 5 Installation Fig. 56: Installing pins u Screw pins 1, 4 on aggregate support and PTO bracket. © 2021 by Kohler Co. All rights reserved. KD62V12 33525088601_7_1 EN_US 2021-07...
- Page 64 Screw cover with nuts 6. Fig. 58: Installing cover u Mount cover 9 on pins 1, 4. u Fix cover 9 with lock washers 7 and screws 8. Specific values Not applicable. © 2021 by Kohler Co. All rights reserved. KD62V12 33525088601_7_1 EN_US 2021-07...
- Page 65 **Refer to screws reuse rules. (For more information see: 5.3.2 Screws pre-tightening, reuse and marking, page 264.) 3.2.3 Cylinder head cover removal and installation Previous tasks Not applicable. © 2021 by Kohler Co. All rights reserved. KD62V12 33525088601_7_1 EN_US 2021-07...
- Page 66 After the temperature has cooled down to a level it can be touched, proceed with the tasks on the engine. u Shut down the engine. u Secure the area according to local lockout/tagout procedure. Special tools Not applicable. Consumables and equipment Not applicable. © 2021 by Kohler Co. All rights reserved. KD62V12 33525088601_7_1 EN_US 2021-07...
- Page 67 Mount a new seal 3 on cylinder head cover 1. u Position screws 2 into the bores of the cylinder head cover 1. u Position cylinder head cover 1 on rocker arm housing. u Tighten screws 2. © 2021 by Kohler Co. All rights reserved. KD62V12 33525088601_7_1 EN_US 2021-07...
- Page 68 Repair Service and Repair Manual Covers Specific values Not applicable. Tightening specifications Refer to standard tightening torques. (For more information see: 5.3 Standard tightening torques, page 264.) © 2021 by Kohler Co. All rights reserved. KD62V12 33525088601_7_1 EN_US 2021-07...
- Page 69 After the temperature has cooled down to a level it can be touched, proceed with the tasks on the engine. © 2021 by Kohler Co. All rights reserved. KD62V12 33525088601_7_1 EN_US 2021-07...
- Page 70 Exhaust valves B1-B6 Series of cylinders – Bank B Inlet valves Engine rear (flywheel side) Left engine side Engine front (damper side) Right engine side Direction of rotation © 2021 by Kohler Co. All rights reserved. KD62V12 33525088601_7_1 EN_US 2021-07...
- Page 71 B4, B6 Tab. 14: Reference table for the flywheel positioning Set the valve clearance Step 1 u Rotate crankshaft in direction of rotation with turning device to index 1. © 2021 by Kohler Co. All rights reserved. KD62V12 33525088601_7_1 EN_US 2021-07...
- Page 72 74.) (For more information see: Setting valve clearance, page 74.) Step 6 u Pass flywheel groove index 5. Step 7 u Pass flywheel groove index 1. © 2021 by Kohler Co. All rights reserved. KD62V12 33525088601_7_1 EN_US 2021-07...
- Page 73 Overlap TDC** * Ignition order ** Opposite cylinder (overlap) Tab. 15: Valve set order u Set cylinder to overlap TDC position. u Adjust valve clearance of ignition TDC cylinder. © 2021 by Kohler Co. All rights reserved. KD62V12 33525088601_7_1 EN_US 2021-07...
- Page 74 Repeat procedure for next valve. u Mark cylinder when the operation is completed. u Repeat entire procedure for exhaust rocker arm 5. Specific values Use feeler gauge to set valve clearance. © 2021 by Kohler Co. All rights reserved. KD62V12 33525088601_7_1 EN_US 2021-07...
- Page 75 +100 µm (3.94 th) clearance 19.69 th Exhaust 1 mm +100 µm (3.94 th) valve/ clear- 0.04 in ance Tab. 16: Tolerance values Tightening specifications Fig. 69: Rocker arms locknuts © 2021 by Kohler Co. All rights reserved. KD62V12 33525088601_7_1 EN_US 2021-07...
- Page 76 Special tool Designation Turning device. (For more information see: Use the turning device, page 260.) Tab. 18: Special tools Consumables and equipment – Engine oil – Rags – Cleaner © 2021 by Kohler Co. All rights reserved. KD62V12 33525088601_7_1 EN_US 2021-07...
- Page 77 Inlet rocker arm Rocker arm housing Removal WARNING The valve springs must not be under stress. Risk of injuries. u Turn crankshaft to firing TDC position using turning device. © 2021 by Kohler Co. All rights reserved. KD62V12 33525088601_7_1 EN_US 2021-07...
- Page 78 Remove inlet rocker arm assembly 5 and exhaust rocker arm assembly 8. Fig. 74: Removing shafts from rocker arms u Remove inlet shaft 6 from inlet rocker arm 5. u Remove exhaust shaft 9 from exhaust rocker arm 8. © 2021 by Kohler Co. All rights reserved. KD62V12 33525088601_7_1 EN_US 2021-07...
- Page 79 Remove valve bridges 3 and pushrods 2 from swing followers 1. Installation Information Put matching cylinder in firing TDC position. Fig. 76: Preparing inlet and exhaust shafts u Inspect presence of plug in inlet shaft and exhaust shaft. © 2021 by Kohler Co. All rights reserved. KD62V12 33525088601_7_1 EN_US 2021-07...
- Page 80 Fig. 78: Installing pushrods and valve bridges u Insert pushrods 2 into cylinder head and fit it with swing followers 1. u Insert valve bridges 3 into inlet and exhaust valves. © 2021 by Kohler Co. All rights reserved. KD62V12 33525088601_7_1 EN_US 2021-07...
- Page 81 Screw and fit rocker arms with screws 7 in inlet shaft, exhaust shaft and fitting sleeves 4. Specific values (For more information see: 3.3.1 Rocker arms - Valve clearance set (SL 204), page 69.) Tightening specifications Fig. 80: Rocker arms screws © 2021 by Kohler Co. All rights reserved. KD62V12 33525088601_7_1 EN_US 2021-07...
- Page 82 (For more information see: 3.6.2 High pressure pipes removal and installation, page 109.) Specific safety instructions – Set cylinders to ignition TDC position. Special tools Special tool Designation Coolant connector pipe tool Tab. 20: Special tools © 2021 by Kohler Co. All rights reserved. KD62V12 33525088601_7_1 EN_US 2021-07...
- Page 83 – Cleaner Overview Fig. 82: Task overview Positioning pin Seal (x4) Screw (M8) Coolant pipe HT Closing cover Locking ring Seal Rocker arm housing Fitting sleeve (x5) Seal © 2021 by Kohler Co. All rights reserved. KD62V12 33525088601_7_1 EN_US 2021-07...
- Page 84 Repair Service and Repair Manual Rocker arms Removal Fig. 83: Sliding locking ring u Slide locking ring 8. © 2021 by Kohler Co. All rights reserved. KD62V12 33525088601_7_1 EN_US 2021-07...
- Page 85 Slide pipes out of rocker arm housing. Fig. 85: Removing rocker arm housing u Lift rocker arm housing 9. u Move rocker arm housing and coolant pipe HT to remove the assembly. © 2021 by Kohler Co. All rights reserved. KD62V12 33525088601_7_1 EN_US 2021-07...
- Page 86 Remove seals 4, 6 from closing cover and coolant pipe HT. u Remove fitting sleeves 5. Installation Fig. 87: Preparing rocker arm housing u Grease coolant pipe. u Insert fitting sleeves 5. © 2021 by Kohler Co. All rights reserved. KD62V12 33525088601_7_1 EN_US 2021-07...
- Page 87 Put seals 6 and locking ring 8 on coolant pipe HT 7. u Insert coolant pipe HT 7 in rocker arm housing. Fig. 90: Inserting pins and seal © 2021 by Kohler Co. All rights reserved. KD62V12 33525088601_7_1 EN_US 2021-07...
- Page 88 Insert positioning pins 1 in rocker arm housing. Fig. 91: Placing tool Information Tighten screws from inlet and outlet rocker arms. u Place tool on pipe. u Insert pipe into rocker arm housing. © 2021 by Kohler Co. All rights reserved. KD62V12 33525088601_7_1 EN_US 2021-07...
- Page 89 Vent cooling system at the end of installation. Specific values Not applicable. Tightening specifications Refer to standard tightening torques. (For more information see: 5.3 Standard tightening torques, page 264.) © 2021 by Kohler Co. All rights reserved. KD62V12 33525088601_7_1 EN_US 2021-07...
- Page 90 Torque reaction arm for electric torque multiplier or manual torque multi- No illustration plier No illustration Spare battery pack for electric torque multiplier only No illustration Battery charger 110V for electric torque multiplier only © 2021 by Kohler Co. All rights reserved. KD62V12 33525088601_7_1 EN_US 2021-07...
- Page 91 – Castrol Optimol paste white T – Rags – Cleaner Overview Fig. 94: Task overview Cylinder head Flame ring O-ring set Bolt (M30) Seal carrier Washer Cylinder head gasket (soft metal) Locating pin © 2021 by Kohler Co. All rights reserved. KD62V12 33525088601_7_1 EN_US 2021-07...
- Page 92 Lift and push cylinder head up and down to dismantle it. u Remove cylinder head. u Remove cylinder head gasket 4. u Remove flame ring 5. Installation Fig. 96: Installing cylinder head gasket and flame ring © 2021 by Kohler Co. All rights reserved. KD62V12 33525088601_7_1 EN_US 2021-07...
- Page 93 Mount seal carrier 3 with O-rings 2. u Grease O-rings 2. Fig. 98: Installing cylinder head u Mount lifting device on cylinder head. u Mount cylinder head. © 2021 by Kohler Co. All rights reserved. KD62V12 33525088601_7_1 EN_US 2021-07...
- Page 94 Fig. 99: Inserting cylinder head bolts u Lubricate bolts 6 and washers 7 with Castrol Optimol paste white T. u Insert and tighten the bolts. Fig. 100: Mounting lifting lug © 2021 by Kohler Co. All rights reserved. KD62V12 33525088601_7_1 EN_US 2021-07...
- Page 95 If cylinder heads are connected with a lifting lug bracket, both need to be taken off and replaced. Information Vent coolant circuit at the end of installation. Specific values Not applicable. Tightening specifications Fig. 101: Cylinder head tightening sequence Fig. 102: Cylinder head bolts © 2021 by Kohler Co. All rights reserved. KD62V12 33525088601_7_1 EN_US 2021-07...
- Page 96 O = Engine oil XX = Loctite 243 YY = Loctite 577 **Refer to screws reuse rules. (For more information see: 5.3.2 Screws pre-tightening, reuse and marking, page 264.) © 2021 by Kohler Co. All rights reserved. KD62V12 33525088601_7_1 EN_US 2021-07...
- Page 97 Not applicable. Special tools Special tool Designation Turning device. (For more information see: Use the turning device, page 260.) Tab. 23: Special tool Consumables and equipment – Not applicable. © 2021 by Kohler Co. All rights reserved. KD62V12 33525088601_7_1 EN_US 2021-07...
- Page 98 Turn engine until piston is in BDC (Bottom Dead Center) position. u Check inside of liner by endoscope. u Note findings on data sheet. u Repeat procedure for each cylinder. © 2021 by Kohler Co. All rights reserved. KD62V12 33525088601_7_1 EN_US 2021-07...
- Page 99 3.5.2 Torsional vibration damper removal and installation - SL2-1340 Previous tasks q Remove the protection plate of the torsional vibration damper. (For more information see: 3.2.1 Vibration damper cover removal and installation, page 59.) © 2021 by Kohler Co. All rights reserved. KD62V12 33525088601_7_1 EN_US 2021-07...
- Page 100 In case of shock or damage, always replace the torsional vibration damper. Special tools Special tool Designation Guiding rod M28 – Damper (x2) Locking device Tab. 25: Special tools Consumables and equipment – Rags – Cleaner © 2021 by Kohler Co. All rights reserved. KD62V12 33525088601_7_1 EN_US 2021-07...
- Page 101 Using the turning device, rotate the torsional vibration damper so that the lifting thread is located at the top. (For more information see: 4.1.2 Turning device, page 259.) © 2021 by Kohler Co. All rights reserved. KD62V12 33525088601_7_1 EN_US 2021-07...
- Page 102 Remove bolts 4 and disk 3. Fig. 111: Lifting thread location u Install lifting device on the lifting thread. u Remove screws 2. u Remove torsional vibration damper 1. © 2021 by Kohler Co. All rights reserved. KD62V12 33525088601_7_1 EN_US 2021-07...
- Page 103 Install locking device with screws (M16) to lock crankshaft. Fig. 113: Lifting thread location u Install lifting device on the lifting thread. u Lift torsional vibration damper 1. © 2021 by Kohler Co. All rights reserved. KD62V12 33525088601_7_1 EN_US 2021-07...
- Page 104 Tighten screws 2 to torque. u Position disk 3 and bolts 4. u Tighten bolts 4 to torque. u Remove locking device. Specific values Not applicable. Tightening specifications Fig. 114: Bolts sequence © 2021 by Kohler Co. All rights reserved. KD62V12 33525088601_7_1 EN_US 2021-07...
- Page 105 O = Engine oil XX = Loctite 243 YY = Loctite 577 **Refer to screws reuse rules. (For more information see: 5.3.2 Screws pre-tightening, reuse and marking, page 264.) © 2021 by Kohler Co. All rights reserved. KD62V12 33525088601_7_1 EN_US 2021-07...
- Page 106 3.6.1 Fuel return and venting pipes removal and installation Previous tasks q Close fuel supply. Specific safety instructions Not applicable. Special tools Not applicable. Consumables and equipment – Rags – Cleaner – Bucket for fuel © 2021 by Kohler Co. All rights reserved. KD62V12 33525088601_7_1 EN_US 2021-07...
- Page 107 Service and Repair Manual Repair Fuel system Overview Fig. 116: Fuel return and venting pipes Fig. 117: Fuel pump pipes © 2021 by Kohler Co. All rights reserved. KD62V12 33525088601_7_1 EN_US 2021-07...
- Page 108 Leakage-fuel detection block to leakage- fuel distributor block Sensor A Connection leakage fuel HP pump (A bank) Leakage indication high-pressure system Leakage-fuel distributor block Removal u Remove fuel return and venting pipes. © 2021 by Kohler Co. All rights reserved. KD62V12 33525088601_7_1 EN_US 2021-07...
- Page 109 (For more information see: 5.3 Standard tightening torques, page 264.) 3.6.2 High pressure pipes removal and installation Previous tasks q Release the pressure of the HP fuel system using Kodia tool. © 2021 by Kohler Co. All rights reserved. KD62V12 33525088601_7_1 EN_US 2021-07...
- Page 110 Risk of property damage by reuse of sealing. Leakage by faulty seal. u Replace all sealings. Special tools – Plugs for piping Consumables and equipment – Rags – Cleaner – Bucket for fuel © 2021 by Kohler Co. All rights reserved. KD62V12 33525088601_7_1 EN_US 2021-07...
- Page 111 Fuel pipe Fuel pipe Retaining plate Screw (M10) Clamp Distributor block Fig. 121: Task overview Screw (M10) Clamp Clamp Screw (M10) Clamp Plate Holder Clamp Screw (M8) Clamp Clamp © 2021 by Kohler Co. All rights reserved. KD62V12 33525088601_7_1 EN_US 2021-07...
- Page 112 Fig. 123: Removing high pressure piping u Remove screw 1 with retaining plate 6 and clamp 7. u Remove screw 3. u Remove distributor block 4. u Remove fuel pipes 2, 5. © 2021 by Kohler Co. All rights reserved. KD62V12 33525088601_7_1 EN_US 2021-07...
- Page 113 Remove screws 12. u Remove clamps 13, 14. Fig. 125: Removing high pressure piping u Remove fuel pipes 19, 20, 21, 22, 23 with flange joints 24. © 2021 by Kohler Co. All rights reserved. KD62V12 33525088601_7_1 EN_US 2021-07...
- Page 114 Install fuel pipes 19, 20, 21, 22, 23 with flange joints 24. Fig. 127: Installing clamps u Install clamps 13, 14 with screws 12. u Install clamps 9, 10, 17, 18,plate 16 and holder 11 with screws 8, 15. © 2021 by Kohler Co. All rights reserved. KD62V12 33525088601_7_1 EN_US 2021-07...
- Page 115 (For more information see: Tightening specifications, page 115.) Specific values Not applicable. Tightening specifications Refer to standard tightening torques. (For more information see: 5.3 Standard tightening torques, page 264.) © 2021 by Kohler Co. All rights reserved. KD62V12 33525088601_7_1 EN_US 2021-07...
- Page 116 O = Engine oil XX = Loctite 243 YY = Loctite 577 **Refer to screws reuse rules. (For more information see: 5.3.2 Screws pre-tightening, reuse and marking, page 264.) © 2021 by Kohler Co. All rights reserved. KD62V12 33525088601_7_1 EN_US 2021-07...
- Page 117 Consumables and equipment – Rags – Cleaner Overview Fig. 130: Low pressure circuit piping Removal u Remove fuel supply pipes. Information Close all open connections with original plugs. © 2021 by Kohler Co. All rights reserved. KD62V12 33525088601_7_1 EN_US 2021-07...
- Page 118 Keep the engine away from heat, sparks, open flame, or any other ignition source. NOTICE Risk of property damage by reuse of sealing. Leakage by faulty seal. u Replace all sealings. © 2021 by Kohler Co. All rights reserved. KD62V12 33525088601_7_1 EN_US 2021-07...
- Page 119 – Engine oil – Castrol Optimol Paste White T Overview Fig. 132: Task overview Injector sleeve Screw (M12) Retaining plate Injector clamp Screw (M12) Collet Injector Adaptor High-pressure pipe © 2021 by Kohler Co. All rights reserved. KD62V12 33525088601_7_1 EN_US 2021-07...
- Page 120 Disconnect HT sensor on both ends if installed. u Remove both adaptors from rocker arm housing. Fig. 134: Removing high-pressure pipe u Take off high-pressure pipe 5 from adaptor 9. © 2021 by Kohler Co. All rights reserved. KD62V12 33525088601_7_1 EN_US 2021-07...
- Page 121 Remove retaining plate 2 with screws 3. u Close all open connections with the matching plugs (available as replacement parts). Fig. 136: Removing clamp u Remove clamp 7 by opening screw 6. © 2021 by Kohler Co. All rights reserved. KD62V12 33525088601_7_1 EN_US 2021-07...
- Page 122 Remove injector 4 with extracting tool. Installation Fig. 138: Lubricating injector O-rings u Clean carbon from injector seat surface on injector sleeve. u Lubricate injector 4 O-rings with Castrol Optimol Paste White T. © 2021 by Kohler Co. All rights reserved. KD62V12 33525088601_7_1 EN_US 2021-07...
- Page 123 Fig. 140: Positioning injector and clamp Information Injectors can be mounted in two positions. Note that only one position is correct. Make sure the clamp is centered between valve springs. © 2021 by Kohler Co. All rights reserved. KD62V12 33525088601_7_1 EN_US 2021-07...
- Page 124 Tighten screw 6 to torque. (For more information see: Tightening specifications, page 125.) u Tighten high-pressure pipe 5 to torque. (For more information see: Tightening specifications, page 125.) © 2021 by Kohler Co. All rights reserved. KD62V12 33525088601_7_1 EN_US 2021-07...
- Page 125 Put all parts in place and tighten by hand before following the sequence. Information Refer to screws reuse rules. (For more information see: 5.3.2 Screws pre-tightening, reuse and marking, page 264.) Fig. 144: Injector © 2021 by Kohler Co. All rights reserved. KD62V12 33525088601_7_1 EN_US 2021-07...
- Page 126 1 70 Nm 52 ft-lb Tab. 30: Tightening specifications table *Lubricants: MG = Molykote G-n-plus MW = Castrol Optimol paste white T MH = Molykote HSC O = Engine oil © 2021 by Kohler Co. All rights reserved. KD62V12 33525088601_7_1 EN_US 2021-07...
- Page 127 Consumables and equipment – Rags – Cleaner – Bucket for fuel Overview Fig. 146: Task overview Fuel filter Flange joint Flange joint Flange joint Flange joint Screw (M10) © 2021 by Kohler Co. All rights reserved. KD62V12 33525088601_7_1 EN_US 2021-07...
- Page 128 ± 5° 201AA EN 1665 M10x1.5x30-8.8-FLZN 1 25 Nm 18 ft-lb Tab. 31: Tightening specifications table *Lubricants: MG = Molykote G-n-plus MW = Castrol Optimol paste white T © 2021 by Kohler Co. All rights reserved. KD62V12 33525088601_7_1 EN_US 2021-07...
- Page 129 – Bucket for fuel Overview Fig. 148: Task overview Fuel return block Leakage-fuel detection block Screw (M10) Screw plug (depending on application) Retaining plate Screw (M8) Screw (M8) © 2021 by Kohler Co. All rights reserved. KD62V12 33525088601_7_1 EN_US 2021-07...
- Page 130 Remove fuel pipings connected to HP fuel pump. Specific safety instructions NOTICE Risk of property damage by reuse of sealing. Leakage by faulty seal. u Replace all sealings. © 2021 by Kohler Co. All rights reserved. KD62V12 33525088601_7_1 EN_US 2021-07...
- Page 131 HP Fuel Pump Lifting Device Guiding rod M12 (x2) Tab. 32: Special tools Consumables and equipment – Vaseline – Oil – Castrol Optimol paste white T – Rags – Cleaner © 2021 by Kohler Co. All rights reserved. KD62V12 33525088601_7_1 EN_US 2021-07...
- Page 132 Removal u Remove a first screw 3 and a second one diametrically opposed. u Place guiding rods in place of the two screws. u Remove remaining screws 3. © 2021 by Kohler Co. All rights reserved. KD62V12 33525088601_7_1 EN_US 2021-07...
- Page 133 Information Lubricate HP connection o-ring with Castrol Optimol paste white T. Lubricate shaft teeth and o-rings with engine oil. Fig. 153: Fuel pump O-rings u Place guiding rods. © 2021 by Kohler Co. All rights reserved. KD62V12 33525088601_7_1 EN_US 2021-07...
- Page 134 134.) u Install HP pump piping. u Perform the venting on the fuel circuit. Specific values Not applicable. Tightening specifications Fig. 155: Fuel pump tightening sequence © 2021 by Kohler Co. All rights reserved. KD62V12 33525088601_7_1 EN_US 2021-07...
- Page 135 3.6.8 Gearbox - Fuel pump removal and installation Previous tasks q Remove fuel pumps. (For more information see: 3.6.7 Fuel pump HP and LP removal and installation (SL 250), page 130.) © 2021 by Kohler Co. All rights reserved. KD62V12 33525088601_7_1 EN_US 2021-07...
- Page 136 Connection flange Screw (M10) Screw (M12) O-ring O-ring O-ring O-ring O-ring O-ring Gearbox O-ring Screw (M10) Information Only remove connection flange 1 in case of complete overhaul of engine. © 2021 by Kohler Co. All rights reserved. KD62V12 33525088601_7_1 EN_US 2021-07...
- Page 137 Position gearbox 6 with o-rings 3, 4, 5, 10, 11 and pin 9. u Screw gearbox 6 with screws 7, 8. u Tighten screws 7, 8 to torque. Specific values Not applicable. Tightening specifications Fig. 158: Gearbox screws © 2021 by Kohler Co. All rights reserved. KD62V12 33525088601_7_1 EN_US 2021-07...
- Page 138 O = Engine oil XX = Loctite 243 YY = Loctite 577 **Refer to screws reuse rules. (For more information see: 5.3.2 Screws pre-tightening, reuse and marking, page 264.) © 2021 by Kohler Co. All rights reserved. KD62V12 33525088601_7_1 EN_US 2021-07...
- Page 139 Charge air pipe – end segment (B bank) Screw (M10) O-ring Screw plug Pipe Connection piece Charge air pipe – middle segment (B O-ring bank) Gasket Screw plug Screw (M10) © 2021 by Kohler Co. All rights reserved. KD62V12 33525088601_7_1 EN_US 2021-07...
- Page 140 Previous tasks Not applicable. Specific safety instructions NOTICE Risk of property damage by reuse of sealing. Leakage by faulty seal. u Replace all sealings. Special tools Not applicable. © 2021 by Kohler Co. All rights reserved. KD62V12 33525088601_7_1 EN_US 2021-07...
- Page 141 Screw (M10) Pipe Screw plug Clamp Screw (M10) Locking plate Screw (M10) Screw (M12) Screw (M10) Screw (M10) Distance sleeve See next page for continuation of the image legend © 2021 by Kohler Co. All rights reserved. KD62V12 33525088601_7_1 EN_US 2021-07...
- Page 142 Screw (M10) Clamp Fig. 161: Task overview - Without EATS Compensator Fig. 162: Task overview - With EATS O-ring Screw (M10) Flap with actuator Screw (M10) Flange joint Compensator © 2021 by Kohler Co. All rights reserved. KD62V12 33525088601_7_1 EN_US 2021-07...
- Page 143 Remove compensator 3 with seals 2. u Remove screws 4, 11 with nuts 1. u Remove compensator 12 with seals 2. Fig. 164: Removing charge air lines © 2021 by Kohler Co. All rights reserved. KD62V12 33525088601_7_1 EN_US 2021-07...
- Page 144 Remove screws 11. u Remove compensator 3 with seal 2. Fig. 165: Removing compensator - Without EATS u Remove screws 11. u Remove compensator 23 with seals 2. © 2021 by Kohler Co. All rights reserved. KD62V12 33525088601_7_1 EN_US 2021-07...
- Page 145 Information At first, install the whole line without tightening the screws. Tighten all screws to torque at the end of installation, making sure that compensators are aligned evenly. © 2021 by Kohler Co. All rights reserved. KD62V12 33525088601_7_1 EN_US 2021-07...
- Page 146 Screw clamps 7, 22 with screws 9, 20, locking plates 8, and distance sleeves 21. Fig. 168: Installing clamps u Pretighten both screws 9 simultaneously to ensure Δ = Δ after tightening. © 2021 by Kohler Co. All rights reserved. KD62V12 33525088601_7_1 EN_US 2021-07...
- Page 147 Screw assembly to charge air cooler with screws 11 and seal 2. u Screw assembly to turbocharger with screws 16, distance sleeves 18, seal 2 and nuts 1. u Install screw plug 17. u Tighten screws 16 to torque. © 2021 by Kohler Co. All rights reserved. KD62V12 33525088601_7_1 EN_US 2021-07...
- Page 148 Fig. 171: Installing flap with actuator - With EATS u Install flap with actuator 25 and compensator 29 with screws 27, 28 and o-rings 24 Specific values Not applicable. © 2021 by Kohler Co. All rights reserved. KD62V12 33525088601_7_1 EN_US 2021-07...
- Page 149 (For more information see: 3.10.1 Venting line removal and installation, page 197.) q Drain LT coolant circuit until level is lower than the base of the charge air coolers. © 2021 by Kohler Co. All rights reserved. KD62V12 33525088601_7_1 EN_US 2021-07...
- Page 150 Several adapted lifting devices are available. Follow the instructions manual of the hoisting beam, handling devices and the local safety regula- tions. For further information, please contact your nearest authorized Kohler service representative. Consumables and equipment – Vaseline – Rags ©...
- Page 151 Remove screws 1, 2. u Remove charge air coolers 4. Installation u Insert o-ring 5 in charge air coolers 4. u Insert pipes 6 in aggregate support. © 2021 by Kohler Co. All rights reserved. KD62V12 33525088601_7_1 EN_US 2021-07...
- Page 152 1 60 Nm 44 ft-lb Tab. 36: Tightening specifications table *Lubricants: MG = Molykote G-n-plus MW = Castrol Optimol paste white T MH = Molykote HSC O = Engine oil © 2021 by Kohler Co. All rights reserved. KD62V12 33525088601_7_1 EN_US 2021-07...
- Page 153 Charge air system XX = Loctite 243 YY = Loctite 577 **Refer to screws reuse rules. (For more information see: 5.3.2 Screws pre-tightening, reuse and marking, page 264.) © 2021 by Kohler Co. All rights reserved. KD62V12 33525088601_7_1 EN_US 2021-07...
- Page 154 NOTICE Risk of property damage by reuse of sealing. Leakage by faulty seal. u Replace all sealings. Special tools Not applicable. Consumables and equipment – Rags – Cleaner © 2021 by Kohler Co. All rights reserved. KD62V12 33525088601_7_1 EN_US 2021-07...
- Page 155 Install straight air intake connections 2, 7 with nuts 1. u Install flanges 5, 8 with o-rings 6 and screws 4. u Install plugs 3 in straight air intake connections 2, 7. Specific values Not applicable. © 2021 by Kohler Co. All rights reserved. KD62V12 33525088601_7_1 EN_US 2021-07...
- Page 156 (For more information see: 5.3.2 Screws pre-tightening, reuse and marking, page 264.) 3.8.2 Exhaust pipes to turbocharger removal and installation Previous tasks q Disconnect application set exhaust system. © 2021 by Kohler Co. All rights reserved. KD62V12 33525088601_7_1 EN_US 2021-07...
- Page 157 Replace all sealings. Special tools Not applicable. Overview Fig. 178: Task overview Screw (M12) Nut (M10) Distance sleeve Turbocharger Support Turbocharger Exhaust elbow Screw plug Seal Washer Clamp segment © 2021 by Kohler Co. All rights reserved. KD62V12 33525088601_7_1 EN_US 2021-07...
- Page 158 Position supports 3 with distance sleeves 2. u Tighten nuts 7 to torque. u Tighten screws 1 to torque. Specific values Not applicable. Tightening specifications Fig. 179: Exhaust pipes © 2021 by Kohler Co. All rights reserved. KD62V12 33525088601_7_1 EN_US 2021-07...
- Page 159 After the temperature has cooled down to a level it can be touched, proceed with the tasks on the engine. NOTICE Risk of property damage by reuse of sealing. Leakage by faulty seal. u Replace all sealings. Special tools Not applicable. © 2021 by Kohler Co. All rights reserved. KD62V12 33525088601_7_1 EN_US 2021-07...
- Page 160 Fig. 180: Task overview Exhaust elbow Washer Exhaust gas turbocharger Screw plug Nut (M10) Distance sleeve Seal Retaining plate See next page for continuation of the image legend © 2021 by Kohler Co. All rights reserved. KD62V12 33525088601_7_1 EN_US 2021-07...
- Page 161 Screw (M12) Fig. 181: Task overview Screw (M8) Compensator Cover O-ring O-ring Compensator Compensator Removal Fig. 182: Removing compensators u Remove screws 11. u Remove compensators 14, 15, 17. © 2021 by Kohler Co. All rights reserved. KD62V12 33525088601_7_1 EN_US 2021-07...
- Page 162 Remove cover 12. Fig. 183: Removing elbows u Remove screws 10, and distance sleeves 8. u Remove retaining plates 9. u Remove exhaust elbow 1. Installation Fig. 184: Installing elbows © 2021 by Kohler Co. All rights reserved. KD62V12 33525088601_7_1 EN_US 2021-07...
- Page 163 Install compensators 14, 17 with screws 11, and o-rings 13. u Install compensator 15 with screws 11, and o-rings 13, 16. u Tighten screws 11 to torque. Specific values Not applicable. © 2021 by Kohler Co. All rights reserved. KD62V12 33525088601_7_1 EN_US 2021-07...
- Page 164 O = Engine oil XX = Loctite 243 YY = Loctite 577 **Refer to screws reuse rules. (For more information see: 5.3.2 Screws pre-tightening, reuse and marking, page 264.) © 2021 by Kohler Co. All rights reserved. KD62V12 33525088601_7_1 EN_US 2021-07...
- Page 165 Risk of property damage by reuse of sealing. Leakage by faulty seal. u Replace all sealings. Special tools Not applicable. Consumables and equipment – Hot temperature grease – Rags – Cleaner © 2021 by Kohler Co. All rights reserved. KD62V12 33525088601_7_1 EN_US 2021-07...
-
Page 166: Table Of Contents
Screw plug Distance sleeve Screw (M10) Removal Fig. 188: Removing turbocharger u Remove screws 1 and washers 2. u Open and loosen V-clamp 9. u Lift the turbocharger. © 2021 by Kohler Co. All rights reserved. KD62V12 33525088601_7_1 EN_US 2021-07... - Page 167 Tighten screws 8 with applied distance sleeves 7 to torque. u Insert o-rings 10, 11 in turbocharger bracket. u Position V-clamp 9 on exhaust pipe outlets. u Lift the turbocharger. © 2021 by Kohler Co. All rights reserved. KD62V12 33525088601_7_1 EN_US 2021-07...
- Page 168 Install turbocharger cooling lines. (For more information see: 3.10.2 Turbocharger cooling lines removal and installation, page 203.) Information Vent coolant circuit at the end of installation. Specific values Not applicable. © 2021 by Kohler Co. All rights reserved. KD62V12 33525088601_7_1 EN_US 2021-07...
- Page 169 *Lubricants: MG = Molykote G-n-plus MW = Castrol Optimol paste white T MH = Molykote HSC O = Engine oil XX = Loctite 243 YY = Loctite 577 © 2021 by Kohler Co. All rights reserved. KD62V12 33525088601_7_1 EN_US 2021-07...
- Page 170 Consumables and equipment – Rags – Cleaner Overview Fig. 192: Task overview Flange joint Flange joint Pipe O-ring Clamp Pipe See next page for continuation of the image legend © 2021 by Kohler Co. All rights reserved. KD62V12 33525088601_7_1 EN_US 2021-07...
- Page 171 Service and Repair Manual Repair Exhaust gas system Plate Screw (M10) Screw (M8) Orifice Screw (M8) O-ring Distribution block Fig. 193: Task overview O-ring O-ring Flange Pipe Screw (M8) © 2021 by Kohler Co. All rights reserved. KD62V12 33525088601_7_1 EN_US 2021-07...
- Page 172 Remove screws 11. u Remove pipe 10, orifice 12 and o-ring 13. u Remove screws 6. u Remove distribution block 7 and o-ring 9. u Remove flange joints 1, 8. © 2021 by Kohler Co. All rights reserved. KD62V12 33525088601_7_1 EN_US 2021-07...
- Page 173 Assemble o-rings 17 on pipe 18 and place both flanges 15. u Insert o-rings 14 in both flanges 15. u Position assembly with screws 16 between both turbocharger brackets on oil supply connection. © 2021 by Kohler Co. All rights reserved. KD62V12 33525088601_7_1 EN_US 2021-07...
- Page 174 Install plate 4 and clamps 3 with screws 5. u Tighten screws 5 to torque. Specific values Not applicable. Tightening specifications Refer to standard tightening torques. (For more information see: 5.3 Standard tightening torques, page 264.) © 2021 by Kohler Co. All rights reserved. KD62V12 33525088601_7_1 EN_US 2021-07...
-
Page 175: Screw (M16)
Fig. 198: Task overview Turbocharger bracket Bracket Washer Seal Screw (M16) Oil return pipe Holder O-ring Screw plug Screw (M8) Flange joint Screw plug Screw (M16) Cover Screw (M10) © 2021 by Kohler Co. All rights reserved. KD62V12 33525088601_7_1 EN_US 2021-07... - Page 176 Fig. 199: Task overview Screw (M12) Screw (M12) Screw (M8) Holder Holder Removal Fig. 200: Holders u Remove screws 16, 17. u Remove holders 18. u Remove screws 19. © 2021 by Kohler Co. All rights reserved. KD62V12 33525088601_7_1 EN_US 2021-07...
- Page 177 Exhaust gas system u Remove holder 20. Fig. 201: Removing turbocharger brackets u Remove screws 7. u Lift off turbocharger bracket 1. u Remove screws 8. u Remove brackets 9. © 2021 by Kohler Co. All rights reserved. KD62V12 33525088601_7_1 EN_US 2021-07...
- Page 178 Fig. 202: Removing oil return pipes u Remove screws 13. u Remove oil return pipes 11. u Remove cover 15. Installation u Install brackets 9 with screws 8 on turbocharger bracket 1. © 2021 by Kohler Co. All rights reserved. KD62V12 33525088601_7_1 EN_US 2021-07...
- Page 179 Tighten screws 13 to torque. Fig. 204: Installing turbocharger brackets u Install screw plugs 5, 14 and flange joint 6. u Screw turbocharger brackets 1 with screws 7 © 2021 by Kohler Co. All rights reserved. KD62V12 33525088601_7_1 EN_US 2021-07...
- Page 180 (For more information see: 3.8.3 Turbocharger removal and installation (SL 233), page 165.) q Remove turbocharger bracket. (For more information see: 3.8.5 Turbocharger brackets removal and installation, page 175.) © 2021 by Kohler Co. All rights reserved. KD62V12 33525088601_7_1 EN_US 2021-07...
-
Page 181: Seal
Not applicable. Consumables – Hot temperature grease – Rags Overview Fig. 206: Task overview Compensator V-clamp Seal Removal u Loosen V-clamps 3. u Remove compensators 1 with seals 2. © 2021 by Kohler Co. All rights reserved. KD62V12 33525088601_7_1 EN_US 2021-07... - Page 182 264.) Exhaust pipes removal and installation Previous tasks q Remove exhaust gas turbocharger. (For more information see: 3.8.3 Turbocharger removal and installation (SL 233), page 165.) © 2021 by Kohler Co. All rights reserved. KD62V12 33525088601_7_1 EN_US 2021-07...
- Page 183 – Hot temperature grease – Rags Overview Fig. 208: Task overview Seal Plug Outlet manifold Outlet manifold Screw (M10) Outlet manifold Seal V-clamp Sealing ring Compensator Plug Outlet manifold Sealing ring © 2021 by Kohler Co. All rights reserved. KD62V12 33525088601_7_1 EN_US 2021-07...
- Page 184 Place outlet manifolds 2, 13 with seals 1 and screws 3. u Tighten plugs 6, 8, V-clamps 11 and screws 3 to torque. Specific values Not applicable. © 2021 by Kohler Co. All rights reserved. KD62V12 33525088601_7_1 EN_US 2021-07...
- Page 185 Fig. 209: Exhaust pipe screws tightening sequence Fig. 210: Exhaust pipe screws and plugs Torque Angle (°) Screw specifications ± 5% ± 5° 410AA DRW 10123168 M10x1.5x80-C3J 1 52 Nm 38 ft-lb © 2021 by Kohler Co. All rights reserved. KD62V12 33525088601_7_1 EN_US 2021-07...
- Page 186 O = Engine oil XX = Loctite 243 YY = Loctite 577 **Refer to screws reuse rules. (For more information see: 5.3.2 Screws pre-tightening, reuse and marking, page 264.) © 2021 by Kohler Co. All rights reserved. KD62V12 33525088601_7_1 EN_US 2021-07...
- Page 187 Wait until the engine has cooled down. Special tools Not applicable. Consumables and equipment Not applicable. Overview Fig. 211: Task overview Clamp Screw (M8) Hose Screw (M12) Clamp Hose © 2021 by Kohler Co. All rights reserved. KD62V12 33525088601_7_1 EN_US 2021-07...
- Page 188 Installation Fig. 213: Installing hoses u Install hoses 2, 6 with clamps 1. u Install clamp 3 with screws 4, 5 on hose 6. u Tighten clamps 1. © 2021 by Kohler Co. All rights reserved. KD62V12 33525088601_7_1 EN_US 2021-07...
- Page 189 3.9.2 Oil centrifuge removal and installation (depending on application) Previous tasks q Drain engine oil. Specific safety instructions Not applicable. Special tools Not applicable. Consumables and equipment – Rags – Cleaner © 2021 by Kohler Co. All rights reserved. KD62V12 33525088601_7_1 EN_US 2021-07...
- Page 190 Remove oil centrifuge base 7 from oil centrifuge 1. u Remove screws 16. u Remove flange 17 with pipe 19. Installation u Install o-rings 20 on pipe 19. © 2021 by Kohler Co. All rights reserved. KD62V12 33525088601_7_1 EN_US 2021-07...
- Page 191 *Lubricants: MG = Molykote G-n-plus MW = Castrol Optimol paste white T MH = Molykote HSC O = Engine oil XX = Loctite 243 YY = Loctite 577 © 2021 by Kohler Co. All rights reserved. KD62V12 33525088601_7_1 EN_US 2021-07...
- Page 192 Spin-on oil filter Seal Filter head Removal u Clean sealing area. u Open spin-on oil filter 1 with filter wrench. u Remove filter. u Repeat procedure for all filters. © 2021 by Kohler Co. All rights reserved. KD62V12 33525088601_7_1 EN_US 2021-07...
- Page 193 3.9.4 Prelubricating pump removal and installation (depending on application) Previous tasks q Drain engine oil. Specific safety instructions Not applicable. Special tools Not applicable. Consumables and equipment – Rags © 2021 by Kohler Co. All rights reserved. KD62V12 33525088601_7_1 EN_US 2021-07...
-
Page 194: Distance Sleeve
Remove screws 4, distance sleeves 5 and nuts 6. u Remove holders 7. Installation Information Do not install relay 11 on the engine. u Install holders 7 with screws 4, distance sleeves 5 and nuts 6. © 2021 by Kohler Co. All rights reserved. KD62V12 33525088601_7_1 EN_US 2021-07... - Page 195 ± 5% ± 5° M8 10.9 480H 1 34 Nm 25 ft-lb M10 10.9 FLZN 1 66 Nm 49 ft-lb M12 10.9 FLZN 1 113 Nm 83 ft-lb © 2021 by Kohler Co. All rights reserved. KD62V12 33525088601_7_1 EN_US 2021-07...
- Page 196 O = Engine oil XX = Loctite 243 YY = Loctite 577 **Refer to screws reuse rules. (For more information see: 5.3.2 Screws pre-tightening, reuse and marking, page 264.) © 2021 by Kohler Co. All rights reserved. KD62V12 33525088601_7_1 EN_US 2021-07...
- Page 197 Risk of property damage by reuse of sealing. Leakage by faulty seal. u Replace all sealings. Special tools Not applicable. Consumables and equipment – Rags – Cleaner – Loctite 243 © 2021 by Kohler Co. All rights reserved. KD62V12 33525088601_7_1 EN_US 2021-07...
- Page 198 Venting LT charge air cooler Flange joint Flange joint Venting LT charge air cooler Venting HT thermostat T connector Venting LT turbocharger Screw (M10) Venting HT collecting pipe Distribution block © 2021 by Kohler Co. All rights reserved. KD62V12 33525088601_7_1 EN_US 2021-07...
- Page 199 Repair Cooling system Fig. 220: Task overview Screw (M8) Holder Screw (M6) Holder Clamp Holder Nut (M6) Holder Holder Holder Distance sleeve Fig. 221: Task overview Venting line © 2021 by Kohler Co. All rights reserved. KD62V12 33525088601_7_1 EN_US 2021-07...
- Page 200 Fig. 223: Removing venting lines u Remove clamps 14 with screws 13, and nuts 15. u Remove holders 16, 18, 19, 20, 21, 22 with screws 5, 12, and distance sleeve 17. © 2021 by Kohler Co. All rights reserved. KD62V12 33525088601_7_1 EN_US 2021-07...
- Page 201 Fig. 224: Removing venting lines u Remove venting pipes 1, 3, 7, 9, 10, 11. u Remove screws 5. u Remove distributor block 6. Installation Fig. 225: Installing venting lines © 2021 by Kohler Co. All rights reserved. KD62V12 33525088601_7_1 EN_US 2021-07...
- Page 202 Install clamps 14 and holders 16, 18, 19, 20, 21, 22 with screws 5, 12, 13, distance sleeve 17 and nuts 15. Information Use Loctite 243 only for screw 13 in holder 19. © 2021 by Kohler Co. All rights reserved. KD62V12 33525088601_7_1 EN_US 2021-07...
- Page 203 (For more information see: 3.10.1 Venting line removal and installation, page 197.) Specific safety instructions NOTICE Risk of property damage by reuse of sealing. Leakage by faulty seal. u Replace all sealings. Special tools Not applicable. © 2021 by Kohler Co. All rights reserved. KD62V12 33525088601_7_1 EN_US 2021-07...
- Page 204 Distance sleeve Pipe Screw (M8) Retaining plate Screw (M8) Fitting Retaining plate Fitting Screw (M8) Retaining plate Flange joint Screw (M8) T connector Pipe Pipe Pipe Screw (M10) © 2021 by Kohler Co. All rights reserved. KD62V12 33525088601_7_1 EN_US 2021-07...
- Page 205 Aggregate support connector T connector Screw (M10) Pipe Retaining plate Screw (M10) Plug Pipe Removal Turbocharger coolant supply Fig. 230: Removing pipes u Remove screws 1, 7, 19. © 2021 by Kohler Co. All rights reserved. KD62V12 33525088601_7_1 EN_US 2021-07...
- Page 206 Remove aggregate support connector 39. u Unscrew connection nuts of pipes 33, 36, 37, 43. u Remove pipes 33, 36, 37, 43. u Disconnect fittings, flange joints and connectors. © 2021 by Kohler Co. All rights reserved. KD62V12 33525088601_7_1 EN_US 2021-07...
- Page 207 Install plugs 35 with nuts 34 on T connectors 12, 29 and flange joint 11. u Install retaining plate 41 with screws 42. u Install plates 2 with clamps 3 and screws 1. u Tighten screws 1 to torque. © 2021 by Kohler Co. All rights reserved. KD62V12 33525088601_7_1 EN_US 2021-07...
- Page 208 Install plates 2 and clamps 3 with screws 1, 7. u Tighten screws 1 to torque. u Screw retaining plates 21, 24 with screws 8, 25. Specific values Not applicable. © 2021 by Kohler Co. All rights reserved. KD62V12 33525088601_7_1 EN_US 2021-07...
- Page 209 (For more information see: 3.10.1 Venting line removal and installation, page 197.) Specific safety instructions NOTICE Risk of property damage by reuse of sealing. Leakage by faulty seal. u Replace all sealings. © 2021 by Kohler Co. All rights reserved. KD62V12 33525088601_7_1 EN_US 2021-07...
- Page 210 Aggregate support connector Pipe Screw (M10) Pipe Screw (M8) Distance sleeve Retaining plate Screw (M8) Pipe Screw (M8) Fitting Clamp Retaining plate Screw (M8) Fitting Retaining plate Pipe Adaptor © 2021 by Kohler Co. All rights reserved. KD62V12 33525088601_7_1 EN_US 2021-07...
- Page 211 Pipe Plug Pipe Coupling Retaining plate Flange joint Pipe T connector Screw (M10) Pipe T connector Pipe Removal Fig. 237: Removing pipes u Remove screws 1, 9, 21. © 2021 by Kohler Co. All rights reserved. KD62V12 33525088601_7_1 EN_US 2021-07...
- Page 212 Remove retaining plates 45. u Remove screws 16, 41 u Remove aggregate support connector 40. u Loosen connection nuts of pipes 32, 33, 37, 38, 42, 46. © 2021 by Kohler Co. All rights reserved. KD62V12 33525088601_7_1 EN_US 2021-07...
- Page 213 Install fittings 28. u Install plug 43 and nut 44. u Install retaining plates 45 with screws 47. u Install plates 2 and clamps 3 with screws 1. © 2021 by Kohler Co. All rights reserved. KD62V12 33525088601_7_1 EN_US 2021-07...
- Page 214 Install plate 2 and clamps 3 with screws 21. u Install retaining plate 25 with screws 5. u Install plates 2 and clamps 3 with screws 1. Specific values Not applicable. © 2021 by Kohler Co. All rights reserved. KD62V12 33525088601_7_1 EN_US 2021-07...
- Page 215 3.10.3 Thermostat HT and housing removal and installation (SL 217) Previous tasks q Drain HT coolant circuit. Specific safety instructions NOTICE Risk of property damage by reuse of sealing. Leakage by faulty seal. u Replace all sealings. © 2021 by Kohler Co. All rights reserved. KD62V12 33525088601_7_1 EN_US 2021-07...
-
Page 216: Screw (M10)
Screw (M12) Pipe O-ring Screw plug (depending on application) Removal u Remove two screws 4 diametrically opposed. u Place guiding rods in place of the two screws 4. © 2021 by Kohler Co. All rights reserved. KD62V12 33525088601_7_1 EN_US 2021-07... - Page 217 3.10.4 Thermostat LT and housing removal and installation (SL 217) Previous tasks q Drain LT coolant circuit. q Remove venting line LT charge air cooler. (For more information see: 3.10.1 Venting line removal and installation, page 197.) © 2021 by Kohler Co. All rights reserved. KD62V12 33525088601_7_1 EN_US 2021-07...
- Page 218 Replace all sealings. Special tools Special tool Designation Guiding rod M12x230 – Thermostat (x2) Tab. 48: Special tools Consumables and equipment – Vaseline – Rags – Cleaner © 2021 by Kohler Co. All rights reserved. KD62V12 33525088601_7_1 EN_US 2021-07...
- Page 219 Assemble pipe 8 and flange 7 with o-rings 4, 7. u Insert o-rings 7 on coolant pump inlet. u Position pipe assembly on coolant pump inlet. u Position thermostats 1 in thermostats housing 2. © 2021 by Kohler Co. All rights reserved. KD62V12 33525088601_7_1 EN_US 2021-07...
- Page 220 Risk of property damage by reuse of sealing. Leakage by faulty seal. u Replace all sealings. Special tools Special tool Designation Guiding rod M12x100 - Coolant pump (x2) Tab. 49: Special tools © 2021 by Kohler Co. All rights reserved. KD62V12 33525088601_7_1 EN_US 2021-07...
- Page 221 Remove remaining screws 16. u Remove coolant pump HT 9. u Remove screws 5, 15. u Remove coolant pipe 13 with flange 6. u Remove pipe 14 with flange 6. © 2021 by Kohler Co. All rights reserved. KD62V12 33525088601_7_1 EN_US 2021-07...
- Page 222 & PTO cover removal and installation, page 61.) Specific safety instructions NOTICE Risk of property damage by reuse of sealing. Leakage by faulty seal. u Replace all sealings. © 2021 by Kohler Co. All rights reserved. KD62V12 33525088601_7_1 EN_US 2021-07...
-
Page 223: Screw (M8)
– Rags – Cleaner – Vaseline Overview Fig. 249: Task overview Screw (M12) Flange Branch pipe O-ring O-ring O-ring O-ring O-ring Pipe Coolant pump LT Screw (M10) Screw © 2021 by Kohler Co. All rights reserved. KD62V12 33525088601_7_1 EN_US 2021-07... - Page 224 Assemble branch pipe 2 with pipe 5 and flange 7 with o-rings 3, 4, 8. u Position assembly with screws 1, 6 and tighten according to tightening specifications. Information Vent coolant circuit at the end of installation. Specific values Not applicable. © 2021 by Kohler Co. All rights reserved. KD62V12 33525088601_7_1 EN_US 2021-07...
- Page 225 59.) Specific safety instructions Not applicable. Special tools Special tool Designation Locking device Tab. 51: Special tools Consumables and equipment – Rags – Cleaner © 2021 by Kohler Co. All rights reserved. KD62V12 33525088601_7_1 EN_US 2021-07...
- Page 226 Cooling system Overview Fig. 252: Task overview Screw (M16) Screw (M28) Washer Axle Pulley Removal Fig. 253: Locking device u Install locking device with screws (M16) to lock crankshaft. © 2021 by Kohler Co. All rights reserved. KD62V12 33525088601_7_1 EN_US 2021-07...
- Page 227 Remove pulley 3. u Remove screws 4. u Remove axle 5. u Remove locking device. Installation Fig. 255: Locking device u Install locking device with screws (M16) to lock crankshaft. © 2021 by Kohler Co. All rights reserved. KD62V12 33525088601_7_1 EN_US 2021-07...
- Page 228 Observe screws 4 tightening sequence and tightening torque. u Tighten screws 4 to torque. u Install pulley 3 with screws 1, and washers 2. u Tighten screws 1 to torque. Specific values Not applicable. © 2021 by Kohler Co. All rights reserved. KD62V12 33525088601_7_1 EN_US 2021-07...
- Page 229 Fig. 257: Tightening sequence of pulley axle screws Fig. 258: Screws of fan drive pulley Torque Angle (°) Screw specifications ± 5% ± 5° M16x55 10.9 FLZN 1 275 Nm 203 ft-lb © 2021 by Kohler Co. All rights reserved. KD62V12 33525088601_7_1 EN_US 2021-07...
- Page 230 O = Engine oil XX = Loctite 243 YY = Loctite 577 **Refer to screws reuse rules. (For more information see: 5.3.2 Screws pre-tightening, reuse and marking, page 264.) © 2021 by Kohler Co. All rights reserved. KD62V12 33525088601_7_1 EN_US 2021-07...
- Page 231 Special tools Special tool Designation Pin for belt tensioner (x1) Frequency meter Tab. 53: Special tools Consumables and equipment – Vaseline – Rags – Belt tension frequency meter © 2021 by Kohler Co. All rights reserved. KD62V12 33525088601_7_1 EN_US 2021-07...
-
Page 232: Distance Sleeve
Screw (M10) Screw (M10) Tensioning device Retaining plate Screw (M10) Washer Washer Screw (M12) Screw (M10) Screw (M8) Screw (M12) Roller Distance sleeve (EATS only) O-ring Sleeve O-ring © 2021 by Kohler Co. All rights reserved. KD62V12 33525088601_7_1 EN_US 2021-07... - Page 233 Remove belt 13. u Remove guiding rod. Fig. 262: Removing battery charging alternator u Remove screws 4, 18. u Remove battery charging alternator 1. u Remove distance sleeve 20. © 2021 by Kohler Co. All rights reserved. KD62V12 33525088601_7_1 EN_US 2021-07...
- Page 234 Remove screws 7. u Remove auxiliary PTO 12. u Remove o-rings 10, 11. Fig. 264: Removing tensioning device u Remove screw 14. u Remove tensioning device 15. © 2021 by Kohler Co. All rights reserved. KD62V12 33525088601_7_1 EN_US 2021-07...
- Page 235 Installation Fig. 266: Installing auxiliary PTO u Grease o-rings 10, 11. u Insert o-rings 10, 11 in auxiliary PTO 12. u Install auxiliary PTO 12 with screws 7. © 2021 by Kohler Co. All rights reserved. KD62V12 33525088601_7_1 EN_US 2021-07...
- Page 236 Fig. 268: Installing roller u Install roller 9 on plate 5. u Install plate 5 with screws 7, 8, 16 and washers 6, 17. u Tighten roller 9 to torque. © 2021 by Kohler Co. All rights reserved. KD62V12 33525088601_7_1 EN_US 2021-07...
- Page 237 Install belt 13 on the PTO pulley. u Remove the guiding rod. u Use 1/2” toggle in tensioning device 15 to tension belt 13. u Check belt 13 tension. © 2021 by Kohler Co. All rights reserved. KD62V12 33525088601_7_1 EN_US 2021-07...
- Page 238 **Refer to screws reuse rules. (For more information see: 5.3.2 Screws pre-tightening, reuse and marking, page 264.) 3.11.2 Starter removal and installation (SL 260) Previous tasks Not applicable. © 2021 by Kohler Co. All rights reserved. KD62V12 33525088601_7_1 EN_US 2021-07...
- Page 239 Unplug wiring harness connection 3. u Remove nut from ground connection 1. u Disconnect ground cable 6. u Remove nut from power supply 5. u Disconnect power supply cable. © 2021 by Kohler Co. All rights reserved. KD62V12 33525088601_7_1 EN_US 2021-07...
- Page 240 30 Nm (22 ft-lb) Tab. 55: Tightening specifications table *Lubricants: MG = Molykote G-n-plus MW = Castrol Optimol paste white T MH = Molykote HSC O = Engine oil © 2021 by Kohler Co. All rights reserved. KD62V12 33525088601_7_1 EN_US 2021-07...
- Page 241 – Not applicable. Special tools – Not applicable. Consumables and equipment – Not applicable. Overview Fig. 274: Task overview Starter Screw (M16) Removal u Disconnect starter electrical connections. © 2021 by Kohler Co. All rights reserved. KD62V12 33525088601_7_1 EN_US 2021-07...
- Page 242 *Lubricants: MG = Molykote G-n-plus MW = Castrol Optimol paste white T MH = Molykote HSC O = Engine oil XX = Loctite 243 YY = Loctite 577 © 2021 by Kohler Co. All rights reserved. KD62V12 33525088601_7_1 EN_US 2021-07...
- Page 243 Service and Repair Manual Repair Electrical system **Refer to screws reuse rules. (For more information see: 5.3.2 Screws pre-tightening, reuse and marking, page 264.) ***± 25% Accuracy is accepted. © 2021 by Kohler Co. All rights reserved. KD62V12 33525088601_7_1 EN_US 2021-07...
- Page 244 Risk of property damage by reuse of sealing. Leakage by faulty seal. u Replace all sealings. Special tools Not applicable. Consumables and equipment – High temperature grease – Rags – Cleaner © 2021 by Kohler Co. All rights reserved. KD62V12 33525088601_7_1 EN_US 2021-07...
- Page 245 Disconnect the diesel exhaust fluid return line from the injector. u Disconnect the electrical connector from the injector. Information Make sure that dust cannot go into the system. © 2021 by Kohler Co. All rights reserved. KD62V12 33525088601_7_1 EN_US 2021-07...
- Page 246 Fig. 279: Removing injector assembly u Remove the injector 3, and the retaining plate 10 together as an assembly. Information Make sure the screws remain in place on the reactor. © 2021 by Kohler Co. All rights reserved. KD62V12 33525088601_7_1 EN_US 2021-07...
- Page 247 Clean the sealing surface on the reactor. Information The sealing surface between injector and reactor must be clean to avoid gas leakage. u Apply high temperature grease on the screws. © 2021 by Kohler Co. All rights reserved. KD62V12 33525088601_7_1 EN_US 2021-07...
- Page 248 Make sure that the gasket 7 remains in place during installation. Make sure that the injector inlet port faces 3 downwards and overlaps the slot in the retaining plate 10. © 2021 by Kohler Co. All rights reserved. KD62V12 33525088601_7_1 EN_US 2021-07...
- Page 249 Connect the diesel exhaust fluid inlet line. u Connect the diesel exhaust fluid return line. u Connect the electrical connector. u Run the system for 30 min to confirm leak-free operation. © 2021 by Kohler Co. All rights reserved. KD62V12 33525088601_7_1 EN_US 2021-07...
- Page 250 Pay attention to the center of gravity and the total weight. u Ensure the load against slipping and toppling. Special tools Not applicable. Consumables and equipment Not applicable. © 2021 by Kohler Co. All rights reserved. KD62V12 33525088601_7_1 EN_US 2021-07...
- Page 251 Screw (M10) 10-pin connector Lifting hook 48-pin connector Connection (M26/M22) Removal Fig. 286: Securing pump u Using the lifting hooks 3, secure the pump 1 to a crane. © 2021 by Kohler Co. All rights reserved. KD62V12 33525088601_7_1 EN_US 2021-07...
- Page 252 It is forbidden to handle the connector locking device 8 on the pump side. Only use the lock on the harness side to disconnect the 10-pin connector 6. u Disconnect the connectors 4, 5 of the diesel exhaust fluid lines. © 2021 by Kohler Co. All rights reserved. KD62V12 33525088601_7_1 EN_US 2021-07...
- Page 253 Remove the pump 1. Installation Fig. 290: Installing pump u Install the pump 1 with screws 2. u Tighten the screws 2 to 33 ±3 ±2 Nm (24 ft-lb). © 2021 by Kohler Co. All rights reserved. KD62V12 33525088601_7_1 EN_US 2021-07...
- Page 254 Tighten the fastening screws of the 48-pin connector 7 to 4 ±0.5 ±0 Nm (3 ft-lb). Fig. 292: Connector locking device - handling forbidden u Connect the 10-pin connector 6 to the pump 1. © 2021 by Kohler Co. All rights reserved. KD62V12 33525088601_7_1 EN_US 2021-07...
- Page 255 Run the system for 30 min to confirm successful priming and leak-free operation. Specific values Not applicable. Tightening specifications Refer to standard tightening torques. (For more information see: 5.3 Standard tightening torques, page 264.) © 2021 by Kohler Co. All rights reserved. KD62V12 33525088601_7_1 EN_US 2021-07...
- Page 256 230611637 Locking device 11343230 230612868 Guiding rod M30x2 - Cylinder head 11133371 230610035 Guiding rod M28x2 - Damper 11133372 230610036 Guiding rod M24x2 - Intermediate gear 11133373 230610037 © 2021 by Kohler Co. All rights reserved. KD62V12 33525088601_7_1 EN_US 2021-07...
- Page 257 Guiding rod M12 - Oil cooler 11133377 230610040 Guiding rod M10 - Exhaust line 11133379 230610041 Guiding rod M12 coolant pump 12427300 230610042 Guiding rod M12 Thermostat 12465862 230611638 © 2021 by Kohler Co. All rights reserved. KD62V12 33525088601_7_1 EN_US 2021-07...
- Page 258 230612680 Torque Reaction Arm for Manual Torque 12227989 230612681 Multiplier Spare Battery pack 12226992 230612682 Battery Charger 110V 12226970 230612683 Battery Charger 230V 12226972 230612684 Adapter 11343096 230612685 © 2021 by Kohler Co. All rights reserved. KD62V12 33525088601_7_1 EN_US 2021-07...
- Page 259 Using the turning device can lead to injuries to personnel working on the engine! u Before using the turning device, prevent the personnel in the vicinity of the engine and get confirmed they stand in a secure area. © 2021 by Kohler Co. All rights reserved. KD62V12 33525088601_7_1 EN_US 2021-07...
- Page 260 Position turning device 2. u Mount and tighten screws 1 according to standard torques values. Information For queries, please contact your nearest authorized Kohler service representative. Use the turning device q The turning device is mounted on the engine.
- Page 261 Remove turning device 2. u Position cover 3. u Mount and tighten screws 4 according to standard torques values. Information For queries, please contact your nearest authorized Kohler service representative. © 2021 by Kohler Co. All rights reserved. KD62V12 33525088601_7_1 EN_US 2021-07...
- Page 262 Information The technical design documents are specific to the delivered engine. Using those documents for other engines is forbidden. For inquiry, please contact your nearest authorized Kohler service representative. © 2021 by Kohler Co. All rights reserved. KD62V12 33525088601_7_1 EN_US...
- Page 263 1000 / 33.8 Molykote Staburags NBU 30 1200 / 40.6 Kübler Copper Paste; Motorex 14 850 / 28.7 Motorex Optimol White T 100 / 3.4 Castrol Tab. 60: Greases © 2021 by Kohler Co. All rights reserved. KD62V12 33525088601_7_1 EN_US 2021-07...
- Page 264 Unless otherwise noted, use the standard torque values into the column of screws quality class "8.8" to tighten screws and bolts. The screws quality classes "10.9" and "12.9" are always indicated with the "Nm" symbol. © 2021 by Kohler Co. All rights reserved. KD62V12 33525088601_7_1 EN_US 2021-07...
- Page 265 For every maintenance task, when a sequence is specified, achieve step 1 for all the sequence before starting step 2. Fig. 317: Standard sequence for 4, 5 and six screws. © 2021 by Kohler Co. All rights reserved. KD62V12 33525088601_7_1 EN_US 2021-07...
- Page 266 Except components listed below, and otherwise noted, u Marking on screws or nuts to track their reuse is not required. Fig. 318: Examples of markings on screws and HP pipe nut. © 2021 by Kohler Co. All rights reserved. KD62V12 33525088601_7_1 EN_US 2021-07...
- Page 267 100 Nm 110 Nm 52 ft-lb 55 ft-lb 74 ft-lb 81 ft-lb 165 Nm 183 Nm 240 Nm 270 Nm 122 ft-lb 135 ft-lb 177 ft-lb 199 ft-lb © 2021 by Kohler Co. All rights reserved. KD62V12 33525088601_7_1 EN_US 2021-07...
- Page 268 – Hexagon head screw plugs with collar - Cylindrical thread according to DIN 910 – Internal drive screw plugs with collar - Cylindrical thread according to DIN 908 © 2021 by Kohler Co. All rights reserved. KD62V12 33525088601_7_1 EN_US 2021-07...
- Page 269 240 Nm M 65 x 2 620 Nm 52 ft-lb 177 ft-lb 457 ft-lb Tab. 65: Tightening torques for screws according to DIN 7643, DIN 910, DIN 908 © 2021 by Kohler Co. All rights reserved. KD62V12 33525088601_7_1 EN_US 2021-07...
- Page 270 540 Nm 260 Nm 214 ft-lb 465 ft-lb 398 ft-lb 192 ft-lb Tab. 66: Standard torques for metric thread unions L series, for steel – see figure above © 2021 by Kohler Co. All rights reserved. KD62V12 33525088601_7_1 EN_US 2021-07...
- Page 271 According to ISO1179-1 / DIN 3852-T2-Form X / DIN 3852-T3-Form X BSP threading. Information Tolerances of the indicated tightening torques: 10 %. Always lubricate the thread before tightening these parts (engine oil). © 2021 by Kohler Co. All rights reserved. KD62V12 33525088601_7_1 EN_US 2021-07...
- Page 272 G 1/2A 65 Nm 150 Nm 115 Nm 48 ft-lb 111 ft-lb 85 ft-lb G 1/2A 65 Nm 130 Nm 115 Nm 48 ft-lb 96 ft-lb 85 ft-lb © 2021 by Kohler Co. All rights reserved. KD62V12 33525088601_7_1 EN_US 2021-07...
- Page 273 432 Nm 208 Nm 171 ft-lb 372 ft-lb 319 ft-lb 153 ft-lb Tab. 70: Standard torques for metric thread unions L series, for aluminium – see figure above © 2021 by Kohler Co. All rights reserved. KD62V12 33525088601_7_1 EN_US 2021-07...
- Page 274 According to ISO1179-1 / DIN 3852-T2-Form X / DIN 3852-T3-Form X BSP threading. Information Tolerances of the indicated tightening torques: 10 %. Always lubricate the thread before tightening these parts (engine oil). © 2021 by Kohler Co. All rights reserved. KD62V12 33525088601_7_1 EN_US 2021-07...
- Page 275 G 1/2A 52 Nm 120 Nm 92 Nm 38 ft-lb 89 ft-lb 68 ft-lb G 1/2A 52 Nm 104 Nm 92 Nm 38 ft-lb 77 ft-lb 68 ft-lb © 2021 by Kohler Co. All rights reserved. KD62V12 33525088601_7_1 EN_US 2021-07...
- Page 276 Fig. 334: Cutting ring lubrication Information Tolerances of the indicated tightening torques: 10 %. Always lubricate the thread before tightening these parts (engine oil). Fig. 335: Cutting ring tightening © 2021 by Kohler Co. All rights reserved. KD62V12 33525088601_7_1 EN_US 2021-07...
- Page 277 5/16 1/2-20 20 Nm 40 Nm 15 ft-lb 30 ft-lb 9/16-18 30 Nm 60 Nm 22 ft-lb 44 ft-lb 3/4-16 60 Nm 115 Nm 44 ft-lb 85 ft-lb © 2021 by Kohler Co. All rights reserved. KD62V12 33525088601_7_1 EN_US 2021-07...
- Page 278 Tolerances of the indicated tightening torques: 10 %. Always lubricate the thread before tightening these parts (engine oil). Fig. 337: VSTI screw plugs with ED seal (left), with o-ring (right) © 2021 by Kohler Co. All rights reserved. KD62V12 33525088601_7_1 EN_US 2021-07...
- Page 279 Tab. 76: VSTI screw plug tightening torques for steel and iron cast parts Do not use hydropneumatic screwdriver. 5.3.10 Standard torques for VSTI screw plugs for aluminium According to DIN EN ISO 6149-2 / ISO 11926-2, metric threading. © 2021 by Kohler Co. All rights reserved. KD62V12 33525088601_7_1 EN_US 2021-07...
- Page 280 127 ft-lb M33x2 180 Nm 250 Nm 133 ft-lb 184 ft-lb M42x2 290 Nm 265 Nm 214 ft-lb 195 ft-lb M48x2 290 Nm 335 Nm 214 ft-lb 247 ft-lb © 2021 by Kohler Co. All rights reserved. KD62V12 33525088601_7_1 EN_US 2021-07...
- Page 281 Tighten the nut a further 90°. Alternatively, refer to the following table for tightening sequence of the nut: Size Equivalent specification Size Equivalent specification 20 Nm 25 Nm 15 ft-lb 18 ft-lb © 2021 by Kohler Co. All rights reserved. KD62V12 33525088601_7_1 EN_US 2021-07...
- Page 282 5 ft-lb 25 mm 12 Nm 0.98 in 9 ft-lb 30 mm 30 Nm 1.18 in 22 ft-lb Tab. 79: Tightening torques for collar clamps according to DIN 3017-3 © 2021 by Kohler Co. All rights reserved. KD62V12 33525088601_7_1 EN_US 2021-07...
- Page 283 Personal Protective Equipment Power Take-Off Repair and Service Manual SAPS Sulphated Ash, Phosphorus and Sulfur Safe Work Procedure Top Dead Center Volume Control Valve Tab. 80: Abbreviations table © 2021 by Kohler Co. All rights reserved. KD62V12 33525088601_7_1 EN_US 2021-07...
- Page 284 American National Standards Institute German standard European standard European Union International Labor Organisation ISCED International Standard Classification of Education Society of Automotive Engineers World Health Organization Tab. 81: Acronyms table © 2021 by Kohler Co. All rights reserved. KD62V12 33525088601_7_1 EN_US 2021-07...
- Page 285 Tab. 84: Pressure conversion factors table 5.5.4 Volume conversion factors Convert from Multiply by 61023.744 35.315 Imperial gallon 219.969 US gallon 264.172 l (liter) 1000 Tab. 85: Volume conversion factors table © 2021 by Kohler Co. All rights reserved. KD62V12 33525088601_7_1 EN_US 2021-07...
- Page 286 °C K = C + 273.15 Tab. 90: Temperature conversion factors table 5.5.10 Density conversion factors Convert from Multiply by Kg/m lb/US gallon 0.00834 Kg/m lb/imperial gallon 0.01002 © 2021 by Kohler Co. All rights reserved. KD62V12 33525088601_7_1 EN_US 2021-07...
- Page 287 Service and Repair Manual Appendix Unit conversion tables Convert from Multiply by Kg/m lb/ft 0.0624 Tab. 91: Density conversion factors table © 2021 by Kohler Co. All rights reserved. KD62V12 33525088601_7_1 EN_US 2021-07...
- Page 288 Appendix Service and Repair Manual Prefix 5.6 Prefix Name Symbol Factor tera giga mega kilo milli μ micro nano Tab. 92: Common prefix multipliers table © 2021 by Kohler Co. All rights reserved. KD62V12 33525088601_7_1 EN_US 2021-07...
- Page 289 Service and Repair Manual Appendix Prefix © 2021 by Kohler Co. All rights reserved. KD62V12 33525088601_7_1 EN_US 2021-07...
- Page 290 33525088601_7_1 EN_US 2021-07 LHID12566187 © 2021 by Kohler Co. All rights reserved.
Need help?
Do you have a question about the KD62V12 and is the answer not in the manual?
Questions and answers