Table of Contents
Advertisement
Quick Links
FREE STANDING RANGE
GAS AND ELECTRIC
APPLIANCES
EUROCHEF USA inc.
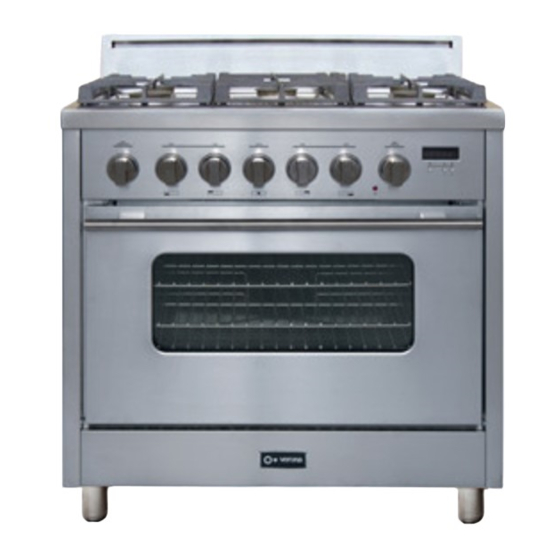
VERONA PRO
MOD.: VEFSGGL65S - VEFSGEL65S
INSTRUCTION GUIDE, INSTALLATION
AND MAINTENANCE
IMPORTANT: SAVE THESE INSTRUCTIONS.
IMPORTANT SAFETY INSTRUCTIONS
Read and follow all instructions before using this appliance to prevent
the potential risk of fire, electrical shock, personal injury or damage to the
appliance as a result of improper usage of the appliance. Use appliance only
for its intended purpose as described in this manual. The Installer must leave
these instructions with the appliance and to the consumer to retain them for
future reference.
WARNING: If the information in this manual is not followed exactly, a
fire or explosion may result causing property damage, personal injury
or death.
Do not store or use gasoline or other flammable vapours and liquids in
the vicinity of this appliance.
WHAT TO DO IF YOU SMELL GAS:
- Do not to light any appliance.
- Do not touch any electrical switch.
- Do not use any phone in your building.
- Immediately call your gas supplier from a neighbour's phone. Follow
the gas supplier's instructions.
- If you cannot reach your gas supplier, call the fire department.
Installation and service must be performed by a qualified installer,
service agency or the gas supplier.
1 CUCINA 36P VERONA 07-2011 BOOKLET for HenryRev. o4
Advertisement
Table of Contents

Subscribe to Our Youtube Channel
Related Manuals for Verona PRO VEFSGGL65S


Summary of Contents for Verona PRO VEFSGGL65S
- Page 1 - If you cannot reach your gas supplier, call the fire department. Installation and service must be performed by a qualified installer, service agency or the gas supplier. 1 CUCINA 36P VERONA 07-2011 BOOKLET for HenryRev. o4...
-
Page 2: Important Safeguards
They should never be allowed to sit or stand on any part of the appliance. Wear proper apparel. Loose fitting or hanging garments should never be worn while using the appliance. 2 CUCINA 36P VERONA 07-2011 BOOKLET for HenryRev. o4... - Page 3 To reduce the risk of burns, ignition of flammable materials, and spillage due to unintentional contact with the utensil, the handle of a utensil should be positioned so that it is turned inward, and does not extend over adjacent surface units. 3 CUCINA 36P VERONA 07-2011 BOOKLET for HenryRev. o4...
- Page 4 26. (Only the desired burner igniter will spark when the control knob is turned to the LIGHT-HIGH position). After the burner lights, turn the knob to the desired flame size, fig. 01, page 26. 4 CUCINA 36P VERONA 07-2011 BOOKLET for HenryRev. o4...
-
Page 5: Electronic Timer
Only for model VEFSGGL65S. After first electrical power on and in case of any electrical power failure and power has been restored, the electronic timer will start flashing, fig. Control Panel VEFSGGL65S. 5 CUCINA 36P VERONA 07-2011 BOOKLET for HenryRev. o4... - Page 6 If no function is activated, the signal frequency can be selected by pressing the “-“ button. Three different frequencies are selectable. Should be instructions for the 6 button clock for the VEFSGEL65 on next page 6 CUCINA 36P VERONA 07-2011 BOOKLET for HenryRev. o4...
- Page 7 , Cooking end time , Time of day, Minute minder , Manual selection , Automatic program Displays: 4-digit 7-segment display for time of day and switching times. “Dialogue” display to identify condition of timer. 7 CUCINA 36P VERONA 07-2011 BOOKLET for HenryRev. o4...
- Page 8 After the automatic programme has ended, the symbol “A” blinks. The audible signal is heard and the cookpot symbol and the relay are switched off. 8 CUCINA 36P VERONA 07-2011 BOOKLET for HenryRev. o4...
- Page 9 The lower and circular elements are concealed under the floor and behind back wall of the oven respectively. The elements will turn on and off to maintain the oven temperature. ROAST: 9 CUCINA 36P VERONA 07-2011 BOOKLET for HenryRev. o4...
- Page 10 RACK PLACEMENT FOR SPECIFIC FOODS: Always place oven racks in desired location while oven is cool. If rack must be moved while oven is hot, do not let potholder contact hot heating element in oven. 10 CUCINA 36P VERONA 07-2011 BOOKLET for HenryRev. o4...
- Page 11 6 to 8 in Ø Power Larg. (17000 BTU), on VEFSGE/GGL65S from 8 to 12 in Ø U-Power (18500 BTU), on VEFSGE/GGL65S from 8 to 12 in Ø Burner operational Notes, fig. 08A, page 27: 11 CUCINA 36P VERONA 07-2011 BOOKLET for HenryRev. o4...
- Page 12 This is easily done using a damp cloth and a non-abrasive detergent, wipe using a soft dry cloth. For stainless steel parts with stubborn soils, use only plastic scrubbing pad or a sponge with vinegar and warm water. 12 CUCINA 36P VERONA 07-2011 BOOKLET for HenryRev. o4...
- Page 13 When the front of the door is high enough and hinges are locked, you will be able to lift the hinges to clear the slots 4) Pull the hinges out of the slots in the oven front frame. 13 CUCINA 36P VERONA 07-2011 BOOKLET for HenryRev. o4...
-
Page 14: Replacing The Oven Light
3) Remove, unscrewing, lens bulb cover and light bulb. 4) Replace bulb with a 25 W – 120 Vac appliance bulb only. 5) Replace lens bulb cover. 6) Reconnect power to range. Reset electronic clock. 14 CUCINA 36P VERONA 07-2011 BOOKLET for HenryRev. o4... -
Page 15: Installation Instructions
If cabinet storage is to be provided, the risk can be reduced by installing a range hood that projects horizontally a minimum of 5 inches beyond the bottom of the cabinets. 15 CUCINA 36P VERONA 07-2011 BOOKLET for HenryRev. o4... - Page 16 “EDGE” toward centre of opening and against the back wall with a first hole height of 1 ¾” plus “A” (distance between side wall bottom edge and floor after range levelling) as shown in figure 14, page 29. 16 CUCINA 36P VERONA 07-2011 BOOKLET for HenryRev. o4...
- Page 17 D. Proceed with the reminder of the installation instructions as well as proper range four legs installation, see please fig. 14A, page 29. 17 CUCINA 36P VERONA 07-2011 BOOKLET for HenryRev. o4...
-
Page 18: Connecting The Range
Canada and 120/208V ~ 60 Hz for US, use flexible cord type according with National Codes. CAUTION: Be sure the electrical power is off from the breaker box to the junction box until the range is installed and ready to operate. 18 CUCINA 36P VERONA 07-2011 BOOKLET for HenryRev. o4... - Page 19 WARNING: This appliance requires a ground connection for your protection against shock hazard and should be connected directly into a properly grounded receptacle. 19 CUCINA 36P VERONA 07-2011 BOOKLET for HenryRev. o4...
-
Page 20: Gas Supply
A TRAINED SERVICEMAN OR GAS APPLIANCE INSTALLER MUST MAKE THE GAS SUPPLY CONNECTION. Leak testing of the appliance shall be conducted by the installer according to the instructions given in section (h). 20 CUCINA 36P VERONA 07-2011 BOOKLET for HenryRev. o4... - Page 21 If a leak appears, turn off supply line gas shut-off valve, tighten connections, turn on the supply line gas shut off valve, and retest for leaks. 21 CUCINA 36P VERONA 07-2011 BOOKLET for HenryRev. o4...
-
Page 22: Gas Conversion
To switch injectors, it is enough to unscrew fixed injector using a proper 7 Hex. key tool and replace it with new injector for new gas setting. For proper injector size, follow Rangetop and Oven Technical Data chart and fig. 09. 22 CUCINA 36P VERONA 07-2011 BOOKLET for HenryRev. o4... -
Page 23: Service/Parts Information
(figure 18). For Gas Oven adjustment remove knob and insert a small flat tip screwdriver on left side slot (figure 19), page 31. 23 CUCINA 36P VERONA 07-2011 BOOKLET for HenryRev. o4... - Page 24 WIDTH 29 in 29 in DEPTH 16 in 16 in OVERALL SIZE 3.35 cu. ft. 3.76 cu. ft. BROILING AREA OVEN ACCESSORIES One Dripping Tray Two Cooking Racks, four rack positions 24 CUCINA 36P VERONA 07-2011 BOOKLET for HenryRev. o4...
-
Page 25: Dimensions Of The Appliances
In our continuing effort to improve the quality and performance of our cooking products, it may be necessary to make changes to the appliance without revising this guide. The manufacturer does not take any responsibility on booklet printing mistakes. 25 CUCINA 36P VERONA 07-2011 BOOKLET for HenryRev. o4... - Page 26 FIGURES Fig. n° 01 Fig. n° 02 Fig. n° 03 Fig. n° 04 Fig. n° 05 Fig. n° 06 Fig. n° 07 26 CUCINA 36P VERONA 07-2011 BOOKLET for HenryRev. o4...
- Page 27 Fig. n° 08 Fig. n° 08A Fig. n° 08B BURNER CUP BURNER CROWN ORIFICE ELECTRODE BURNER BASE Fig. n° 09A Fig. n° 10 27 CUCINA 36P VERONA 07-2011 BOOKLET for HenryRev. o4...
- Page 28 Fig. n° 11 Fig. n° 12 28 CUCINA 36P VERONA 07-2011 BOOKLET for HenryRev. o4...
- Page 29 Fig. n° 13 One bracket either location Fig. n° 14 29 CUCINA 36P VERONA 07-2011 BOOKLET for HenryRev. o4...
- Page 30 Fig. 14A Fig. n° 15A Fig. n° 15B 30 CUCINA 36P VERONA 07-2011 BOOKLET for HenryRev. o4...
- Page 31 Fig. n° 16 Fig. n° 18 B Fig. n° 18 A Fig. n° 17A Fig. n° 17B Fig. n° 19 31 CUCINA 36P VERONA 07-2011 BOOKLET for HenryRev. o4...
-
Page 32: Control Panel Features
Control Panel on range model: VEFSGEL65S Cooling Fan Oven Temp Front Left Rear Left Center Rear Right Front Right Oven Function Fan Failure when lit. Control Panel on range model: VEFSGGL65S 32 CUCINA 36P VERONA 07-2011 BOOKLET for HenryRev. o4... - Page 33 STEP 3: fix and secure backguard to cooktop with the three supplied auto-thread screws. And last, make sure backguard is in place and secured by moving back and forth the backguard itself. 33 CUCINA 36P VERONA 07-2011 BOOKLET for HenryRev. o4...
- Page 34 WIRING DIAGRAM FOR 36 INCH RANGE WITH GAS OVEN Should this be OE or PE? WIRING DIAGRAM FOR 36 INCH RANGE WITH ELECTRIC OVEN 34 CUCINA 36P VERONA 07-2011 BOOKLET for HenryRev. o4...
Need help?
Do you have a question about the PRO VEFSGGL65S and is the answer not in the manual?
Questions and answers