Table of Contents
Advertisement
Quick Links
Advertisement
Table of Contents

Related Manuals for HIKVISION DS-K1F600-D6E-F-S


Summary of Contents for HIKVISION DS-K1F600-D6E-F-S
- Page 1 DS-K1F600-D6E Series Enrollment Station User Manual UD16571B-A...
- Page 2 MERCHANTABILITY, SATISFACTORY QUALITY, OR FITNESS FOR A PARTICULAR PURPOSE. THE USE OF THE PRODUCT BY YOU IS AT YOUR OWN RISK. IN NO EVENT WILL HIKVISION BE LIABLE TO YOU FOR ANY SPECIAL, CONSEQUENTIAL, INCIDENTAL, OR INDIRECT DAMAGES, INCLUDING, AMONG OTHERS, DAMAGES FOR LOSS OF...
- Page 3 THE APPLICABLE LAW, THE LATER PREVAILS. Data Protection During the use of device, personal data will be collected, stored and processed. To protect data, the development of Hikvision devices incorporates privacy by design principles. For example, for device with facial recognition features, biometrics data is stored in your device with encryption method;...
- Page 4 Available Model Product Name Model Description Supports enroll face DS-K1F600-D6E and card No. Enrollment Station Supports enroll face, DS-K1F600-D6E-F fingerprint, and card Use only power supplies listed in the user instructions: Model Manufacturer Standard ADS-26FSG-12 SHENZHEN HONOR 12018EPB ELECTRONIC CO LTD ADS-26FSG-12 SHENZHEN HONOR 12018EPI-01...
- Page 5 Regulatory Information FCC Information Please take attention that changes or modification not expressly approved by the party responsible for compliance could void the user’s authority to operate the equipment. FCC compliance: This equipment has been tested and found to comply with the limits for a Class B digital device, pursuant to part 15 of the FCC Rules.
- Page 6 designated collection points. For more information see: www.recyclethis.info 2006/66/EC (battery directive): This product contains a battery that cannot be disposed of as unsorted municipal waste in the European Union. See the product documentation for specific battery information. The battery is marked with this symbol, which may include lettering to indicate cadmium (Cd), lead (Pb), or mercury (Hg).
- Page 7 Safety Instruction These instructions are intended to ensure that user can use the product correctly to avoid danger or property loss. The precaution measure is divided into Dangers and Cautions: Dangers: Neglecting any of the warnings may cause serious injury or death.
- Page 8 equipment installation on vibrations surface or places subject to shock (ignorance can cause equipment damage). • Do not place the device in extremely hot (refer to the specification of the device for the detailed operating temperature), cold, dusty or damp locations, and do not expose it to high electromagnetic radiation.
-
Page 9: Table Of Contents
Contents 1 Overview ..............1 2 Appearance .............. 1 3 Activation ..............2 3.1 Activate via Device ..........2 3.2 Activate via SADP ..........3 4 Enroll Administrator's Face ........4 5 Enroll via Device ............4 5.1 Enroll Face via Device ..........4 5.2 Enroll Fingerprint via Device ......... - Page 10 7.6.1 Import User ..........20 7.6.2 Export Enrolled Data ........21 7.6.3 Clear Enrolled Data ........21 7.7 System Maintenance .......... 22 A. Tips When Collecting/Comparing Face Picture ..24 B. Tips for Scanning Fingerprint ......... 25 C. Communication Matrix and Device Command ..26...
-
Page 11: Overview
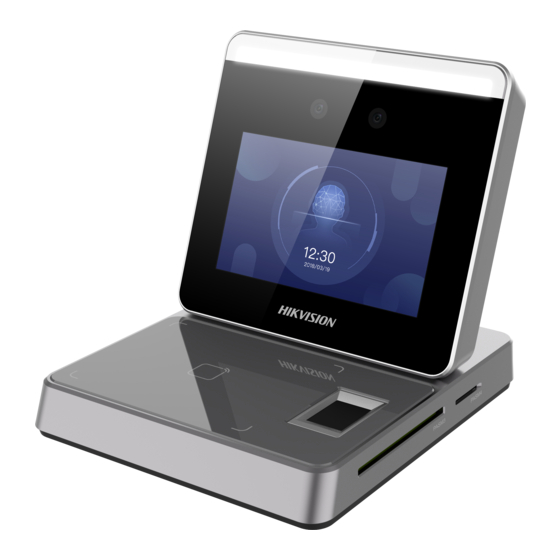
1 Overview Introduction Figure 1-1 Product Appearance The enrollment station can realize multiple user information's enrollment on one device. It supports enrolling face picture, fingerprint (parts of the device model support), 13.56 MHz IC card No., and 125KHz ID card No. Features •... -
Page 12: Activation
Table 2-1 Appearance Description Description PSAM3 Card Slot (Reserved) PSAM4 Card Slot (Reserved) Screen Camera Supplement Light Camera USB Interface Network Interface Power Interface PSAM Card Slot (Reserved) PSAM Card Slot (Reserved) Debugging Port Fingerprint Module Card Presenting Area Indicator 3 Activation You should activate the device before the first login. -
Page 13: Activate Via Sadp
Before You Start • Get the SADP software from the supplied disk or the official website http://www.hikvision.com/en/ , and install the SADP according to the prompts. • The device and the PC that runs the SADP tool should be within the same subnet. -
Page 14: Enroll Administrator's Face
Status of the device becomes Active after successful activation. 5. Modify IP address of the device. 1) Select the device. 2) Change the device IP address to the same subnet as your computer by either modifying the IP address manually or checking Enable DHCP. -
Page 15: Enroll Fingerprint Via Device
Before You Start • Power on and activate the device. For details about the activation, see Activation. • Enable Face Required in Set Enrollment Rule after logging in the device backend. Steps 1. Tap on the initial page. 2. Optional: If you have added an administrator's face in Add Administrator and enabled Verify by Administrator in Set Enrollment Rule, you should verify the administrator's permission. -
Page 16: Enroll Card Via Device
Steps 1. Tap on the initial page. 2. Optional: If you have added an administrator's face in Add Administrator and enabled Verify by Administrator in Set Enrollment Rule, you should verify the administrator's permission. Figure 5-2 Authenticate Administrator Page - Make sure the face is in the face recognition frame when authentication. -
Page 17: Enroll Via Client Software
Figure 5-3 Authenticate Administrator Page - Make sure the face is in the face recognition frame when authentication. Note For details about face recognition, see Tips When Collecting/Comparing Face Picture. - Tap on the right side and enter the administrator's name and password. - Page 18 Figure 6-2 Add Organization 3) Create an organization name. Note Up to 10 levels of organizations can be added. The added organizations will be displayed in the list on the left of the page. 5. Add person. 1) Select an organization from the list on the left. 2) Click Add on right panel.
-
Page 19: Enroll Fingerprint Via Client Software
6) Click OK. 7) Face the enrollment station's camera and capture a picture according to the instructions on the enrollment station. 8) Click to capture again. 9) Click OK. 7. Confirm to add the person. - Click Add to add the person and close the Add Person window. - Page 20 Note Up to 10 levels of organizations can be added. The added organizations will be displayed in the list on the left of the page. 5. Add person. 1) Select an organization from the list on the left. 2) Click Add on right panel. 3) Set the person's basic information, including the person's name, gender, email, tel, effective period, and remark.
-
Page 21: Enroll Card Via Client Software
10. Confirm to add the person. - Click Add to add the person and close the Add Person window. - Click Add and New to add the person and continue to add other persons. 6.3 Enroll Card via Client Software Before You Start •... - Page 22 Figure 6-10 Add Person Note Once the person information is expired, the credentials and access control settings of the person will be invalid and the person will have no authorization to access the doors. 6. On the Add window, click Credential → Card . 7.
-
Page 23: Get Person Information From Enrollment Station
- Click Add and New to add the person and continue to add other persons. 6.4 Get Person Information from Enrollment Station You can get the person information from the device for further operations. Steps Note • If the person name stored in the device is empty, the person name will be filled with the issued card No. -
Page 24: Basic Operation
The edited basic information will be imported to the client software. What to do next After the basic information is imported to the client software, you should enroll other information such as the face, fingerprint, etc. For details, see Enroll via Client Software. 7 Basic Operation 7.1 Login by Administrator Login the device backend to set the device basic parameters. -
Page 25: Communication Settings
Figure 7-3 Administrator Page 3. Set the administrator's parameters. - Edit the super administrator's parameters: Tap admin and edit the super administrator's face and password. - Add a new administrator: Tap and set the administrator's type, add face and password. Figure 7-4 Administrator Information Page Super Administrator Contains all management and operation permissions. -
Page 26: Manage Enrollment
Figure 7-5 Set Wired Network Set the device IP address, subnet mask, and gateway. Set Wireless Network Parameters The device can connect to the Ethernet via wireless connection. Long tap on the initial page for 3 s and login the home page. Tap Comm. -
Page 27: Basic Settings
Note Only parts of the device models support fingerprint recognition function. Refer to the actual page for details. Search Enter a person's employee ID and tap the search icon, or present a card on the card presenting area. The system will enter the User Information page. -
Page 28: Other Settings
Figure 7-10 Enrollment Rules Page The configurable rules and descriptions are as follows: Verify by Administrator If enabling the function, you should verify the administrator's permission before enrollment. Employee ID Length Set the employee ID's length when enrolling a person's information. -
Page 29: Set Biometric Parameters
Figure 7-11 Basic Settings Page White Light Brightness Set the supplement white light's brightness. The brightness range is from 1 to 100. 0 refers to turning off the light. 1 refers to the darkest, and 100 refers to the brightest. IR Light Brightness Set the IR light brightness when the IR light is enabled. -
Page 30: Data Management
Parameter Description Note Biometric recognition products are not 100% applicable to anti-spoofing environments. If you require a higher security level, use multiple authentication modes. After enabling face anti- s poofing Liveness function, you can set the matching Security security level when performing live face Level authentication. -
Page 31: Export Enrolled Data
Figure 7-13 Data Management Page 3. Tap Export Template. The template will be exported to the USB flash drive. 4. Edit the exported table and enroll the user information. Note Make sure the edited file is saved in the folder named "DS- K1F600"... -
Page 32: System Maintenance
Long tap on the initial page for 3 s and login the home page. Tap Data. Figure 7-15 Data Management Page Tap Clear Enrolled Data to delete all enrolled data in the device, including all face pictures, fingerprints, card, etc. 7.7 System Maintenance You can view the device system information and capacity. - Page 33 Plug the USB flash drive in the device USB interface. Tap Upgrade → OK , and the device will read the digicap.dav file in the USB flash drive to start upgrading. Reboot The device will reboot after the confirmation.
-
Page 34: Tips When Collecting/Comparing Face Picture
A. Tips When Collecting/Comparing Face Picture The position when collecting or comparing face picture is as below: Expression • Keep your expression naturally when collecting or comparing face pictures, just like the expression in the picture below. • Do not wear hat, sunglasses, or other accessories that can affect the facial recognition function. -
Page 35: Tips For Scanning Fingerprint
B. Tips for Scanning Fingerprint Recommended Finger Forefinger, middle finger or the third finger. Correct Scanning The figure displayed below is the correct way to scan your finger: You should press your finger on the scanner horizontally. The center of your scanned finger should align with the scanner center. -
Page 36: Communication Matrix And Device Command
Device Command Scan the following QR code to get the device common serial port commands. Note that the command list contains all commonly used serial ports commands for all Hikvision access control and video intercom devices. Figure C-2 Device Command...
Need help?
Do you have a question about the DS-K1F600-D6E-F-S and is the answer not in the manual?
Questions and answers