Advertisement
Scan for full manual
Step 1: Check what's in the box
VP-409 Video to WUXGA Scaler
1 Power cord
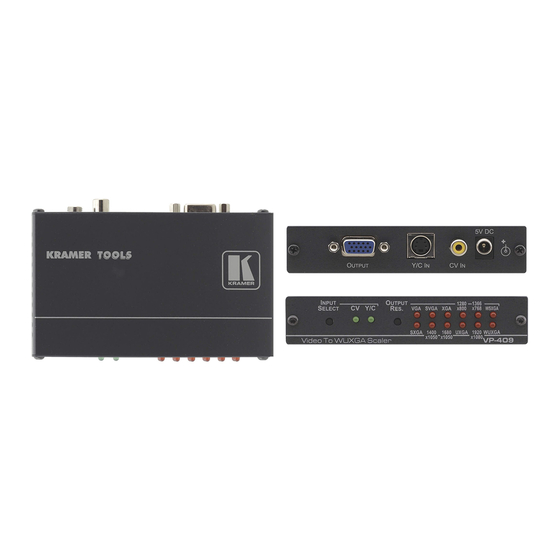
Step 2: Get to know your VP-409
#
Feature
1
OUTPUT 15-pin HD Connector
2
Y/C IN 4-pin Connector
3
CV IN RCA Connector
4
5V DC
5
INPUT SELECT Button
6
CV LED
7
Y/C LED
8
OUTPUT RES. Button
9
VGA LED
10
SVGA LED
11
XGA LED
12
1280x800 LED
13
1366x768 LED
14
WSXGA LED
15
SXGA LED
16
1400x1050 LED
17
1680x1050 LED
18
UXGA LED
19
1920x1080 LED
20
WUXGA LED
VP-409 Quick Start
VP-409 Quick Start Guide
This guide helps you install and use your
Go to
www.kramerav.com/downloads/VP-409
upgrades are available.
Function
Connects to the VGA-WUXGA acceptor
Connects to an s-Video source
Connects to a composite video source
+5V DC connector for powering the unit
Press to select between inputs
Illuminates when the CV input is selected
Illuminates when the Y/C input is selected
Press to select the desired output resolution
Illuminates when the VGA (640x480) resolution is selected
Illuminates when the SVGA (800x600) resolution is selected
Illuminates when the XGA (1024x768) resolution is selected
Illuminates when the 1280x800 (Wide XGA) resolution is selected
Illuminates when the 1366x768 (WXGA) resolution is selected
Illuminates when the WSXGA (1440x900) resolution is selected
Illuminates when the SXGA (1280x1024) resolution is selected
Illuminates when the 1400x1050 (SXGA+) resolution is selected
Illuminates when the 1680x1050 (WSXGA+) resolution is selected
Illuminates when the UXGA (1600x1200) resolution is selected
Illuminates when the 1920x1080 (1080p RGB) resolution is selected
Illuminates when the WUXGA (1920x1200) resolution is selected
VP-409
for the first time.
to download the latest user manual and check if firmware
1 Set of rack ears
1 Quick start guide
P/N: 2 9 0 0 - 3 0 1 2 6 2 QS
Rev: 2
Advertisement
Table of Contents

Related Manuals for Kramer VP-409


Summary of Contents for Kramer VP-409
- Page 1 Step 1: Check what’s in the box VP-409 Video to WUXGA Scaler 1 Set of rack ears 1 Power cord 1 Quick start guide Step 2: Get to know your VP-409 Feature Function OUTPUT 15-pin HD Connector Connects to the VGA-WUXGA acceptor...
- Page 2 • Reliable earthing of rack-mounted equipment should be maintained. Step 4: Connect inputs and outputs Always switch OFF the power on each device before connecting it to your VP-409. To achieve specified extension distances, use the recommended Kramer cables available at www.kramerav.com/product/VP-409.
Need help?
Do you have a question about the VP-409 and is the answer not in the manual?
Questions and answers