Table of Contents
Advertisement
Quick Links
BT8310
PROFESSIONAL VIDEO WALL MOUNT
INSTALLATION GUIDE & PARTS LIST
This Pack Contains 1 Mount
PLEASE KEEP THIS PARTS LIST FOR FUTURE REFERENCE
Installation Safety Notes.....................................................................................................................2
Parts List.............................................................................................................................................4
Replace Springs..................................................................................................................................5
Replace Handwheels..........................................................................................................................6
Interface Adaptors...............................................................................................................................7
Installation Instructions........................................................................................................................8
Product Dimensions............................................................................................................................13
Fit Additional AV Equipment...............................................................................................................15
B-Tech Contact Details.......................................................................................................................16
INSTALLATION TOOLS REQUIRED
Flathead & crosshead
screwdriver
B-TECH AUDIO VIDEO MOUNTS
CONTENTS
Drill
Drill bit
www.btechavmounts.com
FEATURES
●
Designed for flat screens up to 50kg (110lbs)
●
Modular mount for unlimited wall display configurations
●
Fits screens with VESA mounting patterns
from 200 x 200mm up to 400 x 400mm
●
VESA adaptor kit available for mounting patterns
from 600 x 400mm up to 800 x 400mm
Suitable for landscape or portrait screen mounting
●
Tool-less micro-adjustments with 8 knobs for seamless
alignment of the wall display
●
Push to open / push to close system
provides quick and easy service access
Integrated cable management
●
Screen specific template kit available to order separately
for quick and easy screen alignment
Pencil
Level
Advertisement
Table of Contents

Related Manuals for B-Tech BT8310-B XL


Summary of Contents for B-Tech BT8310-B XL
-
Page 1: Table Of Contents
CONTENTS Installation Safety Notes........................2 Parts List.............................4 Replace Springs..........................5 Replace Handwheels..........................6 Interface Adaptors..........................7 Installation Instructions........................8 Product Dimensions..........................13 Fit Additional AV Equipment.......................15 B-Tech Contact Details........................16 INSTALLATION TOOLS REQUIRED Flathead & crosshead Drill Drill bit Level Pencil screwdriver B-TECH AUDIO VIDEO MOUNTS www.btechavmounts.com... -
Page 2: Installation Safety Notes
Do not attempt to install this product until all instructions and warnings have been read and properly understood. Please keep these instructions for future reference. B-Tech International Limited, its distributors and dealers are not liable or responsible for damage or injury caused by improper installation, improper use or failure to observe these safety instructions. In such cases, all guarantees will expire. - Page 3 Niniejszy produkt musi być zamontowany na odpowiedniej powierzchni, a podczas użytkowania nie wolno przekraczać podanego maksymalnego obciążenia. A B-Tech International Ltd. recomenda que a instalação deste produto seja efectuada por um instalador de AV profissional ou outra pessoa devidamente habilitada. A B-Tech International Ltd. e os seus distribuidores e concessionários não são responsáveis por danos ou lesões causados por uma instalação incorrecta.
-
Page 4: Parts List
IMPORTANT: FIXING SCREWS ARE NOT INCLUDED WITH THIS PRODUCT. B-TECH HIGHLY RECOMMEND THIS PRODUCT BE INSTALLED BY A SUITABLY QUALIFIED PERSON. THE INSTALLER MUST BE SATISFIED THAT THE TYPE OF FIXINGS USED ARE SUITABLE FOR THE TYPE OF WALL THE PRODUCT IS TO BE MOUNTED TO. CARE MUST BE TAKEN AS TO WHERE THIS PRODUCT IS LOCATED AS SOME WALLS ARE NOT SUITABLE FOR INSTALLATION. -
Page 5: Replace Springs
REPLACE SPRINGS (OPTIONAL) To reduce the amount of force you have to apply to the screen to push to open / push to close, replace the factory fitted springs with the lower tension springs (part 4). This is recommended for LCD, LED and fragile screens. REPLACE FACTORY FITTED SPRINGS WITH THE LOWER... -
Page 6: Replace Handwheels
REPLACE HANDWHEELS (OPTIONAL) When the BT8310 is used with smaller screens, it is possible the handwheels will be visible above the top of the screens. The handwheels can be replaced with part 3 to avoid this if required. HANDWHEEL PLASTIC ENDCAP... -
Page 7: Interface Adaptors
INTERFACE ADAPTORS VESA 600 x 400mm and 800 x 400mm BT8310-AD64 & BT8310-AD84 To be able to mount flat screens with VESA 600 x 400mm or PARTS LIST 800 x 400mm fixing patterns, use the BT8310-AD64 or PART NAME ADAPTOR ARM BT8310-AD84 interface adaptor (not included). -
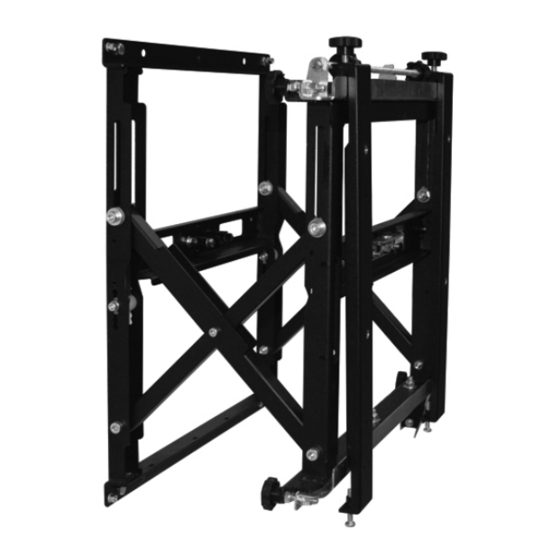
Page 8: Installation Instructions
INSTALLATION INSTRUCTIONS Attach the interface arms to the flat screen. 1.1 Fix the interface arms (part 2) to the back of the flat screen using parts 5-14. 1.2 Completely loosen the two safety screws (D). D Safety screw Install the first mount. 2.1 Determine the centre (C) of the first flat screen at the bottom left. - Page 9 For quick and easy installation of the video wall Mounting Spacer Kits. mounts, it is advised that a mounting spacer kit is used (not included). A different kit is required for each different flat screen model. Screen Dimensions Screen Size Spacer 1026mm x 580mm 46"...
- Page 10 Installation and alignment of the additional mounts. 4.1 Once the first wall mount has been installed, draw a horizontal alignment line or use a laser Alignment line level to get the alignment line as shown. 4.2 Using the large spacer, place the second wall mount as shown whilst being careful to keep on the alignment line.
- Page 11 Flat screen alignment. Z axis adjustment knob X axis adjustment knob Y axis adjustment knob Y axis adjustment knob Level Plumb 5.1 Hook the first flat screen onto the bottom left wall plate first. Keep the x axis knobs between the middle of the two interface arms (part 2).
- Page 12 Servicing the flat screen. 6.1 To service the flat screen, push the screen and the mount will release and move PUSH out from the wall. Be careful not to damage the screen when pushing. Keep hold of the screen as it moves outwards.
-
Page 13: Product Dimensions
91mm 489mm 542mm MAXIMUM / OPEN 281mm WARNING FIX / TIE THE CABLES TO PREVENT POSSIBLE DAMAGE THESE INSTRUCTIONS ARE INTENDED AS A GUIDE ONLY AND B-TECH ACCEPTS NO LIABILITY FOR THE ACCURACY OF THE INFORMATION CONTAINED IN THIS DOCUMENT. - Page 14 BT8310 PRODUCT DIMENSIONS 10 x 300mm 400mm 200mm 489mm 31.5mm 31.5mm 426mm 379mm 300mm 90-104mm 150mm 150mm Ø5mm Ø5mm 13mm 440mm 255mm 214.5mm 542mm 542mm 516mm 220.5mm 261mm...
-
Page 15: Fit Additional Av Equipment
BT8310-AD64 & BT8310-AD86 PRODUCT DIMENSIONS BT8310-AD64 8.2mm 8.2mm 400mm 15mm 600mm 620mm BT8310-AD86 8.2mm 8.2mm 400mm 15mm 800mm 820mm FIT ADDITIONAL AV EQUIPMENT There are two available spaces for AV equipment / media players to be fitted within the mount. AV EQUIPMENT / MEDIA PLAYER SHOWING MAXIMUM DIMENSIONS AV EQUIPMENT / MEDIA PLAYER... -
Page 16: B-Tech Contact Details
©2012 B-Tech International Limited. All rights reserved. B-Tech Audio Video Mounts is a division of B-Tech International Limited. B-Tech & Better By Design are registered trademarks of B-Tech International Limited. All other brands and product names are trademarks of their respective owners.
Need help?
Do you have a question about the BT8310-B XL and is the answer not in the manual?
Questions and answers