
Subscribe to Our Youtube Channel
Related Manuals for Youshiko YC9390


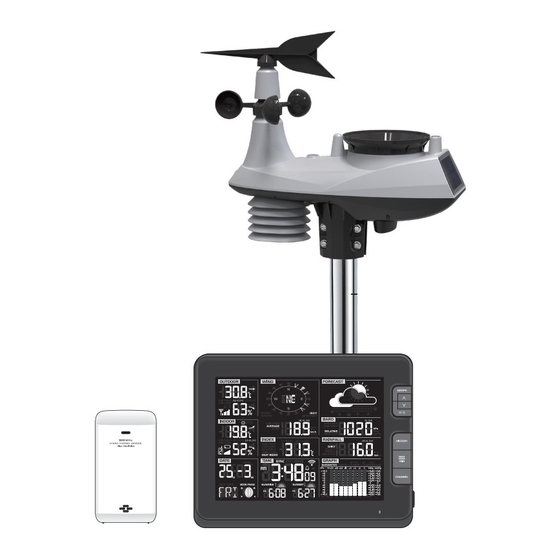
Summary of Contents for Youshiko YC9390
- Page 1 Wi-fi weather station with 6-in-1 professional sensor Model: YC9390 User Manual Mounting pole not included...
-
Page 3: Table Of Contents
TABLE OF CONTENTS Introduction . . . . . . . . . . . . . . . . . . . . . . . . . . . . . . . . . . . . . . . . . . . 1 Overview . -
Page 4: Introduction
INTRODUCTION Thank you for selecting Wi-fi weather station with 6-in-1 professional sensor. This system gathers and automatically uploads accurate and detailed weather data to Weather Underground website - the famous weather service which allows weather observers to upload their local weather data with automated personal weather stations (PWS) - at which you can access and upload your weather data freely . - Page 5 6 . LCD display 10 . [ MAX / MIN ] key 7 . [ GRAPH / Λ ] key 11 . [ CHANNEL ] key 8 . [ °F / °C / V ] key 12 . Status LED 9 .
-
Page 6: Lcd Display
LCD DISPLAY 1 . Outdoor temperature & humidity 6 . Time, sunrise/sunset & system status 2 . Indoor temperature & humidity 7 . Weather forecast 3 . Calendar & moon phase 8 . Barometer 4 . Wind direction & speed 9 . -
Page 7: Wireless 6-In-1 Outdoor Sensor
WIRELESS 6-IN-1 OUTDOOR WEATHER SENSOR 1 . Wind vane 7 . Battery door 2 . Wind cups 8 . [ RESET ] key 3 . Antenna 9 . Transmission status LED 4 . Radiation shield 10 . Level gradienter 5 . Pole mount hole (fit for 35 ~40mm 11 . -
Page 8: Installation And Setup
INSTALLATION AND SETUP WIRELESS INDOOR SENSOR Pairing the wireless Indoor sensor with the console 1 . Remove the battery door of the sensor . 2 . Insert 2 x AA size batteries into the battery compartment . Make sure you insert them the right way according to the polarity information marked on the battery compartment . -
Page 9: Main Console
Mounting guideline 1 . Install the sensor at least 1 .5m off the ground for better and more accurate wind measurements . 2 . Choose an open area within 150 meters from the main console . 3 . Install the sensor as level as possible to achieve accurate rain and wind measurements . -
Page 10: Create A Wunderground Account And Setup Wi-Fi Connection
Note: This console has a dual backup system which allows you to backup different settings and history records . Backup item list - Time & Date - Bar chart records By battery backup - Max/Min records - Past 24 hours weather history data records - Alert setting values - Router setting... - Page 11 Note: You need to validate your email address before you can register your weather station . Click “Send Validation Email” to receive an email from wunderground.com that contains a validation link. Click on the link to finish the validation. 2 . After you have created your account and completed the Email validation, please go back to the WUndergound web page .
- Page 12 4 . Enter a name for your PWS, then choose “Other” for “Station Hardware” . Once you have completed, click “Submit” . 5 . Jot down Your Station ID and Station key for the further setup step .
- Page 13 B. Setup the Wi-fi Console to transmit weather data to wunderground.com 1 . When you plug the adaptor into the DC jack to power up the Wi-fi console during the first time start up, or press and hold the [ Wi-Fi / SENSOR ] key for 6 seconds in normal mode, the Status LED on the main console will flash green light to signify that it has entered into the AP mode, in which the console is ready for the Wi-fi setup.
- Page 14 4 . Fill in the connection information for the setup interface . Your PWS will base on this information to connect the Wi-fi router. Language: English WiFi Router setup Select the Wi-fi router (SSID) you will connect to Router: ROUTER_A Manually enter the SSID if it is not on the list Add Router Security type:...
- Page 15 5 . Click “Apply” to finish the setup. If all the information you entered is correct, the setup interface will show as the following. If it does not change, check and fill in the missing information . Once the setup is completed, the Wi-fi console will disconnect the Wi-fi connection with your smart phone or computer and start to search for the router that you have assigned .
-
Page 16: Viewing Live Weather Data
VIEWING LIVE WEATHER DATA 1 . To view the wireless outdoor sensor's live data in a web browser (PC or mobile version), please visit www .wunderground.com, and then, In the menu bar, enter your “station ID” in the searching box . The weather information will show up on the next page . 2 . -
Page 17: Operation And Other Setting Of The Console
OPERATION AND OTHER SETTING OF THE CONSOLE TIME & DATE, MOON PHASE, SUNRISE & SUNSET The TIME and DATE information windows locate at the bottom left of the console display . You can view all the time related information and console status in these two sections . Moon Phase The moon phase is determined by the time, date and time zone . -
Page 18: Wi-Fi Connection Status
Wi-fi CONNECTION STATUS As soon as the console successfully connects to the Wi-fi router, the Wi-fi signal icon “ ” will appear on the LCD display. If the Wi-fi signal is not stable or the console is trying to connect to the router, the icon will flash. -
Page 19: Setting Alarm Time
SETTING ALARM TIME 1 . In normal time mode, press and hold [ ALARM ] key for 2 seconds until the alarm hour digit flashes to enter alarm time setting mode. 2 . Press [ GRAPH / Λ ] or [ °F / °C / V ] key to adjust the value, or press and hold to change rapidly . -
Page 20: Wind
The INDOOR Window The INDOOR window displays the thermo-hygro reading of wireless indoor thermo-hygro sensor(s) (Ch .1 -Ch .7) Wireless Indoor sensor signal strength: No signal Weak signal Good signal Note: Please locate the sensors where console can receive good signal . Viewing Different Indoor Channel This console is capable to pair with up to 7 wireless indoor thermo-hygro sensors . -
Page 21: Weather Index
Viewing Wind Direction Real time wind Past wind directions direction indicator indicator of last 5 minutes Wind direction in 360° Wind speed level or 16-direction Average / gust wind speed To select the wind display mode In normal mode, press [ WIND ] key to switch between AVERAGE wind speed and GUST wind speed . - Page 22 To set UV index gain Sensor Manufacturing Gain The UV sensor manufacturer may have included a gain or adjustment for a specific sensor technology or build . Please reference your 6-in-1 outdoor weather sensor battery compartment for any reference to gain adjustment . In the example in Figure 1, a gain of 1 .7 must be entered into the console .
- Page 23 20 ~ 28 km/h 13 ~ 17 mph Dust and loose paper raised . Small Moderate breeze branches begin to move . 11 ~ 16 knots 5.5 ~ 7.9 m/s 29 ~ 38 km/h 18 ~ 24 mph Branches of a moderate size move . Fresh breeze Small trees in leaf begin to sway .
-
Page 24: Weather Forecast
Wind Chill A combination of the wireless outdoor sensor's temperature and wind speed data determines the current wind-chill factor . Heat Index The heat index, which is determined by the wireless outdoor sensor's temperature & humidity data, when the temperature is between 27°C (80°F) and 50°C (120°F) . Heat Index range Warning Explanation... -
Page 25: Barometric Pressure
Note: - The weather forecast is reflecting the weather situation for next 12 hours, it may not necessarily reflect the current situation. - The “Snowy” icon will be displayed when the outdoor temperature is below -3°C (26°F), and under cloudy or rainy forecast . BAROMETRIC PRESSURE The barometric pressure window (BARO) locates in the middle right of the LCD Barometric pressure: the atmospheric pressure is the pressure at any location of the... -
Page 26: Rainfall
RAINFALL The RAINFALL reading displays in the middle right of the LCD . It shows how many mm/inches of rain have accumulated in the rain collector in one-hour time period to indicate the current rainfall rate . To set the rainfall unit 1 . - Page 27 Outdoor °F or °C Past 72 hours temperature Indoor humidity (according to the Past 72 hours current channel) Outdoor humidity Past 72 hours Rainfall mm or in Past 7 days (daily) To view the daily MAX/MIN The console can record the daily MAX/MIN weather data for your easy review . - In normal mode, press [ MAX / MIN ] key to check the daily MAX/MIN records .
-
Page 28: Weather Alert Setting
WEATHER ALERT SETTING Weather Alert can alert you of certain weather conditions . Once the alert criterion is met, the alarm sound will activate and the LCD’s alert icon will flash. To set alert 1 . Press [ ALERT ] to select and display the desired weather alert reading in the sequence below: Alert reading Sequence Setting Range... -
Page 29: Pointing The 6-In-1 Sensor To South
POINTING THE 6-IN-1 SENSOR TO SOUTH The outdoor 6-in-1 sensor is calibrated to point to North for the maximum accuracy . However, for the user's convenience (e .g . users in the Southern hemisphere), it is possible to use the sensor with the wind vane pointing to South . -
Page 30: Cleaning The Uv Sensor And Calibration
CLEANING THE UV SENSOR AND CALIBRATION Clean the UV sensor cover lens For precision UV measurement, gentle clean the UV sensor cover lens by the pure water regularly . UV Sensor Degradation Over time, the UV sensor will naturally degrade . The UV sensor can be calibrated with a utility grade UV meter . -
Page 31: Precautions
6 . Once the update completed, the main console will restart and return to the normal display screen . 7 . Remove the USB mass storage driver from the main console . 8 . Set the time zone on the main console . 9 . -
Page 32: Specification
SPECIFICATION MAIN CONSOLE General Specification Dimensions (W x H x D) 215 x 172 x 29mm (8 .5 x 6 .8 x 1 .1in) Weight 639g (with batteries) Main power DC 5V, 1A adaptor Backup battery 3 x AAA size 1 .5V batteries (alkaline recommended) Operating temperature range -5˚C ~ 50˚C Wi-fi Communication Specification... - Page 33 Indoor / Outdoor Temperature Display & Function Specification Note: The following details are listed as they are displayed or operate on the console . Temperature unit °C and °F Display range -40 ~ 80°C (-40 ~ 176°F) 55 ~ 60°C ± 0.5°C (131 ~ 140°F ± 0.9°F) 10 ~ 55°C ±...
-
Page 34: 6-In-1 Outdoor Sensor
2 x AA size 1 .5V batteries (alkaline recommended) Weather data Temperature and humidity RF frequency 868Mhz RF transmission range 150m Transmission interval 60 seconds Operating range -40 ~ 60°C (-40 ~ 140°F) Lithium batteries required All enquiries: service@youshiko.co.uk Made for Youshiko in PRC...
Need help?
Do you have a question about the YC9390 and is the answer not in the manual?
Questions and answers