
Subscribe to Our Youtube Channel
Related Manuals for Youshiko YC9395


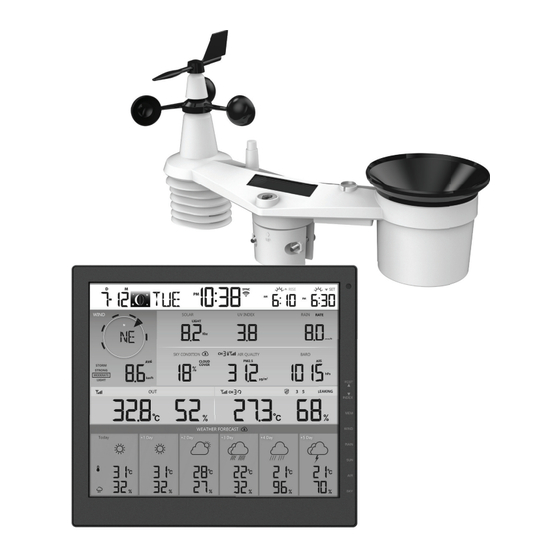
Summary of Contents for Youshiko YC9395
- Page 1 6-Day Forecast WI-FI Weather Station With 7-in-1 Professional Sensor Model: YC9395 User Manual * POLE IS FOR ILLUSTRATION PURPOSE. IT'S NOT INCLUDED.
-
Page 2: Table Of Contents
TABLE OF CONTENTS 1. INTRODUCTION ..............4 1.1 QUICK START GUIDE . - Page 3 7. PROWEATHERLIVE (PWL) LIVE DATA & OPERATION ........30 7.1 VIEW LIVE DATA .
-
Page 4: Introduction
- The AC/DC adaptor of apparatus should not be obstructed OR should be easily accessed during intended used. - To be completely disconnect the power input, the AC/DC adaptor of apparatus shall be disconnected from the mains. CAUTION - Danger of explosion if battery is incorrectly replaced. Replace only with the same or equivalent type. - Battery cannot be subjected to high or low extreme temperatures, low air pressure at high altitude during use, storage or transportation. -
Page 5: Quick Start Guide
QUICK START GUIDE The following Quick Start Guide provides the necessary steps to install and operate the weather station, and upload to the Internet, along with references to the pertinent sections. Step Description Section Power up the 7-in-1 sensor array 3.1.3 Power up the display console and pair with sensor array Manually set date and time (This part is unnecessary if the weather... -
Page 6: Getting Started
GETTING STARTED WIRELESS 7-IN-1 SENSOR 1. Rain collector 7. Antenna 12. Battery door 2. Balance indicator 8. Mounting clamp 13. Drain holes 3. Solar panel 9. Radiation shield and 14. Rain sensor thermo-hygro sensor 4. UVI / light sensor 15. Tipping bucket 10. -
Page 7: Install Rain Gauge Funnel
3.1.2 INSTALL RAIN GAUGE FUNNEL Install the rain gauge funnel and rotate clockwise to lock the funnel to the sensor array Step 2 Lock Step 1 grooves 3.1.3 INSTALL BATTERIES Unscrew the battery door at bottom of unit. Insert the 3 AA batteries (non-rechargeable) according to the +/- polarity indicated. -
Page 8: Direction Alignment
NOTE: - Any metal object can attract lightning strikes, including your sensor-array mounting pole. Never install sensor-array in stormy days. - If you want to install a sensor-array on a house or building, consult a licensed electrical engineer to ensure proper grounding. -
Page 9: Synchronizing Additional Sensor(S) (Optional)
SYNCHRONIZING ADDITIONAL SENSOR(S) (OPTIONAL) This console can display the data from additional sensors and upload to ProWeatherLive (PWL) cloud server for user to view the data in PWL website and App. Please contact your local retailer for details of difference sensors. Some of these sensors are multi-channel. -
Page 10: Recommendation For Best Wireless Communication
RECOMMENDATION FOR BEST WIRELESS COMMUNICATION Effective wireless communication is susceptible to noise interference in the environment, and distance and barriers between the sensor transmitter and the display console. 1. Electromagnetic interference (EMI) – these may be generated by machinery, appliances, lighting, dimmers and computers, etc. -
Page 11: Setup Display Console
NOTE: - The backup battery can backup: Time & Date & Max/Min weather records, rainfall records. - The built-in memory can backup: WI-FI setting, Hemisphere setting, Calibration values, and Sensor ID of paired sensor(s). - Please always remove the back-up battery if the device is not going to be used for a while. Please keep in mind that even when the device is not in use, certain settings, such as the clock, alert settings and records in its memory, will still drain the back-up battery. -
Page 12: Display Console Functions And Operation
DISPLAY CONSOLE FUNCTIONS AND OPERATION SCREEN DISPLAY 1. Time & Data, Moon phase, Sunrise / sunset 6. Sky condition & moon rise / moon set 7. Air quality 2. Wind direction & speed 8. Barometer 3. Solar Light intensity 9. Indoor / CH temperature & humidity 4. -
Page 13: Console Features
Press to switch between maximum and minimum values of Daily and MAX / MIN Since Press to switch between average wind speed, wind gust and Beaufort Scale WIND Press and hold 2 seconds to switch wind direction between language and 360 bearing RAIN Press to switch between Daily rain, and different rain measurement Press to switch between Solar Light Intensity and Sunburn time... -
Page 14: High / Low Temperature Forecast For Today & Next 5 Days
Based on the longitude and latitude of the device in your ProWeatherLive account, (refer to PWL setup), the console indicates the weather forecasts of today and next 5 days. Multi day weather forecast section Weather forecast with High (HI) and Low (LO) temperatures is default mode in this section, if update is normal, the icon will appear and update interval is per hour. -
Page 15: Outdoor Temperature, Humidity & Temperature Index
4.3.4 OUTDOOR TEMPERATURE, HUMIDITY & TEMPERATURE INDEX 1. Outdoor sensor low battery indicator 2. Outdoor sensor signal indicator to show the signal receiving strength 3. Temperature index mode indicator 4. Outdoor Temperature reading 5. Outdoor Humidity reading NOTE: - If temperature / humidity is below the measurement range, the reading will show “Lo”. If temperature / humidity is above the measurement range, the reading will show “HI”. -
Page 16: Multi-Channel And Scroll Mode For Optional Sensors
4.3.5.1 OVERVIEW 1. Low battery indicator for CH sensor 2. Sensor signal strength icon 3. Channel number 4. Auto loop icon 5. Temperature reading section 6. Indoor icon 7. Floating pool sensor icon 8. Water leak sensor status section 9. Soil moisture sensor icon 10. -
Page 17: Wind
4.3.8 WIND 4.3.8.1 WIND SPEED AND DIRECTION SECTION OVERVIEW Real time wind direction indicator Past wind directions Wind direction indicator of last 5 minutes (maximum 6) Average / Gust Wind speed Wind speed or level indicator Beaufort scale A solid arrow indicates the current real-time wind direction, whereas the bars indicate up to six different wind direction of the past 5 minutes. - Page 18 4.3.8.4 BEAUFORT SCALE TABLE The Beaufort scale is an international scale of wind velocities ranging from 0 (calm) to 12 (Hurricane force). Beaufort Scale Description Wind Speed Land Condition < 1 km/h < 1 mph Calm Calm. Smoke rises vertically. <...
-
Page 19: Barometric Pressure
≥ 118 km/h Severe widespread damage to vegetation ≥ 74 mph Hurricane force and structures. Debris and unsecured ≥ 64 knots objects are hurled about. ≥ 32.7m/s 4.3.9 BAROMETRIC PRESSURE The atmospheric pressure is the pressure at any location of the earth caused by the weight of the column of air above it. -
Page 20: Air Quality
UV INDEX VS SUNBURN TIME TABLE Exposure level Moderate High Very high Extreme UV index 12~16 Sunburn time 45 minutes 30 minutes 15 minutes 10 minutes Recommended Moderate or high UV level! Suggest to Very high or Extreme UV level! Suggest to wear sunglasses, broad brim hat and wear sunglasses, broad brim hat and long- protection... -
Page 21: Sky Condition
4.3.13 SKY CONDITION Sky condition section show the % of cloud cover according to the device location input in PWL. If you have optional lightning sensor, you can also view the lightnings detected instantly. 4.3.13.1 CLOUD COVER MODE Cloud cover is an important component of understanding and predicting the weather. -
Page 22: Moon Phase
4.3.15 MOON PHASE The moon phase is determined by time Northern Southern Moon Phase and date of the console. The following Hemisphere Hemisphere table explains the moon phase icons of New Moon the Northern and Southern Hemispheres. Please refer to section 6.3 web interface Waxing Crescent about how to setup for the Southern Hemisphere. -
Page 23: Wi-Fi Connection Status
4.3.19 WI-FI CONNECTION STATUS WI-FI icon on the console display indicates the console's connection status with WI-FI router. Stable: Console is in Flashing: Console is trying connection with WI-FI router to connect to WI-FI router OTHER SETTING 4.4.1 TIME, DATE AND GENERAL SETTING Press and hold the for 2 seconds to enter the SET mode. -
Page 24: Unit Setting
4.4.2 UNIT SETTING Use the [ UNIT ] key to change the unit of the readings on the console display. Below is the operation step: - Press and hold [ UNIT ] key for 2 seconds to enter the unit setting mode. - Short press [ UNIT ] key to proceed to the next setting step. -
Page 25: Create Pwl Account & Setup Wi-Fi Connection Of Console
CREATE PWL ACCOUNT & SETUP WI-FI CONNECTION OF CONSOLE The console can upload /download weather data in ProWeatherLive (PWL) cloud server through WI-FI router, you can follow the step below to setup your device. NOTE: ProWeatherLive (PWL) website and APP are subjected to change without notice. CREATE PWL ACCOUNT AND ADD NEW DEVICE IN PWL 1. - Page 26 4. Click the " Edit " on the top right corner of the station tab. 5. Enter the "Device name", "Device MAC address", "Elevation", "Latitude", "Longitude" and select your time zone in the station tab, then click "confi rm" to save the setting. NOTE: Enter a negative sign for Latitudes or Longitudes when it’s South or West respectively.
-
Page 27: Connect Console To Wi-Fi
CONNECT CONSOLE TO WI-FI CONSOLE IN ACCESS POINT MODE When you power up the console for the fi rst time, the console LCD will show fl ashing "AP" and " " icon to signify that it has entered AP (Access Point) mode, and is ready for WI-FI settings. User can also press and hold the [ SENSOR / WI-FI ] key for 6 seconds to enter AP mode manually. -
Page 28: Setup The Weather Server Connection
SETUP THE WEATHER SERVER CONNECTION Enter the information into the following web interface "SETUP" page. Ensure all information is entered prior to pressing to connect the console to ProWeatherLive. Apply SETTINGS Press "ADVANCED" icon to SETUP ADVANCED advanced page Select setup UI display language Language: English WiFi Router setup... -
Page 29: Advance Setting In Web Interface
ADVANCE SETTING IN WEB INTERFACE Press "ADVANCED" key at the top of web interface to enter the advance setting page, this page allow you to set and view the calibration data of the console, as well as update the firmware version on PC/Mac web browser. -
Page 30: Calibration
6.4.1 CALIBRATION 1. User can input the offset and/or gain values for different parameters while current offset and gain values are shown next to their corresponding blank. 2. Once completed, press at the bottom of the SETUP page Apply The current offset value will show the previous value that you entered, please input the new value in the blank if any changes needed, the new value will effective once you press Apply icon in SETUP page. -
Page 31: Maintenance
MAINTENANCE FIRMWARE UPDATE The console supports OTA firmware update capability. Its firmware may be updated over the air anytime (whenever necessary) through any web-browser on a PC/Mac with WI-FI connectivity. Update function, however, is not available through mobile/smart devices. Current firmware Firmware version: 1.00 version Browse... -
Page 32: Re-Pairing The Sensor(S) Manually
8.2.1 RE-PAIRING THE SENSOR(S) MANUALLY Whenever you changed the batteries of the 7-in-1 weather sensor array or other additional sensors, re-synchronization must be done manually. 1. Change all the batteries to new ones in the low battery sensor(s). 2. Press [ SENSOR / WI-FI ] key on the console to enter sensor synchronization mode (as indicated by the flashing antenna ). -
Page 33: Specifications
Multi-day forecast, cloud 1. Ensure your console is connected to PWL cover, visibility, sunrise/ 2. Ensure latitude, longitude & time zone in "Edit Devices" of the console on sunset, moon rise/ PWL are correct moon set times are not 3. Press the [ REFRESH ] key to update the data instantly accurate Sunrise/sunset, moon 1. - Page 34 RF frequency 868Mhz (Depend on country version) RF transmission range 150m Time Related Function Specification Time display HH: MM Hour format 12hr AM / PM or 24 hr Date display DD / MM or MM / DD Time synchronize method Through PWL to get the local time of the console location Weekday languages EN / DE / FR / ES / IT / NL / RU...
-
Page 35: Wireless 7-In-1 Sensor
1 ~99% RH non-condensing UKCA Declaration of Conformity Youshiko Ltd hereby declares that the product fully complied to applicable guidelines and corresponding standards for sales in the UK. For full details, please contact customer services of Youshiko Ltd (email address : cs@youshiko.co.uk) All enquiries: service@youshiko.co.uk...
Need help?
Do you have a question about the YC9395 and is the answer not in the manual?
Questions and answers