Advertisement
Insert batteries in main unit first, then make sure sensor is on CH1, and
then, insert batteries in the outdoor sensor , then leave it, this weather
station will self set everything automatically, Radio control signal may
take time, depends on the location in UK, but will pick up the signal
within few minutes to few hours ( Max between 1am to 3 am ), weather
station will set UK time / date and temperature / humidity etc, itself and
then you don't have to do anything ever. You must keep the weather
station well away from other electronics devices like TV, computer etc to
avoid any interfaces for the radio control signal.
1. Features
1.1
Weather Forecast
1.2
Time
1.3
Humidity
1.4
Temperature
USER MANUAL
YOUSHIKO YC9337 WEATHER STATION
AUTOMATIC SETTINGS:
- Sunny, Slightly Cloudy, Cloudy, Rainy and Snow animation
- Radio Controlled Time
- Perpetual Calendar Up to Year 2099
- Daily Alarm Function
- Indoor & Outdoor measurable range: 0 ~ 99%
- Outdoor Humidity Record from Start-Up/Reset, and the corresponded time
- 24 Hours Min/Max Humidity Record
- Temperature of multi channels
- Measures °C / °F user selectable
- 24 Hours Lowest & Highest Temperature Record
- Comfort Indicator Icon
1
Advertisement
Table of Contents

Subscribe to Our Youtube Channel
Related Manuals for Youshiko YC9337


Summary of Contents for Youshiko YC9337
- Page 1 USER MANUAL YOUSHIKO YC9337 WEATHER STATION AUTOMATIC SETTINGS: Insert batteries in main unit first, then make sure sensor is on CH1, and then, insert batteries in the outdoor sensor , then leave it, this weather station will self set everything automatically, Radio control signal may...
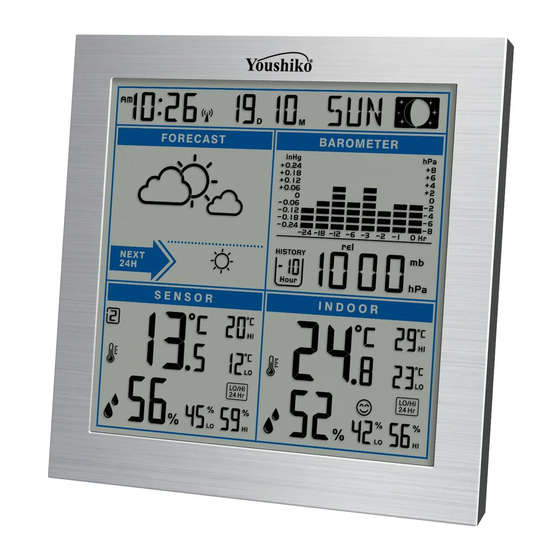
- Page 2 Wireless Outdoor Sensor - Low-battery indicator for sensors - Wall Mount or Table Stand - 70-meter transmission range in an open area 2. Main Unit Appearance 2.1 Part A- LCD A1: Radio control icon A2: Date A3: Day of week A4: Time A5: Weather forecast A6: Moon phase...
-
Page 3: Getting Started
2.2 Part B- Buttons B1: “RESET” button B2: “BARO HISTORY” button B3: “CHANNEL” button B4: “TIME SET” button B5: “ALARM SET/ (ALARM ON/OFF)” button B6: “MEM/ - ” button B7: “BARO/ UNIT” button B8: “ALERT SET / (ON/OFF)” button B9: “+/ (C/F)” button 2.3 Part C- Structure C1: Wall Mount Hole C3: Stand... - Page 4 vehicles, high voltage lines, etc. 6. RF transmission The main unit automatically starts to receive transmission from sensors for temperature & humidity after powering on. The sensors will automatically transmit temperature and humidity signal to the main unit after batteries inserted. For having more than one external transmitter (maximum3), select the Channel, CH1, CH2 or CH3 to ensure each sensor is transmitting different channel before inserting batteries.
- Page 5 7.3 Temperature Press “°C /°F” button to select temperature in Celsius mode or Fahrenheit mode. The measurable indoor temperature range is -10°C to + 50°C. If the indoor temperature is out of the measurable range, LL. L (beyond the minimum temperature) or HH.H (beyond the maximum temperature) will be shown on the indoor temperature column of the LCD.
- Page 6 7.6 Comfort indicator Comfort Indicator icon (A16) for the display of pleasant/unpleasant climate. : too dry : comfort : too moist 8. Time and Alarm 8.1 Radio Controlled Clock: After power on and main unit finishes receiving the transmission from outdoor ...
- Page 7 8.3 Daily Alarm Function: Press “ALARM ON/OFF” button (B5) to turn on or turn off alarm function. Alarm time and alarm icon “ ” display if alarm function is activated. Hold “ALARM SET” button (B6) button for 2 seconds to enter the setting of alarm ...
-
Page 8: Moon Phase Display
+3 °C If there is any inconsistency of weather forecast between local weather station and this unit, the local weather station's forecast should prevail. 9.2 Barometric Trend Pointer The trend pointer displayed on the LCD besides weather forecast indicates the trend of the barometric pressure. -
Page 9: Low Battery Indication
11. Low battery indication: The low battery icon “ ”will appear, it indicates that the display channel’s sensor is in low battery status. The batteries should be replaced. 12. Precautions Use a pin to press the reset button if the unit does not work properly. ... - Page 10 • This product is not a toy. Keep out of the reach of children. • No part of this manual may be reproduced without written authorization of the manufacturer. R&TTE Directive 1999/5/EC Summary of the Declaration of Conformity: We hereby declare that this wireless transmission device All enquires: service@youshiko.co.uk...
Need help?
Do you have a question about the YC9337 and is the answer not in the manual?
Questions and answers