
Related Manuals for Kramer Yarden 6-C


Summary of Contents for Kramer Yarden 6-C
- Page 1 K R A ME R E LE CT R O N IC S L TD . USER MANUAL MODEL: Yarden 6-C Closed-back Ceiling Speakers P/N: 2900-300347 Rev 2...
-
Page 3: Table Of Contents
Setting up an Array Installation Painting the Speaker Technical Specifications Figures Figure 1: Yarden 6-C in a Boardroom Setup Figure 2: Yarden 6-C Closed-back Ceiling Speaker Figure 3: Yarden 6-C Schematic Diagram Figure 4: Mounting the Yarden 6-C Figure 5: Plugging and Securing the Cable... -
Page 4: Introduction
Hotel lobbies and conference rooms Boardrooms and meeting rooms Classrooms and lecture venues Yarden 6-C speakers are designed for indoor dry locations and are suitable for use in air handling spaces (plenum spaces). Yarden 6-C - Introduction... -
Page 5: Getting Started
Achieving the Best Performance To achieve the best performance: Use only good quality connection cables (we recommend Kramer high- performance, high-resolution cables) to avoid interference, deterioration in signal quality due to poor matching, and elevated noise levels (often associated with low quality cables) ... -
Page 6: Overview
The Yarden 6-C consists of a pair of high performance closed back speakers. Mount your Yarden 6-C speakers to the ceiling in one of two ways: either directly onto the ceiling or, for added protection, secure the speakers safely, using our Section ... -
Page 7: Your Yarden 6-C Closed-Back Ceiling Speakers
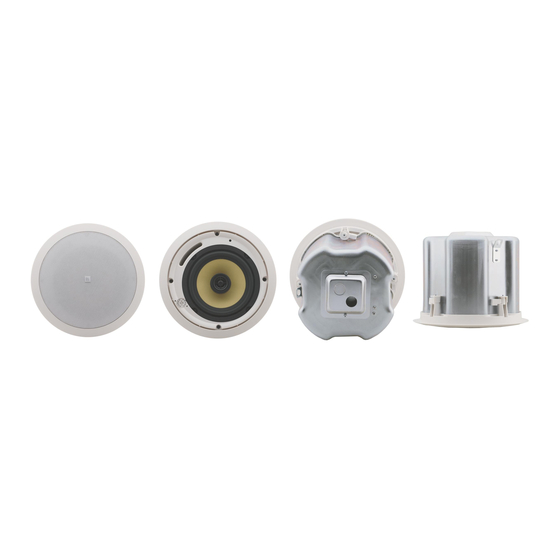
Your Yarden 6-C Closed-back Ceiling Speakers Figure 2 defines the Yarden 6-C: Figure 2: Yarden 6-C Closed-back Ceiling Speaker The following table defines the Yarden 6-C hardware items (per speaker pair) for each model in the series: Description A pair of ceiling... -
Page 8: Figure 3: Yarden 6-C Schematic Diagram
When this is the case, the speakers will need additional support. Figure 3 shows a schematic diagram of the Yarden 6-C: Figure 3: Yarden 6-C Schematic Diagram Yarden 6-C - Your Yarden 6-C Closed-back Ceiling Speakers... -
Page 9: Installing The Yarden 6-C Closed-Back Ceiling Speakers
Installing the Yarden 6-C Closed-back Ceiling Speakers This section explains how to install the Yarden 6-C, that is: Section 5 Choosing the best place to locate your speakers (see Section 5 Cutting the ceiling tile (see ... -
Page 10: Mounting The Speakers
Mounting the Speakers To mount the Yarden 6-C, do the following: 1. Place the C-ringovertheholecutintheceilingtile(onthe“ceiling”side). Place it around the hole so that the tabs are located in parallel to the tile edges. Yarden 6-C - Installing the Yarden 6-C Closed-back Ceiling Speakers... -
Page 11: Figure 4: Mounting The Yarden 6-C
5. Plug the connector into the socket in the terminal cup of the speaker (see Figure 6. Run the wires through the opening in the input terminal cover and then connect to the speaker terminal block connector. Yarden 6-C - Installing the Yarden 6-C Closed-back Ceiling Speakers... -
Page 12: Figure 5: Plugging And Securing The Cable
9. If required, you can secure the speaker more safely by connecting the speaker support ring to an independent secure anchor point. 10. Adjust each speaker to the appropriate tap setting before installing the grille (see Figure Yarden 6-C - Installing the Yarden 6-C Closed-back Ceiling Speakers... -
Page 13: Setting Up An Array Installation
Setting up an Array Installation When installing Yarden 6-C in an array installation layout, you have to define the distance between speakers as well as the layout pattern (square or hexagonal). The distance between speakers is set according tothespeakers’dispersion... -
Page 14: Figure 8: Square Layout
You can set the power on each speaker to get the desired power level in different installation areas. Figure 10 shows an example of parallel wiring in a square array installation: Yarden 6-C - Installing the Yarden 6-C Closed-back Ceiling Speakers... -
Page 15: Figure 10: Square Layout Parallel Wiring
Figure 10: Square Layout Parallel Wiring Yarden 6-C - Installing the Yarden 6-C Closed-back Ceiling Speakers... -
Page 16: Painting The Speaker
When painting after installation: Use the circle that you cut out of the template as a paint mask After you finish painting, remove the paint mask Yarden 6-C - Installing the Yarden 6-C Closed-back Ceiling Speakers... -
Page 17: Technical Specifications
Mounting depth: 19.6cm (7.7”) ACCESSORIES: Installation bracket, safety cord attached to grill, ceiling mounting kit, cutout template COLORS: Available in white Specifications are within a 10% tolerance and are subject to change without notice at http://www.kramerelectronics.com Yarden 6-C - Technical Specifications... - Page 19 This page is intentionally left blank...
- Page 20 For the latest information on our products and a list of Kramer distributors, visit our Web site where updates to this user manual may be found. We welcome your questions, comments, and feedback. Web site: www.kramerelectronics.com E-mail: info@kramerel.com SAFETY WARNING...
Need help?
Do you have a question about the Yarden 6-C and is the answer not in the manual?
Questions and answers