
Related Manuals for Kramer SWM-1


Summary of Contents for Kramer SWM-1
- Page 1 K R A ME R E LE CT R O N IC S L T D . USER MANUAL MODEL: SWM-1 Loudspeaker Wall Mount Device P/N: 2900-300089 Rev 1...
-
Page 2: Table Of Contents
Contents Introduction Getting Started Overview Defining the SWM-1 Loudspeaker Wall Mount Device Wall Mount Parts The Loudspeaker Interface Kit The Wall Fixing Kit Installing the SWM-1 Preparing for Installation Attach the Ball Interface to the Loudspeaker Rear Panel Attaching the Ball Clamps... -
Page 3: Introduction
Introduction Welcome to Kramer Electronics! Since 1981, Kramer Electronics has been providing a world of unique, creative, and affordable solutions to the vast range of problems that confront the video, audio, presentation, and broadcasting professional on a daily basis. In recent years, we have redesigned and upgraded... -
Page 4: Getting Started
(where appropriate). The package includes: • An SWM-1 Loudspeaker Wall Mount Device, that consists of a pair of on-wall mounts (the contents are described in detail in Section 4 •... -
Page 5: Overview
Overview The Kramer SWM-1 is a versatile device for wall-mounting loudspeakers. The SWM-1: • Is designed for cabinet loudspeakers weighing up to 5kg (11lbs) • Mounts the loudspeaker 72mm (2.8”) from the wall • Is suitable for single point, dual point and keyhole fixings •... -
Page 6: Defining The Swm-1 Loudspeaker Wall Mount Device
Defining the SWM-1 Loudspeaker Wall Mount Device Each SWM-1 package includes a pair of loudspeaker wall mounts. The following sections define the parts of one (of two) wall mount kit. Wall Mount Parts You need to disassemble the SWM-1 before installing it. -
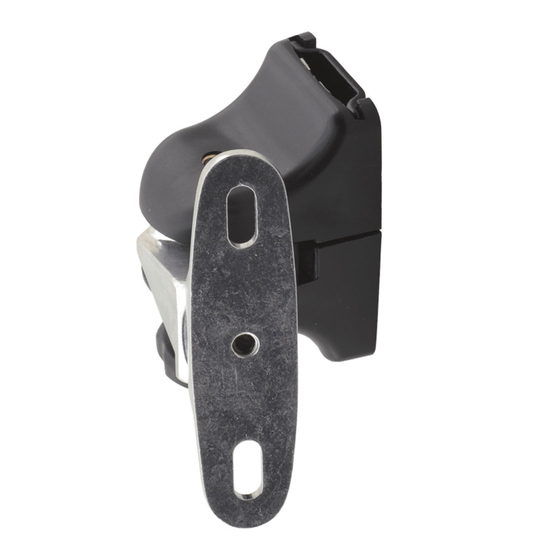
Page 7: The Loudspeaker Interface Kit
Use the wall fixing screws and wall plugs to fix the wall mount with the loudspeaker to the wall. Parts per Unit M4.8x32mm Wood Screw (2) No6 Wall Plug, for part A1 (2) SWM-1 - Defining the SWM-1 Loudspeaker Wall Mount Device... -
Page 8: Installing The Swm-1
Level and stud finder (optional) Attach the Ball Interface to the Loudspeaker Rear Panel This section describes several methods in which you can attach the SWM-1 Ball Interface to the rear side of the loudspeaker. Choose the method that fits best to... - Page 9 No Inserts Available: Connect the ball interface to the adapter interface using an M6x12mm screw, and then use the two M4.2x19mm wood screws (see Section 4.2 ) to connect them to the loudspeaker rear panel. SWM-1 - Installing the SWM-1...
-
Page 10: Attaching The Ball Clamps
Attaching the Ball Clamps Attach the top and lower ball clamps to the ball interface as illustrated in Figure Figure 2: Attaching the Ball Clamps Figure 3 shows the assembled kit: Figure 3: SWM-1 Assembled Kit SWM-1 - Installing the SWM-1... -
Page 11: Wall Mounting The Swm-1
Wall Mounting the SWM-1 You can mount the SWM-1 either on a brick or concrete wall or wood/wood stud walls. To mount on a concrete or brick wall, as shown in Figure 4, use a 6mm (1/4”) masonry bit with your drill:... -
Page 12: Mounting The Loudspeaker On The Wall
To set the position of the loudspeaker, loosen the thumbwheel (or the top hex screw), set the loudspeaker at the desired angle and then retighten, as shown in Figure Figure 7: Setting the Loudspeaker Position SWM-1 - Installing the SWM-1... -
Page 13: Technical Specifications
88mm x 79mm x 72mm (3.5” x 3.1” x 2.8”), W, D, H WEIGHT: One wall mount: 0.19kg (0.42lbs) approx. Shipping weight (for pair): 0.55kg (1.21lbs) approx. Specifications are subject to change without notice at http://www.kramerelectronics.com SWM-1 - Technical Specifications... - Page 14 1. Any product which is not distributed by us or which is not purchased from an authorized Kramer dealer. If you are uncertain as to whether a dealer is authorized, please contact Kramer at one of the agents listed in the Web site www.kramerelectronics.com.
- Page 15 For the latest information on our products and a list of Kramer distributors, visit our Web site where updates to this user manual may be found. We welcome your questions, comments, and feedback. Web site: www.kramerelectronics.com E-mail: info@kramerel.com SAFETY WARNING...
Need help?
Do you have a question about the SWM-1 and is the answer not in the manual?
Questions and answers