Table of Contents
Advertisement
Quick Links
Advertisement
Table of Contents

Related Manuals for LAUNCH TECH X-431 PRO MINI


Summary of Contents for LAUNCH TECH X-431 PRO MINI
- Page 1 Version: V1.00.000 Revised date: 2016-11-14...
- Page 2 X-431 PRO MINI User Manual Copyright Information Copyright © 2016 by LAUNCH TECH. CO., LTD. All rights reserved. No part of this publication may be reproduced, stored in a retrieval system, or transmitted in any form or by any means, electronic, mechanical, photocopying, recording or otherwise, without the prior written permission of LAUNCH.
- Page 3 Do not insert foreign objects into or place heavy objects on your device. Sensitive components inside might cause damage. Do not use X-431 PRO MINI in exceptionally cold or hot, dusty, damp or dry environments. In places using X-431 PRO MINI may cause interference or generate a potential risk, please turn it off.
- Page 4 LAUNCH X-431 PRO MINI User Manual Always perform automotive testing in a safe environment. If the VCI module remains unused for a long period of time, it is suggested to unplug the connector from vehicle’s DLC to conserve battery power.
-
Page 5: Table Of Contents
RODUCT ROFILE ....................1 EATURES X-431 PRO MINI............2 NOWLEDGE OF 1.3.1 X-431 PRO MINI whole set .............. 2 1.3.2 X-431 PRO MINI handset..............2 1.3.3 VCI module (Only applies for 12V cars) ........... 3 ............... 4 ECHNICAL ARAMETERS ..................5 ACKAGE 2 PREPARATIONS..................... - Page 6 LAUNCH X-431 PRO MINI User Manual 4.2.3 Function menu................15 4.3 C ..................16 ONNECTIONS 4.3.1 Preparation ..................16 4.3.2 DLC location ................... 16 4.3.3 Vehicle connection................16 4.4 B ................18 LUETOOTH ETTING 4.5 S ................. 18 TART IAGNOSING 4.5.1 Read DTC..................
- Page 7 LAUNCH X-431 PRO MINI User Manual 5.3 S .................. 32 YNCHRONIZATION 5.3.1 Connect to PC ................32 5.3.2 Run on PC ..................32 5.3.3 Install an application ............... 32 5.4 C ..................33 LEAR ACHE 6 FAQ ....................... 34...
-
Page 8: Introductions
Through the simple Bluetooth communication between the VCI module and X-431 PRO MINI, it achieves full car model and full system vehicle trouble diagnosis, which includes Reading DTCs, Clearing DTCs, Reading Data Stream, Actuation Test and Special Functions. -
Page 9: Knowledge Of X-431 Pro Mini
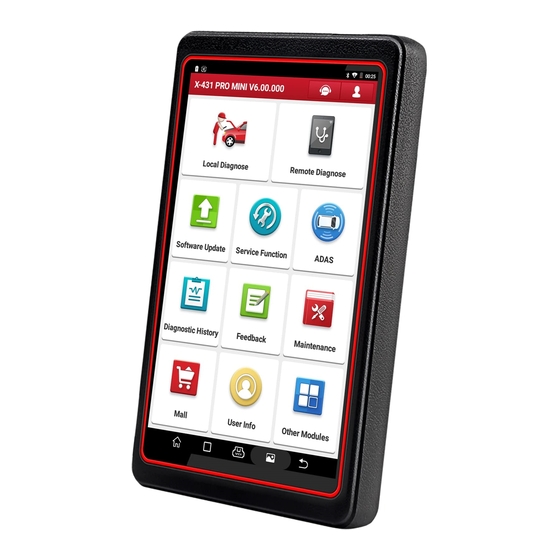
1.3 Knowledge of X-431 PRO MINI 1.3.1 X-431 PRO MINI whole set X-431 PRO MINI is mainly composed of an X-431 PRO MINI handset, and a VCI module. 1.3.2 X-431 PRO MINI handset Fig. 1-1 X-431 PRO MINI tablet... -
Page 10: Vci Module (Only Applies For 12V Cars)
For housing the VCI module. POWER/Screen lock In Off mode, press it to turn X-431 PRO MINI on; In On mode, turn X-431 PRO MINI off with long press or lock screen with short press. Carry strap Speakers USB/Charging port To connect to the power adaptor for charging. -
Page 11: Technical Parameters
LAUNCH X-431 PRO MINI User Manual ① OBD-16 diagnostic To connect on vehicle’s OBD2 DLC. connector ② Mini USB port For connecting the USB cable to the tablet to perform vehicle diagnosis. (Note: This port is disabled for X-431 PRO MINI.) ③... -
Page 12: Package List
X-431 PRO MINI User Manual 1.5 Package List While opening X-431 PRO MINI package for the first time, please carefully check the following components. Common accessories for each X-431 PRO MINI are same, but for different destinations, the accessories of X-431 PRO MINI may vary. -
Page 13: Preparations
While X-431 PRO MINI has low battery, a beep will sound. If it is very low, X-431 PRO MINI will be switched off automatically. -
Page 14: Lock & Unlock The Screen
2.5 Lock & unlock the screen Many screen lock modes are available on X-431 PRO MINI. Note: You are recommended to set screen lock as “None” since X-431 PRO MINI is a frequently used diagnostic tool. 2.5.1 Lock the screen When it is ON, press [POWER] once to lock the screen;... -
Page 15: Screen Layout
LAUNCH X-431 PRO MINI User Manual 2.6 Screen layout There are four on-screen buttons available on the bottom of the screen. BACK to return to the previous screen. HOME to navigate to the Android’s home screen. Recent Apps to view the recently launched applications. -
Page 16: Set Screen Lock
1. On the home screen, tap Settings > Security > Screen lock. 2. Choose the desired screen lock mode and follow the on-screen instructions to finish your setting. Note: You are recommended to set screen lock as “None” since X-431 PRO MINI is a frequently used diagnostic tool. -
Page 17: Wi-Fi Setting
Note: If you don’t need to use Wi-Fi for a while, you can turn it off to conserve battery life. X-431 PRO MINI has built-in Wi-Fi that can be used to get online. Once you’re online, you can register your X-431 PRO MINI, surf the Internet, get apps, send email, launch the remote diagnosis, and check for software updates etc. -
Page 18: How To Diagnose
X-431 PRO MINI. Fig. 4-1 4.2 Initial Use During initial use, tap the X-431 PRO MINI icon on the home screen to launch it and enter the main menu screen. 4.2.1 User registration Tap “Login” on the upper right corner of the main menu screen:... - Page 19 LAUNCH X-431 PRO MINI User Manual Fig. 4-2 1. If you are a new user, tap “New Registration”. See Fig. 4-3. Fig. 4-3 Note: To obtain better service, you need to provide real information. A. Create App account: In Fig. 4-3, fill in the information in each field and then...
- Page 20 LAUNCH X-431 PRO MINI User Manual Fig. 4-4 B. Activate the VCI module: In Fig. 4-4, input the Serial Number and Activation Code, which can be found in the password envelope. Product SN Product SN Activation code Fig. 4-5 Note: To exit and activate it later, tap “Skip”. In this case, you can activate your connector by tapping “Activate Connector”...
- Page 21 LAUNCH X-431 PRO MINI User Manual Fig. 4-6 To download the diagnostic software, tap “Yes” to enter the software download page. Tap “No” to download it later. Fig. 4-7 On the download page, tap “Update” to start downloading. It may take several minutes to finish it, please be patient to wait.
-
Page 22: Diagnostic Software Layout
4.2.3 Function menu It mainly includes the following items: Name Description Tradition Diagnose Configures X-431 PRO MINI to operate as a diagnostic tool. Remote Diagnosis This option aims to help repair shops or technicians to get the repair job fixed faster. -
Page 23: Connections
Throttle should be in a closed position. Select the VCI module If X-431 PRO MINI is testing vehicles equipped with universal OBD II 16 PIN diagnostic socket, please use the included VCI module. (For vehicles with non-OBD II 16 PIN diagnostic socket, a non-16 PIN connector is required.) 4.3.2 DLC location... - Page 24 3. Choose one of the two ways to obtain power from: A. Power adaptor: Connect one end of the included power adaptor to DC IN port of X-431 PRO MINI tablet, and the other end to AC outlet. B. Internal battery pack For non-OBDII vehicle, proceed as follows: 1.
-
Page 25: Bluetooth Setting
4.4 Bluetooth Setting Enter X-431 PRO MINI Bluetooth setting screen (“Settings” --> “Bluetooth”), slide the Bluetooth switch to ON and X-431 PRO MINI will start searching available Bluetooth device, tap the desired connector to pair. By default, the Bluetooth name is 98639*****00 (where ***** stands for 5 digits.). - Page 26 X-431 PRO MINI and the vehicle. Tap “OBD VIN” to scan the vehicle identification number of the vehicle. Once scanning is complete and successful, X-431 PRO MINI will enter the diagnostic software of the vehicle. Note: Before using this function, the corresponding diagnostic software and Auto search file need to be downloaded on your tool first while downloading the diagnostic software.
-
Page 27: Read Dtc
LAUNCH X-431 PRO MINI User Manual on-screen instruction to access the diagnostic software. Take Demo as an example to demonstrate how to diagnose a vehicle. 1). Tap the “DEMO” to enter the software selection page. 2). Tap “DEMO” to ignore Bluetooth connection and jump to the DEMO system selection screen. - Page 28 LAUNCH X-431 PRO MINI User Manual Fig. 4-17 Highlight a certain DTC item, and then tap to search the definition of the selected DTC online. On-screen Buttons: Exit: Tap it to return to the home screen. Report: To save the current diagnostic data.
-
Page 29: Clear Fault Memory
LAUNCH X-431 PRO MINI User Manual 4.5.2 Clear fault memory After reading the retrieved codes from the vehicle and certain repairs have been carried out, you can use this function to erase the codes from the vehicle. Before performing this function, please be sure the vehicle’s ignition key is in the ON position with the engine off. - Page 30 LAUNCH X-431 PRO MINI User Manual Unselect: Tap it to deselect all data stream items. Exit: Tap it to return to the home screen. Print: Tap it to print the current screen. To perform printing, you need to purchase a Wi-Fi printer manufactured by LAUNCH separately. For details on printer setting, see Chapter 4.10.3 “Launch wireless printer connection”.
-
Page 31: Special Function
4.5.5 How to view History? Generally once a vehicle diagnosis is performed, X-431 PRO MINI will record the every details of diagnostic process. The History function provides a quick access to the tested vehicles and users can resume from the last operation, without the necessity of starting from scratch. -
Page 32: Remote Diagnosis
Tap “Remote Diagnosis” to enter, the screen appears blank by default. 4.6.1 Interface layout Fig. 4-20 Search bar Directly input the username of the X-431 PRO MINI to start searching, and then tap the desired one to add it into your friend list. Alphabetic The name of friends is sorted by alphabetic order. -
Page 33: How To Launch A Remote Diagnosis
To perform this function, you need to download and install the corresponding vehicle diagnostic software. Make sure the VCI module is properly connected to the vehicle’s DLC and the Bluetooth communication between your X-431 PRO MINI and the VCI module works smoothly. Cancel To cancel this operation. -
Page 34: Personal Center
LAUNCH X-431 PRO MINI User Manual 4.9 Personal Center This function allows users to manage your personal information, configure system settings and feedback your vehicle issues or diagnostic reports to us for analysis. 4.9.1 My report This option is used to view the diagnostic report generated in process of vehicle diagnosis. -
Page 35: Change Password
LAUNCH X-431 PRO MINI User Manual 4.9.7 Change password This item allows you to modify your login password. 4.10 Settings It enables you to make some application settings and view software version information etc. 4.10.1 Units of measurement It is designed to set the measurement unit. Metric System and English System are available. - Page 36 LAUNCH X-431 PRO MINI User Manual at + reboot = 1 rebooting... 3. Tap “Reset” to configure Wi-Fi printer. Step 1: Connect the printer: “Scan” select desired printer hotspot named with X-431PRINTER-XXXX (XXXX stands for 4 characters), and then tap “Connect”...
-
Page 37: Network Test
LAUNCH X-431 PRO MINI User Manual tap “Printing test” to test the printing. Fig. 4-24 Now you can use the Wi-Fi printer to print! If the printer is not found, please reset the printer to default factory settings (refer to Step 2 for details) and check whether the current device and the printer are on the same LAN. -
Page 38: Others
LAUNCH X-431 PRO MINI User Manual 5 Others 5.1 Email The function allows you to send and receive emails. 5.1.1 Configure an email account Note: Before sending or receiving email, you have to set up an email account. In addition, this function requires a stable network connection. -
Page 39: Download Files
Unknown sources switch to off. 5.3 Synchronization You can transfer media files and APK between the PC and X-431 PRO MINI. 5.3.1 Connect to PC 1. Use the USB cable to connect the X-431 PRO MINI to your PC. -
Page 40: Clear Cache
LAUNCH X-431 PRO MINI User Manual 5.4 Clear Cache Doing so clears all browsing records and accounts and enables X-431 PRO MINI to run smoothly and quickly. 1. Tap Settings > Apps. 2. Tap and select “Sort by size” to arrange all applications in size order. -
Page 41: Faq
“Uninstall”). If all steps mentioned above are finished and the system still works slowly. Please try to close the system and reboot your X-431 PRO MINI. 4. How to reset X-431 PRO MINI? Resetting may cause data loss. Before doing so, please make sure important data and information has been backed up. - Page 42 6. The date and time of X-431 PRO MINI cannot be set. It is because Automatic date & time is set on your X-431 PRO MINI. Tap “Settings” --> “Date & time”, deselect “Automatic date & time” and then set the date and time manually.
- Page 43 Send the unit pre-paid to: Attn: Customer Service Department LAUNCH TECH. CO., LTD. Launch Industrial Park, North of Wuhe Avenue, Banxuegang, Bantian,...
- Page 44 LAUNCH X-431 PRO User Manual — Warranty Longgang, Shenzhen, Guangdong P.R.China, 518129 Launch website: http://www. cnlaunch.com http://www.x431.com http://www.dbscar.com Statement: LAUNCH reserves the rights to make any change to product designs and specifications without notice. The actual object may differ a little from the descriptions in the manual in physical appearance, color and configuration.
- Page 45 This device complies with Part 15 of the FCC Rules. Operation is subject to the following two conditions: (1) this device may not cause harmful interference, and (2) this device must accept any interference received, including interference that may cause undesired operation. Changes or modifications not expressly approved by the party responsible for compliance could void the user's authority to operate the equipment.
Need help?
Do you have a question about the X-431 PRO MINI and is the answer not in the manual?
Questions and answers