Table of Contents
Advertisement
Quick Links
Advertisement
Table of Contents

Subscribe to Our Youtube Channel
Related Manuals for LAUNCH TECH X-431 PAD V LINK HD


Summary of Contents for LAUNCH TECH X-431 PAD V LINK HD
- Page 1 Version: V1.00.000 Revised date: 01-31-2023...
- Page 2 Copyright Information Copyright © 2023 by LAUNCH TECH CO., LTD. (also called LAUNCH for short). All rights reserved. No part of this publication may be reproduced, stored in a retrieval system, or transmitted in any form or by any means, electronic, mechanical, photocopying and recording or otherwise, without the prior written permission.
- Page 3 LAUNCH Using This Manual This manual contains device usage instructions. Some illustrations shown in this manual may contain modules and optional equipment that are not included in your system. The following conventions are used. Bold Text Bold text is used to highlight selectable items such as buttons and menu options. Example: Tap OK.
- Page 4 LAUNCH Before starting the engine, put the gear lever in the Neutral position (for manual transmission) or in the Park (for automatic transmission) position to avoid injury. NEVER smoke or allow a spark or flame in vicinity of battery or engine. Do not operate the tool in explosive atmospheres, such as in the presence of flammable liquids, gases, or heavy dust.
-
Page 5: Table Of Contents
LAUNCH TABLE OF CONTENTS 1 Introduction .................................. 2 1.1 Product Profile ................................. 2 1.2 Package List ................................2 1.3 Components & Controls ............................2 1.3.1 Display tablet ..............................2 1.3.2 VCI ................................... 4 1.3.3 Docking station ..............................5 1.4 Technical Specifications ............................6 2 Initial Setup ................................... - Page 6 LAUNCH 6.7 Data Optimization ..............................33 6.8 Nox Sensor ................................33 7 Software Update ................................. 34 7.1 Update Diagnostic Software & APP ........................34 7.2 Update Frequently Used Software ........................34 7.3 Renew Subscription .............................. 35 8 ADAS ................................... 36 9 More .....................................
-
Page 7: Introduction
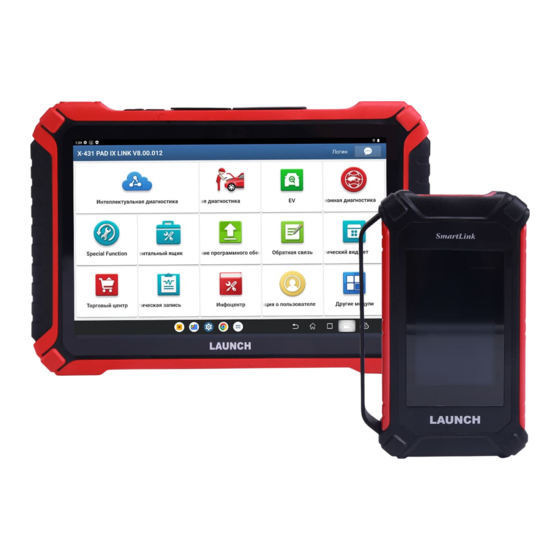
LAUNCH 1 Introduction 1.1 Product Profile This Android OS-based, tablet-style diagnostic tool incorporates the best possible coverage of OE-level diagnostics with multitasking capable software. Using the powerful 8-core 2.0GHz processor and a 10.1 inch sunlight readable capacitive touch screen with a resolution of 1920 x 1200 pixels, it delivers quick and complete diagnostic functionalities which technicians need to diagnose, research and repair vehicles in one solution. - Page 8 LAUNCH 1. Memory Card Slot Insert a memory card for storage extension. 2. Data I/O Port • Connect it to the SmartLink C V2.0 device to perform vehicle diagnosis. • Connect it to the add-on module to extend the functions of the diagnostic tablet. 3.
-
Page 9: Vci
LAUNCH Convert voice into an electrical signal. 7. Charging LED It illuminates red while the tablet is charging. Once charging is finished, it will illuminate solid green. 8. Ambient Light Sensor Sense the amount of the ambient light present. 9. Front Camera Snapshot the view ahead the screen. -
Page 10: Docking Station
LAUNCH 1. DB-15 diagnostic connector Connect it to the vehicle’s DLC (Data Link Connector) port via the diagnostic cable. 2. Touch screen 3. LAN/WAN port Connect it to the modem via the crossover cable. It only applies to the SmartLink Super Remote Diagnostics. 4. -
Page 11: Technical Specifications
LAUNCH 1. Charging slot Charge the diagnostic tablet. 2. OBD II socket Store the OBD II adaptor to avoid loss. 3. DC 5V OUT port Reserved for charging other USB devices only. 4. Charging port Use the power adaptor to supply power to the docking station through connection to AC outlet. 5. - Page 12 LAUNCH Size: 204mm x 110mm x 45mm Working temperature: -10℃ ~ 50℃...
-
Page 13: Initial Setup
LAUNCH 2 Initial Setup 2.1 Charging the Tablet Notes: • Only use the included power adaptor to recharge the tablet. Use of any other adaptor will damage the tool. We assume no responsibility for damage or loss resulting from using other similar adaptors other than the specified one. •... -
Page 14: Changing Language
LAUNCH 1. On the home screen, tap Other Modules -> Tablet Settings -> Display -> Brightness level. 2. Drag the slider to adjust it. Alternatively, user may also slide the Automatically brightness switch to ON, and the system will automatically adjust the screen brightness. -
Page 15: Register & Update
LAUNCH 3 Register & Update For new users, you will need to experience a user registration process before getting started. 3.1 Register & Update After the tablet is initialized, tap the Login button on the upper right corner of the screen, the following screen will appear: (If you are a new user, follow to proceed.) - Page 16 LAUNCH Input the Product Serial Number and Activation Code can be found in the supplied Password Envelope. Note: To exit and activate it later, tap Skip. In this case, you can activate the VCI by tapping More -> Common -> Personal Center ->...
-
Page 17: Home Screen
LAUNCH 3.2 Home screen It mainly includes the following items: Name Description Automatic Diagnose Automatically decode the vehicle VIN and quickly access to the vehicle system. Local Diagnose Diagnose a vehicle manually. There are two remote diagnostics platforms available: SmartLink Super remote Remote Diagnose diagnostics solution and X-431 Remote Diagnostics. - Page 18 LAUNCH Collect some frequently asked questions related to the product. Product manual Provide a soft copy of instruction manual on the product. This module includes some commonly used applications of Android’s system. For more details, refer Built-in to Chapter 9.2. apps...
-
Page 19: Connections
LAUNCH 4 Connections 4.1 Preparation The ignition is turned on. The vehicle battery voltage range is 18-30V. The throttle is in closed position. Find DLC location: For commercial vehicles, the DLC is always located in driver’s cab. 4.2 Vehicle Connection The method used to connect the VCI device to a vehicle’s DLC depends on the vehicle’s configuration as follows: For OBD II vehicles, use the diagnostic cable (2) and OBD II adaptor (3) to connect the VCI to the vehicle’s DLC port. -
Page 20: Diagnosis
LAUNCH 5 Diagnosis 5.1 Automatic Diagnosis Through simple wireless communication between the tablet and VCI, you can quickly scan all available systems of the currently identified vehicle. Once the automatic detection is successfully performed, the system will directly output the scan result. - Page 21 LAUNCH On-screen Buttons: Vehicle Coverage: Tap to view the vehicle models that the current diagnostic software covers. What’s new: Tap to view the optimized items and enhancements. Introduction: Tap to check the software function list. Note: Tap to read some precautions on using the current diagnostic software. OK: Tap it to go to next step.
-
Page 22: Version Information
LAUNCH 4). Select test function: Select the desired test function. Note: Different vehicle has different diagnostic menus. 5.2.1 Version Information This function is used to read the version information of system mode, vehicle VIN, software and ECU. 5.2.2 Read Fault Code This function displays the detailed information of DTC records retrieved from the vehicle’s control system. - Page 23 LAUNCH Help: Tap to view the help information. Code Search: Tap to search for more information about the current DTC online. Report: Tap to save the current data in text format. Note: Diagnostic report is classified into three categories: Pre-Repair report, Post-Repair report and Diagnostic Scan. No matter which type you saved the report as, the report type will be appended as a tag on the upper right corner of the diagnostic report for easier identification.
-
Page 24: Clear Fault Code
LAUNCH Report -> Health Reports. For details on report operations, please refer to Chapter 9.1.1. 5.2.3 Clear Fault Code This function enables you to erase the codes from the vehicle after reading the retrieved codes from the vehicle and certain repairs have been carried out. Before performing this function, make sure the vehicle’s ignition key is in the ON position with the engine off. - Page 25 LAUNCH OK: Tap to confirm and jump to the next step. After selecting the desired items, tap OK to enter the data stream reading page. Notes: 1. If the value of the data stream item is out of the range of the standard (reference) value, the whole line will display in red. If it complies with the reference value, it displays in blue (normal mode).
- Page 26 LAUNCH • Combine: This option is mostly used in graph merge status for data comparison. In this case, different items are marked in different colors (maximum 4 items can be displayed on the same screen simultaneously). If the graph is more than one page, swipe the screen from the left to jump to the next page.
-
Page 27: Actuation Test
LAUNCH to end recording and save it. The saved file follows the naming rule: It begins with vehicle type, and then the product S/N and ends with record starting time (To differentiate between files, please configure the accurate system time). All diagnostic records can be replayed from More ->... -
Page 28: Special Function
LAUNCH During the actuation test, the display tablet outputs commands to the ECU in order to drive the actuators, and then determines the integrity of the system or parts by reading the ECU data, or by monitoring the operation of the actuators, such as switching an injector between two operating states. - Page 29 LAUNCH • SmartLink Service Platform – It can be accessed from the SmartLink module of the diagnostic tablet. There are two modules available on the link service platform: Common user (for SmartLink C) and Service provider (for SmartLink B). • SmartLink C (Customer) - SmartLink Service Subscriber. In the SmartLink system, the SmartLink C needs to perform the following operations.
-
Page 30: X431 Remote Diagnostics
LAUNCH perform the following operations. 1). Launch Service Link Platform: Binds SmartLink B dongles and accepts orders from SmartLink C. • If the SmartLink B dongle works with the LAUNCH-specific diagnostic tool equipped with SmartLink module, tap SmartLink to add the SmartLink B device and accepts orders on the diagnostic tool. •... - Page 31 LAUNCH Tap Remote Diagnose to launch remote diagnostics directly or follow the steps below to add the partner into the Contacts list. Tap the desired name from the list, the following screen will appear: Tap Add friend, a dialog box pops up: Tap CONFIRM to send your request.
- Page 32 LAUNCH Tap the input field and use the on-screen keyboard to enter the text message, and then tap Send to send it. to send the voice message. to send the emoj. to call out more function options. File: Choose diagnostic reports or local files to send. Picture: Choose screenshots or pictures to send.
- Page 33 LAUNCH Request to control the partner’s device remotely to help him diagnose the vehicle. Notes: Remote diagnosis has the same diagnostic steps as manual diagnosis. In process of remote diagnosis, tap the button to send a voice message. ...
- Page 34 LAUNCH Cancel To cancel this operation.
- Page 35 LAUNCH 4. Launch remote diagnosis (Device-To-PC) Except that the remote diagnosis can be done between different Launch’s diagnostic tools that come loaded with the module, user also can ask for remote control from PC client technician. Tap the Remote tab, the following screen will appear: 1.
- Page 36 LAUNCH 3. Tell the partner to input his own official technician account and password, and then tap Login to navigate to the following figure. 4. Tell the partner to check the box Serial number and enter the Serial Number provided by you, and then tap Start remote diagnosis to control your device remotely.
-
Page 37: Service Function
LAUNCH 6 Service Function This module provides an easy dial to quickly access the most commonly performed service functions. It offers coding, reset, relearn and more service functions, to help vehicles get back to functional status after repair or replacement. 6.1 DPF Regeneration This function can help remove PM (Particulate Matters) from the DPF filter by using combustion oxidation methods (such as high temperature heating combustion, fuel additive or catalyst reduce PM ignition combustion) to keep the... -
Page 38: Data Optimization
LAUNCH It needs to be performed in the following cases: • Need the standard format data to perform other operations. 6.7 Data Optimization This function enables you to optimize the vehicle power by revising vehicle data. 6.8 Nox Sensor NOx sensor is a sensor used to detect the content of nitrogen oxides (NOx) in engine exhaust. If the NOx fault is re-initialized and the NOx catalytic converter is replaced, it is necessary to reset the catalytic converter learned value stored in the engine ECU. -
Page 39: Software Update
LAUNCH 7 Software Update This module enables you to update the diagnostic software & App and frequently used software. 7.1 Update Diagnostic Software & APP Go to Upgrade Center on the Job Menu and tap the Downloaded tab. The Available tab displays a list of software that can be updated. Under it, all software is categorized into three kinds: •... -
Page 40: Renew Subscription
LAUNCH Tap Update to start downloading. Once download is finished, the software packages will be installed automatically. 7.3 Renew Subscription If the software subscription is due or expires, the system will prompt you to renew your subscription. Tap Renewal on the bottom of the screen to enter the Mall to renew the subscription. -
Page 41: Adas
LAUNCH 8 ADAS This module enables you to effectively and accurately calibrate a wide range of camera-based & radar-based driver assistance systems, e.g. the front camera for the lane departure warning system, the radar sensor for the ACC (Adaptive Cruise Control) or the camera for adaptive headlights. It needs to work with the specific ADAS calibration tool (sold separately). -
Page 42: More
LAUNCH 9 More This module include some mini apps associated with diagnostics, add-on modules and some frequently used built-in apps. 9.1 Common Apps This function allows users to manage personal information, VCI and make some in-app system settings. 9.1.1 Personal center This function allows users to manage personal information and VCI. - Page 43 LAUNCH On-screen Buttons: Graph – displays the parameters in waveform graphs. Value – this is the default mode which displays the parameters in texts and shows in list format. Combine – this option is mostly used in graph merge status for data comparison. In this case, different items are marked in different colors.
- Page 44 LAUNCH This item is used to check the status of the subscription renewal card. Input the 12-digit subscription renewal card number. Tap Search to get the search result. 9. Profile Use this item to view and configure personal information. • The profile description includes a ‘placeholder’ for a user photograph. Tap the user image to change it. •...
- Page 45 LAUNCH 5. Select All Printers -> Add printer and enable the installed printer service, the system starts searching for all available Wi-Fi printers of the brand. 6. Select the desired Wi-Fi printer from the list. If the chosen Wi-Fi printer hotspot is open, the tablet can connect it directly.
-
Page 46: Diagnostic History
LAUNCH Tap Add technician account, the following popup will appear: • If you already have an account, please enter the user name and password. After inputting, tap Add Immediately to add it as a sub-account. • If you have not registered any account, tap Create sub user. Enter the user name and password, and then tap Add Immediately to add it as a sub-account. -
Page 47: Diagnostic Feedback
LAUNCH from scratch. Tap Diagnostic record on the home screen, all diagnostic records will be listed on the screen in date sequence. • Tap certain vehicle model to view the details of the last diagnostic report. • To delete certain diagnostic history, select it and then tap Delete. To delete all historical records, tap Select All and then tap Delete. -
Page 48: Toolbox
LAUNCH C. Offline list Tap it to display all diagnostic feedback logs which have not been submitted successfully due to network failure. Once the tablet gets a stable network signal, it will be uploaded to the server automatically. Note: Removing software may completely delete the software from the tablet. If some software is not used and the tablet runs out of space, you can use this feature to remove it. -
Page 49: Recording Master
LAUNCH On the home screen, tap Other modules -> Built-in apps -> TeamViewer. The following screen will appear: Note: In order to provide support and take control of your tablet remotely, you partner needs to install and run the TeamViewer full version program in his computer, and have your TeamViewer ID. -
Page 50: J2534 Reprogramming Using Smartlink C
LAUNCH 10 J2534 Reprogramming Flash programming has become a common and profitable procedure in the repair and service of today’s vehicles. As part of the 21st Century Tune-up, reprogramming is often the only solution for problems ranging from driveability and loss of power to poor fuel economy and emissions related issues. -
Page 51: Synchronization
LAUNCH 11 Synchronization You can transfer media files and APK between the tablet and a computer. 1. Connect the tablet to a computer via the included data cable. 2. Swipe the screen from the top, tap -> USB Management. 3. Deselect the USB Switch. 4. -
Page 52: Faq
LAUNCH 12 FAQ 1. How to save power? 1. Please turn off the screen while the tool keeps idle. 2. Set a shorter standby time. 3. Decrease the brightness of the screen. 4. If WLAN connection is not required, please turn it off. 2. - Page 53 LAUNCH If the downloaded diagnostic software is still displayed in English, it indicates that the software of the current language is under development. 7. How to retrieve the login password? Please follow below steps to proceed in case you forgot the login password: 1.
- Page 54 • Order quantity • Part number • Part name Customer Service If you have any questions on the operation of the unit, please contact local dealer, or contact LAUNCH TECH CO., LTD.: Website: www.x431.com www.cnlaunch.com Tel: 86-755-84557891 E-mail: X431@cnlaunch.com Statement: LAUNCH reserves the rights to make any change to product designs and specifications without notice.
Need help?
Do you have a question about the X-431 PAD V LINK HD and is the answer not in the manual?
Questions and answers